This article is contributed. See the original author and article here.
Microsoft Graph API is a powerful REST API that enables access to cloud resources and it supports two types of permissions, application and delegated permissions.
Some operations do not support application permissions, it only support delegated permissions.
To call Graph API from Azure Logic Apps using delegated permissions, follow the steps below:
1. Register an app, add required delegated API permissions to your registered app and grant admin consent.
- Go to your Azure Active directory
- From left side menu, click on Manage -> App registerations
- Click + New registeration
- Specify a name for the registered app and click Register, app Overview is opened.
- Copy the Application (client) id and Directory (tenant) id to a text editor for later use
- From left side menu, click on Manage -> Certificates & secrets
- Under Client secrets, click + New client secret
- Specify a description, select an expiry duration and click Add
- Copy the secret value to a text editor for later use
- From left side menu, click Manage -> API permissions
- Click + Add a permission
- From select an API, select Microsoft Graph
- Select Delegated permissions
- Select the permissions by checking the checkbox next to required permissions and click Add permissions
- Click Grant admin consent


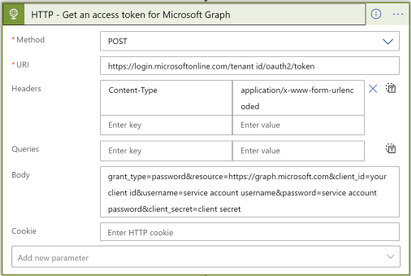
2. In your Logic app, before the Graph API HTTP action, add another HTTP action to get an access token for Microsoft Graph:
- From Method dropdown list, select POST method
- For URI, enter https://login.microsoftonline.com/your tenant id/oauth2/token, for your tenant id, check step 1.e above
- Add header with key: Content-Type, value: application/x-www-form-urlencoded
- For Body, enter:
grant_type=password&resource=https://graph.microsoft.com&client_id=your client id&username=service account username&password=service account password&client_secret=client secret
Note that client_id (check step 1.e above) and client_secret (check step 1.i above) are for your registered App, service account username and password are for a user account in your active directory.
3. Add Data operations – Parse JSON action
- For Content, select Body from the Dynamic content list
- For Schema, enter the following schema:
{
“properties”: {
“access_token”: {
“type”: “string”
},
“expires_in”: {
“type”: “string”
},
“expires_on”: {
“type”: “string”
},
“ext_expires_in”: {
“type”: “string”
},
“not_before”: {
“type”: “string”
},
“resource”: {
“type”: “string”
},
“token_type”: {
“type”: “string”
}
},
“type”: “object”
}

4. Add Variables – Initialize variable action
- Enter name for the variable: AuthorizationHeaderValue
- From Type dropdown list, select String

5. Add Variables – Set variable action
- From name dropdown list, select AuthorizationHeaderValue variable
- For value, enter Bearer access_token; note that there is a single space left after Bearer, and access_token is selected from Dynamic content list

6. For the last step, the HTTP action that calls Microsoft Graph API
- From Method dropdown list, select required method
- For URI, enter the graph API method you want to call
- Add header with key: Authorization, value: select AuthorizationHeaderValue variable

Your workflow should look as follows:

Brought to you by Dr. Ware, Microsoft Office 365 Silver Partner, Charleston SC.

Recent Comments