by Scott Muniz | Sep 4, 2020 | Azure, Technology, Uncategorized
This article is contributed. See the original author and article here.
One of the biggest challenges businesses face is how to integrate disparate data sources from many different sources, and how to turn valuable data into actionable insights. Big Data Clusters (BDC) is on the right choice for Big Data Analytics solutions.
As a cloud-native, platform-agnostic, open data platform for analytics at any scale orchestrated by Kubernetes, BDC works on Azure Kubernetes Service ( AKS ) – a fully managed Kubernetes service in Microsoft Azure cloud platform.
For security-critic customers who need a private environment, deploying BDC with AKS private cluster is a good way to restrict use of public IP addresses. Furthermore you can use UDR ( user-defined routes) to restrict egress traffic. You can do this with automation scripts are available on SQL Sample Github repo – private-aks.
Deploy AKS private cluster with automation scripts
Go to the Github repo to deploy AKS private cluster from here with your client in Linux OS or using WSL/WSL2. There are two bash scripts of you can use to deploy AKS private cluster:
You can use deploy-private-aks.sh to provision a private AKS cluster with private endpoint, and fto limitthe use of public addresses as well as egress traffic, use deploy-private-aks-udr.sh to deploy BDC with AKS private cluster and limit egress traffic with UDR ( User-defined Routes ).
Here we take more common case where a you deploy BDC with AKS private cluster. After downloading the script on the client environment, you can use the following command to execute the script :
chmod +x deploy-private-aks.sh
sudo ./deploy-private-aks.sh
Input your Azure subscription ID, the resource group name, and the Azure region that you wish to deploy your resource:

The deployment will take a few minutes. You’ll be able to find the deployed resources on your Azure portal after the deployment completes.
Access to AKS private cluster
After you deploy a private AKS cluster, you need to access a VM to connect to AKS cluster. There are multiple ways to help you manage your AKS private cluster, and you can find those at this link. Here we’re using the easiest option, which is to provision a management VM which installs all required SQL Server 2019 big data tools and resides on the same VNET with your AKS private cluster, then connect to that VM so you can get access to private AKS cluster as follows :

Deploy BDC with AKS private cluster with automation script
You can download the script deploy-bdc.sh to deploy BDC without a public endpoint:
chmod +x deploy-bdc.sh
sudo ./deploy-bdc.sh
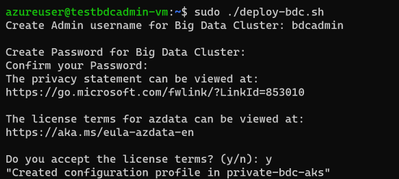
This requires you to set up the BDC admin username and password, and then it kicks off a BDC cluster deployment:

At the end of the deployment, the script will list all the BDC endpoints :

Connect to BDC in AKS private cluster
Make sure all components of your BDC cluster show a healthy status :
azdata bdc status show
If all goes well, you’ll get this output:

You can use the SQL Server master instance in the cluster endpoint to connect to BDC cluster with SQL Server Management Studio or Azure Data Studio as shown here :

Wrap up
As we saw in the first part of this article, businesses are looking for a secure, portable way to create value from multiple sources of data. Using SQL Server’s Big Data Cluster ( BDC ) in an Azure Kubernetes Service ( AKS ) private cluster, they get exactly that. You’ve seen how to use two variations of scripts that are available on our repository to fit your network environment and security requirements. You can also customize the scripts with your specific requirements for the information such as IP addresses range, flags to add or remove an AKS feature while creating AKS cluster before deploying in your environment.
by Scott Muniz | Sep 3, 2020 | Azure, Technology, Uncategorized
This article is contributed. See the original author and article here.
Sr. Customer Engineer Dave Newman here on a short post regarding Azure Site Recovery. Hope this helps you in your day to day cloud journey
When replicating Azure VMs from one Azure Region to another for DR purposes, the Mobility Service extension must be added to each protected VM. The extension installation is completed automatically during the “Enable replication” phase of protecting Azure VMs.
Periodically, the Azure Site Recovery (ASR) product group will release an Update rollup to include new features, component updates, support improvements and bug fixes. These are not always on a consistent cadence. Typically, there will be at least one each quarter but sometimes, the case of bug fixes there could be more than one. At the time of this writing there have been 8 releases in the last 12 months.
The ASR product team has created an automated process that will update the Mobility service extension on Azure VMs that are being replicated. When you establish a new Recovery services vault in your target region and select VMs from the source region to protect, the process of creating new resources on the target side includes the creation of a new Azure automation account that will manage this process. When enabled, the management of the agent versions is handled by a global runbook. A job is created in that Automation account that will initialize daily at midnight to check for the presence of a new agent version. If none is found, then the job completes with no action. If a new version is found, the extension will be updated on the VMs via an Azure Automation runbook to bring the systems into compliance with that latest version.
This seems great but there are a few issues. The new Azure Automation account is automatically named and there is no option to specify what that name will be. This will break naming convention. Good governance rules in Azure dictate that wherever possible that a naming convention should be followed. The way the ASR automatically chooses a name is that it takes the first 8 characters of the name of the Recovery service vault, appends a dash (hyphen) and three random alphanumeric characters and then appends the string “-asr-automationaccount”.
If your vault is currently named “AZWUSPRODRSV01”, then the name of your automation account would look something like “AZWUSPRO-a1b-asr-automationaccount”. (the “a1b” character set will be a randomly chosen alphanumeric string.) Not a very governance compliant name.
The second issue is that when creating an Azure Automation account, the default process for authenticating action is to use a “RunAs Account” as defined in the Automation account. This account is an Azure AD Service Principal that is granted a Role Based Access Control (RBAC) role by the creation process. The granted role is Contributor at the Subscription level. That means that the person creating the Automation account needs to have rights in Azure AD to create Azure AD Service Principals and have Owner or User Access Admin RBAC role at the subscription level. Other than User Access Admin, you cannot assign roles with greater privilege than you have been granted. If you are on the DR/Backup team at your organization, you may not have those permissions.
The question at hand is, how can you create a naming convention compliant Azure automation account and tell ASR to use that Automation account for the process of updating the Mobility service extension on protected Azure VMs?
Step one in this is to ensure that a naming convention compliant Azure automation account exists in the same location and resource group as your recovery services vault on the target side. The creation of an Automation account often requires coordination between the Identity team and the Azure team. As mentioned previously, the person creating this Azure resource needs to have the Owner RBAC role defined at the Subscription level. As a person on the DR/Backup Team you may need to work with someone else who has the appropriate permissions to have this resource created. The creation of the Azure AD Service Principal account is something that could be achieved by temporarily granting the built-in Azure AD role of Application Administrator or Application Developer to the user creating the Automation account. A tutorial for the creation of an Automation account can be found here.
Once the Automation account exists, the recovery service vault in the target region needs to be configured to use that account. This can either be done at the instantiation of the vault or can be done to an existing vault. Both methods will be shown.
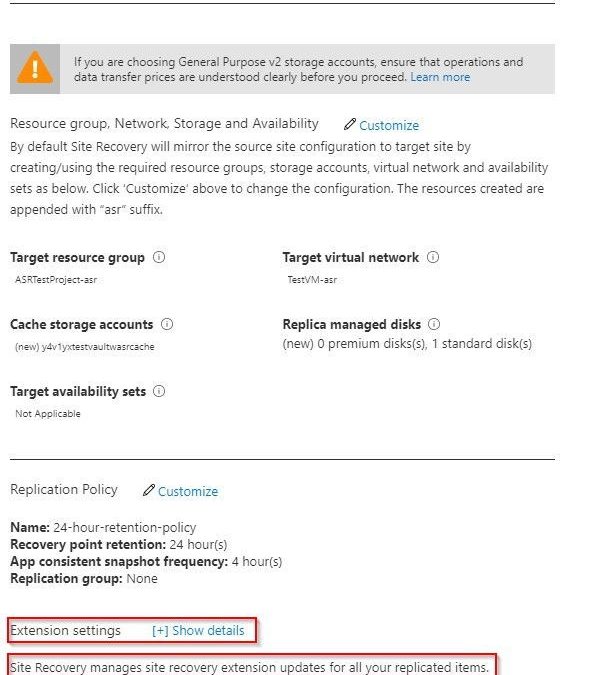
If you are building out your recovery services vault for the first time for Azure to Azure DR replication, you can follow the normal steps as outlined in this tutorial. Before you complete the tutorial, stop at the end of the Configure replication settings section. Do not click the Create target resources button just yet. The tutorial shows how you can customize the process so that you can use naming convention conforming target objects. There is another option visible on that blade that the tutorial does not cover. At the bottom of the blade there is an option for Extension settings with a [+] Show details link.

As you can see, it indicates that extension updates are being managed for you. But this is where it wants to do the collection of actions as mentioned earlier in this document that might fail because of permissions. If you open the Extension settings, you will see that there are a few options. You have the option to turn the process off and manage updates manually if you wish. This avoids the need for an Automation account but adds the manual effort of keeping the VMs updated as new versions become available.

The other box allows you to choose a specific, pre-existing, naming convention compliant Automation account.

Once this has been defined you can Create target resources and the system will not attempt to create resources that do not line up with your well-defined Azure governance.
If you have already configured replication for VMs and have seen the process of creating that Automation account fail because of lack of permissions, we will now show how to resolve that issue.
For an existing recovery services vault that you want to either establish or reconfigure, you will need to navigate to the Manage section in the left side menu of your vault and choose the Site Recovery infrastructure option.

From the Site Recovery infrastructure blade, choose Extension update settings. This allows you to toggle on and off the automatic management of the extension updates. It also indicates the name of the Automation account being used if this function is turned on.

If the toggle is set to off because the automation account failed to create, and if a new automation account has already been created and is available in the same resource group and in the same Azure location as the vault, that automation account will display as the account the system wants to use. If that is the case, then all you need to do to resolve this issue is to flip this switch to On.
This document has shown how can you create a naming convention compliant Azure automation account and tell ASR to use that Automation account for the process of updating the Mobility service extension on protected Azure VMs.
The ask that I have heard many times on this issue up updating ASR is – can I do this for my on-premises to Azure VMware systems that have the Mobility Service agent installed. The short answer is that there is no automated process available from the ASR product team currently, but it is something on the product roadmap. 
Hope this helps you in your cloud journey for protecting your Azure VMs.
by Scott Muniz | Sep 3, 2020 | Uncategorized
This article is contributed. See the original author and article here.
Hey AzML community! The VS Code team is excited to announce version 0.6.14 of the AzML extension, with added support for Dataset creation from existing Datastores and an awesome new feature that enables you to power-up your local Jupyter Notebooks.
If you’d like to follow-along with the blog post and try out the new features, you can install the extension here.
Powering your VS Code Notebooks with an AzML Compute instance
Many of you have praised the Jupyter Notebook integration in VS Code as it’s become an integral part of your data-science workflow. You’ve also exclaimed that sometimes you want to run your Notebooks against more powerful machines without having to deal with SSH and connecting to remote servers.
The AzML extension now provides a highly streamlined way of connecting your local Jupyter Notebooks to a compute instance. We’re authenticating using your Azure credentials and eliminating previous manual steps for connecting to the remote server.
It’s extremely easy to get started – you can simply click on the “Jupyter server: ” button in the Notebook toolbar or invoke the “Azure ML: Connect to compute instance Jupyter server” command.
 Invoke remote Jupyter server connection
In case you’re unable to see the “Azure ML: Compute Instances” list option, it’s likely that you don’t have the AzML extension installed. It might take a little bit of time for the quick-pick options to show up as you may be activating the AzML and Python extensions for the first time.
Following the extension’s guided prompts, you can select from a list of compute instances in your workspace. You can also create a new instance by simply providing a name and a VM size.
As a friendly reminder, if you don’t have any workspaces you can create one via the “Azure ML: Create Workspace” command.
 Select or create a new compute instance
Once you’ve selected a compute instance, you will be prompted to reload your VS Code window. After reloading the window and reopening your Notebook, you must run a cell to initiate the compute instance connection.
 Run a cell to connect to the compute instance
Voila! Your local Jupyter Notebook is now running against your AzML compute instance. You gain all the benefits of using Notebooks in VS Code, coupled with the benefits of running against a more powerful remote compute.
For more detailed step-by-step instructions you can follow our docs.
Creating a Dataset from an existing Datastore
With our 0.6.12 (May) release, the AzML extension added support for creating datasets from directly within VS Code. Up until now you could only create a dataset using local files or a web URL. The extension now allows you to use an existing datastore to create a dataset. Following the guided prompts, you can choose from a list of registered datastores and then the absolute path to your data.
 Create a dataset from an existing datastore
Feedback
The new Notebook and compute instance integration is still in its preleminary phase and we’re actively working on supporting a broader set of scenarios:
- Viewing and interacting with your remote server’s filesystem.
- Mounting a dataset onto the compute instance.
- Supporting remote Jupyter server UI changes in the new native notebook editor.
If there’s anything that you would like us to prioritize, please feel free to let us know on Github.
If you would like to provide feedback on the overall extension, please feel free to do so via our survey.
![[Guest blog] In a Pond Full of Odd IT Ducks](https://www.drware.com/wp-content/uploads/2020/09/medium-26)
by Scott Muniz | Sep 3, 2020 | Uncategorized
This article is contributed. See the original author and article here.
This article was written by Navrioska Mateo, a Network Engineer at a multinational company in New York City and a proud member of the Humans of IT community. Navrioska once told her story as a speaker on the renowned storytelling slam + podcast called The Moth, in an episode titled “Life Plan, Rebooted“. She shares her unique career journey and how becoming a dedicated IT professional shaped who she is today.
Being a misfit was second nature to me growing up, combined with an insatiable thirst for learning. I was a massive bookworm with a selective group of friends and very little social skills. I often felt like an odd duck for my interest in wanting to understand the: “How does that work” of everything, building whole worlds with plastic block bricks, and taking apart electronics appliances like my grandmother’s phone to see what was inside. Not many kids in my neighborhood were interested in the same things, so it was hard making friends.
Finding information before search engines was a complex endeavor that resulted in me practically living in libraries and having books as my best friends, before eventually traveling the world one disc at the time on digital encyclopedias (yep, I’m dating myself here).
We humans are complex beings with a tendency to individualize our feelings and problems. I used to think that there were not many people with my interests, and that this was necessary to establish long-lasting relationships.
And then, on that self-discovery journey, I had my first encounter with WinPopup and my life changed. Writing became second nature to me and even if I knew I was just IM-ing with people within the same computer lab, it was liberating. You see, I could be freely be myself behind that screen.
Around that same time, I dove into a command line on MS-DOS, and little did I know that 10 years later I would enroll in engineering school to pursue a Telecommunications, Networking, and Programming degree in my home country, the Dominican Republic.
This brings me to my next point:
Finding my unique identity in tech
.jpg") This is how I look working from CLI
This is how I look working from CLI
I started finding my tribe at college, learning about decoding/encoding, signal transmission, electronics, and a group of skills that created my foundation to be an honest and dedicated professional. However, I discovered something even more important (surprising to me, even) that working as a group towards a goal could be fun, that there is always something to learn from the people you meet no matter their backgrounds, that in diversity there is power, and that no impactful change can be done if everyone thinks the same way.
Today, I am a Network Engineer at a multinational company based in NYC. My professional background is a technical and project management hybrid, and I love what I do but more than that, I love all the doors that this career has opened for me and the people I have met behind those doors.
 Working from a datacenter floor
A year ago I received an email from a stranger saying she had heard about my story at The Moth podcast. She invited me to participate as a panelist for an upcoming session as part of the Microsoft Women IT Pros call series to talk about “My favorite mistake… and recovery” – specifically, to tell one of the stories about something that went wrong in my professional life, and how I recovered from the incident. I said yes to @Cathy Moya and I will always be grateful for her and the #WomenITPros allies I met after that meeting. She is an incredible professional, mentor, and my personal Microsoft fairy godmother.
As my tribe of odd ducks increased, I kept on growing and learning. I decided to resuscitate my (then) abandoned Twitter account and connected with @ShonaBang @Jess Dodson @Ryen Macababbad @systemsmaven, and other amazing IT ninjas. Here is where I found out about #MSIgnite2019 and was awarded a community ambassador pass! It was a proud moment for me:
.jpg") Me at MSIgnite 2019
Me at MSIgnite 2019
There is a pre/post and post-me after this event and talking about everything I learned, felt, and experienced during that week deserves a whole other blog post on its own, but I will summarize it as such: All the panels and workshops on the Humans of IT pre-day truly changed me for the best. I met strangers that became family at the end of that week, countless mentors on the #HumansofIT Community Mentors program and community, I met the man behind the ceramic dinosaur @threddy and got a reminder engraved on my soul that at the end is not so much about the tools and technologies but the humans behind it and how it serves us to build and give back to our own personal global tribe.
It is my hope that you, dear reader, will find your home and newfound family right here on the Humans of IT Community as well, even when – no, especially when – you’ve felt like an odd IT duck like me. This is a place where we can truly belong.
#HumansofIT
#MSIgnite
by Scott Muniz | Sep 3, 2020 | Azure, Technology, Uncategorized
This article is contributed. See the original author and article here.
This installment is part of a broader series to keep you up to date with the latest features in Azure Sentinel. The installments will be bite-sized to enable you to easily digest the new content.
Azure Sentinel supports a set of standard patterns for ingesting data at scale. Customers are able to easily onboard data sources via an extensive gallery of connectors and data collection technologies. Data is the foundation for Azure Sentinel. To increase our set of data sources, we are delighted to announce that the Azure Firewall data connector is now public preview!
Azure Firewall is a managed, cloud-based network security service that protects your Azure Virtual Network resources. It’s a fully stateful firewall-as-a-service with built-in high availability and unrestricted cloud scalability.
You can connect Azure Firewall logs to Azure Sentinel, enabling you to view log data in workbooks, use it to create custom analytics,, and incorporate it to improve your investigation/hunting activities.
Learn more about monitoring Azure Firewall logs.
How to enable:
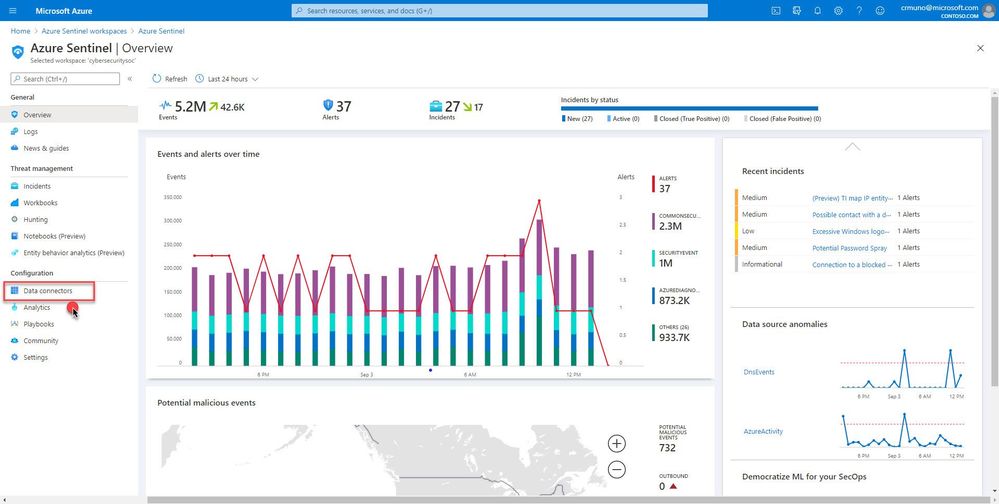
- From the Azure Sentinel navigation menu, select Data connectors.

2. Select Azure Firewall from the data connectors gallery, and then select Open Connector Page on the preview pane.

Enable Diagnostic logs on all the firewalls whose logs you wish to connect:
3. Select the Open Azure Firewall resource > link.

4. From the Firewalls navigation menu, select Diagnostic settings.

5. Select + Add diagnostic setting at the bottom of the list.

GIF Demonstration:

Get Started Today!
Try out the new connector and let us know your feedback using any of the channels listed in the Resources.
You can also contribute new connectors, workbooks, analytics and more in Azure Sentinel. Get started now by joining the Azure Sentinel Threat Hunters GitHub community and follow the guidance.

Recent Comments