by Scott Muniz | Jul 31, 2020 | Uncategorized
This article is contributed. See the original author and article here.
This week the Azure Data Factory team is releasing the following new features in the ADF UX:
Array support for mapping data flow parameters
Array data types are now supported in mapping data flow parameters. You can pass in a list of an existing data type! Learn more on how to parameterize your mapping data flows.

Debug from job cluster
When operationializing your mapping data flows, you can now choose to run a pipeline debug run using either a running interactive debug cluster or with a just-in-time cluster using the integration runtime configuration of the activity.

Use the data flow debug session if you are running a single data flow with a small amount of data. This allows for you to test your business logic without having to wait a few minutes for a new cluster to start up.
For more advanced pipelines that move large amounts of data or have multiple concurrent data flow that run in parallel, use the activity runtime settings to spin up a new cluster. This allows for you to test different performance tuning options before you publish or merge your changes.
Filter by run id
When monitoring your pipelines, you can now look for an individual run by entering the run id into the filter search box. This can be useful for troubleshooting when you have many pipeline runs occurring in a factory.

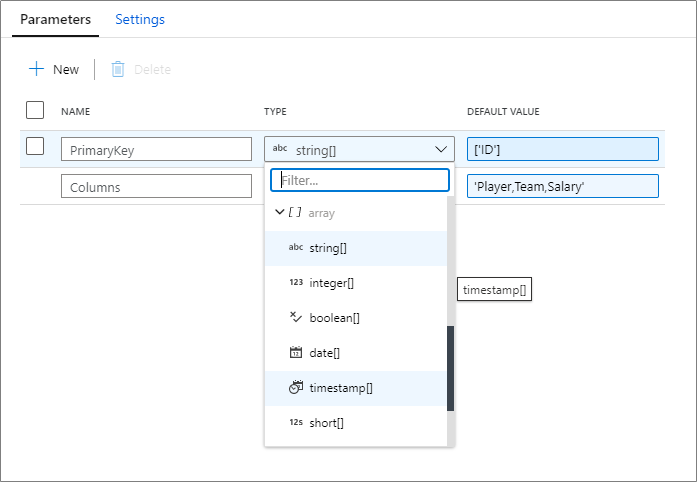
Parameterize key columns
When writing to database sinks using data flows, you may have upsert, updates or deletes enabled on the destination. If so, you must specify a primary key or list of primary keys. For scenarios where the number of primary keys is dynamic, you can now enter a custom expression that takes in an array of column names at run-time. For more information, learn about the alter row transformation.

Updated feedback experience
Lastly, we have updated the feedback form in the ADF UX. Feel free to let us know what you think about some of these new features!


by Scott Muniz | Jul 31, 2020 | Uncategorized
This article is contributed. See the original author and article here.
Enable Multi-Factor Authentication (MFA)
Greetings! We are publishing this blog post to continue our series for the re-vamped Azure Security Center (ASC) Secure Score, and to educate the masses on the importance of ASC and what it can offer our customers…aka YOU. The desired result is to enhance everyone’s security footprint as much as possible leveraging one of the most (if not THE most) powerful forces of compute power on the planet.
What is Multi-Factor Authentication? I won’t go into too much detail here, but it’s basically a process where a user is prompted during the sign-in process for an additional form of identification, such as to enter a code on their cellphone or to provide a fingerprint scan. It leverages something you know (like a password) and something you have (phone / hardware key) or even leverage something you are (biometrics/facial scan). To read more about what MFA is and how it works, check out this article.
Before I dive into the subject of enabling Multi-Factor Authentication for accounts, I would like to address the WHY… Time to hop on the soap box…
We all have been told identity is the perimeter for defense. But what does that mean exactly? Back in the day you could get away with deploying network boundaries and relying on them to establish a good layer of network protection. Think of a moat around a castle as an analogy. However, over the last 20 years we’ve all seen/heard the news stories about how the “moat” approach failed (and continues to fail) time and time again.
To put things into perspective, there are over 300 million fraudulent sign-in attempts to our Azure cloud services every day. Think about the impact of that number on your own Azure tenant! The reality is that “Cyberattacks aren’t slowing down, and it’s worth noting that many attacks have been successful without the use of advanced technology. All it takes is one compromised credential or one legacy application to cause a data breach. This underscores how critical it is to ensure password security and strong authentication.” Reference – here…aka the WHY.
At Ignite 2019, it was discussed that out of all the Azure tenants globally, less than 8% of them WORLD-WIDE have enabled MFA. 99.9% of attacks on accounts are prevented by MFA. Question – Where does your Azure tenant fit in to the mix?
It’s very difficult not to go on a rampage verbally right now given the number of Azure tenants we have… so I’ll climb off the soap box instead.
OK so now you should have a better understanding of why addressing the security control “Enable MFA” is critical to the overall security of your Azure tenant, and in a lot of cases…your on-premises environments can be positively impacted too.
As you learned in this blog post (blog series), recommendations are grouped in Security Controls. This one control is probably considered one of the most important if not THE most important control to activate. Afterwards, your Secure Score will elevate 10 full points! I know it doesn’t sound like a lot, but with the new version of Secure Score it’s quite a positive impact, and is the largest number equated to a security control. Depending on your own tenant, it could be an 18% adjustment!
Note: For more information on Secure Score info, read this article here, and pay particular attention on how to ensure you’re getting the maximum points you can.
Also, the security control “Enable MFA” relates specifically to Azure MFA, not a 3rd party MFA provider. If you wanted to leverage a 3rd party MFA vendor, then we’d be addressing integrating one into an on-premises instance of ADFS in a Hybrid scenario. That’s not the topic of discussion and there’s plenty of available online references for that. Either way, MFA needs to be enabled regardless of whichever direction you choose for your organization.
Pertaining to licensing requirements, you can find all pertinent information regarding that here. There is a ‘free’ option to protect your tenant admin accounts, however it still comes with a cost. In order to take advantage of ‘free’ then you’re limited to either the global administrator accounts of your tenant…OR…your tenant’s got the “security defaults” turned on.
Without going into too much detail on “security defaults,” I will mention that if they are enabled on your tenant, the setting disables regular conditional access policies, then forces all users to have MFA after 14 days (amongst a few other enforcements). So be cognizant of that. Read up and learn more about “security defaults” here.
I believe all the main bases are covered in the blog opening so let’s get to the “meat and potatoes” of the topic at hand. Prior to doing anything, it’s important to make sure the environment is staged, set, and ready to go. Make sure you follow all the planning / recommended steps (found here) to ensure the MFA rollout is successful and issues are limited.
Security Controls
Let’s get going on the actual security controls now. Each one is actually a built-in policy definition contained within the Azure Portal.

MFA should be enabled on accounts with owner permissions on your subscription.
First up is the control under “Enable MFA” section in ASC Recommendations related to OWNER permissions for the subscription. This is to help enforce the control to prevent a breach of accounts or resources.
The last thing you want to do is allow some account that has complete ownership of your subscription to login without another factor of authentication. Simply letting a user account login with a password alone begs an attacker to compromise your tenant through a variety of attacks, taking full control of ALL accounts and ALL resources within the subscription.
Please…turn this on ASAP if it’s not already!!! You want to force MFA each and every time the subscription is accessed by an account with owner permissions.
MFA should be enabled on accounts with write permissions on your subscription.
Just like the previous mentioned control, this one too prevents a breach of accounts or resources on your subscription. Same methodology applies but the differences lie within permission levels. Even being able to write against a subscription allows an attacker to make unauthorized changes to accounts and resources without being an owner.
Again, I can’t stress enough the importance of enabling MFA and ensuring these controls are met!
On the path to Enabling MFA
There are a couple of ways to enable Azure MFA against your tenant. One way is to utilize conditional access policies, and the other is simply to turn it on against your user accounts. (Don’t forget about the caveat regarding “security defaults” mentioned above.) The screenshots show the latest GUI / portal interaction (as of the time of this blog post), but of course you can leverage PowerShell if you so choose.
Let’s look at the process for owner permissions.

Under the ASC Recommendations, simply click the link to initiate the process to enable MFA on owner permissions. It’ll take you to a subscription list page, then click the link associated with your subscription. Next, it’ll display the owner(s) of the subscription on the right side like this:

Click the continue button, and it redirects to the “conditional access policies” of the subscription.

Conditional Access Policy Method
Of the 2 methods mentioned previously, Microsoft recommends using conditional access policies (CAP) to enable MFA for users. Conditional Access policies enforce registration, requiring unregistered users to complete registration at first sign-in, an important security consideration. They give you the most flexibility and granularity when leveraging MFA in the environment. CAPs do require licensing of at least AAD P1, so keep that in mind. To begin your journey towards using CAPs and consuming gobs of relevant information, start here.
Given the flexibility and customization available for CAPs, the configurations could vary, so it’ll depend on what’s available for your tenant. Good news is that there’s “common” policy settings available for you to take advantage of that I’ll be addressing in this post. The common policies available are:
Regarding the ones with the asterisk * – if you enable all 4 that’s basically the same thing as doing the security defaults. Each link for the common policies above will take you directly to the article on how to set up and configure each one.

Reference Material – here.
Follow the above links for guides at enabling policies. At a bare minimum, Microsoft recommends you enabling MFA across administrative roles. Here’s an example of doing exactly that using the preview features (as of 7/2020):
- Sign in to the Azure portal as a global administrator, security administrator, or Conditional Access administrator.
- Browse to Azure Active Directory > Security > Conditional Access.
- Select New policy.
- Give your policy a name. We recommend that organizations create a meaningful standard for the names of their policies.
- Under Assignments, select Users and groups
- Under Include, select Directory roles and choose the following roles at a minimum:
- Authentication Administrator
- Billing administrator
- Conditional Access administrator
- Exchange administrator
- Global administrator (OWNER)
- Helpdesk administrator
- Password administrator
- Security administrator
- SharePoint administrator
- User administrator
- Under Exclude, select Users and groups and choose your organization’s emergency access or break-glass accounts.
- Under Cloud apps or actions > Include, select All cloud apps.
- Under Conditions > Client apps (Preview), set Configure to Yes. Click Done.
- Under Access controls > Grant, select Grant access, Require multi-factor authentication, and select Select.
- Confirm your settings and set Enable policy to On.
- Select Create to create to enable your policy. (PAY ATTENTION TO THE WARNING!)


Lastly, depending on the option selected below could impact your currently logged on account or not. Be mindful on your selection!

19 clicks of the mouse, and you’re done setting up MFA for administrative roles using the preview method of CAP as of 5/2020! You can see how customizable CAPs can be and just think of the flexibility you can leverage in your own environment. Just be careful you don’t accidentally lock yourself out!!
Direct User Method
If CAPs aren’t available to you at this time, then here’s a snippet of the process on simply enabling MFA against user accounts directly. Reference article.
Log into your Azure tenant (https://portal.azure.com), click Azure Active Directory, and go into Users, and then finally All Users. On the top menu bar, you’ll find “Multi-Factor Authentication.” Click it to open a new window to display the MFA user status.


Now that you’re on the MFA page for users, you can select all users who are OWNERS or WRITERS of the subscription, and roll out MFA in one fail swoop (Doing so for ALL users in the environment isn’t really recommended, you want to do that in chunks starting with the privileged accounts) or you can select individual accounts to start enabling MFA against for testing.
PRO TIP – Don’t move users directly to the Enforced state. If you do so, non-browser-based apps stop working because the user hasn’t gone through Azure Multi-Factor Authentication registration and obtained an app password. Only set them to Enforced after they’ve gone through the entire process.
Easy!
PRO TIP – Disabling MFA. We get a lot of customer questions that involve disabling MFA and the correct method to do that. Ultimately if you disable MFA at the subscription level…YOU MUST disable it at the management group as well or it won’t work!
This is the way you SHOULD be doing things: https://techcommunity.microsoft.com/t5/azure-security-center/centralized-policy-management-in-azure-security-center-using/ba-p/1276331
Next Steps
Obviously, you should get working on getting MFA enabled! Get moving on increasing that Secure Score and preventing bad actors from taking advantage of this attack vector on your tenant! We hope to see the statics jump dramatically in the direction of more customers leveraging MFA for sure!
To wrap up this blog post, I’d like you all to keep in mind this is just a small fraction of what ASC and the Secure Score can offer our customers to drive their security posture through the roof. We’re just getting started and this basically translates into some robust steps you can leverage to increase your own comfort level in protecting your environments / assets.
I hope you enjoyed this article and learned something that will assist you in the continued fight of cyber-security. Please continue to enjoy our ASC Secure Score blog series and I look forward virtually seeing you all in the next one. Until then…
GET STARTED ON ENABLING MFA IN AZURE! :smiling_face_with_smiling_eyes:
- The main blog post to this series (here)
- The DOCs article about Secure Score (this one)
Reviewer:
Yuri Diogenes, Senior PM CxE ASC Team
by Scott Muniz | Jul 31, 2020 | Alerts, Microsoft, Technology, Uncategorized
This article is contributed. See the original author and article here.
Greetings!
We’re back with another mailbag, this time focusing on your common questions regarding Azure AD Identity Protection. Security is always top of mind and Identity Protection helps you strike a balance between the usability required for end users to be productive while protecting access to resources. We’ve got some really great questions from folks looking to improve the effectiveness of their alerts and to increase their overall security posture. We even have a sample script for you! I’ll let Sarah, Rohini and Mark take it away.
—–
Hey y’all, Mark back again for another mailbag. You’ve been asking some really great questions around Azure AD Identity Protection. So good, in fact, I’ve kept putting this off for an embarrassingly long time. Then I called in for some help from some excellent feature PMs Sarah Handler and Rohini Goyal.
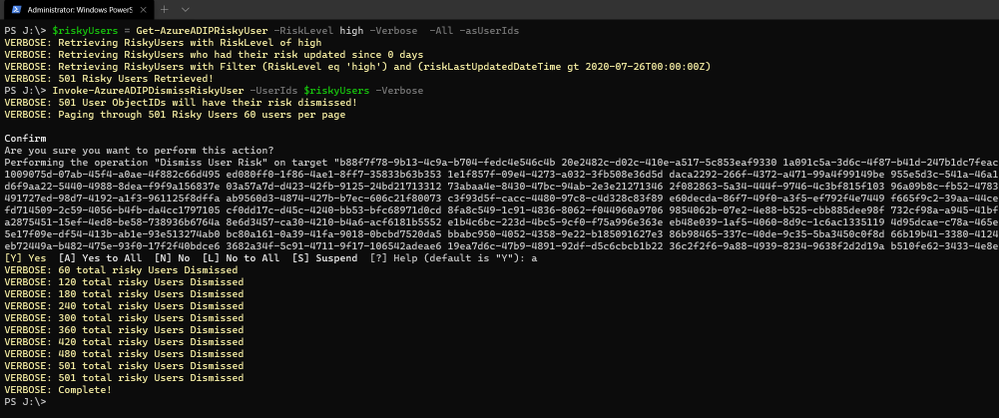
Question 1: I want to bulk dismiss a lot of Users that have risk. How can I do this?
Make sure that before you bulk dismiss users, you’ve already remediated them or determined that they’re not at risk. Then we have a GraphAPI call you can make to dismiss the user risk. We’ve put together a little sample script to help you with doing bulk dismissal.
We’ve provided a sample PowerShell script and examples to enumerate risky users, filter the results, and dismiss the risk for the collection.

Question 2: How do we detect TOR or anonymous VPN? Is it based off exit node or are there ways to bypass this?
We detect anonymizers in a few ways. For Tor, we continually update the list of Tor exit nodes. For VPNs, we use various third-party intelligence to determine whether an anonymizer has been used.
Question 3: How should we handle false positives?
There are two ways to address false positives: giving feedback on false positive detections that occur and reducing the number of false positives that get generated. If while investigating risky sign-ins you find a detection to be a false positive, you should mark “confirm safe” on the risky sign-in. There are two ways to prevent false positives in Identity Protection. The first is to enable sign-in risk policies for your users. When a user is prompted for a sign-in risk policy with MFA and passes the MFA prompt, it gives feedback to the system that the legitimate user signed in and helps to familiarize the sign-in properties for future ones. The second is to mark common locations that you trust as trusted locations in Azure AD.
Question 4: What is the best practice for whitelisting known locations?
First, you want to make sure you’re putting in your public egress end points. This helps with our detection algorithms. We’ve recently increased the named locations to 195 named locations with 2,000 IP ranges per location. You can read more in our docs.
But we know that many times networking teams make changes and don’t notify the Azure AD Admins. It’s good to have a process to work through the Sign-In logs and look for IP ranges that are not part of your named locations and add those as well as remove IPs that no longer are your egress point.
Question 5: Does AAD Leaked credentials connect to Troy Hunt’s Have I been Pwned API? Do I need to supplement with other scans?
Leaked credentials detection does not connect to Troy Hunt’s “Have I been Pwned”. Troy does an excellent job with his service correlating and collecting public dumps. Leaked credentials alerts take into account those public dumps as well as non-public dumps we call out in our docs, more info here. If you want to supplement the Azure AD leaked credentials alerting with other feeds, that is entirely up to you.
Question 6: When I turn on Password Hash Sync does the leaked credential alert on existing ones or only on leaks going forward?
Leaked credentials will only detect on leaks going forward. When we find clear text username and passwords pairs, we don’t keep them. We process them through and delete them. We’ve updated our documentation to call this out and provided more info.
We hope you’ve found this post and this series to be helpful. For any questions you can reach us at AskAzureADBlog@microsoft.com , the Microsoft Forums and on Twitter @AzureAD , @MarkMorow, @Sue_Bohn, and @Alex_A_Simons
-Rohini Goyal, Sarah Handler and Mark Morowczynski

by Scott Muniz | Jul 31, 2020 | Uncategorized
This article is contributed. See the original author and article here.
See what’s next in our Office Hours series, catch up on our Microsoft Inspire announcements and sessions, hear more about Project Cortex on the Intrazone, tell us more about your expertise finding scenarios, learn about our Microsoft 365 Content Services partners and how you can join the program, and see how organizations are using Microsoft 365 to stay connected.
See what’s coming up on Office Hours
Tune in on August 12 (download invite) to learn more about the business case for Project Cortex. We’ll discuss how Project Cortex can save your organization time and lower operational costs.
Did you miss an Office Hours meeting and check the schedule? Learn more about the series and upcoming meetings, and view the recaps and recordings for all past meetings on the Project Cortex Office Hours page.
Catch up on Project Cortex at Microsoft Inspire 2020
At Microsoft Inspire 2020, we announced new taxonomy features, gave an update on Project Cortex availability, and revealed the initial set of Project Cortex launch partners.

Read the blog post, check out the July 22 Office Hours meeting recap, or watch a session below to learn more about knowledge and insights with Project Cortex at Microsoft Inspire 2020.
See what’s new
The Intrazone: Prefrontal Project Cortex
Hear more about the latest Project Cortex updates – digging into the manage metadata service (MMS), classification, and knowledge curation – to learn how you and your company will further the union between people, content, and work processes. Mark and I talk with CJ Tan and Sean Squires, principal program managers on the Project Cortex team in Microsoft 365 engineering.
Tell us more
This week we’re offering an opportunity for you to help influence one of the potential future investment areas of Project Cortex. We’re looking to better understand what expertise finding scenarios are important to customers, and more specifically, which ones Microsoft can help with by providing better tools and processes. Let us know your thoughts in this brief (3 minutes!) survey.
Say ‘hello’ to new charter partners
We’re pleased to announce the addition of several charter partners to the Microsoft 365 Content Services Partner Program for FY20 and highlight some of their recent projects. Our partners help customers worldwide realize the value of Microsoft 365 – from migrating customers off legacy platforms to helping them implement and extend the capabilities of Microsoft 365 Content Services.

Interested in joining this partner program? We’re accepting applications now through August 31 for the Microsoft 365 Content Services Partner Program. Read the announcement to learn more about the program and how to apply. We’re also hosting a program overview meeting (download meeting invite) on Tuesday, August 4 at 8am PDT, to walk partners through the program benefits, requirements, and application process.
Learn about our customers and partners
Read how Microsoft 365 Content Services partners help organizations stay connected in a changing world. Below are a few customer stories from our partners:
For more related stories, see our Case Studies library on the Microsoft Tech Community Resource Center.
Visit the Project Cortex resource center to learn more.
by Scott Muniz | Jul 31, 2020 | Uncategorized
This article is contributed. See the original author and article here.
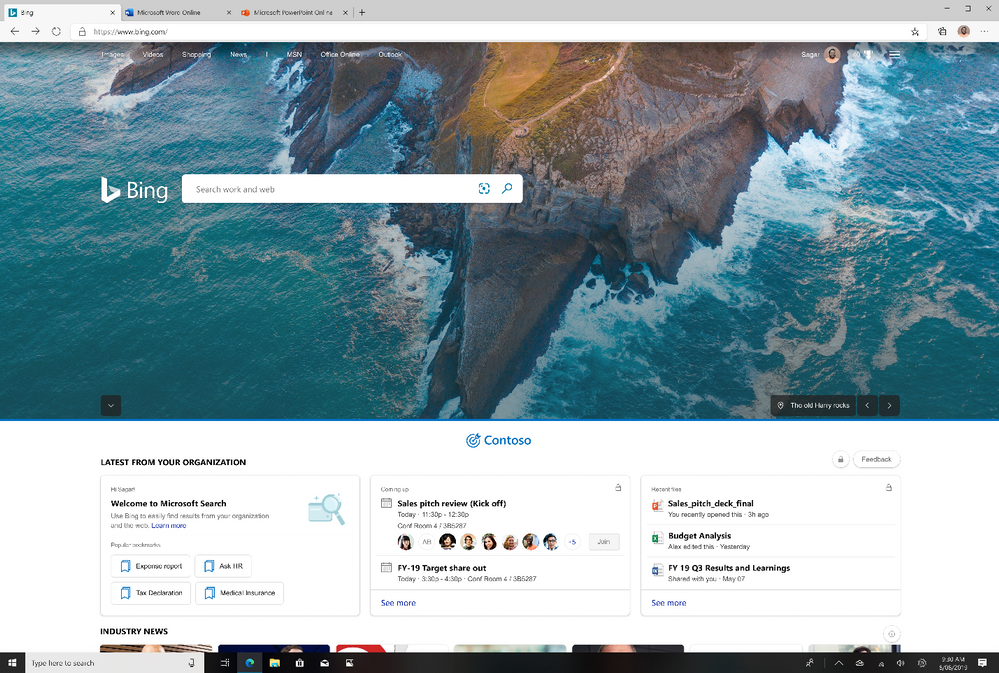
We’re happy to announce a new experience just for Microsoft Search in Bing users: the Bing enterprise homepage. Now you’ll see the same Bing homepage you love, enhanced with the work info you need, including popular bookmarks, meetings, recent files, and news. And with automatic sign in, you can get to the info even faster.

What are the benefits of the Bing enterprise homepage?
Customized branding: You’ll see your company’s logo and name right on the Bing homepage. Enterprise admins can configure the brand logo by customizing the Microsoft 365 theme for your organization. (Your logo will be changed across Microsoft 365 and Microsoft Search.)
Fast access to popular and timely info: If your organization has added bookmarks in the Microsoft 365 admin center, you’ll see popular bookmarks to help you get to important internal resources even faster.
You’ll also see your upcoming meetings—and who’s invited. (And for an even fuller picture of your day, just click the see more link.)
To help you pick up where you left off, you’ll see recent files you and co-workers have collaborated on.
News that impacts your work: Read the latest headlines and stories that matter to you and your industry. Enterprise admins can choose the industries for your enterprise, as well as topics important to your company, in your Microsoft 365 admin center settings (Org settings > Services > News).
Search suggestions designed for work: Just like you see web suggestions when you start a search, now you’ll see work suggestions too. Start typing a work-related search, like your manager’s name, in the search box to see it in action.
Highlight your news: Soon you’ll be able to showcase your company’s top internal news stories on the Bing homepage. Check out the image below for an early preview.

When will I see the new enterprise homepage?
The enterprise homepage updates started rolling out during the end of July. The admin controls for Industry news and internal news from your organization will roll out across tenants in August.
Coming soon: More controls
The right homepage for your business: We’re working on features that will let enterprise admins customize the homepage for your organization, including turning off the homepage image by default. (Your users will still be able to turn it back on.) And for organizations that prefer the ‘classic’ Bing homepage, Enterprise admins will have the option to turn off the enterprise homepage features.
Frequently asked questions
Who can see work info on the enterprise homepage?
Only you can see your work info. And your enterprise homepage is customized just for you. To help protect your privacy, you must sign in with a valid work or school account to see info from your organization. To learn more about privacy and Microsoft Search, see How Microsoft Search in Bing helps keep your info secure.
How can I hide enterprise info on the homepage?
To temporarily hide this info, minimize it by clicking the chevron control just above the enterprise section.

Or, on the homepage menu (upper-right corner), turn off the Show news & work info toggle.
Is this available outside the US?
Currently, the Bing enterprise homepage is available in eight locations: Australia, Canada, France, Germany, Great Britain, India, Spain and the US. The Industry news carousel is only rolling out in the US.
We hope you enjoy the new Bing enterprise homepage as much as we loved building it for you.

Recent Comments