by Scott Muniz | Jun 23, 2020 | Uncategorized
This article is contributed. See the original author and article here.
By: Jisun Shin | Senior Program Manager – Microsoft Mobile Experiences & Priya Ravichandran | Senior Program Manager – Microsoft Endpoint Manager – Intune
Microsoft Endpoint Manager (MEM) – Intune allows you to provision and manage Android Enterprise (AE) fully managed devices which are corporate-owned and assigned to people in your organization. While the Microsoft Endpoint Manager admin center allows you to configure device and app management settings on fully managed devices, there are limited solutions allowing you to customize and standardize the end user experience on corporate devices. The Microsoft Launcher for enterprise, with the integration of Intune, is able to address this gap on AE fully managed devices. Microsoft Launcher has been a popular Android application which allows you to customize your home screen on your personal device, and we’ve taken the best of it and tailored it for corporate-owned devices.
What are Android Enterprise fully managed devices?
Android Enterprise fully managed devices are corporate-owned devices associated with a single user and leveraged exclusively for work and not personal use. Admins can manage the entire device and enforce policy control. Intune helps you deploy apps and settings to AE devices, including AE fully managed devices.
This contrasts with the AE dedicated devices that are userless devices intended for shared scenarios. These dedicated devices – usually configured for specialized functions and users – leverage the Managed Home Screen app to be able to deliver the locked down end user experiences needed for these devices. To learn more about AE dedicated devices, read this blog post.
What is Microsoft Launcher?

Microsoft Launcher is an Android application that lets users personalize their phone, stay organized on the go, and seamlessly sync their Calendar, Task, Notes and more between their phones and their PCs. Microsoft has built on these end users experiences to allow you to define the preferred experiences on the AE fully managed devices for your organization as well as provide your users some options to personalize their experiences on these corporate devices.
On AE fully managed devices, Microsoft Launcher allows the organization to ensure that all end users on these corporate devices have a consistent home screen experience. It also enables the standardization of the look and feel of end users experience across fully managed Android, regardless of OEMs and system versions (OS version requirement for Microsoft Launcher is Android 4.2 or later; note Intune’s Android support is detailed here).
What are some of the benefits of using Microsoft Launcher?
Standard and consistent experience
Android is inherently customizable with wide range of flexibility. Therefore, Android device UIs are fragmented by device, model, and OS version with different OEMs. With Microsoft Launcher, organizations can set up and deploy consistent and universal home screen UI between devices.
Customization
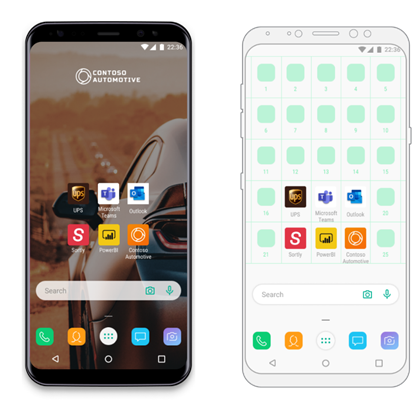
With Microsoft Launcher and the integration with Intune, IT admins can customize the home screen on the fully managed device by configuring the wallpaper, apps, search box, position and set of apps, and more.
These are some UX customization examples you can do on the AE fully managed devices with Microsoft Launcher:
- Set a custom wallpaper to show your branding on company-owned devices.
- Specify set and order of your apps on the home screen to make more important and frequently used apps easier to access
- Customize the grid layout of the device
- Show or hide dock, search bar and M365 feed to optimize devices for the purpose of work
M365 Feed
M365 Feed makes it easy to view user’s calendar, to-do lists, recent documents, and Sticky Notes on the go. It helps the users have a centralized dashboard designed to keep everything work-related in the same and easily accessible place.

How can we start using Microsoft Launcher in our organization?
Let’s get started with step-by-step instruction to set up your device with Microsoft Launcher.
Before you begin, please make sure whether you have an Android device can be enrolled into Intune as an Android Enterprise fully managed device. You can check the “Technical requirements” section in docs here. Also, note – these steps are fully documented in our docs and links to documentation are provided at the end of this post. We’re tying together several different articles for your continuity.
Step #1 – Enable corporate-owned user device
In this step you will generate an enrollment token to enroll the fully managed device. Please note that this step assumes you have already set Intune as your MDM authority and that you have connected your Intune tenant to your Managed Google Play account.
In the MEM console, navigate from Devices > Android > Android enrollment > Corporate-owned fully managed devices. Under Allow users to enroll corporate-owned user devices, choose Yes.

When this setting is set to Yes, it provides you with an enrollment token (a random string) and a QR code for your Intune tenant. This single enrollment token is valid for all your users and won’t expire. Depending on the Android OS and version of the device, you can use either the token or QR code to enroll the device.
Step #2 – Create a group
In the MEM admin center, navigate to Groups > All groups > New group.

The Group type should be set to “security.” Create a new group by filling out a Group name and, if you want, a Group description. Change Membership type to “Assigned”. And then Add members.

Search and select members to the group you are going to add. Also you can add new or remove existing group members any time after creating a new group later.

Select Create to add the group and return the New group page. Confirm your device group was created in the All groups page.

Step #3- Approve and assign Microsoft Launcher as a managed app
This step will make sure that Microsoft Launcher is downloaded and installed on your enrolled devices and automatically launched.
Once you have linked your Intune and Managed Google Play accounts, you should add Microsoft Launcher in the Managed Google Play store and assign it to the device group you created.
When you navigate Client apps> Apps> All apps, you can find a list of managed apps which can be added to the Intune enrolled devices. If you can find Microsoft Launcher in Managed Google Play store, you can immediately add this app the group you created.
However, if you cannot find Microsoft Launcher from the list, you should add Microsoft Launcher app to your organization’s Managed Google Play store first. To add public, private or web applications, stay in Apps > All apps and choose “add.”

And Under Select app type choose Managed Google Play app.

You should see something like this:

In this example, we will illustrate adding Microsoft Launcher, a public application.
With the Play Store icon selected, search for “Microsoft Launcher” among the public apps and then select the Microsoft Launcher icon.


Choose Approve which will generate a pop-up like this:

Select Approve once more and follow the instructions on the next pop-up regarding app permission requests. Click Done when you are ready.

Notice the app will now be marked as “Approved” underneath its listing.

Repeat the above steps for other applications you would like into add to the Managed Google Play store. You can add private applications or web apps (web links) as well through the same way.
When you are done, select the Sync button in the top left-hand corner. You will see this banner appear back in your application list:

Once the applications have successfully synced into your list, search and click “Microsoft Launcher” in Apps > All apps.

Choose Properties > Assignments (edit).

And then add your device group created in Step 2 to the Required assignments and save.

Step #4 – Create a device configuration profile
In this step, we will walk you through creating a device configuration profile for your fully managed devices. This profile will allow you to configure device-level behavior and will also allow you to configure Microsoft Launcher as a default launcher, which is how your device(s) will know to launch Microsoft Launcher automatically.
Navigate to Devices > Device configuration> Profiles > Create profile.

Under Platform, select “Android Enterprise.” Under Profile select “Device restrictions” beneath “Device Owner Only.”

Choose Create and fill out a Name for your profile and, if you want, a Description.

When you’re ready, choose Next. Use the available categories to configure any settings that are applicable to your scenario. For this tutorial, we will focus only on showing you how to set up Microsoft Launcher under the Device experience category.
Choose Enrollment type as “Fully managed” and set Make Microsoft Launcher the default launcher as “Enable” (Default is “Not configured”).

Once you’re done configuring the rest of the device restrictions for the fully manages device, , choose Next, assign the profile to your device group, review your changes to make sure everything looks correct and choose Create.

At this point, you can enroll your devices into Intune and expect them to receive applied device settings and other policies, and automatically lock into and launch Microsoft Launcher. See the details in Step 6 for more on device enrollment.
Step #5 – Create an app configuration profile
If you have completed steps 1-4, you are all set to enroll your devices. This step is optional, and should be used if you want to learn how to leverage the full scope of capabilities offered by Microsoft Launcher. Additionally, any time Microsoft Launcher publishes an update to the Managed Google Play store with new features, the settings become instantly available via app configuration deployment.
In the MEM Admin Center, navigate to Apps > App configuration policies > Add > Managed Devices

Fill in the Name and, if you want, a Description. For platform choose Android Enterprise and Work Profile and Device Owner Profile and for targeted app select Microsoft Launcher. Choose Next when you are ready to continue.

On the top half of the screen are Permissions assignments. For this tutorial, we will be using the default permissions, and will not be making any adjustments here. However, feel free to make changes as you see fit.
On the bottom half of the screen are Configuration Settings.

You can choose to use configuration designer or JSON data to configure your settings.


Configuration designer will show you all available configurations for features within Microsoft Launcher the instant a new update is released on the Managed Google Play Store. However, some configuration keys will only be configurable through JSON format. We will show you briefly how to use Configuration settings format > Use configuration designer to add our Microsoft Launcher features, but will use Enter JSON data format to achieve our scenario.
5.A Using configuration designer to setup Microsoft Launcher features
From the Configuration settings format drop-down menu, select Use configuration designer and choose Add to open a panel with all the available Microsoft Launcher configuration keys.
Select the configuration keys you want to edit in the right panel and press “OK”

After selecting the configuration keys, you’ll see that they have default values.

To make a configuration value change, hover and interact under the “Configuration value” column for each row.

Once your changes have been made, select Next.

On the Assignments page under Included groups, choose Select groups to include and pick the device group you created in Step 2. Hit Next to review + create and when you’re ready, choose Create.

Once properties are configured via the Configuration Designer, the JSON data will also be updated to only reflect these properties. To add additional configuration keys into the JSON Data, use the JSON script example to copy the necessary lines for each configuration key.
5.B Using configuration designer to setup Microsoft Launcher features
Now, let’s finish Microsoft Launcher configuration by using JSON to specify set and position of apps on the home screen.
You can edit your existing app configuration profile by clicking on the policy you just made in Apps > App configuration policies.

Then select Properties> Settings (Edit)

Go to the Configuration settings format drop-down menu to select Enter JSON data. You can see all of your existing configurations in JSON format.

Your JSON should always begin and end with this:
{
    "kind": "androidenterprise#managedConfiguration",
    "productId": "app:com.microsoft.launcher",
    "managedProperty": [
//FEATURE CONFIGURATIONS GO HERE
    ]
}
5.B.1 Set Allow-Listed Applications
This key allows you to define the set of apps visible on the home screen from amongst the apps installed on the device. You can define the set of apps to show on Microsoft Launcher home screen by entering the app package name of the apps that you would like to make visible. This can only be configurable in JSON data format in the app configuration policy.
The apps that you set in allow-list should already be installed on the device in order to be visible on the home screen.
{
    "key": "com.microsoft.launcher.HomeScreen.Applications",
    "valueBundleArray":
    [
        {
            "managedProperty": [
                {
                    "key": "package",
                    "valueString": ""
                },
                {
                    "key": "class",
                    "valueString": ""
                }
            ]
        }
    ]
}
Add the following JSON snippet in “valueString” field where feature configurations go.
-
Package: This is the application package name you want to display on the home screen.
-
Class: This is an application activity which is specific to open a certain page within the app. It would use the default app page if this value is empty.
5.B.2. Custom App Order on home screen
This key allows you to specify the order of apps among the apps and weblinks viable on the home screen by entering component type, position, package, class, label and link. This can only be configurable in JSON data format in the app configuration policy.
The apps and weblinks that you set in allow-list should already be installed or added on the device in order to positioned on the home screen.
{
    "key": "com.microsoft.launcher.HomeScreen.AppOrder",
    "valueBundleArray": [
        {
            "managedProperty": [
                {
                    "key": "type",
                    "valueString": ""
                },
                {
                    "key": "position",
                    "valueInteger":
                },
                {
                    "key": "package",
                    "valueString": ""
                },
                {
                    "key": "class",
                    "valueString": ""
                }
            ]
        },
        {
            "managedProperty": [
                {
                    "key": "type",
                    "valueString": ""
                },
                {
                    "key": "position",
                    "valueInteger":
                },
                {
                    "key": "package",
                    "valueString": ""
                },
                {
                    "key": "class",
                    "valueString": ""
                }
            ]
        }
    ]
}
Add the following JSON snippet in “valueString” field where feature configurations go.
- Type: If you want to specify positions of apps, the only type supported is application. If you want to specify positions of web links, the type is weblink.
- Position: This specifies application icon slot on home screen. This starts from position 1 on the top left, and goes left to right, top to bottom.
- Package: This is the application package name you want to display on the home screen
- Class: This is an application activity which is specific to open a certain page within the app. It would use the default app page if this value is empty.
Step #6 – Enroll a fully managed device and use Microsoft Launcher
When you enroll a fully managed device that is in the target group, you will see that the Microsoft Launcher is the default launcher the end user experience will align with your configurations. Your device is all set and ready for use!
If you need to check the details of Android enterprise device enrollment, please visit this page.
Video
We’ve even created a video for you so you can see how this works from an end user perspective! Watch our video posted on YouTube:
Next steps
We’re thrilled to introduce capabilities that Microsoft Launcher provides to help you customize and streamline user experience on your Intune fully managed devices. We will keep improving and innovating our product, and we need your help. We would love to learn from you about what you like or what you need help while using Intune enrolled AE fully managed device Microsoft Launcher. We would appreciate feedback or suggestions from you. If you want to help us, please click here.
Quick links
All document you would need to set up Android Enterprise fully managed devices with Microsoft Launcher are in the following.
- Set the mobile device management authority.
- Connect your Intune account to your Managed Google Play account.
- Set up Intune enrollment of Android Enterprise fully managed devices.
- Enroll your fully managed devices.
- You can enroll your devices at any point after creating a group. In this blog post, we enrolled the devices after setting up apps a device configuration profile, but it is equally reasonable to deploy policies post-enrollment.
- Add Managed Google Play apps.
- Add Android Enterprise system apps.
- Assign apps to your groups.
- Choose “required” for Managed Google Play apps and AE system apps that you want accessible on your dedicated devices.
- Choose “uninstall” for AE system apps that you want hidden on your dedicated devices.
- Apply device configuration settings.
- Device restrictions.
- Apply app configuration policies to managed AE devices.
- Full list of features you can configure with Microsoft Launcher.

by Scott Muniz | Jun 23, 2020 | Uncategorized
This article is contributed. See the original author and article here.
Over the last several months, we have seen many customers adopting Microsoft Teams, even if their mailboxes are still hosted in an on-premises environment. One of the common issues in this scenario is not being able to see the Calendar tab in the Microsoft Teams client.
Would you like to know how to troubleshoot this? Read on!
For cloud users, the Calendar section in Teams is connected to their Exchange Online (EXO) calendar. In other words, when you schedule a meeting in Outlook, it’ll show up in Teams (and vice versa). For a great overview of this functionality, see Schedule a meeting in Teams.
To make calendar access work for your on-prem mailboxes, Teams needs access to your Exchange on-prem organization for both Autodiscover and EWS. There are several things to remember here.
- Autodiscover and EWS URLs should be available from the Internet. Pre-Auth is not supported. If you use some sort of publishing system, you will need to configure pass-through. You can verify that external URLs on-prem are accessible, trying to open them from internet directly in web browser. Test with https://mail.contoso.com/EWS/Exchange.asmx and https://autodiscover.contoso.com/Autodiscover/Autodiscover.xml .You can also use http://aka.ms/exrca to test connectivity for EWS and AutoDiscover. But note, that those tests don’t use OAUTH (as of this writing). So, sometimes you might see that those tests pass successfully, but free/busy for on-prem users is not visible from your tenant (see further below for more troubleshooting tips).
- OAUTH authentication should be configured and working between you O365 tenant and Exchange on-prem. To make this work, we highly recommended to run Hybrid Configuration Wizard (HCW) to configure full hybrid mode. For on-premises deployments (newer than Exchange 2010) HCW automatically configures OAUTH between on-premises and EXO. Please make sure to run the latest CUs on-premises as per our Hybrid requirements.
There are some other prerequisites: users with on-premises mailboxes must be synchronized to Azure Active Directory. On-premises mailboxes should be on Exchange 2016 CU3 or higher, as per this article.
If everything is working fine, you should see Calendar tab in your Teams client. When you switch to your Calendar tab, it should be “up to date” (you may need to re-login to the client):

Uh-oh; it’s not working. Now what?
If you used HCW, verify Service Principal Name (SPN) endpoints configured for Azure AD. There should be at least 2 endpoints for EWS and Autodiscover. If you don’t see them, you can connect to AzureAD via PowerShell and check/configure them manually (please see this article for details).
$ServiceName = “00000002-0000-0ff1-ce00-000000000000”;
$x = Get-MsolServicePrincipal -AppPrincipalId $ServiceName;
$x.ServicePrincipalnames.Add(“https://mail.contoso.com/“);
$x.ServicePrincipalnames.Add(“https://autodiscover.contoso.com/“);
Set-MSOLServicePrincipal -AppPrincipalId $ServiceName -ServicePrincipalNames $x.ServicePrincipalNames;
URL to confirm Autodiscover is available
To test if Autodiscover is available, you can use the following. For an on-premises mailbox, if hybrid is configured correctly, O365 should route back to on-premises:
https://outlook.office365.com/autodiscover/autodiscover.json?Email=admin@contoso.com&Protocol=EWS&RedirectCount=5
After redirect is completed, you should see the following on-premises EWS URL:

Collecting logs from Microsoft Teams client
- To make troubleshooting easier, you need to sign out from Microsoft Teams client and then sign back in. It will force calendar load and it will be easier to find error in log or successful location of user’s mailbox.
- Wait until Calendar app appears (if everything successful) or not (if something went wrong)
- Get the logs from the client: press (CTRL+ALT+SHFT+1) for Windows and (Command+Option+SHFT+1) for Mac from within the client to download logs
- Search for Calendar App. If the mailbox is discoverable, logs will show something like this: UserAppsStore: Added calendar app with isFirstParty as true. isMailboxDiscoverable: true, isFreemiumTenant: false, enableFreemiumCalendar: true
Checking EWSAllow Agent Strings
EWS access can be blocked by EWSAllow Agent settings in your Exchange on-prem organization. These can be configured either at the mailbox level or Organization level. This is not very common, but we have seen some organizations use custom EWS settings on-premises.
Check if any agents are blocked on the Organizational level (the following shows none are – default setting):

Also check the setting for the mailbox you are troubleshooting Calendar access for:

The following agents should NOT be blocked as they are used to access on-prem servers:
- MicrosoftNinja/1.0 Teams/1.0 (ExchangeServicesClient/0.0.0.0) SkypeSpaces/1.0a$*+
- SchedulingService
SchedulingService is used by the Teams middle tier when a delegate wants to plan a Teams Meeting for the manager using the OWA or Outlook Teams Plugin. IIS and protocol logs can be helpful to confirm if things are being blocked.
Additional troubleshooting
If all of the above checks out, troubleshooting interoperability between your cloud tenant and on-premises organization is the next thing to do. Here are several guides that will help with this:

Note: if you migrated mailbox from on-prem to EXO, it’s easy to test freebusy availability using Outlook. The above article on manual OATH configuration can be also useful for checking if things are configured properly (but really, you should always use HCW!)
If you are working in Teams calendar directly and you try to invite other on-prem users to a Teams meeting, your users/identities need to be synced with Azure AD Connect to be visible in Teams. While you can type the full email address from an on-prem user to invite them, if this mail domain is an accepted domain in O365 and there is no recipient in O365, mail delivery will fail with unknown recipient as the lookup will be done in O365 Global Address Book. Mailbox itself doesn’t need to be moved to EXO, but the identity should be synced.
Hope this helps in troubleshooting your Teams integration with on-premises mailboxes!
I wanted to thank Nino Bilic and Mirela Buruiana for their review of this post.
Viktoria Gindosova and Dmitry Chernikov


Recent Comments