This article is contributed. See the original author and article here.
In times of rapid change, developers and IT decision-makers must quickly adjust to a drastically evolving landscape. Successful organizations use managed cloud services to reduce operating costs by increasing developer efficiency and seize new business opportunities by accelerating delivery of innovation. App Service is a proven, high-productivity Platform-as-a-Service for hosting web apps and mobile backends. The service provides deployment APIs, networking integration, and built-in monitoring.
This is the first article in a multi-part series on moving applications to App Service. The series will cover how to continuously deploy your applications, register your site with a custom domain and certificate, securely access other cloud services, and how to properly scale and configure your site. Following this guide will help you get started with App Service and put you on excellent foundation for more advanced uses in the future.
Prerequisites
You will need an Azure subscription to complete this guide. You can create a subscription for free. Some parts of this blog series will use the Azure CLI. You can install the CLI locally by following this guide, or you can use the Azure Cloud Shell. The Cloud Shell is a virtual terminal associated with your Azure Subscription, allowing you to run Bash or PowerShell commands to create and update Azure resources.
You will also need to create a GitHub account if you do not have one already. Once you have a GitHub account, fork one of the repositories below and clone it to your local computer. Make sure you fork the repository. The next article will show how to set up Continuous Integration and Delivery with GitHub Actions.
New to Git and GitHub? Click here.
Create the resources
Now that you have an Azure Subscription, the CLI, and the repository, it’s time to create the cloud resources we need. First, open the Azure Portal and click Create a Resource in the top-left dropdown. In the menu, select Web App. This will open the blade to create a web app.

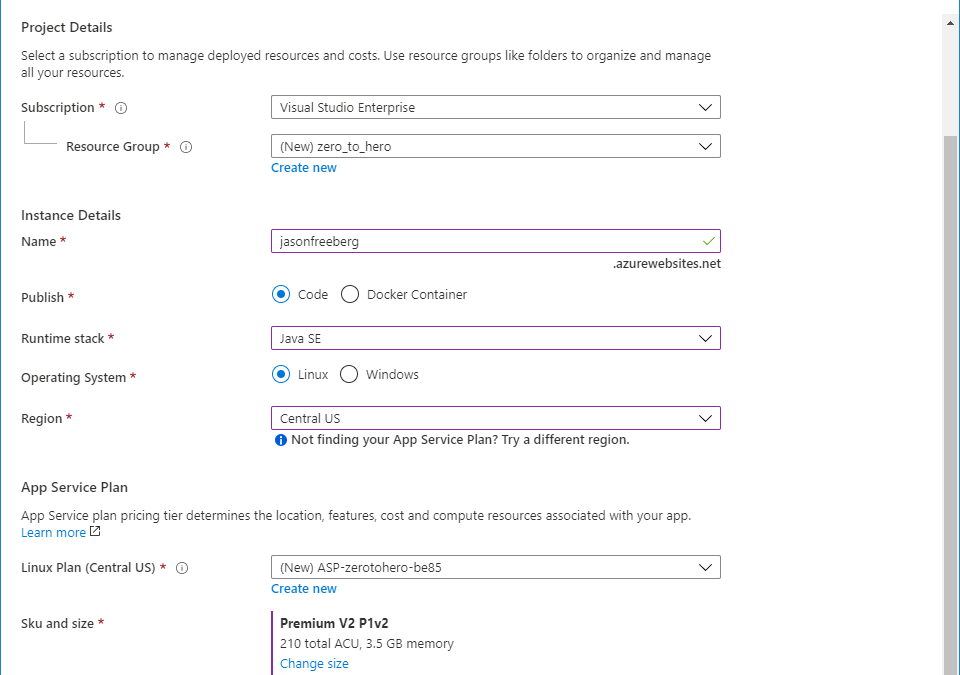
The form will ask for the following inputs:
- Resource Group: This is a group for all the resources for your project. Create a new resource group and name it zero_to_hero.
- Name: The name used for the web app. This name will also be used for the default domain name, so it must be globally unique. Try using your own name and some combination of numbers. For example, john-doe-1.
- Publish: Leave this as code, since we are deploying application code. App Service also supports deploying Docker containers, which is not covered in this guide.
- Runtime stack: Choose the runtime based on the repo you cloned earlier. If you chose the .NET Core repo, then you should choose .NET Core 2.1. For Node.js, select Node 12 LTS. For Spring, select Java 8 SE. (If you are following this guide using your own application, choose an appropriate runtime and version for your app.)
- Region: Select a region close to you or leave this as the default.
When you’re ready, click Review + create, and complete the creation after reviewing your inputs.
The Azure CLI has commands to create and configure your web apps. For more information, see this guide.
The App Service Plan
The App Service Plan represents the underlying Virtual Machine and can host multiple App Services. As you might expect, the higher hardware tiers have more compute resources and features. The plan is also responsible for scaling, which will be covered in a future article. You can always change the hardware tier after creation.
Wrapping Up
Congratulations! You have created an App Service Plan and a web app. You are one step closer to cloud hero status. In the next article you will set up a Continuous Integration and Delivery pipeline to build and deploy your code onto the web app. If you ran into any issues, please comment on this article.
Helpful Resources
- App Service Plan tiers and pricing information
- How many sites can I put in an App Service Plan?
- App Service Documentation
- App Service Team Blog
Brought to you by Dr. Ware, Microsoft Office 365 Silver Partner, Charleston SC.

Recent Comments