This article is contributed. See the original author and article here.
Contributed by @Orin Thomas
At the moment, a Windows Admin Center (WAC) add-in for the Azure Portal is in preview. Unfortunately at the time of writing, the preview is over subscribed and you might be waiting for a while before the feature becomes generally available.
You could go through the effort of deploying a VM in Azure, installing WAC on it, then configuring all the necessary Network Security Groups and Firewall Rules to allow you to interact with that instance. But another option is to spin up a WAC gateway server instance on a local VM, configure Windows Server’s built in Azure Network Adapter as a VPN connection (between your on-premises server and the VNet that hosts your Windows Server VMs in Azure), and then add connections from the WAC gateway server to your Windows Server VMs in Azure.
1. The first step you need to take is to install Windows Admin Center on a local Windows Server instance and configure it as a gateway server. You’ll be connecting from your privileged access workstation (remember that you should avoid doing important secure admin stuff from the same system that you use to surf the web) to this gateway server instance.
If you need a reminder on the steps required to install Windows Admin Center, consult the Windows Admin Center installation documentation.
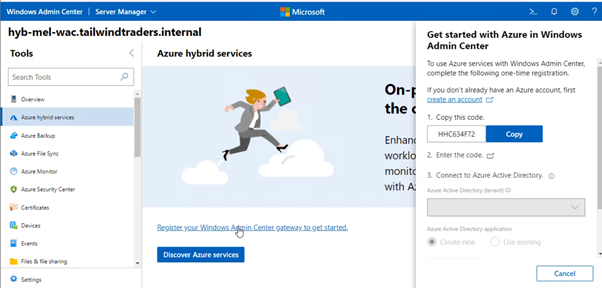
2. Once you’ve completed this installation, you’ll need to connect the gateway server to the Azure Subscription that you want to mange. You do this by selecting the Azure Hybrid Services node and registering your WAC instance with Azure.

Find the steps at Register your gateway with Azure.
3. Once you’ve registered the WAC gateway server instance with Azure, you’ll need to set up the Azure Network Adapter. You do this on the Networks node of WAC when connected to the gateway server instance, specifying the details of the virtual network you wish to connect to.

When you do this, all the point-to-site VPN infrastructure required to connect the on-premises WAC instance to Azure is created and configured and your WAC instance will now have its own connection into the VNet that hosts your Windows Server Azure VMs.
4. The only preparation you need to do for your Windows Server VMs in Azure is to create a firewall rule that allows WINRM-HTTP traffic from the gateway subnet. You can do this with the command:
Set-NetFirewallRule -Name WINRM-HTTP-In-TCP-PUBLIC -RemoteAddress x.x.x.x/YY
(where x.x.x.x/YY is the address space of the VNet that hosts the VMs)
5. Once this connection is established, you’ll be able to add Windows Server Azure VMs to WAC. The easiest way to do this is to use the Windows Server Azure VM’s internal IP address on the Azure VNet.

6. Then with the connection established, you’ll be able to manage Windows Servers on your on-premises network as well as Windows Servers running in Azure, using the same WAC gateway server!
Learn more:
Windows Admin Center product page
Windows Admin Center frequently asked questions
Windows Admin Center documentation
Microsoft Learn – Explore Azure networking services
Microsoft Learn – Architect network infrastructure in Azure
Brought to you by Dr. Ware, Microsoft Office 365 Silver Partner, Charleston SC.

Recent Comments