This article is contributed. See the original author and article here.
As an IT admin you plan to ship new devices to end users which can join the on-premises AD (Active Directory) by leveraging Autopilot with Intune for device management.
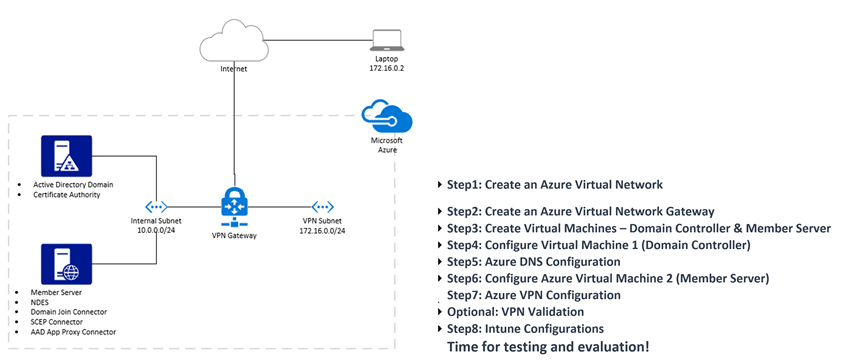
This post is a walkthrough of evaluating the Autopilot Hybrid join over VPN scenario in a lab environment hosted in Azure.
Infrastructure
I have added steps to build the configurations and dependencies along the post, this can get complicated due to the number of components involved. Here is an agenda for this post along with a high-level network configuration of the setup:

For this lab exercise you will need:
|
Azure subscription |
Sign up for a free Azure Subscription Or use your MSDN/MCT/Existing etc. |
|
Intune license |
Sign up for a free Intune trial or use MSDN/Existing etc. |
|
Windows 10 Devices |
Use VM’s or Physical devices as desired. Refer the OS prerequisites here. |
Step1: Create an Azure Virtual Network
Let us start with setting up a networking infrastructure where we can place our VMs later. We will create a New Virtual Network.
- Sign-in to https://portal.azure.com/
- Click Create a resource and look for Virtual Network to create one.

- Choose your appropriate Azure Subscription.
- Create a new Resource Group for this lab.
- Specify a Name of the Virtual Network.
- Choose a Region you want to place this resource to.
- Click Review + Create (leaving defaults for IP Address, Security and Tags)

- Click Create to finish creating the Virtual Network.
Step2: Create an Azure Virtual Network Gateway
We will now create a Virtual Network Gateway which acts as a software VPN.
- Sign-in to https://portal.azure.com/
- Click Create a resource and look for Virtual Network Gateway to create one.

- Choose your appropriate Azure Subscription.
- Specify a Name for the Virtual Network Gateway
- Select the same Region you chose while creating the Virtual Network in the previous exercise.
- Leave the Gateway type to VPN
- Leave VPN type to Route-based
- Leave the SKU to default VpnGw1
- Leave Generation to Generation1
- From the Virtual Network drop-down chose the name of the Virtual Network you created in Step1.
- Leave the default the Gateway subnet address range.
- Leave Create new under Public IP address
- Specify a Public IP address name
- Leave Enable active-active mode to Disabled.
- Leave Configure BGB ASN to Disabled.
- Click Review + Create.

- Click Create to complete the task.
Note: This may take 20 minutes or up. Do not proceed before this activity completes.
Step3: Create Virtual Machines – Domain Controller & Member Server
Now we start preparing the on-premises infrastructure starting with a Domain Controller and a Member Server both hosted as an Azure VM.
- Sign-in to https://portal.azure.com/
- Click Create a resource and look for Virtual Machine under Compute to create one each by repeating the steps twice one for the Domain Controller and the other for the Member Server.

- Choose your appropriate Azure Subscription.
- Select the Resource Group from previous exercise.
- Specify a Name of the VM
- Region is auto populated based on the region you selected from step2.
- Leave the default availability option. (No infrastructure redundancy required.)
- From the Image drop-down choose a Windows Server OS
- Leave the Azure spot instance default to No
- Choose a size as appropriate. (I am leaving the default suggested by Azure)
- Specify a Username and a password.
- Leave the default inbound ports for RDP.
- Leave default licensing.
- Click Review + Create.

The wizard automatically chooses the Networking from the same resource group we selected. Feel free to make any changes as desired.
- Click Create to complete the process.
Once both the VM’s are successfully created, move to the next steps in configuring them.
Step4: Configure Virtual Machine 1 (Domain Controller)
On the first VM acting as a Domain Controller, install the following roles:
- Active Directory Domain Services [Domain Controller]
- Install Azure AD Connect to connect to Azure AD Tenant.
- Re-run AAD Connect to configure Hybrid Azure AD Join

- Create users on-prem and confirm synchronization in AAD. Do not forget to assign licenses.
- Install Active Directory Certificate Services [CA: Certificate Authority] Please choose Enterprise CA since Standalone is not supported for NDES.

- Create Certificate Templates for SCEP Profiles by following the instructions from this blog post for setting up NDES for SCEP certificate deployments. We will reference this blog post at various phases during the setup.
- Web Server Certificate – For NDES Server (VM2)
- Client Authentication Certificate – For NDES Server (VM2) you can even merge this with the Web Server Certificate by adding Client Auth. Capabilities instead of creating a new template.
- SCEP Certificate Template – For Devices
Step5: Azure DNS Configuration
Once your custom domain is created, we need to configure Azure networking to support the custom DNS configuration.
- Sign-in to https://portal.azure.com/
- Browse the Virtual Network created earlier Contoso-VNET
- Choose DNS Servers from the blade.
- Select Custom.
- Specify the internal IP Address of VM1 (in my case it is 10.0.0.4)
- Click Save

- Restart both the VMs connected to this network.
Step6: Configure Azure Virtual Machine 2 (Member Server)
On the second VM we will install a list of roles and features for our solution. One of the primary reasons for building this VM2 is the fact that you cannot co-locate both NDES and CA on the same server.
- Join this VM to the Domain created in Step4.
- Create and configure an NDES Service Account.
- Install the NDES Role for additional guidance refer the instructions from this blog post.
- Install an Azure AD Application Proxy Connector – Instead of a WAP (Web App Proxy server) for publishing NDES URL to the internet.
- Add and an AAD APP Proxy Application for NDES. Refer the instructions from this blog post.
- Request the NDES Web Certificate. Refer the instructions from this blog post.
- Install the Intune Certificate Connector – SCEP
- Install the Intune Domain Join Connector
Step7: Azure VPN Configuration
The above tasks prepare us to setup the Azure VPN user configuration.
- Sign-in to https://portal.azure.com/
- Browse the Virtual Network Gateway resource you created earlier we called it Contoso-VPN
- Click the User VPN Configuration from the menu and click Configure now.

- Specify an Address pool for the VPN clients to connect.
- Under Tunnel type specify IKEv2
- For Authentication type, leave Azure certificate.

- Under Root Certificates specify a name (example Root) and for Public Certificate Data:
- Make sure that you exported the root certificate as a Base-64 encoded X.509 (.cer) file. You need to export the certificate in this format so you can open the certificate with text editor.
- Open the certificate with a text editor, such as Notepad. When copying the certificate data, make sure that you copy the text as one continuous line without carriage returns or line feeds. You may need to modify your view in the text editor to ‘Show Symbol/Show all characters’ to see the carriage returns and line feeds. Copy only the following section as one continuous line:

- Save the configuration.

Note: This may take 10 minutes or up to complete.
- Click Download VPN Client and save for later use.
Optional: VPN Validation
To reduce the complexity, it is a good idea to validate the VPN connection outside Intune configuration.
- Build a Windows 10 VM or use a physical machine (meeting OS Prerequisites) which is not joined to the Domain we created above.
- Copy the VPN client we downloaded in the previous exercise.
Instead of executing the installer of the VPN client, we will manually create the VPN configuration from the Generic folder with the file name called VPNSettings.xml

- Use the following PowerShell cmdlet to manually create the VPN connection. Replace the highlighted values.
Add-VpnConnection -Name ContosoVPN -ServerAddress azuregateway-Replace_With_GUID.vpn.azure.com -AuthenticationMethod MachineCertificate -DnsSuffix domain.dns.com -SplitTunneling -TunnelType Ikev2
Add-VpnConnectionRoute -ConnectionName ContosoVPN -DestinationPrefix 10.0.0.0/16
- Import a Client-Auth cert for this device with Common Name = Computer Name
For this step you may want to generate a Certificate Template with Computer Authentication capability with Name supply in request and the option to export the private key.
- Connect VPN and try to ping/rdp/network-share or even join the machine to Domain.
Step8: Intune Configurations
Now that your base infrastructure configuration is complete, you can proceed with the Intune configuration.
- Enable Intune Automatic Enrollment
- Configure Tenant Branding
- Configure ESP (Enrollment Status Page)
- Create an AAD Group for Devices
- Create Autopilot Deployment Profile for Hybrid VPN Join and assign to the above AAD-Group, preferably to All Devices.

- Capture hardware hash import device and assign profile. Get-WindowsAutoPilotInfo. The sample below will capture the hash, upload in Intune, add to a group and assign to the deployment profile.
Get-WindowsAutopilotInfo –online -AddToGroup “AZ-XYZ” -Assign
- Create Root Cert Configuration Profile and assign to the same AAD-Group.
- Create SCEP Certificate Profile and assign to the same AAD-Group.
Specify the Subject name format as CN={{FullyQualifiedDomainName}}

- Create a VPN Configuration Profile and assign to the same AAD-Group. Refer the configuration settings from the VPN Client you downloaded under the folder named Generic with the file name called VPNSettings.xml
- Specify a Connection Name
- Under Servers Description, specify a Name.
- For Ip Address or FQDN, specify the VPNServer info from VPNSettings.xml
- Set Default server to True.
- Enable Register IP address with internal DNS
- Choose the Connection type as IKEv2
- Choose Always On to Enable
- Set the Authentication method to Machine Certificates.
- Under Authentication certificate choose the SCEP Certificate profile you created before.
- Enable Device Tunnel

- Leave the following sections to defaults:
- Apps and Traffic Rules
- Conditional Access
- Customize the DNS Settings by adding:
- Add the Domain name as your DNS Suffix.
- Add Name Resolution Policy table (NRPT) rule by specifying:
- Domain
- DNS Server IP

- Leave the Proxy settings to defaults.
- Under Split Tunneling:
- Enable the configuration.
- Under Destination prefix and Prefix size specify the subnet address under <Routes> by referring the VPNSettings.xml

- Deploy to the AAD-Device group and proceed with testing/validation on a device.
Time for testing and evaluation!
Thanks,
Arnab Mitra
Brought to you by Dr. Ware, Microsoft Office 365 Silver Partner, Charleston SC.

Recent Comments