This article is contributed. See the original author and article here.
Hack Together: The Microsoft Fabric Global AI Hack
The Microsoft Fabric Global AI Hack is your playground for creating and experimenting with Microsoft Fabric. With mentorship from Microsoft experts and access to the latest tech, you will learn how to build AI solutions with Microsoft Fabric! The possibilities are endless for what you can create… plus you can submit your hack for a chance to win exciting prizes! ?
Learn how to create amazing apps with RAG and Azure Open AI
Are you ready to hack and build a RAG Application using Fabric and Azure Open AI?
?Join us for the Fabric AI Hack Together event and learn the concepts behind RAG and how to use them effectively to empower with your data with AI.
? You’ll get to hear from our own experts Pamela Fox (Principal Cloud Advocate at Microsoft) and Alvaro Videla Godoy (Senior Cloud Advocate at Microsoft) who will introduce you to the challenge, provide links to get started, and give you ideas an inspiration so you can start creating amazing AI solutions with minimal code and maximum impact. :fire:
?? You’ll also get to network with other hackers, mentors, and experts who will help you along the way. Come with ideas or come for inspiration, we’d love to hear what you’re planning to build!
This article is contributed. See the original author and article here.
If you’re using Azure Database for MySQL and have encountered issues with name resolution or the Domain Name System (DNS) when attempting to connect to your server from different sources and networks, then this blog post is for you! In the next sections, I’ll explain the causes of these types of issues and what you need to do to resolve them.
What are DNS issues?
DNS is a service that translates domain names (e.g., servername.mysql.database.azure.com) into IP addresses (e.g., 10.0.0.4) to make it easier for us to identify remember and access websites and servers.
However, at time the DNS service can fail to resolve the domain name to the IP address, or it might resolve it to the wrong IP address. This can result in errors such as “Host not Known” or “Unknown host” when you specify the server name for making connections.
Diagnosing DNS issues
To diagnose DNS issues, use tools such as Ping or nslookup to verify that the host name is being resolved from the source. To test using ping, for example, on the source, run the following command:
ping servername.mysql.database.azure.com
If the server’s name is not resolving, a response similar to the following should appear:
Fig 1: Ping request not returning IP
To test using nslookup, on the source, run the following command:
nslookup servername.mysql.database.azure.com
Again, if the server name is not resolving, a response similar to the following should appear:
Fig 2: nslookup to DNS request not returning IP
If on the other hand the commands return the correct IP address of the server, then the DNS resolution is working properly. If the commands return an error or a different IP address, then there is a DNS issue.
To verify the correct IP address of the server, you can check the Private DNS zone of the Azure Database for MySQL Flexible server. The Private DNS zone is a service that provides name resolution for private endpoints within a virtual network (vNet). You can find the Private DNS zone in the properties of the overview blade of the server, as shown in the following figure:
Fig 3: Checking the private DNS zone in the Properties of overview blade
In the Private DNS zone, you can see the currently assigned IP address to the MySQL Flexible server, as shown in the following figure:
Fig 4: Private DNS Zone overview
Resolving DNS issues
The solution to fix DNS issues depends on the source and the network configuration of the server. In this blog, I will cover two common scenarios: when the source is using the default (Azure-provided) DNS, and when the source is using a custom DNS.
Scenario 1: Source is using the default (Azure-provided) DNS
The default (Azure-provided) DNS can only be used by sources in Azure that have private endpoint, vNet integration, or have IPs defined from a vNet. If you are using the default DNS and you are getting a DNS issue, you need to check the following:
vNet of the source: Check the vNet of the source (also check NIC level configuration in case of Azure VM) and make sure that it is set to Azure-provided DNS. You can check this on the vNet > DNS servers blade, as shown in the following figure:
Fig 5: DNS servers blade in virtual network
Private DNS zone of the server: Go to the Private DNS zone of the MySQL Flexible server and add the vNet of the source to the Virtual Network Link blade, as shown in the following figure:
Fig 6: Adding virtual network link to private DNS zone
After these steps, you should be able to ping and nslookup the server’s name from the source and get the correct IP address.
Scenario 2: Source is using a custom DNS
This is the most commonly used scenario by the users. This pattern can be used in a hub-and-spoke model and also for name resolution from on-premises servers. In this scenario, a custom DNS server is deployed in a hub vNet that is linked to the on-premises DNS server. It can also be deployed without having on-prem connectivity, as shown in the following figure:
Fig 7: Network diagram showing access through custom DNS server in Hub and Spoke network.
In this scenario, the MySQL Flexible server is deployed in a delegated subnet in Spoke2. Spoke1, Spoke2, and Spoke3 are connected through the Hub vNet. Spoke1 and Spoke3 have a custom DNS server configured which is deployed in the Hub vNet. Since both spoke vNets (1 and 3) are connected through the Hub vNet, clients can directly connect with the MySQL Flexible server with IP address only and DNS name resolution would not work.
To fix this issue, perform the following steps:
Conditional forwarder: Add a conditional forwarder on the custom DNS for mysql.database.azure.com domain. This conditional forwarder must point to the Azure DNS IP address: 168.63.129.16, as shown in the following figure:
Fig 8: Adding conditional forwarder for mysql.database.azure.com
Virtual network link: You need to add a virtual network link in the Private DNS zone for the custom DNS server’s vNet, as described in the previous scenario.
On-premises DNS: If you have clients on-premises that need to connect to the Flexible server FQDN, then you need to add a conditional forwarder in the on-premises DNS server pointing to the IP address of the custom DNS server in Azure for mysql.database.azure.com. Alternatively, you can use the same custom DNS IP in additional DNS servers on on-premises clients.
Conclusion
In this blog, I have shown you how to solve DNS issues with Azure Database for MySQL using different DNS scenarios. I hope this helps you to enjoy the benefits of using Azure Database for MySQL for your applications.
We are always interested in how you plan to use Flexible Server deployment options to drive innovation to your business and applications. Additional information on topics discussed above can be found in the following documents:
“Help technical users who had problem installing update KB5034441 2024-01-09 “0x80070643 – ERROR_INSTALL_FAILURE” Workaround: It might be necessary to increase the size of the WinRE partition in order to avoid this issue and complete the installation.”
“The content in this repository is highly valuable for beginners, as it not only introduces the concepts of generative AI but also provides hands-on examples and code snippets to help users understand and implement the techniques. The lessons cover a wide range of topics, including language models, semantic search, transformers, and more, giving learners a holistic understanding of generative AI.
Moreover, the repository is actively maintained and has received significant community engagement, with over 23.6k stars and 15k forks. This level of community activity demonstrates the value and popularity of the content. Additionally, the presence of 50 contributors indicates a collaborative environment where users can benefit from the expertise and insights of others in the field.
I have personally found this content to be highly informative and well-structured, making it an ideal resource for individuals looking to explore generative AI. I believe that this repository will greatly benefit those who are new to the field and provide them with a solid foundation to build upon.
As an MVP, I have written a blog post discussing the significance of generative AI and its potential applications in healthcare. In the blog post, I have highlighted the “Generative AI for Beginners” repository as an excellent starting point for individuals interested in learning more about this field. I have shared practical examples and insights from the repository to showcase the practicality and versatility of generative AI in the healthcare domain.
Additionally, I have organized a virtual event for the local developer community, where I conducted a workshop using the lessons from the “Generative AI for Beginners” repository. The event aimed to introduce beginners to the world of generative AI and provide them with hands-on experience in building their own models. The event received positive feedback, with participants expressing their appreciation for the comprehensive and beginner-friendly content provided by Microsoft.”
“This is a content that compiles all the installation methods for implementing Microsoft 365 security and compliance, and can be used as a reference when writing work or blog articles. It is also a very useful content for planning and proposals, as it serves as a guideline for design and includes license information, which is helpful when planning the order of implementation and construction.”
(In Japanese: Microsoft 365のセキュリティ、コンプライアンスの実装についてすべての設置方法がまとまっており、仕事やブログ記事を書く際にリファレンス的に参照することが可能なコンテンツ。企画、提案の際にも設計の指針になり、ライセンス情報も同コンテンツに記載があるため導入構築順などを計画する際にも役立つ非常に有用なコンテンツ。)
“This is a valuable article that delves deeper into the Microsoft Global Network and provides an answer to the question, ‘Does this connection architecture connect to the internet or not?”
(In Japanese: Microsoft Global Network について一歩踏み込んで「この接続アーキテクチャはインターネットに出るのか否か」に答えを与えてくれる、ありがたい記事です。)
This article is contributed. See the original author and article here.
Power Platform and Low Code are a fast-growing practice area for many partners and we want to hear from you about how you are building and expanding this practice and the type of services you offer, so that we can share back broad trends and insights with the partner community.
We are currently conducting a survey to identify and define the value partners realize through their relationship with Microsoft and Power Platform. This research is being done by IDC’s Channels and Alliances Research Group on behalf of Microsoft. Please use this link to take the survey: https://aka.ms/PowerPartnerProfitabilitySurvey. It takes approximately 10-15 minutes and we recommend that it is completed by your Power Platform practice lead. The questions included are related to Microsoft and Power Platform revenue growth, profit across resale, services and/or software, investments in your Power Platform practice, and Microsoft activities/programs that drive success.
We’re interested in learning about your practice development and the profitability of your Power Platform business. The information you provide will be aggregated and used in an IDC eBook, and will help Microsoft improve its partner strategy and programs related to Power Platform.
This article is contributed. See the original author and article here.
Let’s say you work for a company that has a lot of APIs. You might have a few questions:
How do you manage the lifecycle of those APIs?
What governance would you apply to these APIs?
What is the list of environments needed to manage these APIs?
What are the deployment strategies for those APIs?
How would you integrate those APIs with other services?
As your company’s number of APIs increases, so does the complexity of managing them. Azure API Center (APIC) is a central repository for your APIs lifecycle management, and it offers the more efficient ways for management. Throughout this post, I will take a first look at what Azure API Center is and what it offers.
I’m not going to discuss how to provision an APIC instance in this article. But here’s the reference you can do it by yourself through Bicep – Azure API Center Sample
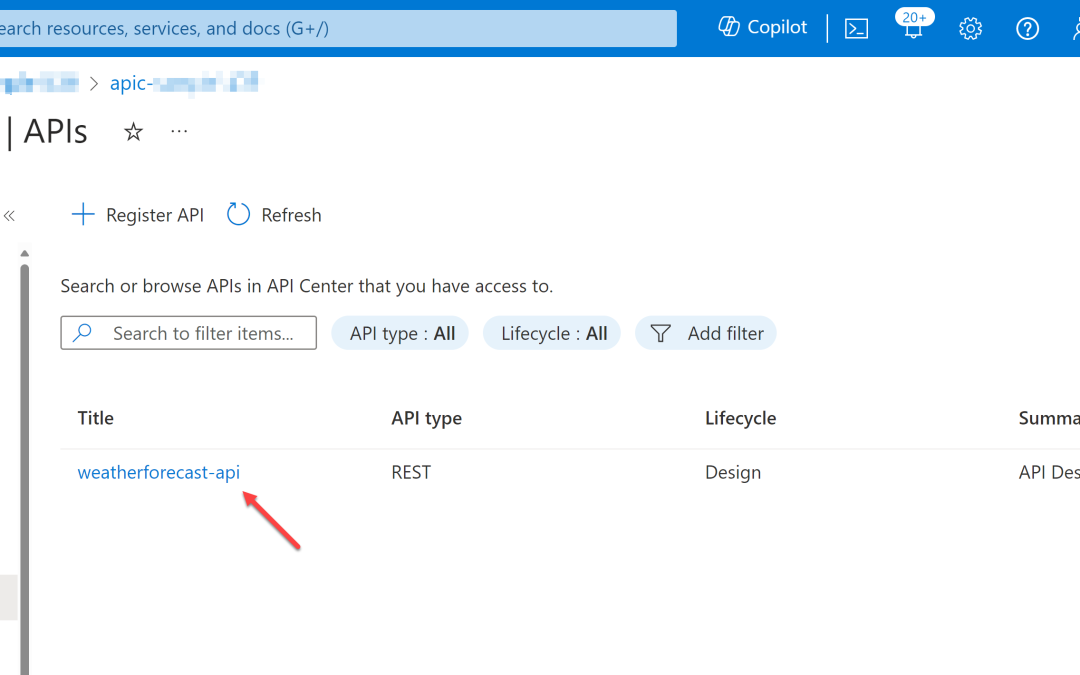
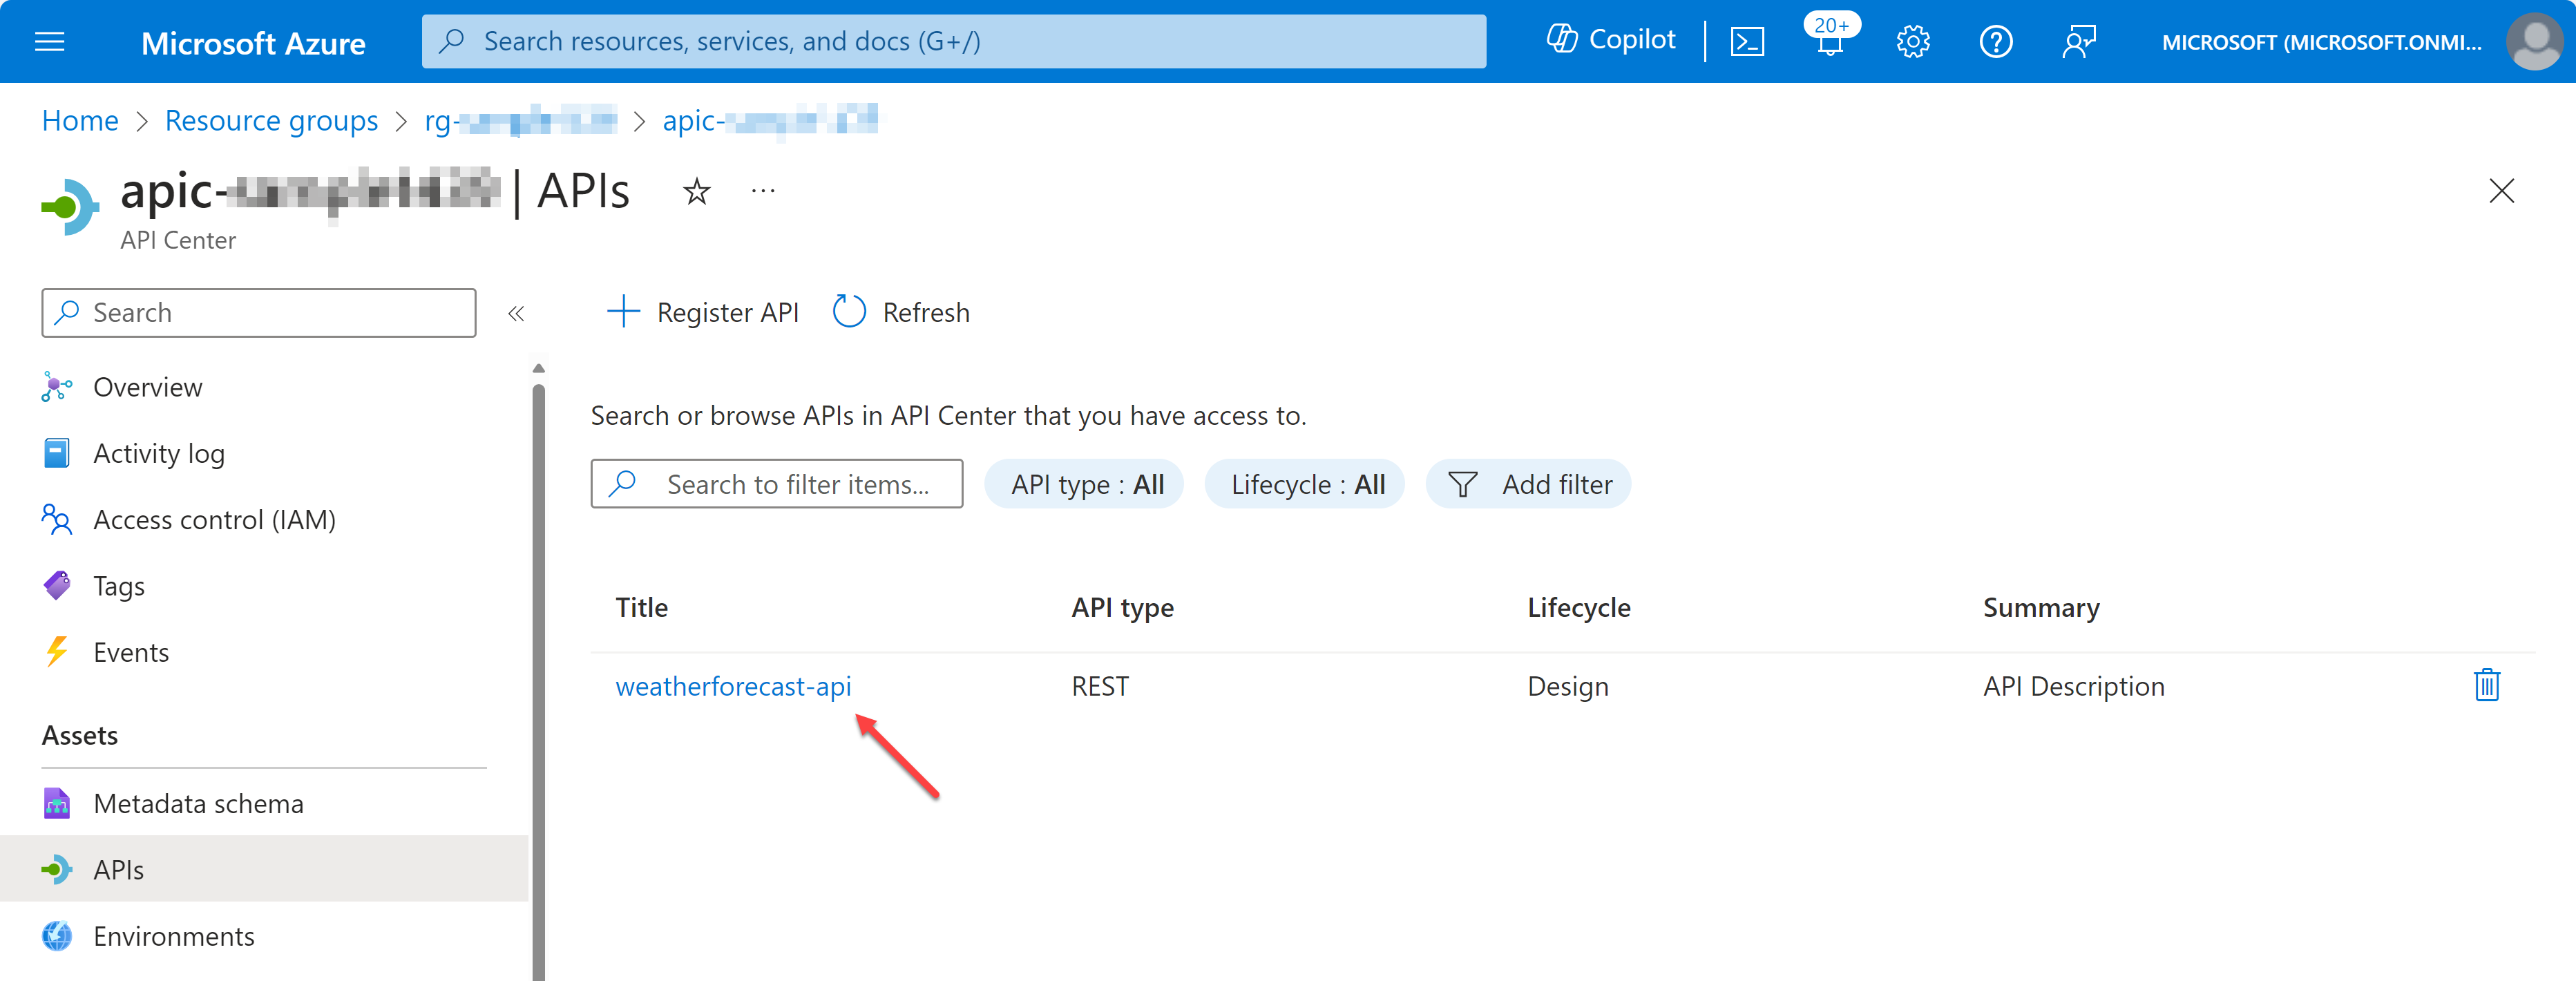
Register APIs to APIC
The purpose of using APIC is to manage your company’s APIs in a centralised manner. From design to deployment, APIC tracks all the histories. To register your APIs to APIC, you can use either Azure CLI or Azure Portal.
Let’s say there’s a weather forecast API you have designed and developed. You have an OpenAPI document for the API, but not implemented yet. Let’s register the API to APIC.
az apic api register
    -g "my-resource-group"
    -s "my-api-center"
    --api-location ./weather-forecast.json
If you want to register another API through the Azure Portal, you can do it by following the official documentation.
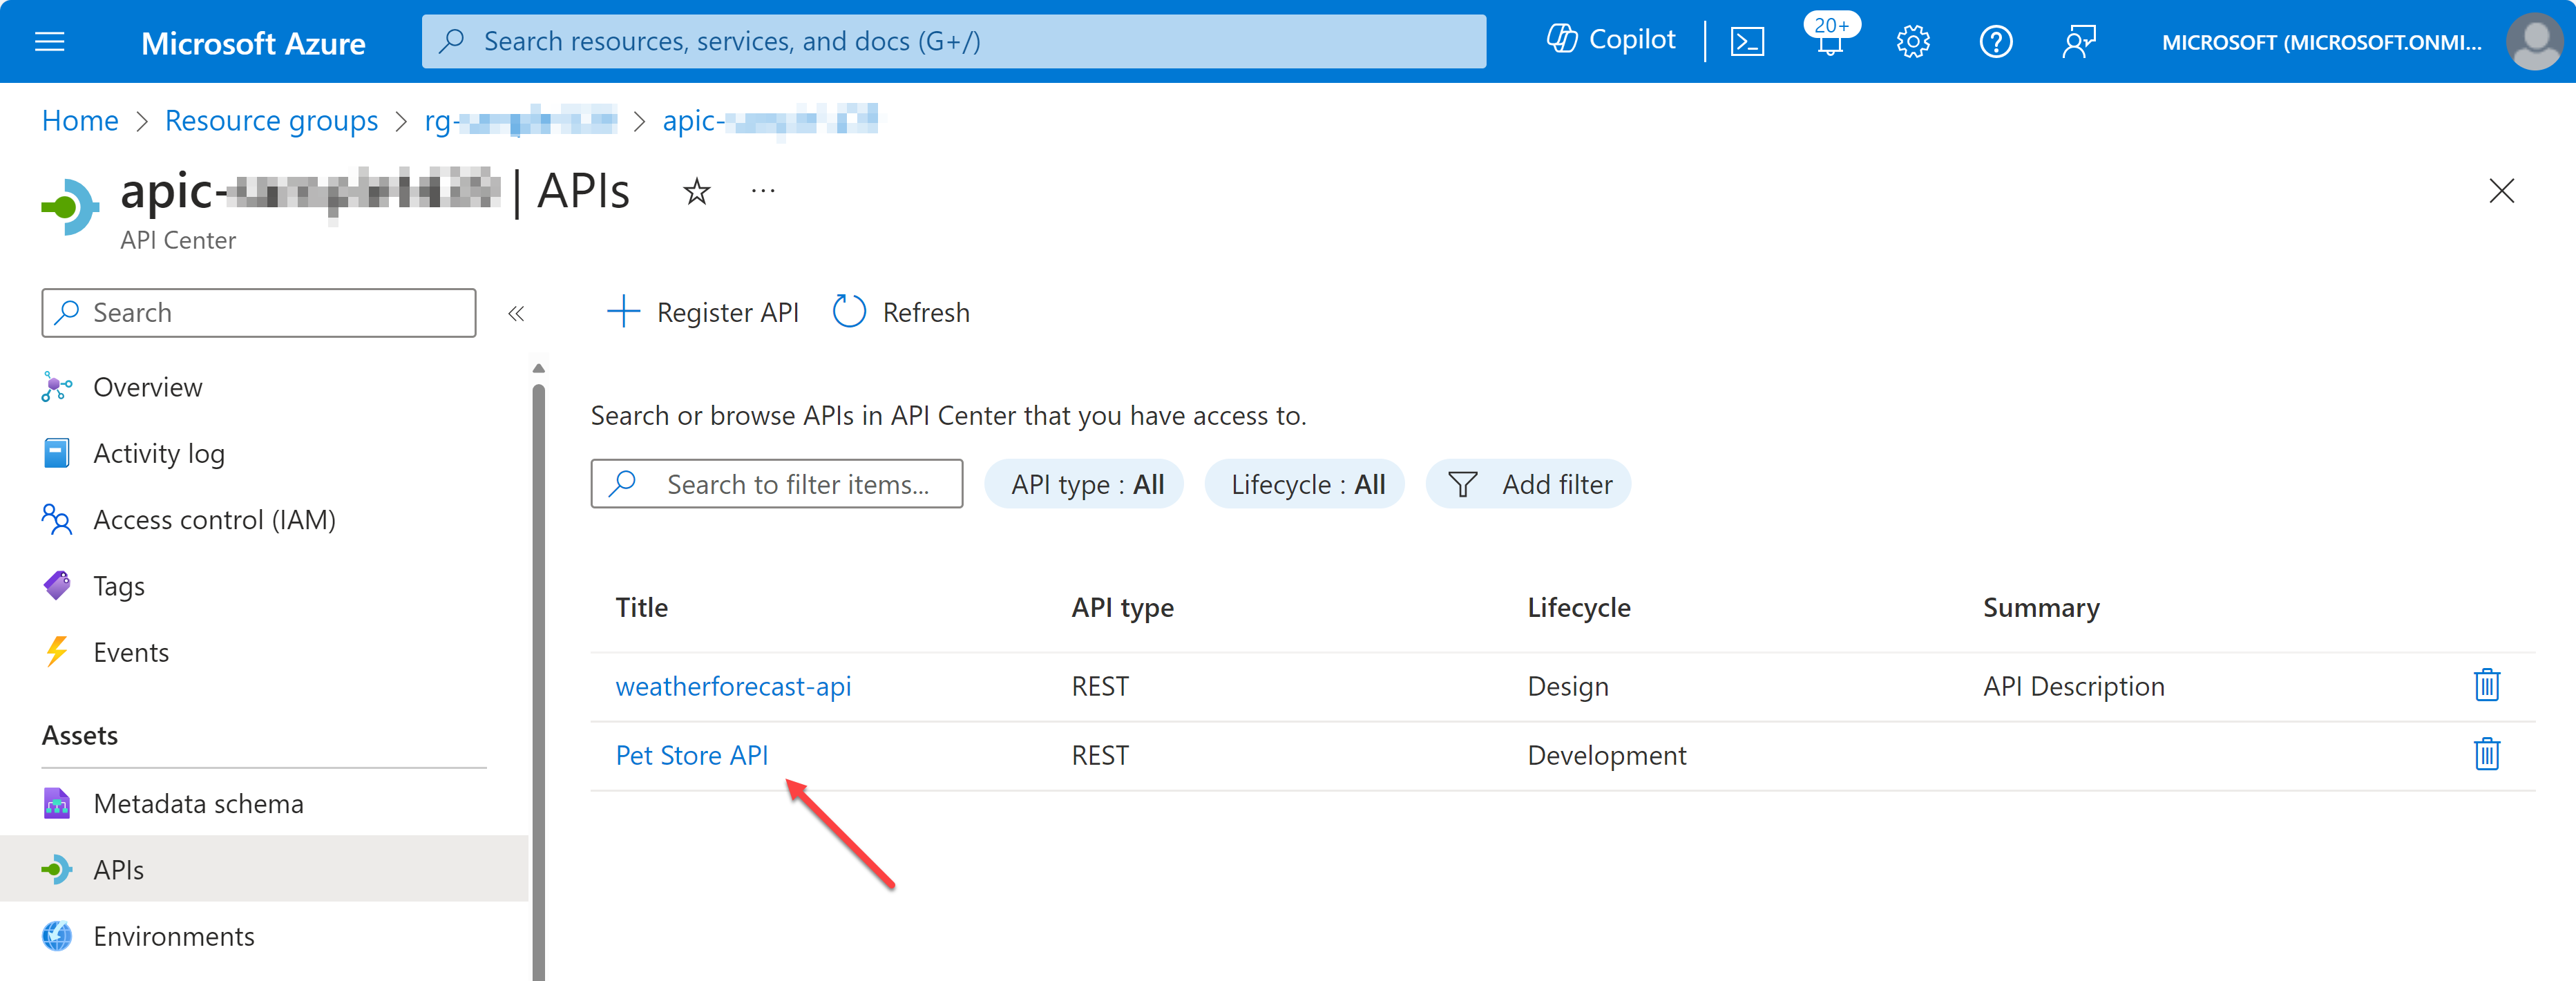
Import APIs from API Management to APIC
If you have already working APIs in Azure API Management (APIM), you can import them to APIC through Azure CLI. But it requires a few more steps to do so.
First of all, you need to activate Managed Identity to the APIC instance. It can be either system identity or user identity, but I’m going to use the system identity for now.
az apic service update
    -g "my-resource-group"
    -s "my-api-center"
    --identity '{ "type": "SystemAssigned" }'
Then, get the principal ID of the APIC instance.
APIC_PRINCIPAL_ID=$(az apic service show
    -g "my-resource-group"
    -s "my-api-center"
    --query "identity.principalId" -o tsv)
Now, register the APIC instance to the APIM instance as an APIM reader.
APIM_RESOURCE_ID=$(az apim show
    -g "my-resource-group"
    -s "my-api-center"
    --query "id" -o tsv)

az role assignment create
    --role "API Management Service Reader Role"
    --assignee-object-id $APIC_PRINCIPAL_ID
    --assignee-principal-type ServicePrincipal
    --scope $APIM_RESOURCE_ID
And finally, import APIs from APIM to APIC.
az apic service import-from-apim
    -g "my-resource-group"
    -s "my-api-center"
    --source-resource-ids "$APIM_RESOURCE_ID/apis/*"
Now, you have registered and imported APIs to APIC. But registering those APIs to APIC does nothing to do with us. What’s next then? Let’s play around those APIs on Visual Studio Code.
View APIs on Visual Studio Code – Swagger UI
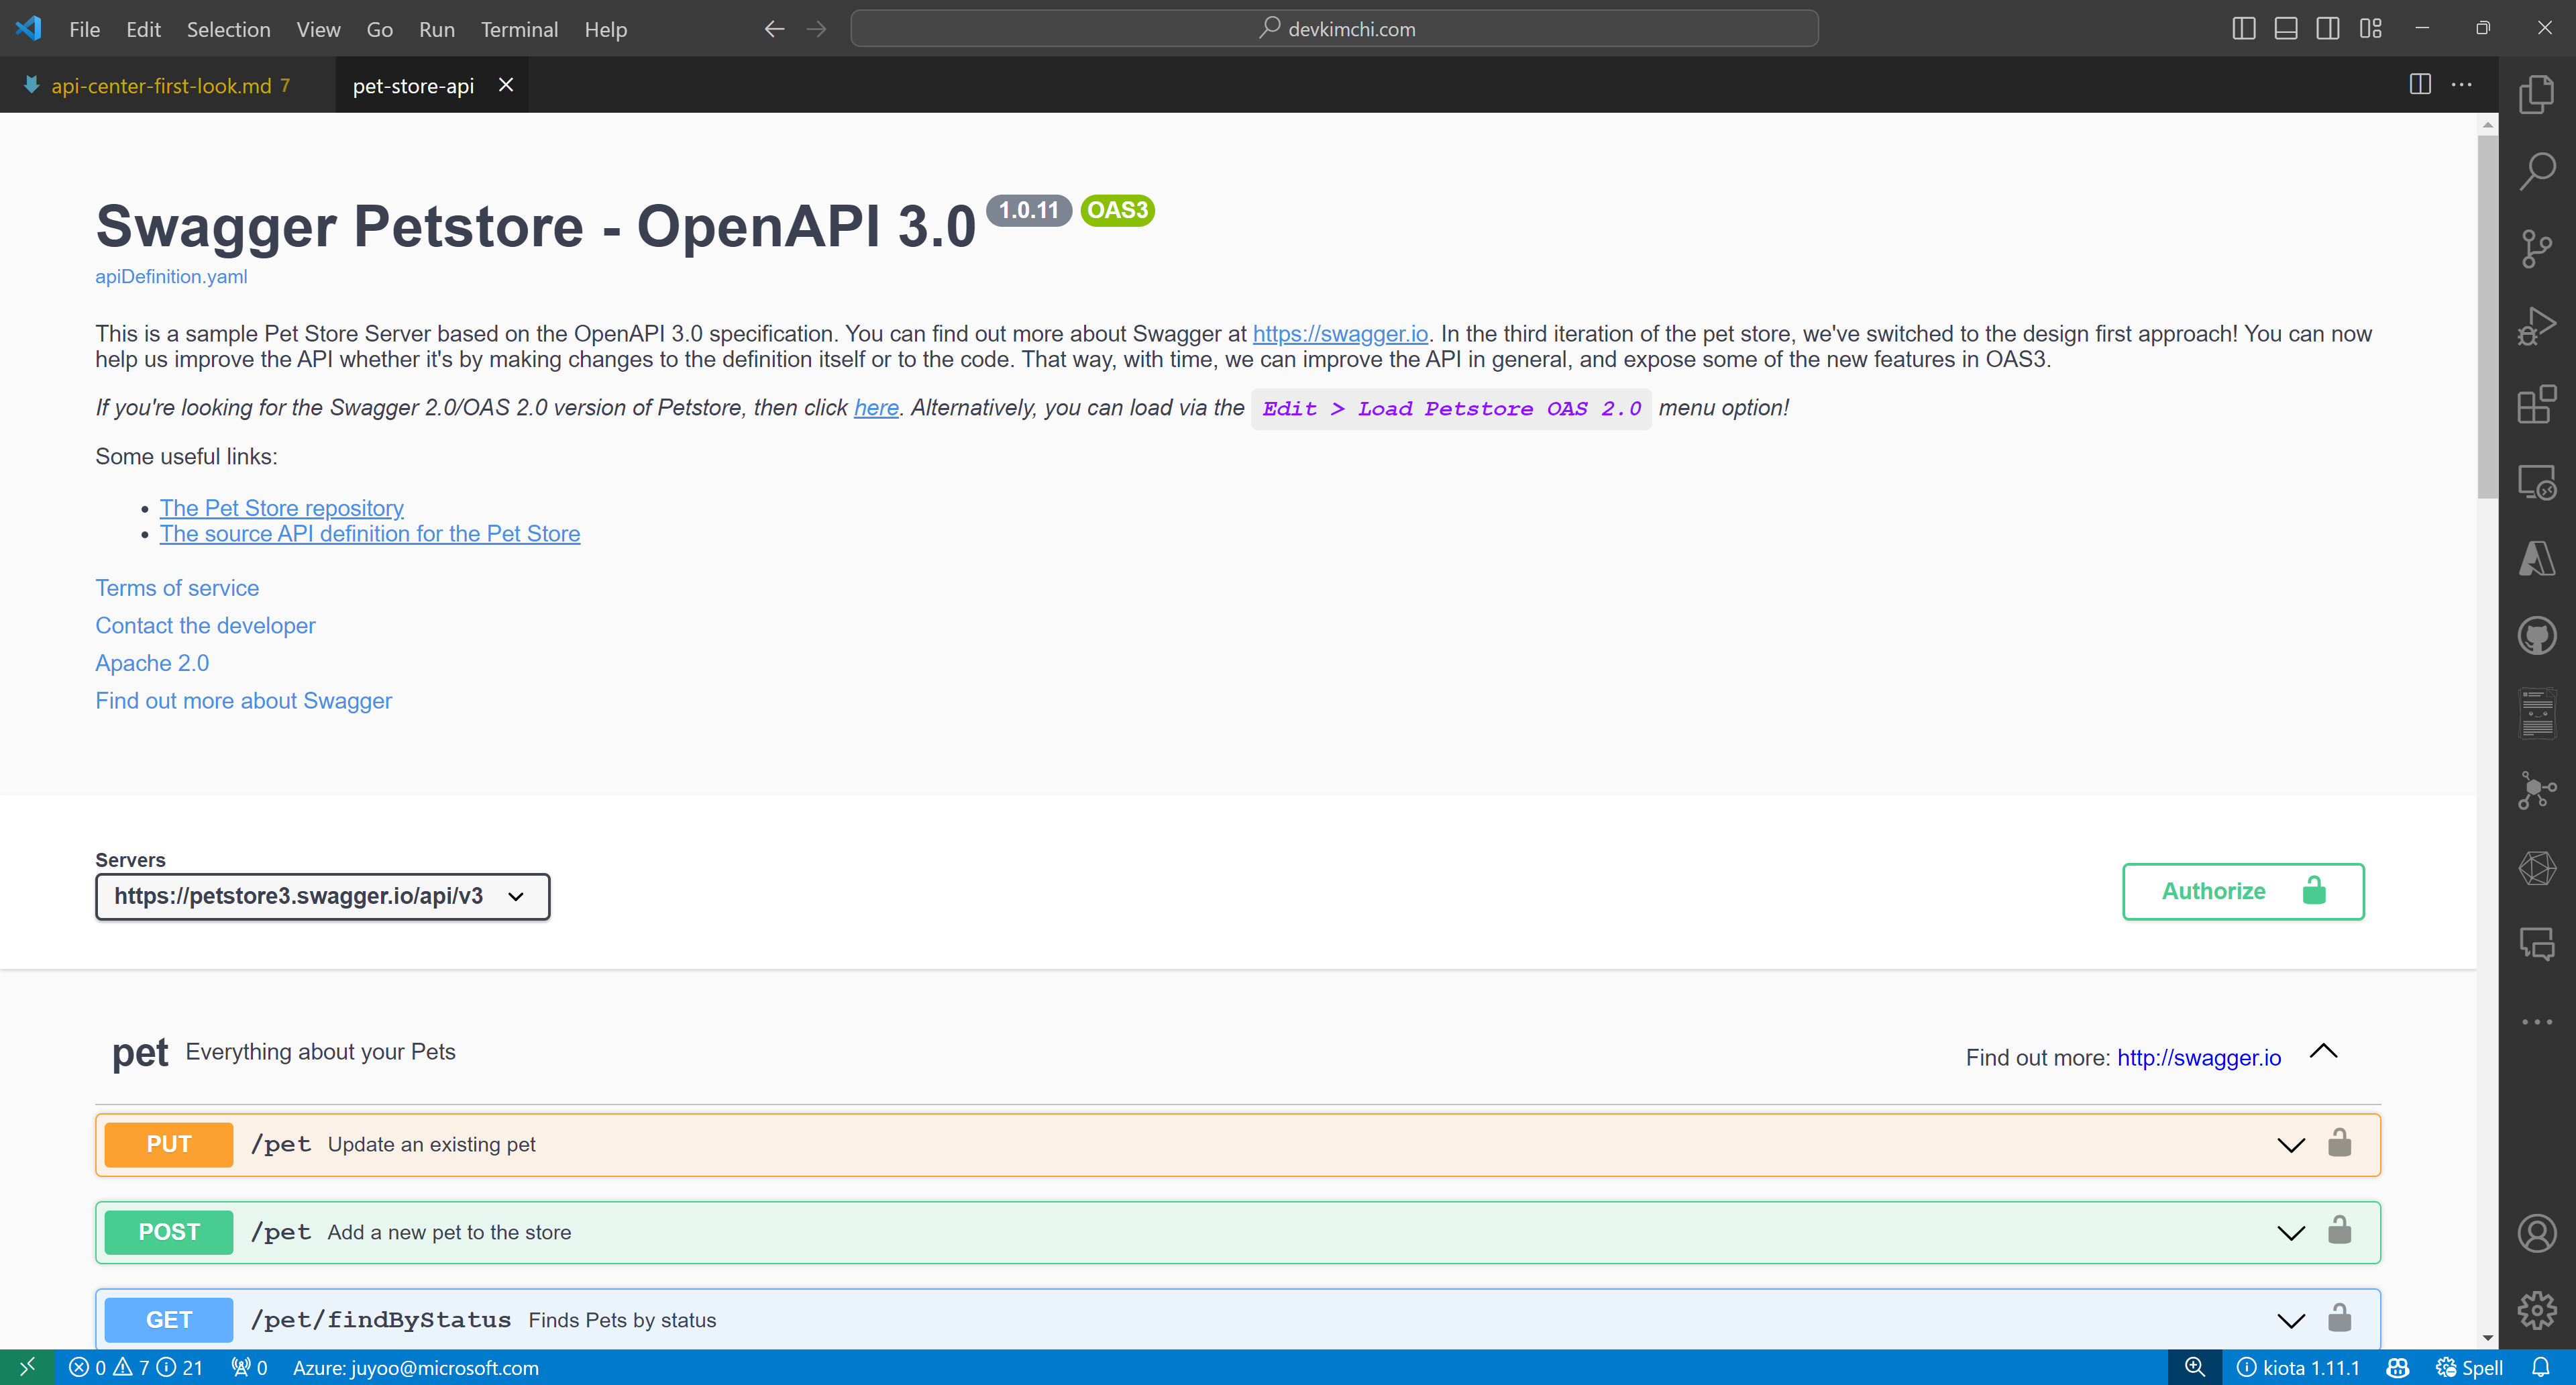
So, what can you do with the APIs registered and imported to APIC? You can view the list of APIs on Visual Studio Code. First, you need to install the Azure API Center extension on Visual Studio Code.
Once you install the extension, you can see the list of APIs on the extension. Choose one of the APIs and right-click on it. Then, you can see the context menu. Click on the Open API Documentation menu item.
You will see the Swagger UI page, showing your API document. With this Swagger UI, you can test your API endpoints.
Test APIs on Visual Studio Code – Rest Client
Although you can test your API endpoints on the Swagger UI, you can also test them in a different way. For this, you need to install the Rest Client extension on Visual Studio Code.
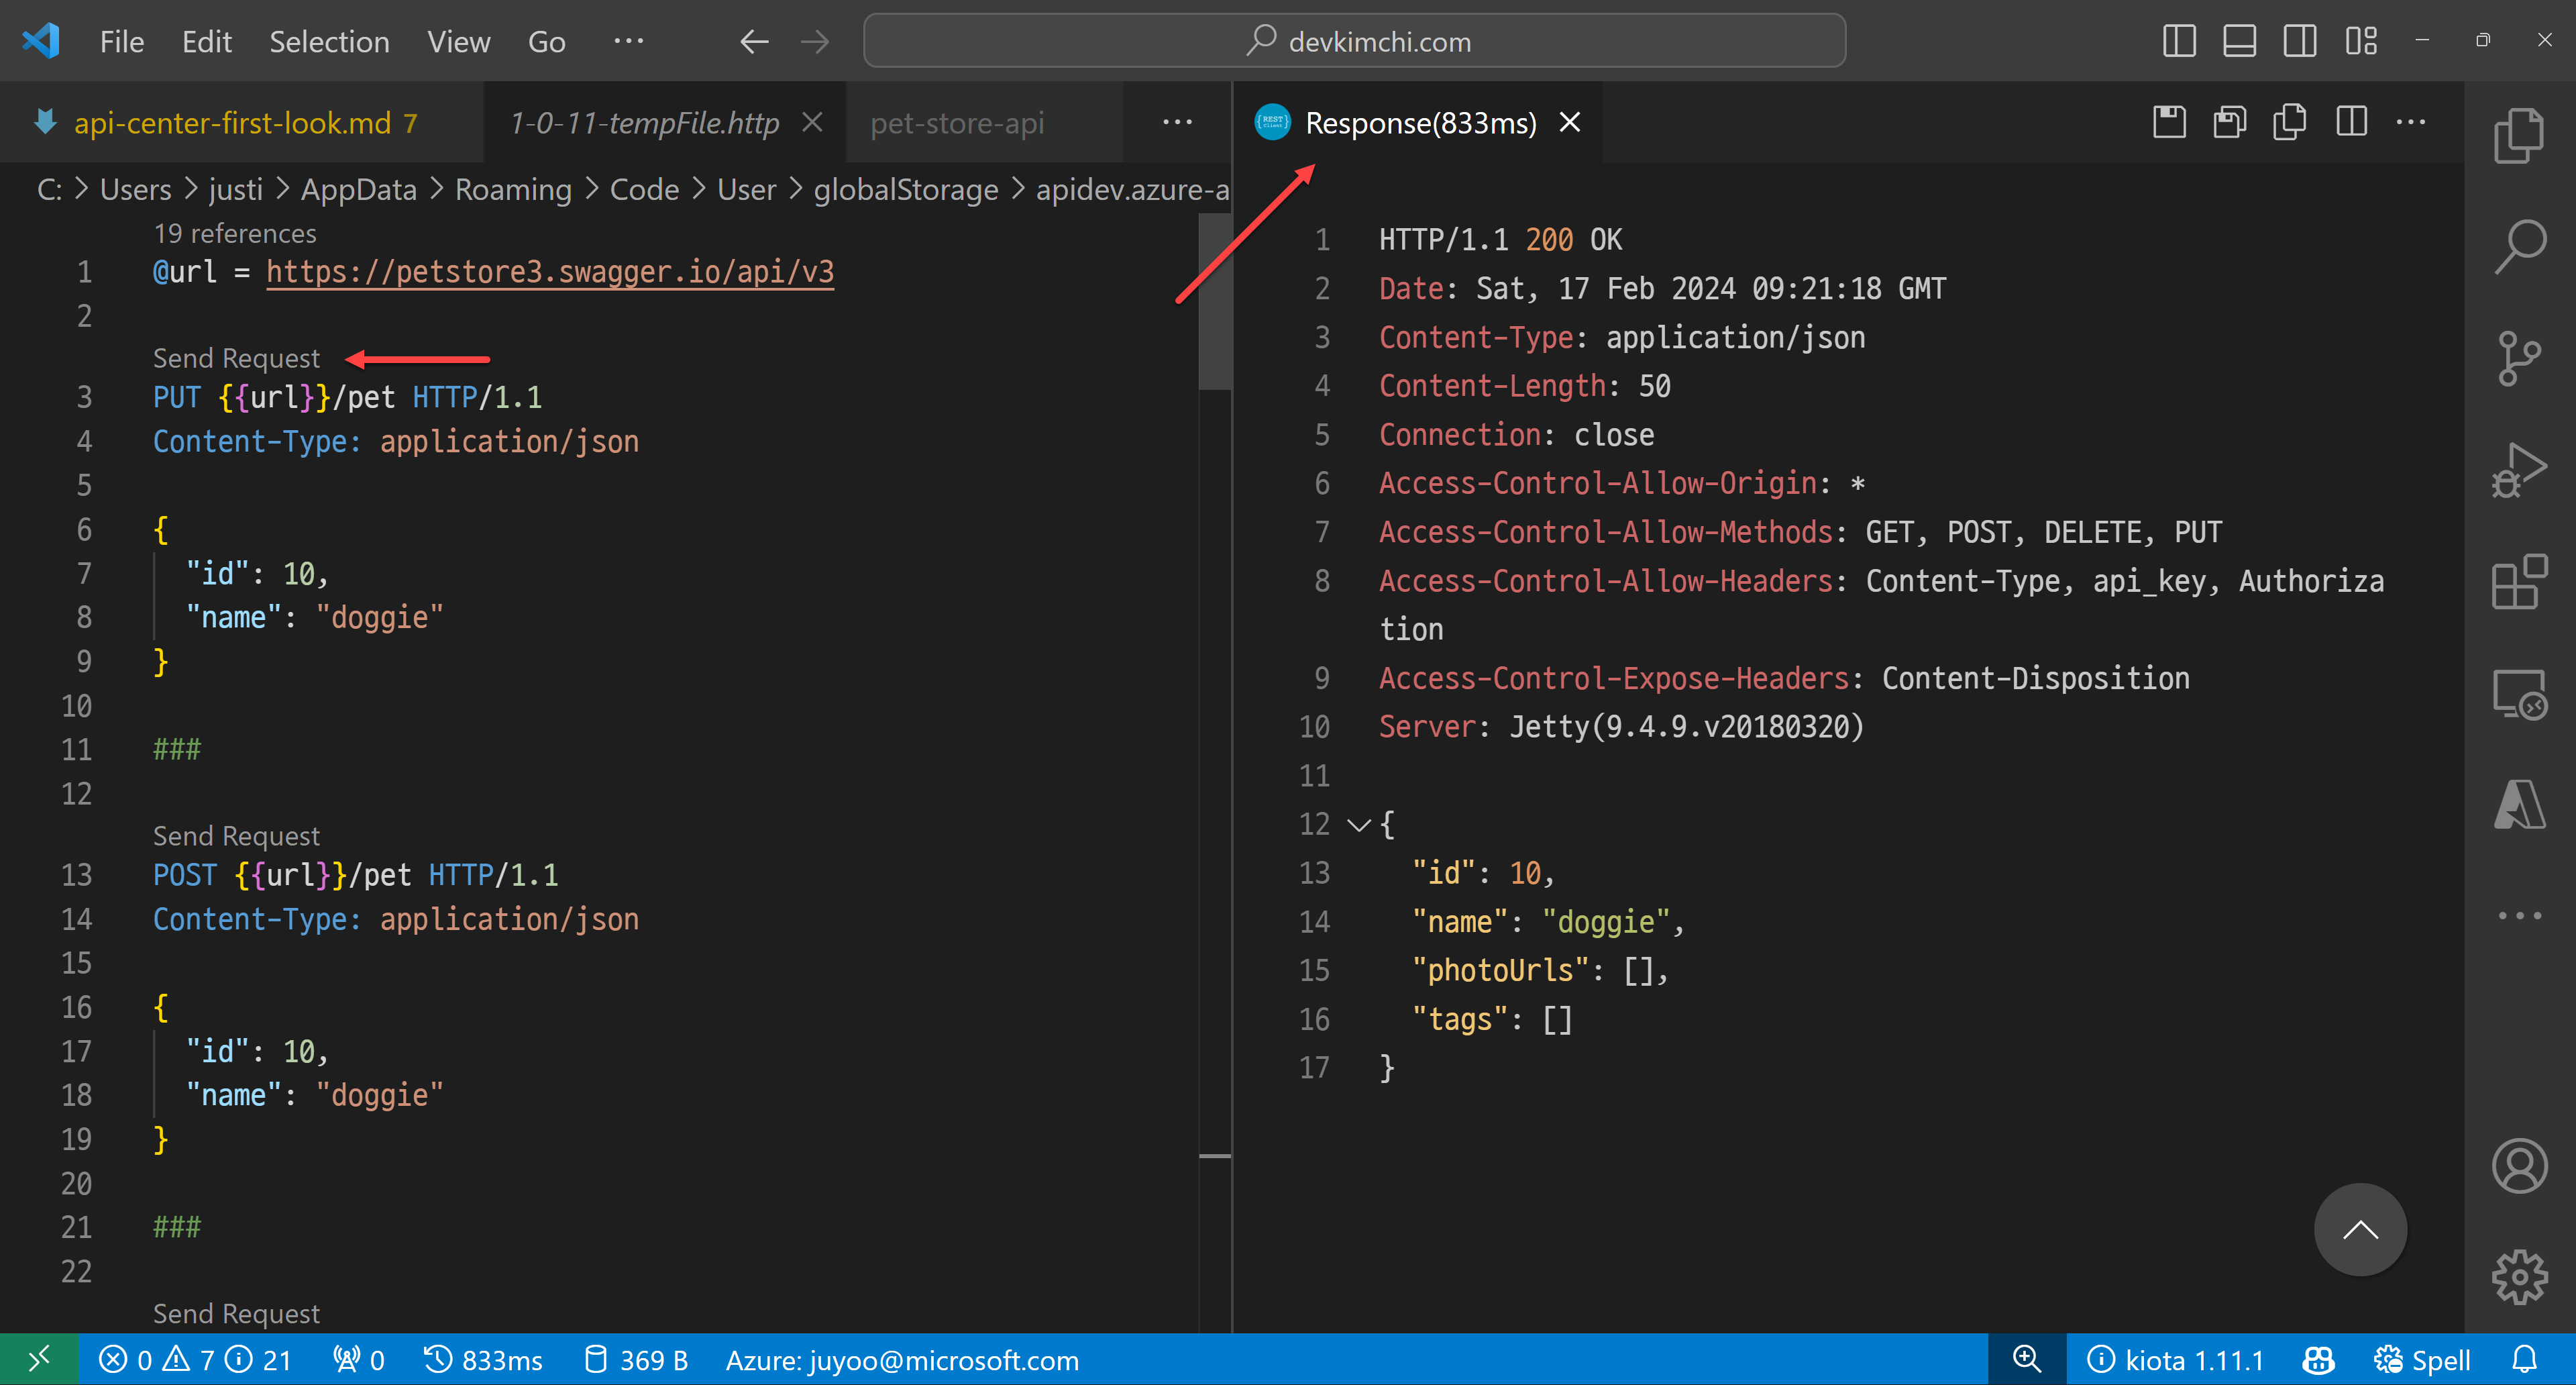
After you install the extension, choose one of the APIs and right-click on it. Then, you can see the context menu. Click on the Generate HTTP File menu item.
Within the HTTP file, you can actually test your API endpoints with different payloads.
Generate client SDK on Visual Studio Code – Kiota
You can write up the client SDK by yourself. But it’s time consuming and fragile because the API can change at any time. But what if somebody or a tool creates the client SDK on your behalf?
One of the greatest features of this APIC extension offers is to generate client SDKs. You can generate the client SDKs for your APIs in different languages. Although the API itself has no implementation yet, you can still work with the client SDK because you know what you need to send and what you will receive in return through the SDK. For this, you need to install the Kiota extension on Visual Studio Code.
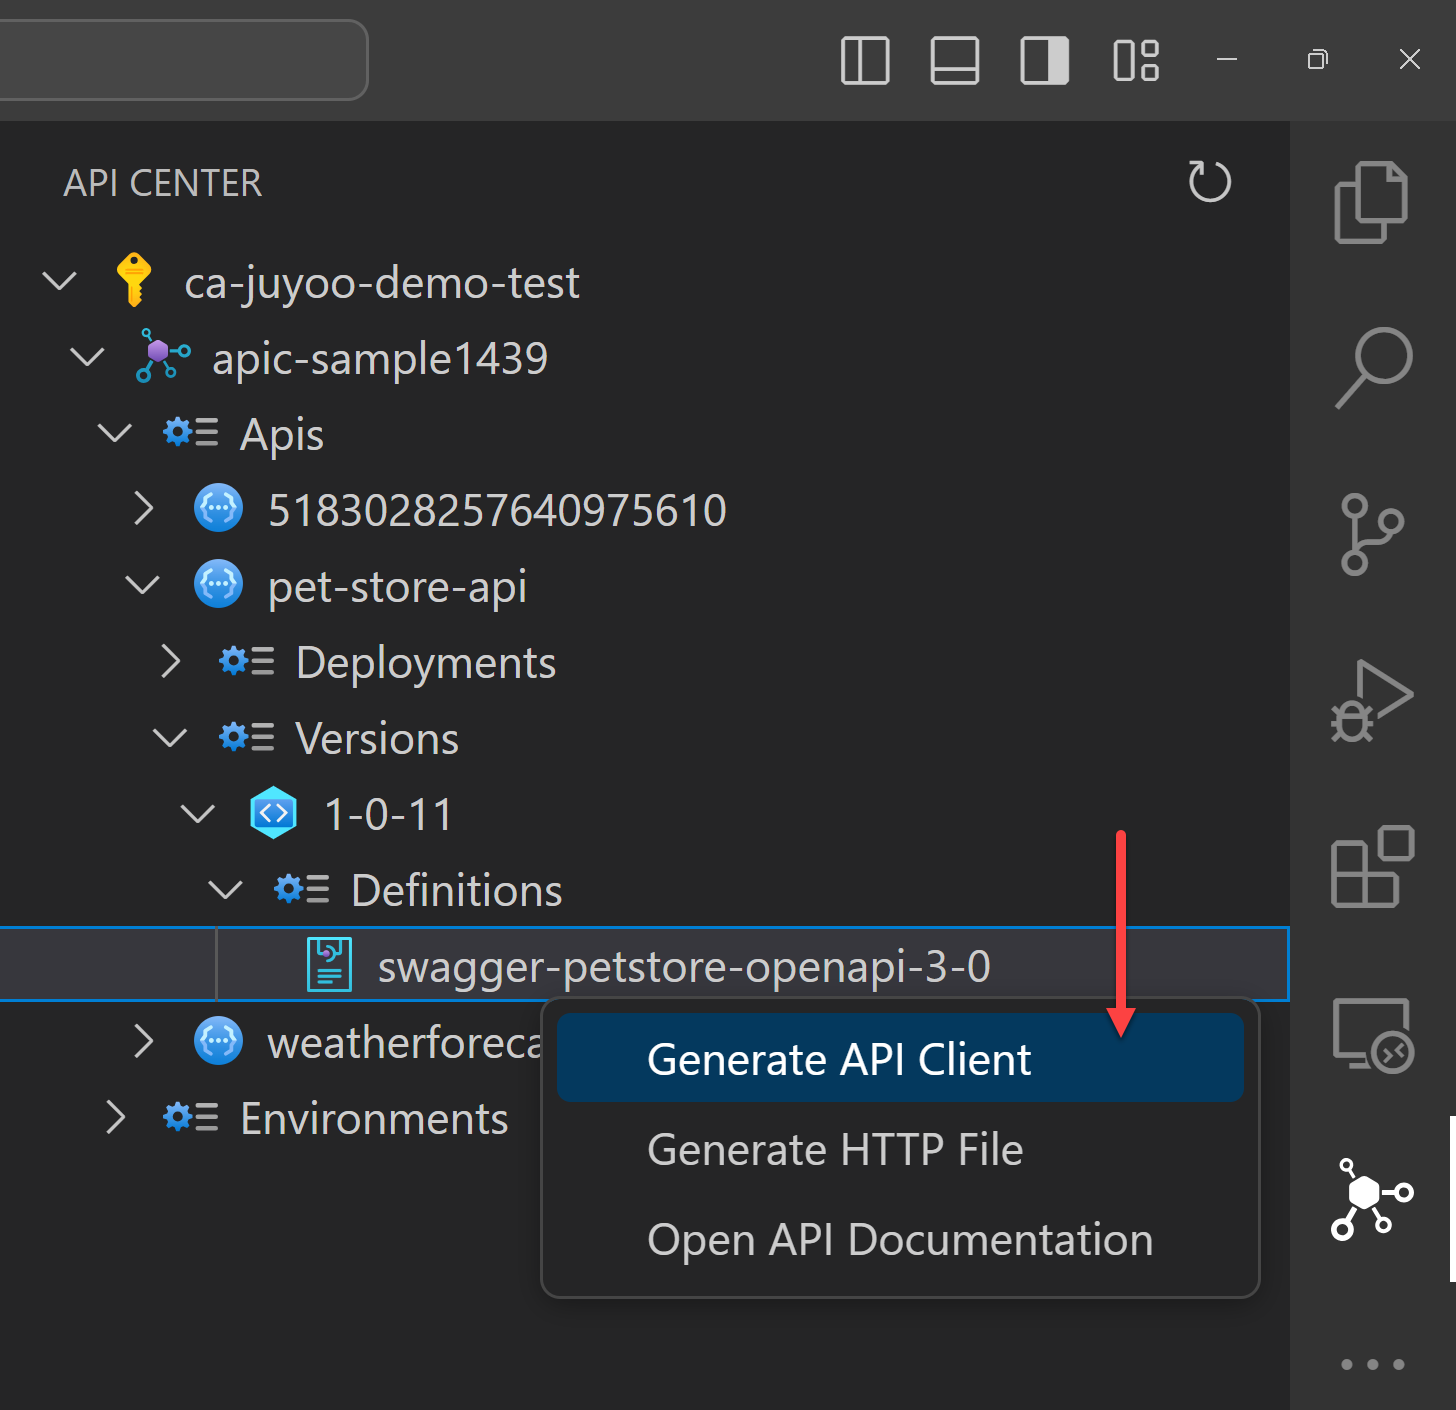
After you install the extension, choose one of the APIs and right-click on it. Then, you can see the context menu. Click on the Generate API Client menu item.
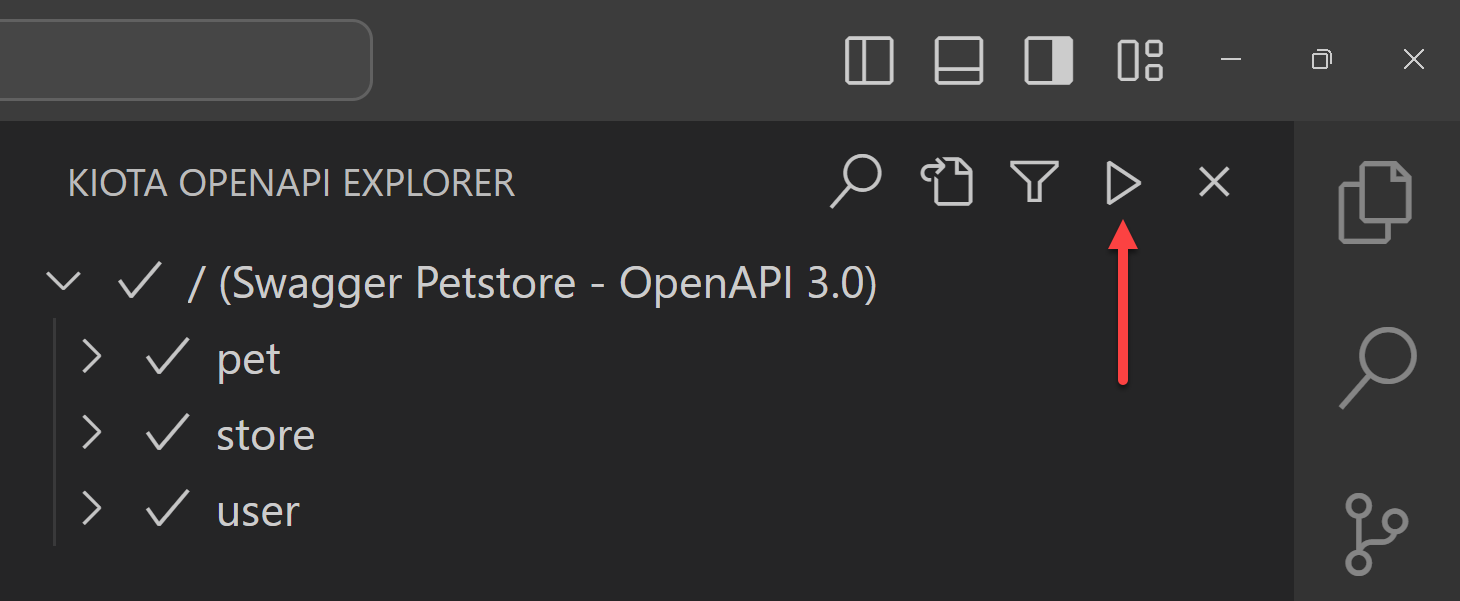
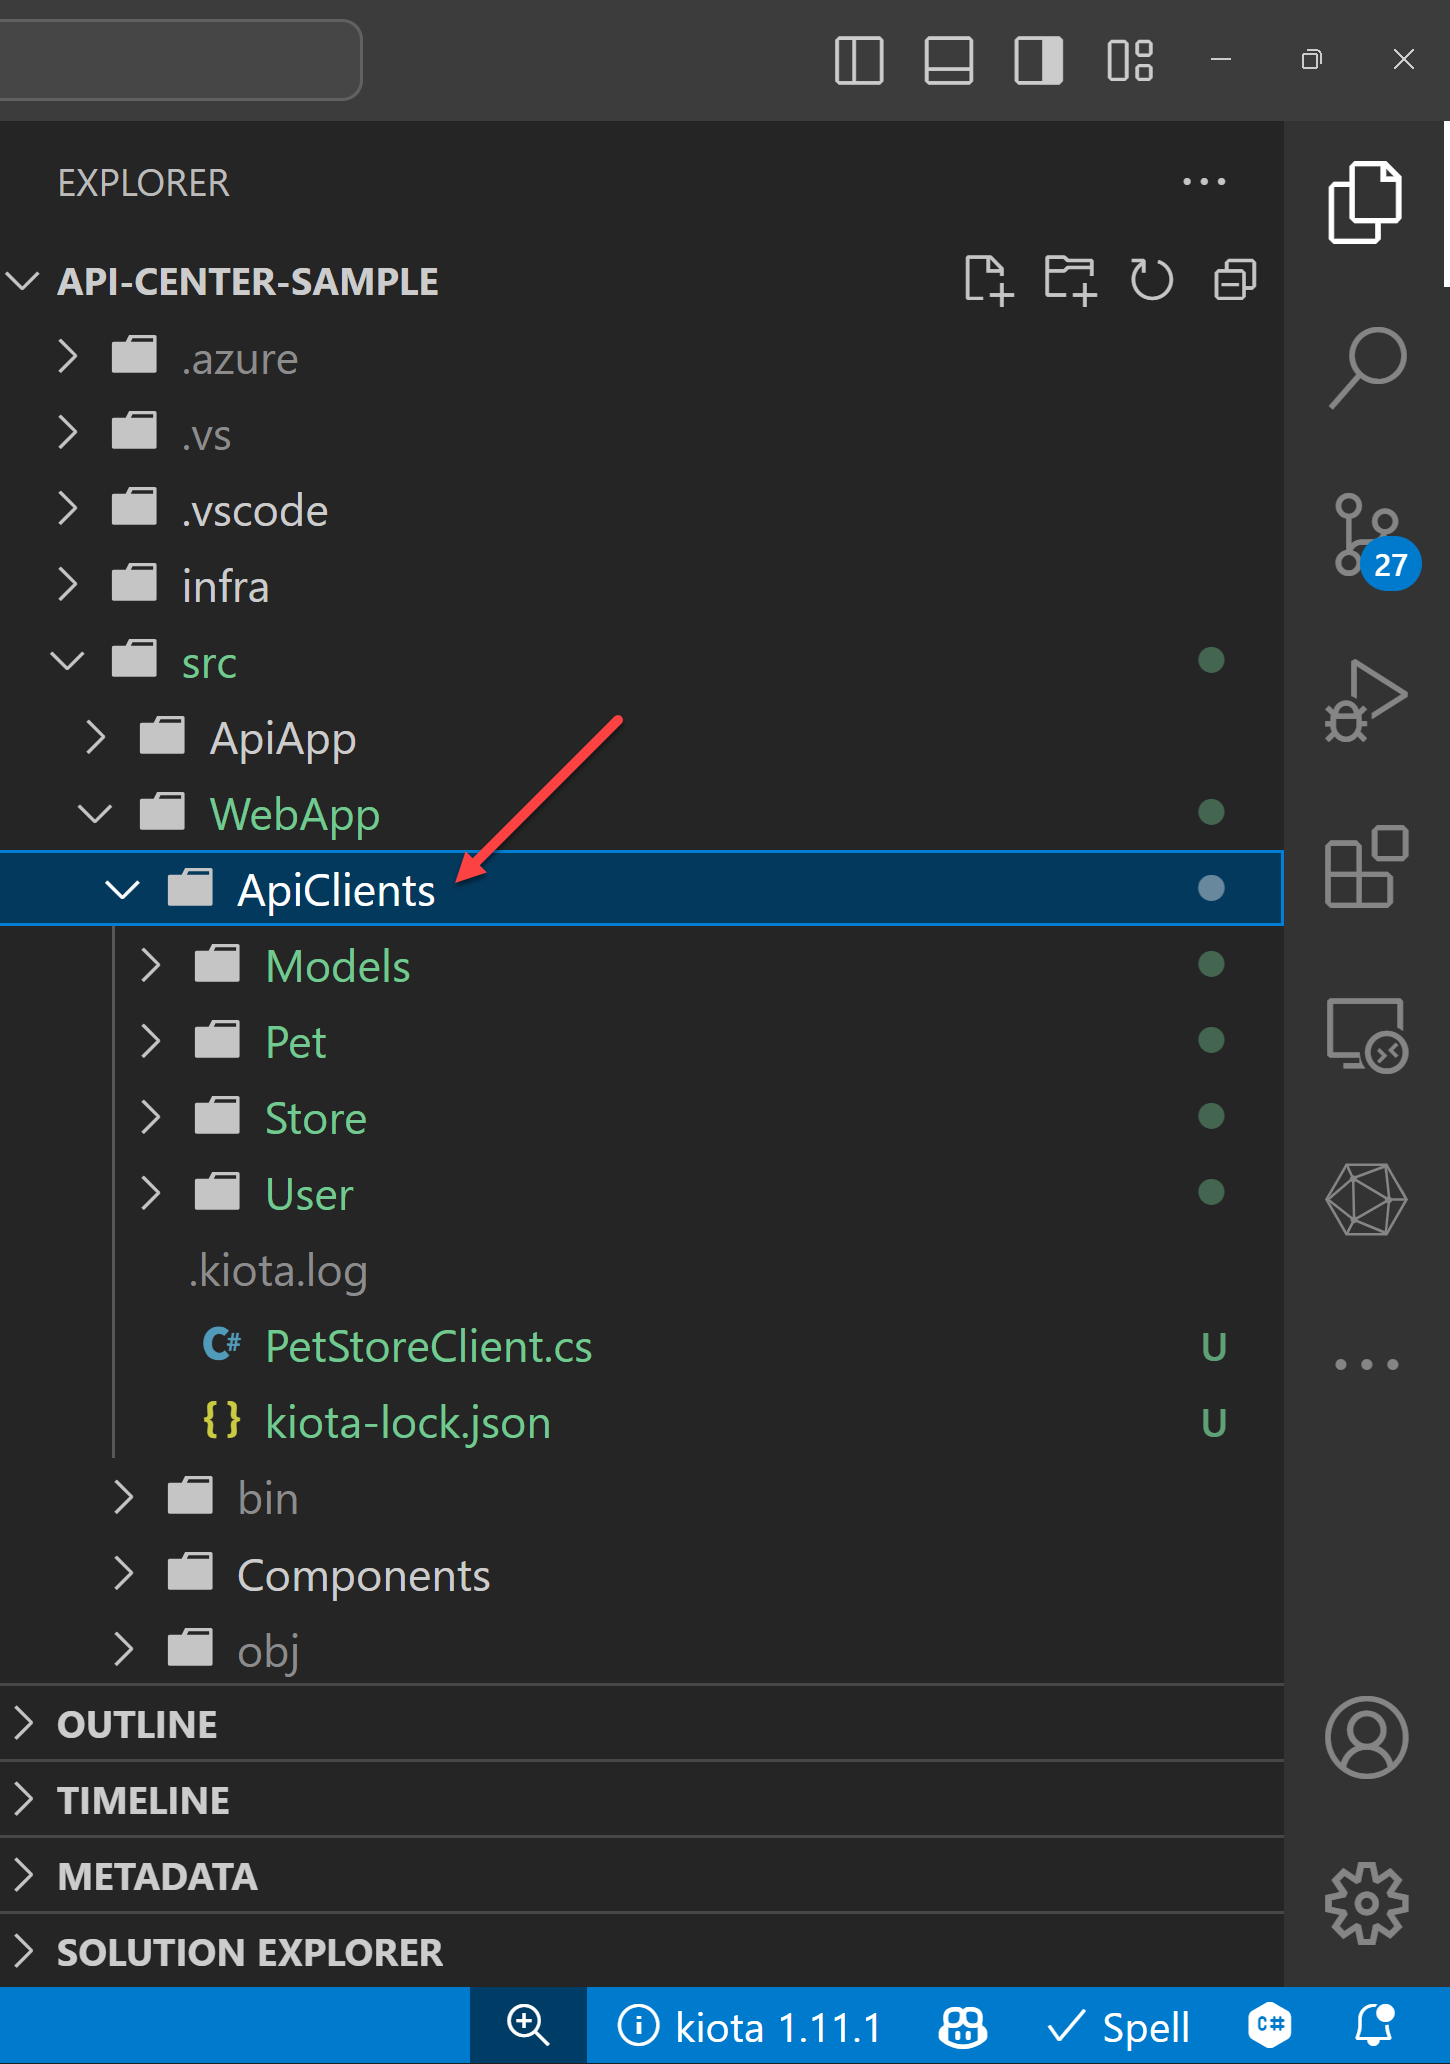
Because I have a Blazor web application, I’m going to generate a C# client SDK for the API. The Kiota extension finds out all the API endpoints from APIC. You can choose them all or just a few of them. Click the :play_button: button, and it generates the client SDK for you.
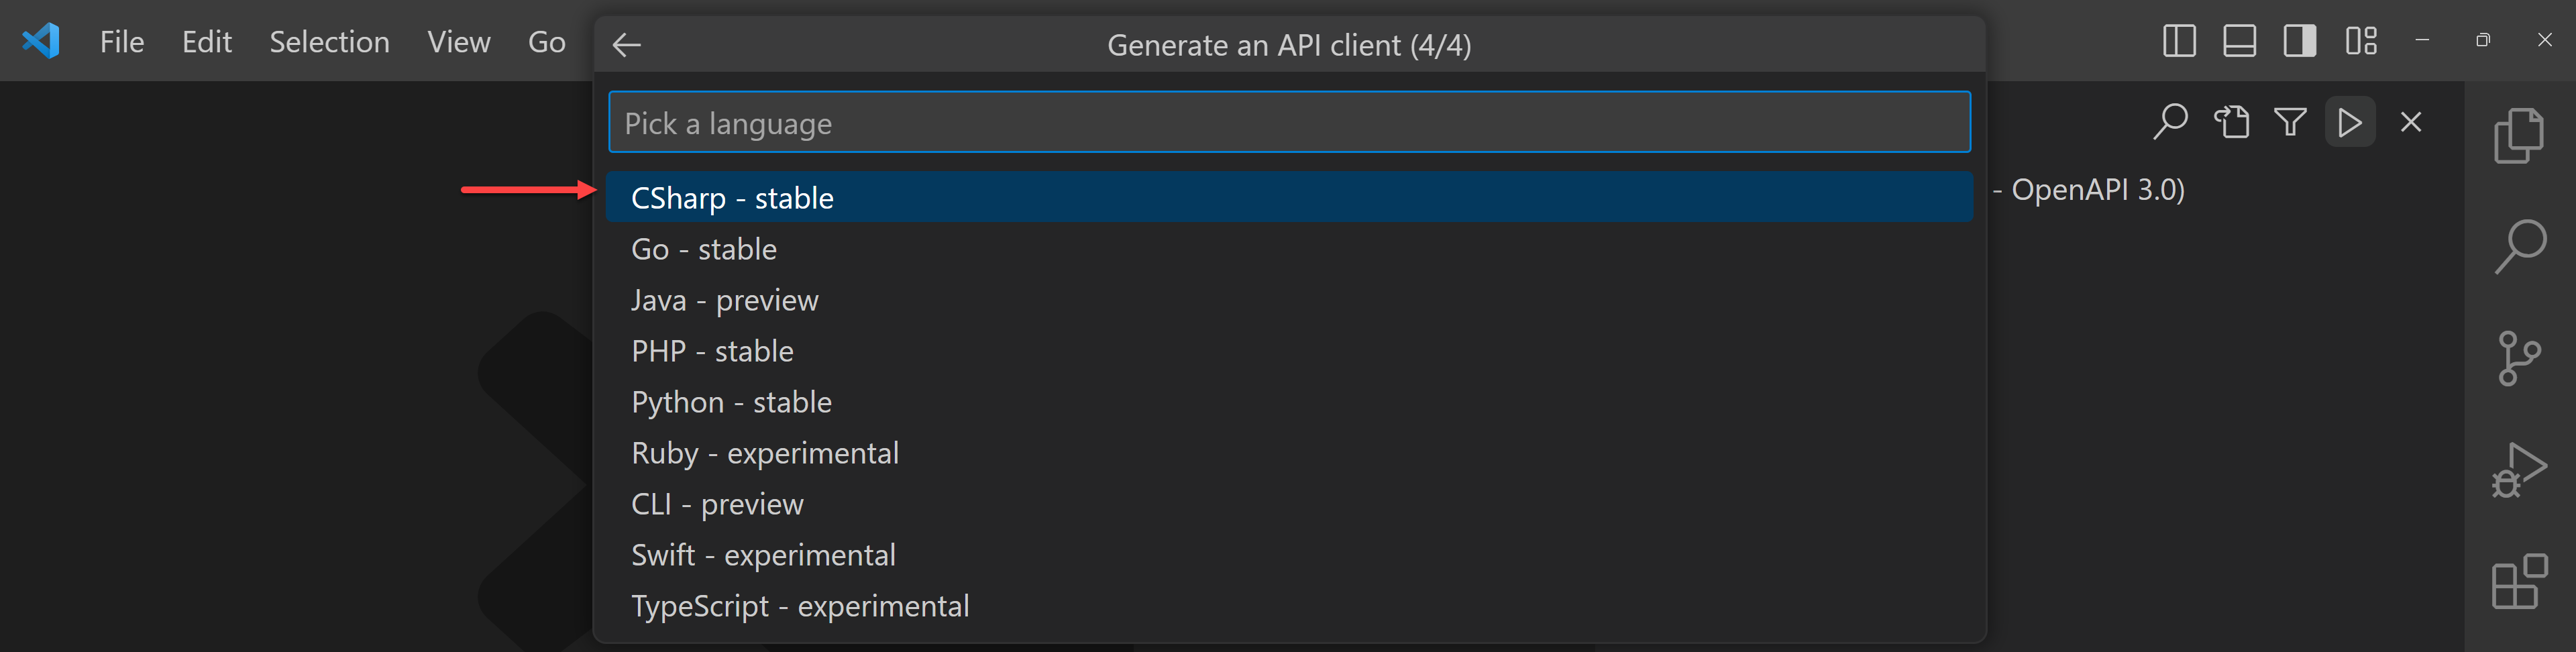
Add the necessary information like class name and namespace of the client SDK, and output folder. Finally it asks in which language to generate the client SDK. There are currently 9 languages available for now. I’m going to choose C#.
The Kiota extension then generates the client SDK into the designated directory.
Consume the generated client SDK within an application
Now, the client SDK has been generated by the Kiota extension from APIC to my Blazor application. Because it uses the Kiota libraries, I need to install the following Kiota NuGet packages to my Blazor web application.
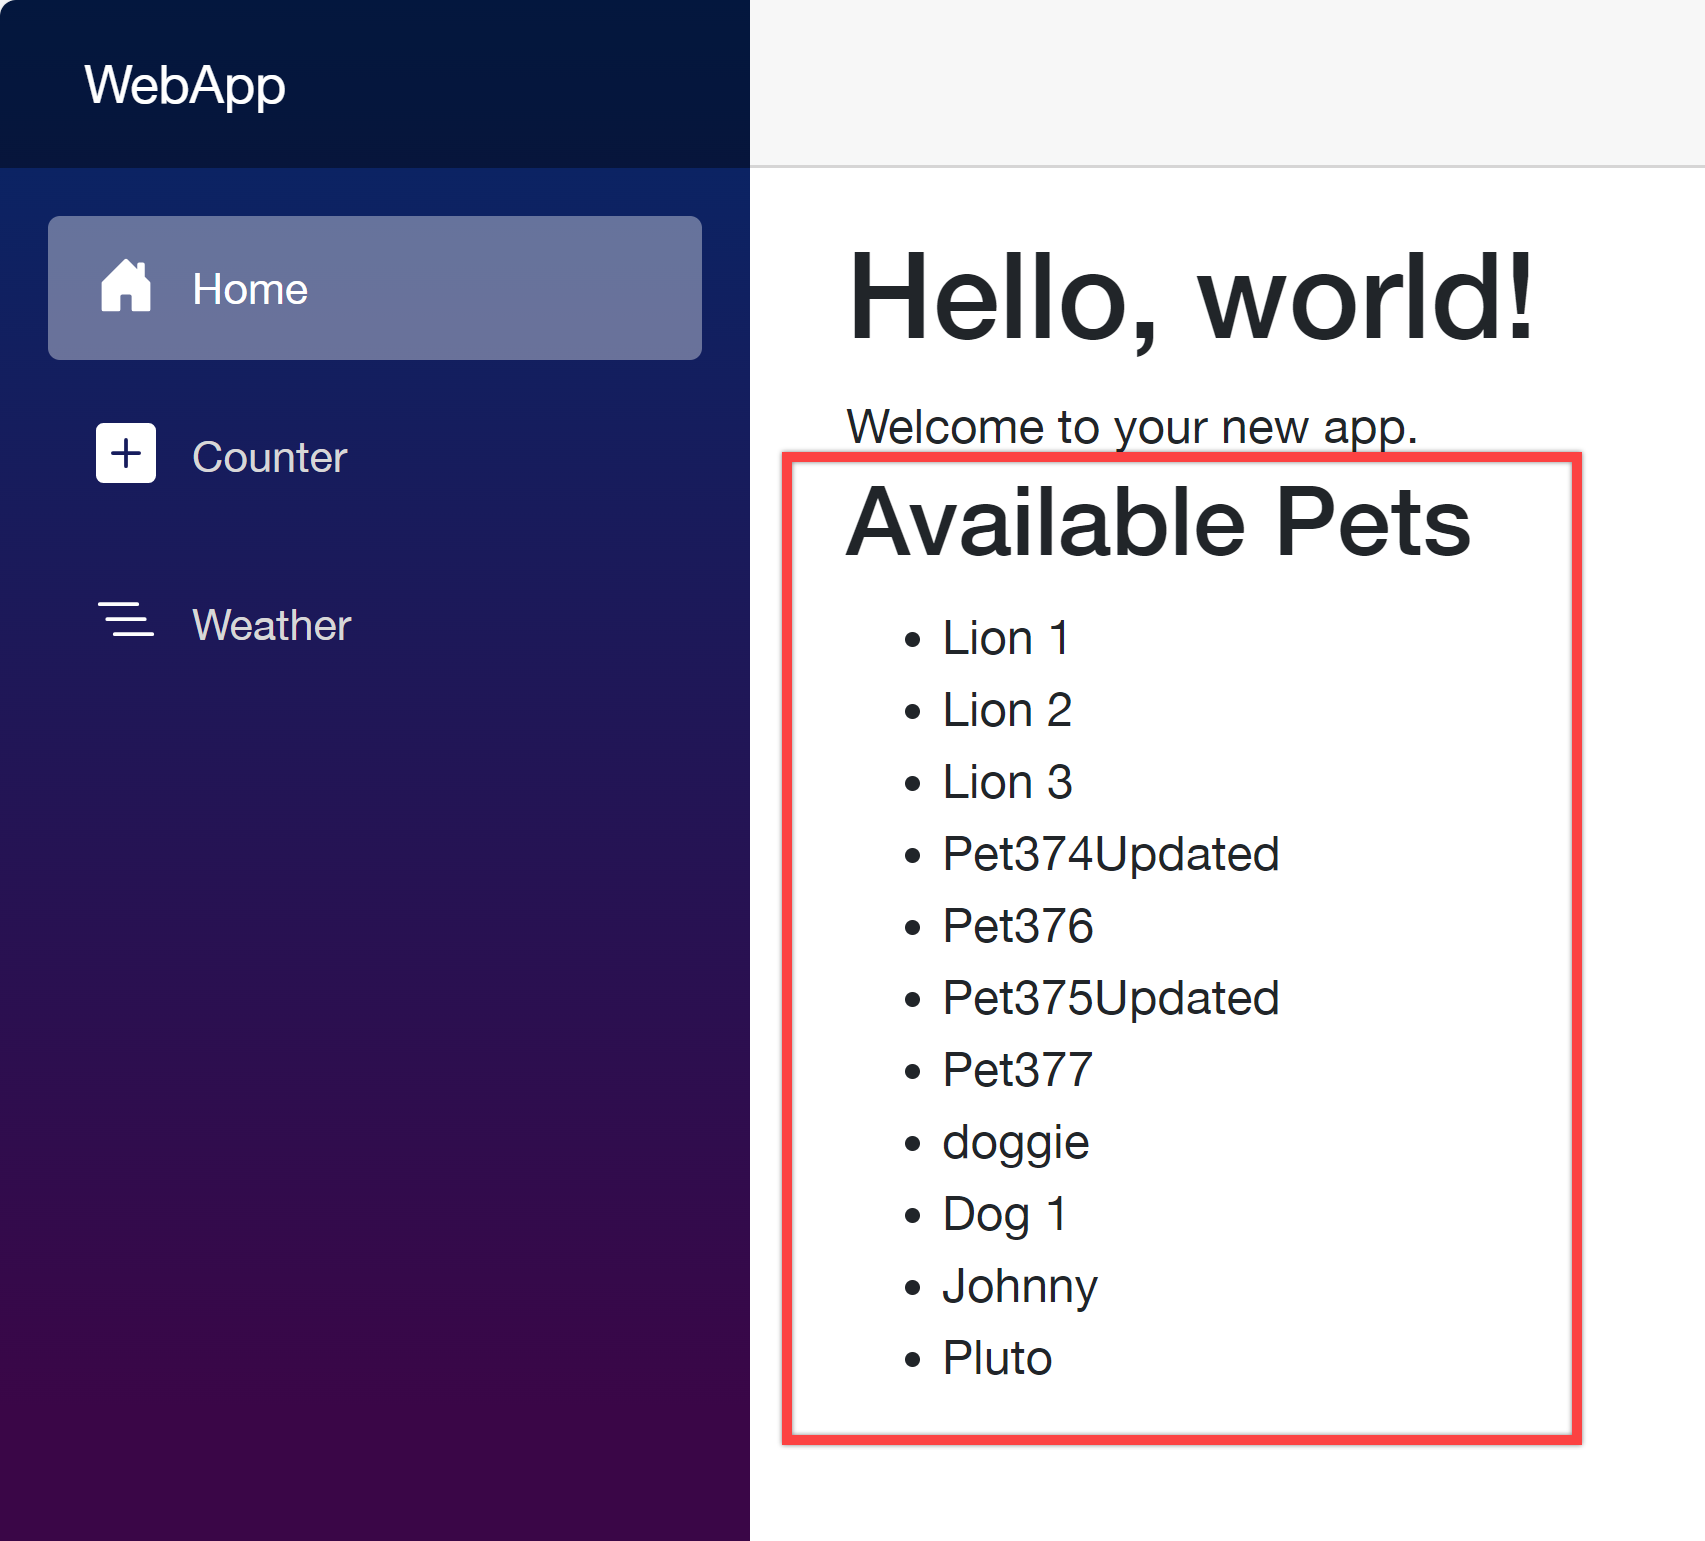
Add dependencies to the Program.cs file and update the Home.razor file to consume the client SDK. Then you will be able to see the result.
Your web application as the API consumer works perfectly with the client SDK generated from APIC.
So far, I’ve walked through how Azure API Center can handle your organisation’s APIs as a central repository, and played around the APIC extension on VS Code. This post has shown you how to provision the APIC instance, register and import APIs in various ways, and how to test those APIs on VS Code and generate the client SDKs directly from VS Code.
As I mentioned in the beginning, taking care of many APIs in one place is crucial as your ogranisation grows up. You might think that you don’t need APIC if your organisation’s API structure is relatively simple. However, even if your organisation is small, APIC will give you better overview of APIs, and how they can interconnected with each other.
More about Azure API Center?
If you want to learn more about APIC, the following links might be helpful.


Recent Comments