Performance considerations for large scale deep learning training on Azure NDv4 (A100) series
This article is contributed. See the original author and article here.
Background
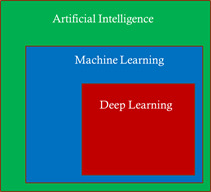
The field of Artificial Intelligence is being applied to more and more application areas, such as self-driving cars, natural language processing, visual recognition, fraud detection and many more.
A subset of artificial intelligence is Deep learning (DL), which is used to develop some of the more sophisticated training model, using deep neural networks (DNN) trying to mimic the human brain. Today, some of the largest DL training models can be used to do very complex and creative tasks like write poetry, write code, and understand the context of text/speech.

These large DL models are possible because of advancements in DL algorithms (DeepSpeed )), which maximize the efficiency of GPU memory management. Traditionally, DL models were very parallel floating-point intensive and so performed well on GPU’s, the newer more memory efficient algorithms made it possible to run much larger DL models but at the expense of significantly more inter-node communication operations, specifically, allreduce and alltoall collective operations.
Modern DL training jobs require large Clusters of multi-GPUs with high floating-point performance connected with high bandwidth, low latency networks. The Azure NDv4 VM series is designed specifically for these types of workloads. ND96asr_v4 has 8 A100 GPU’s connected via NVlink3, each A100 has access to 200 Gbps HDR InfiniBand, a total of 1.6 Tbps internode communication is possible.
We will be focusing on HPC+AI Clusters built with the ND96asr_v4 virtual machine type and providing specific performance optimization recommendations to get the best performance.

Deep Learning hardware and software stack
The Deep learning hardware and software stack is much more complicated compared to traditional HPC. From the hardware perspective CPU and GPU performance is important, especially floating-point performance and the speed in which data is moved from CPU (host) to GPU (device) or GPU (device) to GPU (device). There are many popular Deep learning frameworks e.g. pytorch, tensorflow, Caffe and CNTK. NCCL is one of the popular collective communication library for Nvidia GPU’s and low-level mathematics operations is dependent on the CUDA tools and libraries. We will touch on many parts of this H/W and S/W stack in this post.

How to deploy an HPC+AI Cluster (using NDv4)
In this section we discuss some deployment options.
Which image to use
It’s recommended that you start with one of the Azure Marketplace images that support NDv4. The advantage of using one of these Marketplace images is the GPU driver, InfiniBand drivers, CUDA, NCCL and MPI libraries (including rdma_sharp_plugin) are pre-installed and should be fully functional after booting up the image.
- ubuntu-hpc 18.04 (microsoft-dsvm:ubuntu-hpc:1804:latest)
- Ubuntu is a popular DL linux OS and the most amount of testing on NDv4 was done with version 18.04.
- Ubuntu-hpc 20.04 (microsoft-dsvm:ubuntu-hpc:2004:latest)
- Popular image in DL community.
- CentOS-HPC 7.9 (OpenLogic:CentOS-HPC:7_9-gen2:latest)
- More popular in HPC, less popular in AI.
- NOTE: By default the NDv4 GPU NUMA topology is not correct, you need to apply this patch.
Another option, especially if you want to customize your image is to build your own custom image. The best place to start is the azhpc-images GitHub repository, which contains all the scripts used to build the HPC marketplace images.
You can then use packer or Azure Image builder to build the image and Azure Shared image gallery to store, use, share and distribute images.
Deployment options
In this section we will explore some options to deploy an HPC+AI NDv4 cluster.
- Nvidia Nephele
- Nephele is an open source GitHub repository, primary developers are Nvidia. It’s based on terraform and ansible. It also deploys a SLURM scheduler with container support, using enroot and pyxis.
- It’s a good and proven benchmark environment.
- AzureML
- Is the Azure preferred AI platform, it’s an Azure ML service. It can easily deploy as code a cluster using batch or AKS, upload your environment, create a container, and submit your job. You can monitor and review resulting using the Azure machine learning studio GUI.
- Maybe less control with specific tuning optimizations.
- Azure CycleCloud
- Is an Azure dynamic provisioning and VM autoscaling service that supports many traditional HPC schedulers like PBS, SLURM, LSF etc.
- By default, containers are not supported and if you would like to have SLURM supporting containers you would need to manually integrate enroot and pyxis with cycleCloud+SLURM.
- Currently, does not support Ubuntu 20.04.
- AzureHPC
- Is an open source framework that can combine many different build blocks to create complex and customized deployments in Azure.
- It’s designed as a flexible deployment environment for prototyping, testing, and benchmarking, it’s not designed for production.
- Does not support ubuntu (only CentOS).
- Azure HPC on-Demand Platform (az-hop)
- Is designed to be a complete E2E HPC as a service environment, its deployed using terraform and ansible and uses CycleCloud for its dynamic provisioning and autoscaling capabilities. It also supports OnDemand to provide a web interface to the HPC environment.
- Currently, only supports PBS and does not have any container support.
- Currently, supports CentOS-HPC based images (no Ubuntu).

NDv4 tuning considerations
In this section we will look at a couple of areas that should be carefully considered to make sure your large DL training job is running optimally on NDv4.
GPU tuning
Here is the procedure to set the GPU’s to maximum clock rates and to then reset the GPU clock rate after your job is completed. The procedure for GPU id 0 is shown, need to do this procedure for all GPUs.
First get maximum graphics and memory clock frequencies
max_graphics_freq=$(nvidia-smi -i 0 –query-gpu=clocks.max.graphics –format=csv,noheader,nounits)

max_memory_freq=$( nvidia-smi -i 0 –query-gpu=clocks.max.mem –format=csv,noheader,nounits)

echo “max_graphics_freq=$max_graphics_freq MHz, max_memory_freq=$max_memory_freq MHz”

max_graphics_freq=1410 MHz, max_memory_freq=1215 MHz
Then set the GPUs to the maximum and memory clock frequencies.
sudo nvidia-smi -I 0 -ac $max_memory_freq, $max_graphics_freq

Applications clocks set to “(MEM 1215, SM 1410)” for GPU 00000001:00:00.0

All done.
Finally, when job is finished, reset the graphics and memory clock frequencies.
sudo nvidia-smi -i 0 -rgc

All done.
NCCL tuning
- It is recommended that you use NCCL version >= 2.9.9, especially at higher parallel scales.
- export LD_LIBRARY_PATH==/path/to/libnccl.so (or if necessary LD_PRELOAD=/path/to/libnccl.so)
- Use a specific topology file for ND96asr_v4 and set its location.
- You can get the ND96asr_v4 topology file here.
- export NCCL_TOPO_FILE=/path/to/topology.txt
- Using relaxed ordering for PCI operations is a key mechanism to get maximum performance when targeting memory attached to AMD 2nd Gen EPYC CPUs.
- export NCCL_IB_PCI_RELAXED_ORDERING=1
- export UCX_IB_PCI_RELAXED_ORDERING=on
- This is needed to make sure the correct topology is recognized.
- export CUDA_DEVICE_ORDER=PCI_BUS_ID
- Use eth0 (front-end network interface) to start up processes but use ib0 for processes to communicate.
- export NCCL_SOCKET_IFNAME=eth0
- It’s recommended to print NCCL debug information to verify that the correct environmental variables are set and correct plugins are used (e.g RDMA SHARP plugin).
- For Initial testing and verification, to check that parameters, environmental variables, and plugins are set correctly.
- export NCCL_DEBUG=INFO
- Set to WARNING once you have confidence in your environment.
- export NCCL_DEBUG=WARNING
- For Initial testing and verification, to check that parameters, environmental variables, and plugins are set correctly.
- Enable NCCL RDMA Sharp Plugin, has a big impact on performance and should always be enabled. There are a couple of ways to enable the plugin.
- source hpcx-init.sh && hpcx_load
- LD_LIBRARY_PATH=/path/to/plugin/{libnccl-net.so,libsharp*.so}:$LD_LIBRARY_PATH (or LD_PRELOAD)
- Note: SHARP is currently not enabled on ND96asr_v4.
- Check NCCL_DEBUG=INFO output to verify its loaded.
- x8a100-0000:60522:60522 [5] NCCL INFO Plugin Path : /opt/hpcx/nccl_rdma_sharp_plugin/lib/libnccl-net.so
- Lowering the message size threshold to determine if messages are broken up to use adaptive routing may improve the performance of smaller message sizes.
- export NCCL_IB_AR_THRESHOLD=0
- Also consider NCCL_TOPO=ring or tree (as experiment/debugging, but defaults are generally good)
MPI considerations
When MPI is used with NCCL, MPI is primarily used just to start-up the processes and NCCL is used for efficient collective communication.
You can start processes by explicitly executing mpirun or via a Scheduler MPI integration (e.g SLURM srun command.).
If you have flexibility on the choice of MPI library, then HPCX is the preferred MPI library due to its performance and features.
It is required to disable Mellanox hierarchical Collectives (HCOLL) when using MPI with NCCL.
mpirun –mca coll_hcoll_enable 0 or export OMPI_MCA_COLL_HCOLL_ENABLE=0
Process pinning optimizations
The first step is to determine what is the correct CPU (NUMA) to GPU topology. To see where the GPU’s are located, you can use
ltopo or nvidia-smi topo -m
to get this information or use the check application pinning tool (contained in the azurehpc Github repo (see experimental/check_app_pinning_tool)
./check_app_pinning.py
Virtual Machine (Standard_ND96asr_v4) Numa topologyNumaNode id Core ids GPU ids
============ ==================== ==========
0 [‘0-23′] [2, 3]
1 [’24-47′] [0, 1]
2 [’48-71′] [6, 7]
3 [’72-95’] [4, 5]
We can see that 2 GPU’s are located in each NUMA domain and that the GPU id order is not 0,1,2,3,4,5,6,7, but 3,2,1,0,7,6,5,4. To make sure all GPU’s are used and running optimally we need to make sure that 2 processes are mapped correctly and running in each NUMA domain. There are several ways to force the correct gpu to cpu mapping. In SLURM we can map GPU ids 0,1 to NUMA 1,
GPU ids 2,3 to NUMA 0, GPU ids 4,5 to NUMA 3 and GPU ids 6,7 to NUMA 2 with the following explicit mapping using the SLURM srun command to launch processes.
srun –cpu-bind=mask_cpu:ffffff000000,ffffff000000,ffffff,ffffff,ffffff000000000000000000,ffffff000000000000000000,ffffff000000000000,ffffff00000000000
A similar gpu to cpu mapping is possible with HPCX MPI, setting the following environmental variable and mpirun arguments
export  CUDA_VISIBLE_DEVICES=2,3,0,1,6,7,4,5

–map-by ppr:2:numa                                      (Add :pe=N, if running hybrid parallel (threads in addition to processes)
Then you can use the AzureHPC check_app_pinning.py tool as your job runs to verify if processes/threads are pinned optimally.
I/O tuning
Two aspects of I/O need to be addressed.
- Scratch Storage
- This type of storage needs to be fast (high throughput and low latency); the training job needs to read data, process the data and use this storage location as scratch space as the job runs.
- In an ideal case you would use the local SSD on each VM directly. The NDv4 has a local SSD already mounted at /mnt (2.8 TB), it also has 8 NVMe SSD devices, which when configured and mounted (see below), have ~7 TB capacity.
- If you need a shared filesystem for scratch, combining all NVMe SSD’s and creating a PFS system may be great option from a cost and performance perspective assuming it has sufficient capacity one way to do this is with BeeOND, if not there are other storage options to explore (IaaS Lustre PFS, Azure ClusterStor and Azure Netapp files).
- Checkpoint Storage
- Large DL training jobs can run for Weeks depending on how many VM’s are used, just like any HPC cluster you can have failures (e.g. InfiniBand, memory DIM, ECC error GPU memory etc). It’s critical to have a checkpointing strategy, know the checkpoint interval (e.g. when data is checkpointed), each time how much data is transferred and have a storage solution in place that can satisfy that capacity and performance requirements. If Blob Storage can meet the storage performance, it’s a great option.
How to set-up and configure the NDv4 local NVMe SSD’s
ND96asr_v4 virtual machine contains 8 NVMe SSD devices. You can combine the 8 devices into a striped raid 0 device, that can then be used to create an XFS (or ext4) filesystem and mounted. The script below can be run on all NDv4 VM’s with a parallel shell (e.g pdsh) to create a ~7TB local scratch space (/mnt_nvme).
The resulting local scratch space has a read and write I/O throughput of ~8 GB/s.
#!/bin/bash
mkdir /mnt/resource_nvme
mdadm --create /dev/md128 --level 0 --raid-devices 8 /dev/nvme0n1 /dev/nvme1n1 /dev/nvme2n1 /dev/nvme3n1 /dev/nvme4n1 /dev/nvme5n1 /dev/nvme6n1 /dev/nvme7n1
mkfs.xfs /dev/md128
mount /dev/md128 /mnt/resource_nvme


Restricting data transfer to BLOB storage using the azcopy tool
The process described here is specific to azcopy, but the same principals can be applied to any of the language specific SDK (e.g BLOB API via python).
In this example, lets assume that we have as single BLOB storage account with an ingress limit of 20 Gbps. At each checkpoint, 8 files (corresponding to each GPU) need to be copied to the BLOB storage account, each file will be transferred with its own azcopy. We choose that each azcopy can transfer data at a maximum transfer speed of 2300 Mbps (2300 x 8 = 18400 < 20000 Gpbs) to avoid throttling. The ND96asr_v4 has 96 vcores and so we choose that each azcopy can use 10 cores, so each instance of azcopy gets enough cores and other processes have some additional vcores.
export AZCOPY_CONCURRENCY_VALUE=10

azcopy cp ./file “blob_storage_acc_container” –caps-mbps 2300
DeepSpeed and Onnx Runtime (ORT)
The performance of large scale DL training models built with the pytorch framework can be significantly improved by utilizing DeepSpeed and/or Onnx runtime. It can be straight forward to enable DeepSpeed and Onnx runtime by importing a few extra modules and replacing a few lines of code with some wrapper functions. If using DeepSpeed and Onnx its best practice to apply Onnx first and then DeepSpeed.
HPC+AI NDv4 cluster health checks
Within Azure there is automated testing to help identify unhealthy VM’s. Our testing processes and procedures continue to improve, but still it is possible for an unhealthy VM to be not identified by our testing and to be deployed. Large DL training jobs typically require many VM’s collaborating and communicating with each other to complete the DL job. The more VM’s deployed the greater the change that one of them may be unhealthy, resulting in the DL job failing or underperforming. It is recommended that before starting a large scale DL training job to run some health checks on your cluster to verify it’s performing as expected.
Check GPU floating-point performance
Run high performance linpack (HPL) on each VM, its convenience to use the version contained in the Nvidia hpc-benchmarks container. (Note: This is a non-optimized version of HPL so the numbers reported are ~5-7% slower than the optimized container. It will give you good node to node variation numbers and identify a system that is having CPU, memory, or GPU issues).
#!/bin/bash
#SBATCH -t 00:20:00
#SBATCH --ntasks-per-node=8
#SBATCH -o logs/%x_%j.log

CONT='nvcr.io#nvidia/hpc-benchmarks:20.10-hpl'
MOUNT='/nfs2/hpl/dats/hpl-${SLURM_JOB_NUM_NODES}N.dat:/workspace/hpl-linux-x86_64/sample-dat/HPL-dgx-a100-${SLURM_JOB_NUM_NODES}N.dat'
echo "Running on hosts: $(echo $(scontrol show hostname))"

export NCCL_DEBUG=INFO
export OMPI_MCA_pml=ucx
export OMPI_MCA_btl=^openib,smcuda

CMD="hpl.sh --cpu-affinity 24-35:36-47:0-11:12-23:72-83:84-95:48-59:60-71 --cpu-cores-per-rank 8 --gpu-affinity 0:1:2:3:4:5:6:7 --mem-affinity 1:1:0:0:3:3:2:2  --ucx-affinity ibP257p0s0:ibP258p0s0:ibP259p0s0:ibP260p0s0:ibP261p0s0:ibP262p0s0:ibP263p0s0:ibP264p0s0 --dat /workspace/hpl-linux-x86_64/sample-dat/HPL-dgx-a100-${SLURM_JOB_NUM_NODES}N.dat"
srun --gpus-per-node=8 --container-image="${CONT}" --container-mounts="${MOUNT}" ${CMD}
You should see ~95 TFLOPs DP on ND96asr_v4 (which has 8 A100 GPU’s)
Check host to device and device to host transfer bandwidth
The CUDA bandwidthTest is a convenience way to verify that the host to gpu and gpu to host data bandwidth speeds are good. Below is an example testing gpu id = 0, you would run a similar test for the other 7 gpu_ids, paying close attention to what NUMA domains they are contained in.
numactl –cpunodebind=1 –membind=1 ./bandwidthTest –dtoh –htod –device=0[CUDA Bandwidth Test] – Starting…
Running on…Device 0: A100-SXM4-40GB
Quick ModeHost to Device Bandwidth, 1 Device(s)
PINNED Memory Transfers
Transfer Size (Bytes) Bandwidth(GB/s)
32000000 26.1Device to Host Bandwidth, 1 Device(s)
PINNED Memory Transfers
Transfer Size (Bytes) Bandwidth(GB/s)
32000000 25.0Result = PASS
The expected host to device and device to host transfer speed is > 20 GB/s.
This health check and many more detailed tests to diagnose unhealthy VMs can be found in the azhpc-diagnostics Github repository.
Check the InfiniBand network and NCCL performance
Running a NCCL allreduce and/or alltoall benchmark at the scale you plan on running your deep learning training job is a great way to identify problems with the InfiniBand inter-node network or with NCCL performance.
Here is a SLURM script to run a NCCL alltoall benchmark (Note: using SLURM container integration with enroot+pyxis to use the Nvidia pytorch container.)
#!/bin/bash
#SBATCH -t 00:20:00
#SBATCH --ntasks-per-node=8
#SBATCH --gpus-per-node=8
#SBATCH -o logs/%x_%j.log
export UCX_IB_PCI_RELAXED_ORDERING=on
       UCX_TLS=rc
       NCCL_DEBUG=INFO
       CUDA_DEVICE_ORDER=PCI_BUS_ID
       NCCL_IB_PCI_RELAXED_ORDERING=1
       NCCL_TOPO_FILE=/workspace/nccl/nccl-topology.txt

CONT="nvcr.io#nvidia/pytorch:21.05-py3"
MOUNT="/nfs2/nccl:/workspace/nccl_284,/nfs2/hpcx-v2.8.1-gcc-MLNX_OFED_LINUX-5.1-0.6.6.0-ubuntu18.04-x86_64:/opt/hpcx,/nfs2/nccl_2.10.3-1/nccl:/workspace/nccl"

export OMPI_MCA_pml=ucx
export OMPI_MCA_btl=^openib
export OMPI_MCA_COLL_HCOLL_ENABLE=0

srun --ntasks=$SLURM_JOB_NUM_NODES --container-image "${CONT}"
    --container-name=nccl
    --container-mounts="${MOUNT}"
    --ntasks-per-node=1
    bash -c "apt update && apt-get install -y infiniband-diags"

srun --gpus-per-node=8
    --ntasks-per-node=8
    --container-name=nccl
    --container-mounts "${MOUNT}"
    bash -c 'export LD_LIBRARY_PATH=/opt/hpcx/nccl_rdma_sharp_plugin/lib:/opt/hpcx/sharp/lib:/workspace/nccl/build/lib:$LD_LIBRARY_PATH && /workspace/nccl/nccl-tests/build/alltoall_perf -b8 -f 2 -g 1 -e 8G'
Then submit the above script on for example 4 ND96asr_v4 VM’s
sbatch -N 4 ./nccl.slrm
Similarly, for allreduce, just change the executable to be all_reduce_perf.
The following plots show NCCL allreduce and alltoall expect performance on ND96asr_v4.


Summary
Large scale DL models are becoming very complex and sophisticated being applied to many application areas. The computational and network resources to train these large modern DL models can be quite substantial. The Azure NDv4 series is designed specifically for these large scale DL computational, network and I/O requirements.
Several key performance optimization tips and tricks are discussed to allow you to get the best possible performance running your large deep learning model on Azure NDv4 series.
Credits
To would like to acknowledge the significant contribution of my Colleagues at Microsoft to this post. Jithin Jose provided the NCCL scaling performance data and was the primary contributor to the NCCL, MPI an GPU tuning parameters, he also helped review this document. I would also like to thank Kanchan Mehrotra and Jon Shelley for reviewing this document and providing outstanding feedback.


Recent Comments