Using Custom SharePoint Site Properties to Apply Microsoft 365 Retention with Adaptive Policy Scopes

Using Custom SharePoint Site Properties to Apply Microsoft 365 Retention with Adaptive Policy Scopes

This article is contributed. See the original author and article here.

Now that our new Microsoft Information Governance feature, adaptive policy scopes, has reached general availability (GA), we thought it would be helpful to dive a little deeper into SharePoint site scopes. One of the most common questions we receive regarding site scopes is how administrators can use custom properties to include or exclude SharePoint sites with them. With this post, let’s take a deeper look at what custom properties are, why you may want to use them, and how to configure them.


If you are unfamiliar with adaptive policy scopes, it is an exciting new feature for Information Governance and Records Management which provides the ultimate level of flexibility when applying retention to Microsoft 365 locations. It allows organizations to meet regulatory, legal, or business requirements that demand different retention rules to apply to various departments, locations, and roles.


For more information about adaptive policy scopes, check out the following resources:


Additionally, much of the information we’ll discuss was also presented and demonstrated in our January 2022 webinar “Building Advanced Queries for SharePoint Sites with Adaptive Policy Scopes“: https://aka.ms/AdaptivePolicyScopes-AdvancedSharePoint 


Introduction to SharePoint Site Scopes


Out of the box, adaptive policy scopes allow you to include or exclude SharePoint sites based on indexed properties such as the site’s URL or name. One common problem admins face, however, is that those properties don’t always work well for their retention requirements. Furthermore, SharePoint sites, by default, don’t have many other queryable properties that they find useful when scoping retention policies. Many times, they require more user-centric attributes, such as region or location, to align with regulatory requirements.


For that reason, we designed adaptive policy scopes to take advantage of refinable managed properties which allow administrators to inject and query whatever custom site-level information they want, enabling powerful complex scoping scenarios. For example, an administrator can create a queryable property that references the location in which the site is used, with a value such as “France”.


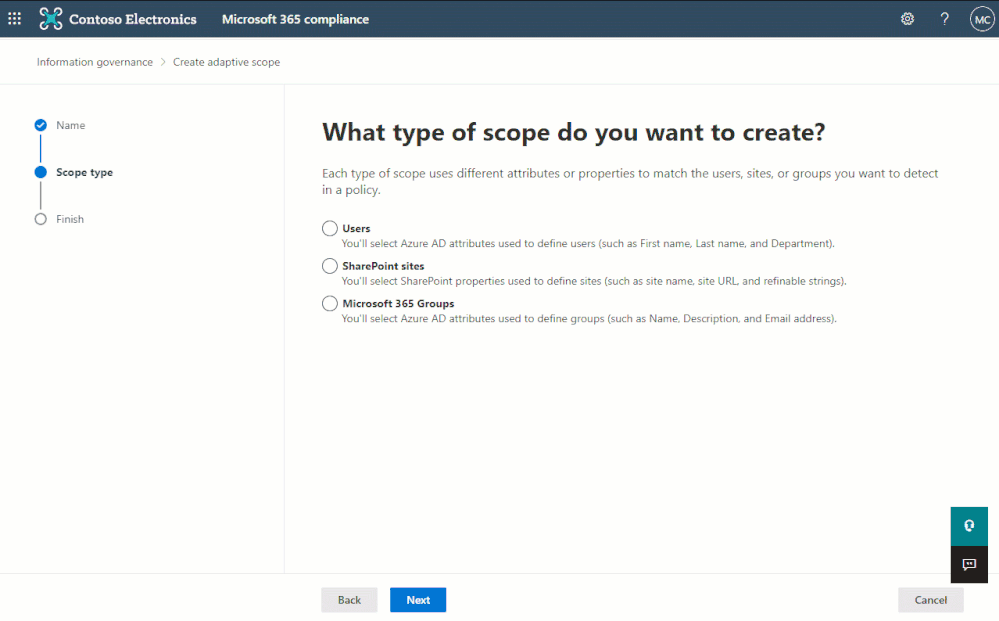
The most popular of these refinable managed properties – and ideal for our location example above – is the refinable string. Because it is the most commonly used refinable managed property, we added it as a selectable option in the simple query builder of the adaptive policy scope wizard when creating a site scope:


The simple query builder can be used to quickly create queries using the most common indexed site properties.The simple query builder can be used to quickly create queries using the most common indexed site properties.


However, there are more refinable managed properties that may also be useful to administrators such as date and integer. These aren’t available in the simple query builder, but for maximum flexibility, can be queried using Keyword Query Language (KQL) within the advanced query builder:


The advanced query builder can be used to create more complex queries using Keyword Query Language (KQL)The advanced query builder can be used to create more complex queries using Keyword Query Language (KQL)


As you can probably guess, deciding whether to use the simple or advanced query builder will depend on the complexity of the scope, the properties which must be queried, and the operators that are required to achieve the intended result. To help understand the differences, refer to the following chart:


The advanced query builder supports more properties, but requires knowledge and experience of KQL.The advanced query builder supports more properties, but requires knowledge and experience of KQL.


How custom properties work in SharePoint Online


Before using a custom property with an adaptive policy scope, it’s important to understand how they work. There are several components that are involved and at play when creating and querying custom properties with SharePoint sites:


  • The site property bag: a per-site dictionary of key/value pairs. This is where an admin could add any custom properties to hold custom data that they’d want to query.

  • Crawled property: when a new custom property is added to a site, a tenant-level crawled property is automatically generated during the SharePoint search and crawl process. This crawled property is not directly queryable and thus cannot be referenced in KQL queries. I like to think of it as unformatted data that has no data type.

  • Refinable managed property: a queryable property that can be mapped to the previously generated crawled property. Mapping the refinable property will define the data type for the custom property, which can then be used to query the custom information. There are several different refinable managed properties, but here are the most common – along with the available operators that type supports:


Managed Property Data Type Supported Operators
RefinableString00-199 String = : <> *
RefinableInt00-49 Integer = : <> * > >= < <=
RefinableDate00-19 ISO 8601 Date/Time = : <> * > >= < <=
reserved keywords


The following image gives an overview of the process each custom property goes through before it can be queried using KQL from within an adaptive policy scope:


Adding a custom property initiates a crawled property which then must be mapped to a managed property to become queryable.Adding a custom property initiates a crawled property which then must be mapped to a managed property to become queryable.


NOTE: Since a tenant-level crawled property is created automatically the first time a custom property is added to a site, the managed property only needs to be mapped once. After mapping, the custom property can be added to more sites and the same managed property can be used to query them all (after indexing occurs).


Adding a custom property for use in adaptive policy scopes


Now that we have a basic understanding of the various components involved under-the-hood, let’s walk through how to create custom properties that can be queried using KQL from within an adaptive policy scope.


Step 1: Adding the custom property to the site property bag


At this time, there’s no way in the UI to add a custom property to a site property bag. So, to make the process as easy as possible, we’ve worked with the open-sourced PnP.PowerShell module team to create cmdlets designed specifically for easily adding/managing custom properties for use with adaptive policy scopes:


To get started, you’ll need to make sure you have the latest version (1.9.0+) of the PnP.PowerShell module installed. Refer to their documentation for installation instructions.


Once installed – at least the first time that you connect to your tenant using PnP.PowerShell – you’ll need to give administrative consent to use the module. To do this, you must authenticate interactively. Choose a SharePoint Online site (we will use Project Wallaby), then use the following cmdlet to connect:


Connect-PnPOnline –Url <SPOSiteUrl> -Interactive


You must first connect to PnP Online interactively to consent to required permissions.You must first connect to PnP Online interactively to consent to required permissions.


Once connected, use Set-PnPAdaptiveScopeProperty to add a custom property to the site’s property bag. 


To provide a real-world example, let’s consider the following scenario:


Contoso wants to create a retention policy that applies to all project sites in the marketing department. The policy will apply indefinite retention while the project is active.


Given the above scenario, it would make sense to add three new custom properties to the property bag of all applicable sites. For our first site, we’ll use the marketing department’s Project Wallaby site:


  • customDepartment:Marketing

  • customSiteType:project

  • customProjectEndDate:2023-01-01


NOTE: You don’t need to add ‘custom’ to the property name, but it can help distinguish custom properties from other properties.


Set-PnPAdaptiveScopeProperty –key customDepartment –value Marketing
Set-PnPAdaptiveScopeProperty –key customSiteType –value project
Set-PnPAdaptiveScopeProperty –key customProjectEndDate –value 2023-01-01


We can then use Get-PnPPropertyBag to verify the properties were successfully added:


Use Get-PnPPropertyBag to verify the custom properties have been added.Use Get-PnPPropertyBag to verify the custom properties have been added.


Step 2: Mapping the refinable managed properties


As we described above, once we’ve added the custom properties to the site’s property bag, the SharePoint search crawl process will generate a new tenant-level crawled property (if one doesn’t already exist). This requires the site to be crawled, so it may take some time. Once the crawled property has been generated, it can be viewed within your tenant’s SharePoint search schema:


https://<tenant>-admin.sharepoint.com/_layouts/15/searchadmin/ta_listcrawledproperties.aspx?level=tenant


A tenant-level crawled property is created for each custom property added, but they are not mapped to any managed property.A tenant-level crawled property is created for each custom property added, but they are not mapped to any managed property.


In the above image, notice that there are not any current mappings. This is where we would need to map each crawled property to a refinable managed property which will assign a data type and enable the ability to query the data based on that type.


To do that, select one of the newly created crawled properties to open the crawled property settings. Then, within “Mappings to managed properties”, search for and choose an applicable refinable managed property. You’ll need to do this for each custom property that was created, but as mentioned before, will only need to do it once for each.


In order to make a crawled property queryable, you must map it to a managed property which gives it a data type.In order to make a crawled property queryable, you must map it to a managed property which gives it a data type.


It is important to emphasize that the refinable property is what gives the crawled property a data type that we can then query. So, when deciding which refinable managed property to use, consider how you want to query the object, then choose the type that makes the most sense. For example, a date supports more operators than a string. Given the 3 properties/values we created, we can map them to the following managed properties:


Custom Property Data Data Type Managed Property
customDepartment Marketing String RefinableString00
customSiteType Project String RefinableString01
customProjectEndDate 2023-01-01 DateTime RefinableDate00


The mappings can be viewed from the tenant-level crawled property page.The mappings can be viewed from the tenant-level crawled property page.


After creating the mappings, crawling of the site is again required before being queryable, which may take some time.


Step 3: Create the query


Finally, now that we’ve added the custom properties and mapped them to refinable managed properties so that they can be queried, we can create the query for use in an adaptive scope.


If we had chosen to use only refinable strings then the simple query builder would be fine to use – but since we chose to use a refinable date too, we must create a KQL query for use in the advanced query builder.


Remembering the example scenario outlined above – and given the custom properties we created – we could query the mapped refinable managed properties using the following KQL query:


RefinableString00=Marketing AND RefinableString01=project AND RefinableDate00>today


Once an adaptive policy scope is created, it generally takes about 24-48 hours for it to start populating with sites that match our query. Since that is a while to wait to simply confirm the query is valid, we can first test it using SharePoint search by navigating to:


https://<tenant-name>.sharepoint.com/Search


SharePoint search can be used to verify/validate KQL queries.SharePoint search can be used to verify/validate KQL queries.


Now that we’ve confirmed it works, we can confidently create a new adaptive policy scope using the same KQL query that was tested above within the advanced query builder of the new adaptive scope wizard:


Creating a SharePoint site scope using KQLCreating a SharePoint site scope using KQL


Automating the process


As you can see, this process is very manual and would be extremely time-consuming to perform over a large number of sites.


For existing sites, we have an example script that can export all existing sites and allow you to set a custom property on any number of them: https://aka.ms/BulkPropertyBagScripts


For future sites, we recommend implementing a site provisioning solution to start integrating custom properties into your workflow. PnP has a provisioning framework, as one option: https://aka.ms/PnP-ProvisioningFramework


We hope you found this blog post useful. Thank you for reading!


FBI and USSS Release Advisory on BlackByte Ransomware

This article is contributed. See the original author and article here.

The Federal Bureau of Investigation (FBI) and the United States Secret Service (USSS) have released a joint Cybersecurity Advisory (CSA) identifying indicators of compromise associated with BlackByte ransomware. BlackByte is a Ransomware-as-a-Service group that encrypts files on compromised Windows host systems, including physical and virtual servers.

CISA encourages organizations to review the joint FBI-USSS CSA and apply the recommended mitigations.

App Architecture | Improve Azure App Performance, Reliability, Security, Operations & Cost

App Architecture | Improve Azure App Performance, Reliability, Security, Operations & Cost

This article is contributed. See the original author and article here.

Free tools and guidance with Azure Advisor and the Well-Architected Review to improve your Azure app performance, reliability, security, operations, and cost. Azure expert, Matt McSpirit, joins Jeremy Chapman to share how you can get actionable recommendations to optimize your architecture across these areas.


Screen Shot 2022-02-14 at 11.45.13 AM.png


Even if you’ve planned and architected your workloads properly, there may still be room for optimization of your existing services. To help with this, the Well-Architected Framework is a set of guiding tenants derived from the experience gathered from real-world implementations. This is defined across five main categories:


  • Reliability- the ability of a system to recover from failures and continue to function.

  • Security- guidance building a comprehensive strategy to protect applications and data from threats.

  • Cost optimization- manage costs to maximize the value of what you spend.

  • Operational excellence- guidance on operations and processes that keep a system running in production.

  • Performance efficiency- main considerations to ensure your system can monitor and respond to service issues to meet your SLAs.


QUICK LINKS:


00:34 — Five categories of the Well-Architected Framework


01:57 — Actionable recommendations for subscriptions


04:32 — Recommendations for a specific workload


07:22 — Periodic health checks of workloads already deployed and running


08:40 — Wrap up


Link References:


If you’ve got existing workloads in the Azure portal, get started with https://aka.ms/AzureAdvisor


Find guidance and links to all the tools in the Azure Architecture Center at https://aka.ms/Architecture


Get Microsoft Assessments and start your well-architected review at https://aka.ms/MicrosoftAssessments


Unfamiliar with Microsoft Mechanics?


We are Microsoft’s official video series for IT. You can watch and share valuable content and demos of current and upcoming tech from the people who build it at Microsoft.


Keep getting this insider knowledge, join us on social:


Video Transcript:


– Up next, if you’re looking to significantly improve your apps and workloads in Azure, we’re going to look at free tools and guidance for discovering and assessing the reliability, security, costs, operations, and performance of what you have running in Azure with actionable recommendations to optimize your architecture across these areas. I’m joined today by Azure expert, Matt McSpirit. It’s great to have you back on for another impactful topic.


– Great. Thanks for having me.


– So on a previous show together, we looked at free assessment tools to give you a clear path forward in Azure, as you navigate the various options. So why don’t we fast forward a bit to the point where you might have a few workloads and services that you’re developing or running in production, and you want to improve the app architecture to reduce costs, maybe improve efficiency or resiliency. Where would you even get started?


– It’s a really common question. Even if you’ve done the due diligence to plan and architect your workloads really well, oftentimes there’s still a ton of room for optimization for your existing services. Now, to help with this, there’s the Azure Architecture Center. And there you get to the Well-Architected Framework, which is a set of guiding tenants derived from the experience gathered from real-world implementations. And this is defined across five main categories. The first is reliability, or the ability of a system to recover from failures and continue to function, where we define various principles for things like testing, resiliency and more. And there’s security, which is about protecting applications and data from threats. So here we share guidance for building a comprehensive strategy, including how you design for specific attacks and how to continually monitor, improve and respond. Then there’s cost optimization for managing costs to maximize the value of what you spend from planning to consumption, monitoring, and optimization. Then there’s operational excellence, where we provide guidance on operations and processes that keep a system running in production. And lastly, performance efficiency, where we tease out the main considerations to ensure that your system can monitor and respond to service issues to meet your SLAs.


– Makes sense. So looking across all the five different categories, how can we help then in those different areas?


– Well, the good news is, is that the categories are built into the various tools and resources. For example, the framework’s incorporated in Azure Advisor and in the Azure Well-Architected review self-assessment to give you actionable recommendations. In fact, let’s start in the Azure portal with Azure Advisor, which is a free tool that continually analyzes your resource configuration, usage telemetry, and then provides actionable recommendations in real time in the subscription context. So here for my subscription, I can see that there are recommendations specific to all the categories in the Well-Architected Framework, and they’re even divided into high, medium, and low impact. And we also provide an Advisor Score, which aggregates advisor recommendations into a simple, actionable score to prioritize the actions that are going to yield the biggest improvement to the posture of your workloads. So here I can see my score across the five categories. And in my case, there are opportunities especially to save costs and increase security. Now in costs, I can see a pretty common recommendation to right size or shut down underutilized virtual machines. So if I click on Security, there are 71 recommendations, spanning permissions, encryption, networking, and more. So I’ll click back into costs. And one of the great things about this assessment is just how actionable these recommendations are. In fact, if I click into this quick fix recommendation for right sizing and shutting down unused VMs, you’ll see it lists 10 VMs that could be optimized and the potential cost savings for each. Now, our dev team’s in India, and if we look at this VM resource here, DP-Win-01, for example, it looks underutilized. We could save 139,000 rupees, which is around $1,900 dollars. And if I click into the usage patterns, you can see it’s just using a tiny amount of CPU, under half a percent. So this isn’t a production VM, and I can shut it down to save costs. So back in my list of recommended actions, I’ll choose to shut down the VM. And from right here, I can shut it down and confirm. So from a Well-Architected perspective, I was able to see and get actionable recommendations in the context of my subscription to optimize the costs of running my workloads.


– And it’s really great to see everything right there in context for you, and you can take action right from Azure Advisor. And I think it’s going to save a lot of time, especially compared to things like manually navigating to that resource, then looking at its usage pattern, and then shutting it down. You know, sometimes finding these underutilized resources that are running in Azure can be like finding a needle in a haystack.


– Yep, absolutely. And as you saw there, there are similar recommendations often with quick fixes across security, reliability, operations, and performance. And what I just showed was in the context of a subscription, which could span across multiple workloads. So let’s now look at what you can do if you just want to get recommendations for a specific workload. So for example, I’ve got a retail site here for Adventure Works, and I’m going through the purchase flow and opening my shopping bag. And when I do that, you’ll see it shares information on what’s frequently bought together based on what is currently a manually-defined list. So we want to add some more intelligence to deliver tailored recommendations. For example, if I just purchased a few pairs of these Zalica trunks, it probably shouldn’t recommend them to me again. Now, in this case, even though we have a machine learning model ready, we don’t have a clear understanding of the architecture attributes that we need to plan for in order to make sure it’s architected in a way that’s reliable, secure, and cost optimized. Now to get guided recommendations, I can go back to the Microsoft assessments I showed last time I was on, and we can choose the Azure Well-Architected Review. So here, if I sign in, I can review individual workloads and track progress over time, and it’s even integrated with Azure Advisor. So I’ll sign in and start a new assessment to show you. I’ll modify the assessment name a little with AW ML model so I can easily return to it later. And I’ve got the option here to link this assessment to Advisor recommendations, but because this is a new workload that I’m assessing before deploying into production, I don’t need to get Azure Advisor recommendations for it quite yet, but we’ll come back to it in a moment. So I’ll go ahead and start. And then in my case, I’ll choose Azure Machine Learning for my workload type. And if you deploy in other workloads, the Core Well-Architected Review and Data Services are going to cover those use cases. So this review for Machine Learning looks at all five categories in the Well-Architected Framework, and I’m selecting all of them in this case. And you can see all of the questions on the left here, and you’ll see there are over 20 questions that you can choose to answer. Now to save a little time, I’ll just show you a few questions across the different categories. So under reliability, there’s questions asking if we’re resilient to failures. Under security, here we can see a question about managing identities. And in the section on costs, I’m asked to review current steps taken to make sure we’re optimizing our spend. And one more thing here in performance efficiencies, asking how I autoscale compute resources for training and inferencing. So once I’m finished, I’ll hit view guidance, and it’s going to output a score, which is based on my answers in each category. So it’s good to see that I’m green with a score of 77 as an average across the categories, but there are still areas to improve on, like performance, where I’m in the yellow. And if I scroll down, I can open each of the categories recommendations. So as I expand all of these one by one, you’ll see it’s highlighting areas where we can improve our workload, so I don’t need to hunt these articles down. And in fact, I’ll scroll back up to reliability. And here, you can see we’ve got a recommendation to use Azure Machine Learning to monitor data drifts. And if I click into the recommendation, it takes me directly to the article in Microsoft Docs to detect data drift and how to set up dataset monitoring, right down to the Python code sample.


– And this is really great, especially as a pre-deployment checklist in this case for your Machine Learning workload. But what if I’ve already got a few services and workloads that are running in Azure? Can I use it then for those cases?


– Absolutely. The Well-Architected Review is perfect for those periodic health checks of your workloads once they’re deployed and running. In fact, the recommendations from Azure Advisor are going to look for optimizations in your running set of Azure resources. So I’ll go back to my assessments homepage, and I’ll open another assessment for the entire retail Adventure Works site. Now, in this case, I scope the assessment to security only. So you’ve got the flexibility to focus on the categories that you really care about. Now, if I view the guidance, you’ll see it’s connected to Azure Advisor. And once there, I can expand the recommendations and you’ll see, in both columns, there are items from Azure Advisor in this subscription as noted by this icon. Now in fact, this recommendation here found that a few of my web apps aren’t connecting over HTTPS and this is something the team needs to address ASAP. And when I look at the affected resources, you’ll see it also as a quick fix. And I can view the logic and script for the fix. So if I select all the resources, I can implement the fix for every impacted web app right from Azure Advisor. So between the Well-Architected self-assessment through to Azure Advisor and the created resources available, everything I’ve shown you today helps you overcome specific learning curves, get automated recommendations, and take advantage of best practices from other Azure users globally, as you build and run your workloads.


– And these are going to be really helpful tools, especially for anyone who’s looking to optimize what they have running in Azure, even like the pre-deployment checklist that you showed earlier. So what’s the best way then to get started with all this?


– Well, thankfully, there’s a number of different ways. So if you’ve got existing workloads in the Azure portal, you can use aka.ms/AzureAdvisor. This is an authenticated link to take you straight to the advisor overview for your tenant. Next, the Azure Architecture Center at aka.ms/Architecture is a great hub for all the resources you need. So there you’re going to find all the guidance and links to all the tools I showed today. And you can get to the Microsoft Assessments at aka.ms/MicrosoftAssessments and start your well-architected review.


– Thanks so much for joining us today, Matt and sharing all the great tools. Of course, keep checking back to Microsoft Mechanics for the latest updates. Subscribe, if you haven’t already, and thank you for watching.


Micro-Agent Now Available for Public Preview for IoT Edge Devices

This article is contributed. See the original author and article here.

While Microsoft Defender for IoT is well known to enable organizations to secure their IoT/OT environments it also provides an opportunity to device builders and solution integrators (SIs) to deliver more secure IoT/OT devices and solutions into the marketplace. Today we are announcing the general availability of a new update that enables device builders and solution integrators to add Defender for IoT support to Azure IoT Edge devices and solutions.  


Based on the lightweight micro-agent, device builders can add revolutionary on-device runtime protection directly into their connected IoT devices giving them real-time threat detection, attack surface reduction capabilities as well as full integration into the Microsoft ecosystem of unified security and management tools.


The lightweight micro-agent provides out of the box security that simplifies the protection of IoT devices, without the need to deploy additional sensors and devices. System integrators and solution operators can also leverage this technology to create new services and opportunities to monetize security.  


The micro-agent supports IoT Edge devices, with an easy installation and identity provisioning process that uses an automatically provisioned module identity to authenticate Edge devices without the need to perform any manual authentication.  


Azure IoT Edge moves cloud analytics and custom business logic to devices, so that your organization can focus on business insights instead of data management. Azure IoT Edge allows you to scale out your IoT solution by packing your business logic into standard containers. You can then deploy those containers to any of your devices and monitor it all from the cloud. 


To learn more on how to install the agent visit Install Defender for IoT micro agent for Edge (Preview).


To learn more about how Microsoft Defender for IoT can benefit device builders, check out the following:  


New transactable offers from Agolo and Ntegral in Azure Marketplace

New transactable offers from Agolo and Ntegral in Azure Marketplace

This article is contributed. See the original author and article here.


Microsoft partners like Agolo and Ntegral deliver transact-capable offers, which allow you to purchase directly from Azure Marketplace. Learn about these offers below:


Agolo logo.jpg

Summarization for Healthcare: Agolo’s Summarization for Healthcare is an automated platform optimized for the nuance and complexity of the healthcare market. Integrated with Azure Cognitive Services, the AI-driven engine uses natural language processing and machine learning technologies to aggregate and organize content, creating human-quality summaries at scale.


Ntegral_Favicon_350x350.png

Azure Data Science Hub: Ntegral’s Azure Data Science Hub provides an Ubuntu 20.04.2 virtual machine that comes pre-installed with popular packages for data science, including data exploration, analysis, modeling, and development tools. The AI/ML environment includes JupyterHub, PyTorch, TensorFlow, and scikit-learn, with a separate Jupyter environment for individuals or teams.


RavenDB on Oracle 8.4: This VM comes pre-installed with RavenDB, an open-source ACID document-oriented database that stores data as JSON documents and can be deployed in distributed clusters with master-master replication. This VM is based on Oracle 8.4, NginX, and Microsoft .NET 5. Ntegral certifies its images to be always updated, secure, and built to work right out of the box.


Amazon Linux 2 for Azure: If your organizations are currently running Amazon Linux 2 on AWS, now you can rest assured that those workloads will work using the same Linux distro on Azure. Optimized by Ntegral, Amazon Linux 2 is the next generation of Amazon Linux, a server operating system from AWS that provides a secure, stable, and high-performance execution environment to develop and run cloud and enterprise applications.


Ubuntu Desktop 20.04 LTS: This Ubuntu desktop-as-a-service solution from Ntegral provides a fully managed Ubuntu Desktop 20.04 LTS virtual environment to support your development and business application needs. Hosted on Azure, this image enables secure remote work from your computer, notebook, or tablet. The image comes pre-installed with LibreOffice, Visual Studio Code, Firefox, Node.js, and Git.


Red Hat Enterprise Linux 8.5: This Azure-based virtual machine comes pre-configured with Red Hat Enterprise Linux (RHEL) 8.5, optimized by Ntegral. RHEL has built-in security features such as Security-Enhanced Linux (SELinux) and mandatory access controls (MAC) to help you combat intrusions and meet regulatory compliance. With Red Hat, you get open-source technology for the enterprise, delivered with enterprise-level support.