by Scott Muniz | Apr 28, 2022 | Security, Technology
This article is contributed. See the original author and article here.
Google has released Chrome version 101.0.4951.41 for Windows, Mac, and Linux. This version addresses vulnerabilities that an attacker could exploit to take control of an affected system.
CISA encourages users and administrators to review the Chrome Release Note and apply the necessary updates.
![MAR-10376640-2.v1 – CaddyWiper]()
by Scott Muniz | Apr 28, 2022 | Security, Technology
This article is contributed. See the original author and article here.
Notification
This report is provided “as is” for informational purposes only. The Department of Homeland Security (DHS) does not provide any warranties of any kind regarding any information contained herein. The DHS does not endorse any commercial product or service referenced in this bulletin or otherwise.
This document is marked TLP:WHITE–Disclosure is not limited. Sources may use TLP:WHITE when information carries minimal or no foreseeable risk of misuse, in accordance with applicable rules and procedures for public release. Subject to standard copyright rules, TLP:WHITE information may be distributed without restriction. For more information on the Traffic Light Protocol (TLP), see http://www.cisa.gov/tlp.
Summary
Description
CISA received one unique file for analysis. This file is a malicious 32-bit Windows Portable Executable (PE). During runtime, this malware attempts to overwrite the victim user’s files with null bytes. The malware also attempts to overwrite the Master Boot Record of attached drives with null bytes, thereby corrupting them and rendering it impossible for the victim to access the victim’s stored data.
For a downloadable copy of IOCs, see: MAR-10376640-2.v1.stix.
Submitted Files (1)
a294620543334a721a2ae8eaaf9680a0786f4b9a216d75b55cfd28f39e9430ea (a294620543334a721a2ae8eaaf9680…)
Findings
a294620543334a721a2ae8eaaf9680a0786f4b9a216d75b55cfd28f39e9430ea
Tags
trojanviruswiper
Details
| Name |
a294620543334a721a2ae8eaaf9680a0786f4b9a216d75b55cfd28f39e9430ea |
| Size |
9216 bytes |
| Type |
PE32 executable (GUI) Intel 80386, for MS Windows |
| MD5 |
42e52b8daf63e6e26c3aa91e7e971492 |
| SHA1 |
98b3fb74b3e8b3f9b05a82473551c5a77b576d54 |
| SHA256 |
a294620543334a721a2ae8eaaf9680a0786f4b9a216d75b55cfd28f39e9430ea |
| SHA512 |
b21039ad67e07a77bbcfe73a89afd22c7e1fd782a5293c41edd0ae1dbd75c4fdf6404d8cfe5cf2191ad1822e32877ded1675e48895e8b9898778855d3dd56636 |
| ssdeep |
192:76f0CW5P2Io4evFrDv2ZRJzCn7URRsjVJaZF:76fPWl24evFrT2ZR5Cn7UR0VJo |
| Entropy |
5.108650 |
Antivirus
| AhnLab |
Trojan/Win.Agent |
| Avira |
TR/Crypt.XPACK.Gen |
| Bitdefender |
Gen:Variant.CaddyWiper.2 |
| ClamAV |
Win.Malware.CaddyWiper-9941573-1 |
| Cyren |
W32/Trojan.WXHP-9071 |
| ESET |
Win32/KillDisk.NCX trojan |
| Emsisoft |
Gen:Variant.CaddyWiper.2 (B) |
| IKARUS |
Trojan.Win32.KillDisk |
| K7 |
Trojan ( 0058f88b1 ) |
| Lavasoft |
Gen:Trojan.Heur.FU.amW@aiAsbgg |
| McAfee |
Trojan-caddywiper.b |
| NANOAV |
Virus.Win32.Gen.ccmw |
| Quick Heal |
SM.mal.generic |
| Sophos |
Troj/KillDisk-G |
| Symantec |
Trojan.Gen.MBT |
| TACHYON |
Trojan/W32.Agent.9216.ABY |
| Trend Micro |
Trojan.F383D2EE |
| Trend Micro HouseCall |
Trojan.F383D2EE |
| Vir.IT eXplorer |
Trojan.Win32.CaddyWiper.DGP |
| VirusBlokAda |
Trojan.DoS.CaddyBlade |
| Zillya! |
Trojan.KillDisk.Win32.311 |
YARA Rules
- rule CISA_10376640_04 : trojan wiper CADDYWIPER
{
meta:
Author = “CISA Code & Media Analysis”
Incident = “10376640”
Date = “2022-03-23”
Last_Modified = “20220324_1700”
Actor = “n/a”
Category = “Trojan Wiper”
Family = “CADDYWIPER”
Description = “Detects Caddy wiper samples”
MD5_1 = “42e52b8daf63e6e26c3aa91e7e971492”
SHA256_1 = “a294620543334a721a2ae8eaaf9680a0786f4b9a216d75b55cfd28f39e9430ea”
strings:
$s0 = { 44 73 52 6F 6C 65 47 65 74 50 72 69 6D 61 72 79 44 6F 6D 61 69 6E }
$s1 = { 50 C6 45 A1 00 C6 45 A2 48 C6 45 A3 00 C6 45 A4 59 C6 }
$s2 = { C6 45 A6 53 C6 45 A7 00 C6 45 A8 49 C6 }
$s3 = { C6 45 B0 44 C6 45 B1 00 C6 45 B2 52 }
$s4 = { C6 45 B8 45 C6 45 B9 00 C6 45 BA 39 }
$s5 = { C6 45 AC 43 C6 45 AD 3A C6 45 AE 5C C6 45 AF }
$s6 = { 55 C6 45 B0 73 C6 45 B1 65 C6 45 B2 72 C6 45 B3 }
$s7 = { C6 45 E0 44 C6 45 E1 3A C6 45 E2 5C C6 45 E3 }
$s8 = { 21 54 68 69 73 20 70 72 6F 67 72 61 6D 20 63 61 6E 6E 6F }
condition:
all of them
}
ssdeep Matches
No matches found.
PE Metadata
| Compile Date |
2022-03-14 03:19:36-04:00 |
| Import Hash |
ea8609d4dad999f73ec4b6f8e7b28e55 |
PE Sections
| MD5 |
Name |
Raw Size |
Entropy |
| 6194652d04e28dad063a1b6e60d110ab |
header |
1024 |
1.873192 |
| f0d4c11521fc3891965534e6c52e128b |
.text |
7168 |
5.644240 |
| d4b14cf770a6e660ba6a6e63f7c22451 |
.rdata |
512 |
0.988058 |
| 0f1286f7c8817e0974ddc3ce1edc1b59 |
.reloc |
512 |
0.081539 |
Packers/Compilers/Cryptors
Description
This file is a 32 bit Windows PE that has been identified as a variant of the malware family known as Caddy Wiper. Static analysis of this application indicates its primary purpose is to destroy victim user data. First the malware attempts to enumerate all files in the directory “C:Users”. The malware will then attempt to recursively overwrite files that it can access in this directory with null bytes, effectively “zeroing” the files out.
The malware will then attempt to access drives attached to the target system, starting with the drive “D:”, and recursively “zero” out all the files it can access on those drives too. Finally, the malware attempts to use the API DeviceIoControl to directly access the physical memory of attached drives. If it is able to access these drives, the malware will zero out the first 1920 bytes of the physical drives, effectively wiping its Master Boot Record and corrupting the drive.
Screenshots

Figure 1. – This screenshot illustrates the main structure of the malware. As illustrated, the malware’s main purpose is to recursively overwrite victim user’s files and physical drives with null bytes.

Figure 2. – Structure that malware uses to build null buffer. This buffer is utilized to overwrite the victim user’s target files.

Figure 3. – Malware trying to zero out .PHYSICALDRIVE7

Figure 4. – Malware trying to zero out .PHYSICALDRIVE4

Figure 5. – Malware trying to zero out .PHYSICALDRIVE3

Figure 6. – Malware attempting to zero out first 1920 bytes of a physical drive attached to the target system.
Recommendations
CISA recommends that users and administrators consider using the following best practices to strengthen the security posture of their organization’s systems. Any configuration changes should be reviewed by system owners and administrators prior to implementation to avoid unwanted impacts.
- Maintain up-to-date antivirus signatures and engines.
- Keep operating system patches up-to-date.
- Disable File and Printer sharing services. If these services are required, use strong passwords or Active Directory authentication.
- Restrict users’ ability (permissions) to install and run unwanted software applications. Do not add users to the local administrators group unless required.
- Enforce a strong password policy and implement regular password changes.
- Exercise caution when opening e-mail attachments even if the attachment is expected and the sender appears to be known.
- Enable a personal firewall on agency workstations, configured to deny unsolicited connection requests.
- Disable unnecessary services on agency workstations and servers.
- Scan for and remove suspicious e-mail attachments; ensure the scanned attachment is its “true file type” (i.e., the extension matches the file header).
- Monitor users’ web browsing habits; restrict access to sites with unfavorable content.
- Exercise caution when using removable media (e.g., USB thumb drives, external drives, CDs, etc.).
- Scan all software downloaded from the Internet prior to executing.
- Maintain situational awareness of the latest threats and implement appropriate Access Control Lists (ACLs).
Additional information on malware incident prevention and handling can be found in National Institute of Standards and Technology (NIST) Special Publication 800-83, “Guide to Malware Incident Prevention & Handling for Desktops and Laptops”.
Contact Information
CISA continuously strives to improve its products and services. You can help by answering a very short series of questions about this product at the following URL: https://us-cert.cisa.gov/forms/feedback/
Document FAQ
What is a MIFR? A Malware Initial Findings Report (MIFR) is intended to provide organizations with malware analysis in a timely manner. In most instances this report will provide initial indicators for computer and network defense. To request additional analysis, please contact CISA and provide information regarding the level of desired analysis.
What is a MAR? A Malware Analysis Report (MAR) is intended to provide organizations with more detailed malware analysis acquired via manual reverse engineering. To request additional analysis, please contact CISA and provide information regarding the level of desired analysis.
Can I edit this document? This document is not to be edited in any way by recipients. All comments or questions related to this document should be directed to the CISA at 1-888-282-0870 or CISA Service Desk.
Can I submit malware to CISA? Malware samples can be submitted via three methods:
CISA encourages you to report any suspicious activity, including cybersecurity incidents, possible malicious code, software vulnerabilities, and phishing-related scams. Reporting forms can be found on CISA’s homepage at www.cisa.gov.
by Scott Muniz | Apr 28, 2022 | Security, Technology
This article is contributed. See the original author and article here.
CISA and the Federal Bureau of Investigation (FBI) have updated joint Cybersecurity Advisory AA22-057A: Destructive Malware Targeting Organizations in Ukraine, originally released February 26, 2022. The advisory has been updated to include additional indicators of compromise for WhisperGate and technical details for HermeticWiper, IsaacWiper, HermeticWizard, and CaddyWiper destructive malware.
CISA and the FBI encourage organizations to review the update to AA22-057A as well as the Shields Up Technical Guidance webpage for ways to identify, respond to, and mitigate disruptive cyber activity.
by Contributed | Apr 27, 2022 | Technology
This article is contributed. See the original author and article here.
On March 15, Synaptiq and Microsoft issued a press release announcing a new Machine Vision pilot program for hospitals. In collaboration with Microsoft, Synaptiq built a demo solution to proactively inform care teams of potential Central Line dressing compliance issues.
The pilot program is designed to help reduce preventable injuries from hospital-borne Central Line-Associated Bloodstream Infections (CLABSIs) and improve speed of care and patient outcomes. It also helps providers standardize care for new and existing staff, identify education opportunities, and decrease documentation time.
According to the NIH, CLABSIs are largely preventable infections that occur in more than 400,000 patients annually in the United States alone, resulting in over 28,000 deaths and costing U.S. hospitals $2 billion. A key piece of preventing CLABSIs is maintaining Central Line dressings as clean and intact as possible.
Machine vision is a type of artificial intelligence (AI) that enables computers to derive information from visual inputs. It is able to collect more precise visual data than human vision ever could, and uses processing power to analyze the visual data faster and more thoroughly than the human mind.
Because visual cues play such a vital role in ensuring patient safety and preventing CLABSIs, machine vision has the potential to exponentially enhance care teams’ ability to recognize and respond to possible infections – before the human eye can even detect a problem is present.
I am truly excited to provide our Voices of Healthcare viewers with a first-look at this incredibly important pilot. I had the opportunity to assist in building the demo solution alongside Synaptiq and cannot wait to see how it helps save many, many lives in the years to come.
For this session on May 11, 2022, Synaptiq’s CEO Stephen Sklarew and Mariana Gattegno, Quality and Patient Safety consultant at Volpini Solutions LLC, will discuss the current status of Central Line dressing maintenance in hospitals today, review the pilot program details, and demo the solution. They will also answer questions and discuss how hospitals joining this effort will benefit.
Synaptiq’s solution to assess Central Line dressings using Microsoft Technologies
Synaptiq’s Machine Vision Pilot Program for Central Line Dressing Maintenance is an example of how Microsoft Cloud for Healthcare can rapidly deliver a machine vision application that works seamlessly with care teams to help provide superior patient experiences.
We see many benefits, such as:
- Hospitals in the pilot program will have an exclusive early adopter opportunity to test the solution first-hand, and their care teams will be able to help design the future solution that best meets their needs.
- It is powered by Microsoft Cloud for Healthcare and leverages many Microsoft technologies that are already licensed by most major hospital systems in the United States.
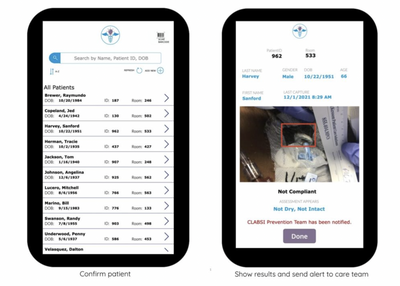
- There are three applications that are part of the solution that support this process: The Central Line Assessment app (Microsoft PowerApps); CLABSI Prevention Team (Microsoft Teams); and Central Line Maintenance dashboard (Microsoft Power BI)
- The Central Line Assessment app runs on a smartphone for convenient bedside access and is used to capture and analyze photos of patients’ dressings. If a potential compliance issue is identified, the care team is alerted to take action. Over time, data from the provider’s electronic medical record (EMR) system accumulates information from the Central Line Assessment app and the patient’s medical record, and the Central Line Maintenance dashboard provides canned reports and ad hoc analysis capabilities to identify trends.
- Most importantly, Synaptiq’s Pilot Program for this solution is an example of how Microsoft Cloud for Healthcare can rapidly deliver a machine vision application that works seamlessly with care teams to help provide superior patient experience – and help save lives.
Come join us to hear how this hospital pilot program will work and how your organization can get involved.
This session will be on May 11th at 11:00 PT / 12:00 MT/ 1:00 CT / 2:00 ET
Please click here to join or download the calendar invite here
As always, we will record the session and post the recording afterward for future consumption. We have a new landing page for this series, so favorite or follow https://aka.ms/VoicesofHealthcareCloud to make sure you never miss a future session.
Please follow the aka.ms/HLSBlog for all this great content.
by Scott Muniz | Apr 27, 2022 | Security, Technology
This article is contributed. See the original author and article here.
This joint Cybersecurity Advisory (CSA) was coauthored by cybersecurity authorities of the United States, Australia, Canada, New Zealand, and the United Kingdom: the Cybersecurity and Infrastructure Security Agency (CISA), National Security Agency (NSA), Federal Bureau of Investigation (FBI), Australian Cyber Security Centre (ACSC), Canadian Centre for Cyber Security (CCCS), New Zealand National Cyber Security Centre (NZ NCSC), and United Kingdom’s National Cyber Security Centre (NCSC-UK). This advisory provides details on the top 15 Common Vulnerabilities and Exposures (CVEs) routinely exploited by malicious cyber actors in 2021, as well as other CVEs frequently exploited.
U.S., Australian, Canadian, New Zealand, and UK cybersecurity authorities assess, in 2021, malicious cyber actors aggressively targeted newly disclosed critical software vulnerabilities against broad target sets, including public and private sector organizations worldwide. To a lesser extent, malicious cyber actors continued to exploit publicly known, dated software vulnerabilities across a broad spectrum of targets.
The cybersecurity authorities encourage organizations to apply the recommendations in the Mitigations section of this CSA. These mitigations include applying timely patches to systems and implementing a centralized patch management system to reduce the risk of compromise by malicious cyber actors.
Click here for a PDF version of this report.
Key Findings
Globally, in 2021, malicious cyber actors targeted internet-facing systems, such as email servers and virtual private network (VPN) servers, with exploits of newly disclosed vulnerabilities. For most of the top exploited vulnerabilities, researchers or other actors released proof of concept (POC) code within two weeks of the vulnerability’s disclosure, likely facilitating exploitation by a broader range of malicious actors.
To a lesser extent, malicious cyber actors continued to exploit publicly known, dated software vulnerabilities—some of which were also routinely exploited in 2020 or earlier. The exploitation of older vulnerabilities demonstrates the continued risk to organizations that fail to patch software in a timely manner or are using software that is no longer supported by a vendor.
Top 15 Routinely Exploited Vulnerabilities
Table 1 shows the top 15 vulnerabilities U.S., Australian, Canadian, New Zealand, and UK cybersecurity authorities observed malicious actors routinely exploiting in 2021, which include:
- CVE-2021-44228. This vulnerability, known as Log4Shell, affects Apache’s Log4j library, an open-source logging framework. An actor can exploit this vulnerability by submitting a specially crafted request to a vulnerable system that causes that system to execute arbitrary code. The request allows a cyber actor to take full control over the system. The actor can then steal information, launch ransomware, or conduct other malicious activity.[1] Log4j is incorporated into thousands of products worldwide. This vulnerability was disclosed in December 2021; the rapid widespread exploitation of this vulnerability demonstrates the ability of malicious actors to quickly weaponize known vulnerabilities and target organizations before they patch.
- CVE-2021-26855, CVE-2021-26858, CVE-2021-26857, CVE-2021-27065. These vulnerabilities, known as ProxyLogon, affect Microsoft Exchange email servers. Successful exploitation of these vulnerabilities in combination (i.e., “vulnerability chaining”) allows an unauthenticated cyber actor to execute arbitrary code on vulnerable Exchange Servers, which, in turn, enables the actor to gain persistent access to files and mailboxes on the servers, as well as to credentials stored on the servers. Successful exploitation may additionally enable the cyber actor to compromise trust and identity in a vulnerable network.
- CVE-2021-34523, CVE-2021-34473, CVE-2021-31207. These vulnerabilities, known as ProxyShell, also affect Microsoft Exchange email servers. Successful exploitation of these vulnerabilities in combination enables a remote actor to execute arbitrary code. These vulnerabilities reside within the Microsoft Client Access Service (CAS), which typically runs on port 443 in Microsoft Internet Information Services (IIS) (e.g., Microsoft’s web server). CAS is commonly exposed to the internet to enable users to access their email via mobile devices and web browsers.
- CVE-2021-26084. This vulnerability, affecting Atlassian Confluence Server and Data Center, could enable an unauthenticated actor to execute arbitrary code on vulnerable systems. This vulnerability quickly became one of the most routinely exploited vulnerabilities after a POC was released within a week of its disclosure. Attempted mass exploitation of this vulnerability was observed in September 2021.
Three of the top 15 routinely exploited vulnerabilities were also routinely exploited in 2020: CVE-2020-1472, CVE-2018-13379, and CVE-2019-11510. Their continued exploitation indicates that many organizations fail to patch software in a timely manner and remain vulnerable to malicious cyber actors.
Table 1: Top 15 Routinely Exploited Vulnerabilities in 2021
Additional Routinely Exploited Vulnerabilities
In addition to the 15 vulnerabilities listed in table 1, U.S., Australian, Canadian, New Zealand, and UK cybersecurity authorities identified vulnerabilities, listed in table 2, that were also routinely exploited by malicious cyber actors in 2021.
These vulnerabilities include multiple vulnerabilities affecting internet-facing systems, including Accellion File Transfer Appliance (FTA), Windows Print Spooler, and Pulse Secure Pulse Connect Secure. Three of these vulnerabilities were also routinely exploited in 2020: CVE-2019-19781, CVE-2019-18935, and CVE-2017-11882.
Table 2: Additional Routinely Exploited Vulnerabilities in 2021
Vulnerability and Configuration Management
- Update software, operating systems, applications, and firmware on IT network assets in a timely manner. Prioritize patching known exploited vulnerabilities, especially those CVEs identified in this CSA, and then critical and high vulnerabilities that allow for remote code execution or denial-of-service on internet-facing equipment. For patch information on CVEs identified in this CSA, refer to the appendix.
- If a patch for a known exploited or critical vulnerability cannot be quickly applied, implement vendor-approved workarounds.
- Use a centralized patch management system.
- Replace end-of-life software, i.e., software that is no longer supported by the vendor. For example, Accellion FTA was retired in April 2021.
- Organizations that are unable to perform rapid scanning and patching of internet-facing systems should consider moving these services to mature, reputable cloud service providers (CSPs) or other managed service providers (MSPs). Reputable MSPs can patch applications—such as webmail, file storage, file sharing, and chat and other employee collaboration tools—for their customers. However, as MSPs and CSPs expand their client organization’s attack surface and may introduce unanticipated risks, organizations should proactively collaborate with their MSPs and CSPs to jointly reduce that risk. For more information and guidance, see the following resources.
Identity and Access Management
- Enforce multifactor authentication (MFA) for all users, without exception.
- Enforce MFA on all VPN connections. If MFA is unavailable, require employees engaging in remote work to use strong passwords.
- Regularly review, validate, or remove privileged accounts (annually at a minimum).
- Configure access control under the concept of least privilege principle.
- Ensure software service accounts only provide necessary permissions (least privilege) to perform intended functions (non-administrative privileges).
Note: see CISA Capacity Enhancement Guide – Implementing Strong Authentication and ACSC guidance on Implementing Multi-Factor Authentication for more information on hardening authentication systems.
Protective Controls and Architecture
- Properly configure and secure internet-facing network devices, disable unused or unnecessary network ports and protocols, encrypt network traffic, and disable unused network services and devices.
- Harden commonly exploited enterprise network services, including Link-Local Multicast Name Resolution (LLMNR) protocol, Remote Desktop Protocol (RDP), Common Internet File System (CIFS), Active Directory, and OpenLDAP.
- Manage Windows Key Distribution Center (KDC) accounts (e.g., KRBTGT) to minimize Golden Ticket attacks and Kerberoasting.
- Strictly control the use of native scripting applications, such as command-line, PowerShell, WinRM, Windows Management Instrumentation (WMI), and Distributed Component Object Model (DCOM).
- Segment networks to limit or block lateral movement by controlling access to applications, devices, and databases. Use private virtual local area networks.
- Continuously monitor the attack surface and investigate abnormal activity that may indicate lateral movement of a threat actor or malware.
- Use security tools, such as endpoint detection and response (EDR) and security information and event management (SIEM) tools. Consider using an information technology asset management (ITAM) solution to ensure your EDR, SIEM, vulnerability scanner etc., are reporting the same number of assets.
- Monitor the environment for potentially unwanted programs.
- Reduce third-party applications and unique system/application builds; provide exceptions only if required to support business critical functions.
- Implement application allowlisting.
Resources
Disclaimer
The information in this report is being provided “as is” for informational purposes only. CISA, the FBI, NSA, ACSC, CCCS, NZ NCSC, and NCSC-UK do not endorse any commercial product or service, including any subjects of analysis. Any reference to specific commercial products, processes, or services by service mark, trademark, manufacturer, or otherwise, does not constitute or imply endorsement, recommendation, or favoring.
Purpose
This document was developed by U.S., Australian, Canadian, New Zealand, and UK cybersecurity authorities in furtherance of their respective cybersecurity missions, including their responsibilities to develop and issue cybersecurity specifications and mitigations.
References
[1] CISA’s Apache Log4j Vulnerability Guidance
Appendix: Patch Information and Additional Resources for Top Exploited Vulnerabilities
|
CVE
|
Vendor
|
Affected Products
|
Patch Information
|
Resources
|
|
CVE-2021-42237
|
Sitecore
|
Sitecore XP 7.5.0 – Sitecore XP 7.5.2
Sitecore XP 8.0.0 – Sitecore XP 8.2.7
|
Sitecore Security Bulletin SC2021-003-499266
|
ACSC Alert Active Exploitation of vulnerable Sitecore Experience Platform Content Management Systems
|
|
CVE-2021-35464
|
ForgeRock
|
Access Management (AM) 5.x, 6.0.0.x, 6.5.0.x, 6.5.1, 6.5.2.x and 6.5.3
OpenAM 9.x, 10.x, 11.x, 12.x and 13.x
|
ForgeRock AM Security Advisory #202104
|
ACSC Advisory Active exploitation of ForgeRock Access Manager / OpenAM servers
CCCS ForgeRock Security Advisory
|
|
CVE-2021-27104
|
Accellion
|
FTA 9_12_370 and earlier
|
Accellion Press Release: Update to Recent FTA Security Incident
|
Joint CSA Exploitation of Accellion File Transfer Appliance
ACSC Alert Potential Accellion File Transfer Appliance compromise
|
|
CVE-2021-27103
|
FTA 9_12_411 and earlier
|
|
CVE-2021-27102
|
FTA versions 9_12_411 and earlier
|
|
CVE-2021-27101
|
FTA 9_12_370 and earlier
|
|
|
CVE-2021-21985
|
VMware
|
vCenter Server 7.0, 6.7, 6.5
Cloud Foundation (vCenter Server) 4.x and 3.x
|
VMware Advisory VMSA-2021-0010
|
CCCS VMware Security Advisory
|
|
CVE-2021-21972
|
VMware
|
vCenter Server 7.0, 6.7, 6.5
Cloud Foundation (vCenter Server) 4.x and 3.x
|
VMware Advisory VMSA-2021-0002
|
ACSC Alert VMware vCenter Server plugin remote code execution vulnerability
CCCS VMware Security Advisory
CCCS Alert APT Actors Target U.S. and Allied Networks – Update 1
|
|
CVE-2021-20038
|
SonicWall
|
SMA 100 Series (SMA 200, 210, 400, 410, 500v), versions 10.2.0.8-37sv, 10.2.1.1-19sv, 10.2.1.2-24sv
|
SonicWall Security Advisory SNWLID-2021-0026
|
ACSC Alert Remote code execution vulnerability present in SonicWall SMA 100 series appliances
CCCS SonicWall Security Advisory
|
|
CVE-2021-44228
|
Apache
|
Log4j, all versions from 2.0-beta9 to 2.14.1
For other affected vendors and products, see CISA’s GitHub repository.
|
Log4j: Apache Log4j Security Vulnerabilities
For additional information, see joint CSA: Mitigating Log4Shell and Other Log4j-Related Vulnerabilities
|
CISA webpage Apache Log4j Vulnerability Guidance
CCCS Active exploitation of Apache Log4j vulnerability – Update 7
|
|
CVE-2021-40539
|
Zoho ManageEngine
|
ADSelfService Plus version 6113 and prior
|
Zoho ManageEngine: ADSelfService Plus 6114 Security Fix Release
|
Joint CSA APT Actors Exploiting Newly Identified Vulnerability in ManageEngine ADSelfService Plus
CCCS Zoho Security Advisory
|
|
CVE-2021-40444
|
Microsoft
|
Multiple Windows products; see Microsoft Security Update Guide: MSHTML Remote Code Execution Vulnerability, CVE-2021-40444
|
Microsoft Security Update Guide: MSHTML Remote Code Execution Vulnerability, CVE-2021-40444
|
|
|
CVE-2021-34527
|
Microsoft
|
Multiple Windows products; see Microsoft Security Update Guide: Windows Print Spooler Remote Code Execution Vulnerability, CVE-2021-34527
|
Microsoft Security Update Guide: Windows Print Spooler Remote Code Execution Vulnerability, CVE-2021-34527
|
Joint CSA Russian State-Sponsored Cyber Actors Gain Network Access by Exploiting Default Multifactor Authentication Protocols and “PrintNightmare” Vulnerability
CCCS Alert Windows Print Spooler Vulnerability Remains Unpatched – Update 3
|
|
CVE-2021-34523
|
Microsoft
|
Microsoft Exchange Server 2013 Cumulative Update 23
Microsoft Exchange Server 2016 Cumulative Updates 19 and 20
Microsoft Exchange Server 2019 Cumulative Updates 8 and 9
|
Microsoft Security Update Guide: Microsoft Exchange Server Elevation of Privilege Vulnerability, CVE-2021-34523
|
Joint CSA Iranian Government-Sponsored APT Cyber Actors Exploiting Microsoft Exchange and Fortinet Vulnerabilities in Furtherance of Malicious Activities
ACSC Alert Microsoft Exchange ProxyShell Targeting in Australia
|
|
CVE-2021-34473
|
Microsoft
|
Multiple Exchange Server versions; see: Microsoft Security Update Guide: Microsoft Exchange Server Remote Code Execution Vulnerability, CVE-2021-34473
|
Microsoft Security Update Guide: Microsoft Exchange Server Remote Code Execution Vulnerability, CVE-2021-34473
|
|
CVE-2021-31207
|
Microsoft
|
Multiple Exchange Server versions; see Microsoft Update Guide: Microsoft Exchange Server Security Feature Bypass Vulnerability, CVE-2021-31207
|
Microsoft Update Guide: Microsoft Exchange Server Security Feature Bypass Vulnerability, CVE-2021-31207
|
|
CVE-2021-3156
|
Sudo
|
Sudo before 1.9.5p2
|
Sudo Stable Release 1.9.5p2
|
|
|
CVE-2021-27852
|
Checkbox Survey
|
Checkbox Survey versions prior to 7
|
|
|
|
CVE-2021-27065
|
Microsoft Exchange Server
|
Multiple versions; see: Microsoft Security Update Guide: Microsoft Exchange Server Remote Code Execution Vulnerability, CVE-2021-27065
|
Microsoft Security Update Guide: Microsoft Exchange Server Remote Code Execution Vulnerability, CVE-2021-27065
|
CISA Alert: Mitigate Microsoft Exchange Server Vulnerabilities
ACSC Advisory Active exploitation of Vulnerable Microsoft Exchange servers
CCCS Alert Active Exploitation of Microsoft Exchange Vulnerabilities – Update 4
|
|
CVE-2021-26858
|
Microsoft
|
Exchange Server, multiple versions; see Microsoft Security Update Guide: Microsoft Exchange Server Remote Code Execution Vulnerability, CVE-2021-26858
|
Microsoft Security Update Guide: Microsoft Exchange Server Remote Code Execution Vulnerability, CVE-2021-26858
|
|
CVE-2021-26857
|
Microsoft
|
Exchange Server, multiple versions; see Microsoft Security Update Guide: Microsoft Exchange Server Remote Code Execution Vulnerability, CVE-2021-26857
|
Microsoft Security Update Guide: Microsoft Exchange Server Remote Code Execution Vulnerability, CVE-2021-26857
|
|
CVE-2021-26855
|
Microsoft
|
Exchange Server, multiple versions; see Microsoft Security Update Guide: Microsoft Exchange Server Remote Code Execution Vulnerability, CVE-2021-26855
|
Microsoft Security Update Guide: Microsoft Exchange Server Remote Code Execution Vulnerability, CVE-2021-26855
|
|
CVE-2021-26084
|
Jira Atlassian
|
Confluence Server and Data Center, versions 6.13.23, from version 6.14.0 before 7.4.11, from version 7.5.0 before 7.11.6, and from version 7.12.0 before 7.12.5.
|
Jira Atlassian: Confluence Server Webwork OGNL injection – CVE-2021-26084
|
ACSC Alert Remote code execution vulnerability present in certain versions of Atlassian Confluence
CCCS Atlassian Security Advisory
|
|
CVE-2021-22893
|
Pulse Secure
|
PCS 9.0R3/9.1R1 and Higher
|
Pulse Secure SA44784 – 2021-04: Out-of-Cycle Advisory: Multiple Vulnerabilities Resolved in Pulse Connect Secure 9.1R11.4
|
CCCS Alert Active Exploitation of Pulse Connect Secure Vulnerabilities – Update 1
|
|
CVE-2021-20016
|
SonicWall
|
SMA 100 devices (SMA 200, SMA 210, SMA 400, SMA 410, SMA 500v)
|
SonicWall Security Advisory SNWLID-2021-0001
|
|
|
CVE-2021-1675
|
Microsoft
|
Multiple Windows products; see Microsoft Security Update Guide Windows Print Spooler Remote Code Execution Vulnerability, CVE-2021-1675
|
Microsoft Security Update Guide: Windows Print Spooler Remote Code Execution Vulnerability, CVE-2021-1675
|
CCCS Alert Windows Print Spooler Vulnerability Remains Unpatched – Update 3
|
|
CVE-2020-2509
|
QNAP
|
QTS, multiple versions; see QNAP: Command Injection Vulnerability in QTS and QuTS hero
QuTS hero h4.5.1.1491 build 20201119 and later
|
QNAP: Command Injection Vulnerability in QTS and QuTS hero
|
|
|
CVE-2020-1472
|
Microsoft
|
Windows Server, multiple versions; see Microsoft Security Update Guide: Netlogon Elevation of Privilege Vulnerability, CVE-2020-1472
|
Microsoft Security Update Guide: Netlogon Elevation of Privilege Vulnerability, CVE-2020-1472
|
ACSC Alert Netlogon elevation of privilege vulnerability (CVE-2020-1472)
Joint CSA APT Actors Chaining Vulnerabilities Against SLTT, Critical Infrastructure, and Elections Organizations
CCCS Alert Microsoft Netlogon Elevation of Privilege Vulnerability – CVE-2020-1472 – Update 1
|
|
CVE-2020-0688
|
Microsoft
|
Exchange Server, multiple versions; see Microsoft Security Update Guide: Microsoft Exchange Validation Key Remote Code Execution Vulnerability, CVE-2020-0688
|
Microsoft Security Update Guide: Microsoft Exchange Validation Key Remote Code Execution Vulnerability, CVE-2020-0688
|
CISA Alert Chinese Ministry of State Security-Affiliated Cyber Threat Actor Activity
Joint CSA Russian State-Sponsored Cyber Actors Target Cleared Defense Contractor Networks to Obtain Sensitive U.S. Defense Information and Technology
CCCS Alert Microsoft Exchange Validation Key Remote Code Execution Vulnerability
|
|
CVE-2019-19781
|
Citrix
|
ADC and Gateway version 13.0 all supported builds before 13.0.47.24
NetScaler ADC and NetScaler Gateway, version 12.1 all supported builds before 12.1.55.18; version 12.0 all supported builds before 12.0.63.13; version 11.1 all supported builds before 11.1.63.15; version 10.5 all supported builds before 10.5.70.12
SD-WAN WANOP appliance models 4000-WO, 4100-WO, 5000-WO, and 5100-WO all supported software release builds before 10.2.6b and 11.0.3b
|
Citrix Security Bulletin CTX267027
|
Joint CSA APT Actors Chaining Vulnerabilities Against SLTT, Critical Infrastructure, and Elections Organizations
CISA Alert Chinese Ministry of State Security-Affiliated Cyber Threat Actor Activity
CCCS Alert Detecting Compromises relating to Citrix CVE-2019-19781
|
|
CVE-2019-18935
|
Progress Telerik
|
UI for ASP.NET AJAX through 2019.3.1023
|
Telerik UI for ASP.NET AJAX Allows JavaScriptSerializer Deserialization
|
ACSC Alert Active exploitation of vulnerability in Microsoft Internet Information Services
|
|
CVE-2019-11510
|
Pulse Secure
|
Pulse Connect Secure 8.2 before 8.2R12.1, 8.3 before 8.3R7.1, and 9.0 before 9.0R3.4
|
Pulse Secure: SA44101 – 2019-04: Out-of-Cycle Advisory: Multiple vulnerabilities resolved in Pulse Connect Secure / Pulse Policy Secure 9.0RX
|
CISA Alert Continued Exploitation of Pulse Secure VPN Vulnerability
CISA Alert Chinese Ministry of State Security-Affiliated Cyber Threat Actor Activity
ACSC Advisory Recommendations to mitigate vulnerability in Pulse Connect Secure VPN Software
Joint CSA APT Actors Chaining Vulnerabilities Against SLTT, Critical Infrastructure, and Elections Organizations
CCCS Alert APT Actors Target U.S. and Allied Networks – Update 1
|
|
CVE-2018-13379
|
Fortinet
|
FortiProxy 2.0.2, 2.0.1, 2.0.0, 1.2.8, 1.2.7, 1.2.6, 1.2.5, 1.2.4, 1.2.3, 1.2.2, 1.2.1, 1.2.0, 1.1.6
|
Fortinet FortiGuard Labs: FG-IR-20-233
|
Joint CSA Russian State-Sponsored Cyber Actors Target Cleared Defense Contractor Networks to Obtain Sensitive U.S. Defense Information and Technology
Joint CSA Iranian Government-Sponsored APT Cyber Actors Exploiting Microsoft Exchange and Fortinet Vulnerabilities in Furtherance of Malicious Activities
Joint CSA APT Actors Chaining Vulnerabilities Against SLTT, Critical Infrastructure, and Elections Organizations
ACSC Alert APT exploitation of Fortinet Vulnerabilities
CCCS Alert Exploitation of Fortinet FortiOS vulnerabilities (CISA, FBI) – Update 1
|
|
CVE-2018-0171
|
Cisco
|
See Cisco Security Advisory: cisco-sa-20180328-smi2
|
Cisco Security Advisory: cisco-sa-20180328-smi2
|
CCCS Action Required to Secure the Cisco IOS and IOS XE Smart Install Feature
|
|
CVE-2017-11882
|
Microsoft
|
Office, multiple versions; see Microsoft Security Update Guide: Microsoft Office Memory Corruption Vulnerability, CVE-2017-11882
|
Microsoft Security Update Guide: Microsoft Office Memory Corruption Vulnerability, CVE-2017-11882
|
CCCS Alert Microsoft Office Security Update
|
|
CVE-2017-0199
|
Microsoft
|
Multiple products; see Microsoft Security Update Guide: Microsoft Office/WordPad Remote Code Execution Vulnerability w/Windows, CVE-2017-0199
|
Microsoft Security Update Guide: Microsoft Office/WordPad Remote Code Execution Vulnerability w/Windows, CVE-2017-0199
|
CCCS Microsoft Security Updates
|

Recent Comments