by Scott Muniz | Jun 14, 2022 | Security, Technology
This article is contributed. See the original author and article here.
CISA has added one new vulnerability to its Known Exploited Vulnerabilities Catalog, based on evidence of active exploitation. These types of vulnerabilities are a frequent attack vector for malicious cyber actors and pose significant risk to the federal enterprise. Note: to view the newly added vulnerabilities in the catalog, click on the arrow in the “Date Added to Catalog” column, which will sort by descending dates.
Binding Operational Directive (BOD) 22-01: Reducing the Significant Risk of Known Exploited Vulnerabilities established the Known Exploited Vulnerabilities Catalog as a living list of known CVEs that carry significant risk to the federal enterprise. BOD 22-01 requires FCEB agencies to remediate identified vulnerabilities by the due date to protect FCEB networks against active threats. See the BOD 22-01 Fact Sheet for more information.
Although BOD 22-01 only applies to FCEB agencies, CISA strongly urges all organizations to reduce their exposure to cyberattacks by prioritizing timely remediation of Catalog vulnerabilities as part of their vulnerability management practice. CISA will continue to add vulnerabilities to the Catalog that meet the specified criteria.
by Scott Muniz | Jun 14, 2022 | Security, Technology
This article is contributed. See the original author and article here.
Citrix has released security updates to address vulnerabilities in Application Delivery Management. An attacker could exploit these vulnerabilities to take control of an affected system.
CISA encourages users and administrators to review Citrix Security Update CTX460016 and apply the necessary updates.

by Contributed | Jun 14, 2022 | Technology
This article is contributed. See the original author and article here.
If you work on an app that processes time-series data coming from devices & provides real-time rich insights regarding them, you may have come across below scalability requirements for your app:
- Support high throughput and low latency while ingesting billions of metrics from thousands to millions of IoT devices.
- Support sub-second response times and high concurrency (100s of users) while powering real-time dashboards.
There’s a common perception that only NoSQL databases can provide that kind of scale. Citus on Azure breaks these barriers by enabling you to build large scale IoT apps within the PostgreSQL ecosystem.
- Due to Postgres, your IoT app gets a rich expressive SQL interface supporting updates, deletes, filters, joins, aggregations, extensions, and so on, along with data consistency & reliability guarantees.
- Due to the superpower of distributing tables across multiple servers and ability to scale-out seamlessly, your app gets the desired performance & scalability as it evolves. You can start small with single node & scale to multiple nodes seamlessly.
This blog will present an end-to-end reference architecture for building a scalable IoT app. Hyperscale (Citus) (a.k.a. Citus on Azure) within the Postgres managed service on azure is the database of choice. The blog also covers certain best practices & considerations you can keep in mind while building your IoT app.
Reference Architecture for IOT workloads on Azure
Okay, let’s get started. First let us go through a high level walk-through of the various tools and services that come together in creating a reference architecture that enables you to build a scalable IoT app.
The main components of this reference architecture include:
- Connecting your devices to the cloud with Azure IoT Hub
- Real-time processing & ingestion of device data with Azure Databricks
- Store and query time-series IoT data using Citus on Azure
- Interactive visualizations on IoT data using Power BI and Grafana
 Figure 1: A reference architecture to build scalable IoT apps using Postgres, Citus and Azure. This architecture depicts an end-to-end flow of how IoT data from devices enters the cloud via Azure IoT Hub and gets processed in Databricks before getting ingested into Postgres with Citus on Azure. Postgres with Citus is the scalable relational database which is used for storing device data and serving real-time dashboards via Grafana or Power BI (along with Azure Functions). This post focuses on how all these pieces come together to enable you to build large scale IoT apps within the Postgres ecosystem.
Connecting your devices to the cloud with Azure IoT Hub
Azure IoT Hub is a managed service in Azure which acts as a central message hub for bi-directional communication between your IoT application and the devices. You can use Azure IoT Hub to build IoT solutions with reliable and secure communications between your IoT devices and a cloud-hosted solution backend. You can connect virtually any device to IoT Hub.
We’ve created a GitHub repo that lets you generate thousands of devices that are registered with IoT hub and send messages at scale. This repo enables you to simulate device data at scale and test IoT Hub. You can also plug scripts inside this repo as a part of your CI/CD pipelines while building your IoT app.
Real-time processing & ingestion of device data with Azure Databricks
Azure Databricks can be used for processing & ingesting device data coming from Azure IoT Hub. Azure Databricks is a fault-tolerant stream processing engine with Kafka compatibility for continuous processing. You can use Spark Structured Streaming for both real-time ingestion and micro-batch processing of data.
The following code snippets show Databricks fetching device data from IoT Hub, processing it & ingesting it into Hyperscale (Citus) on Azure.
- Following Scala code snippet will listen to the stream coming from EventHub (or IoT hub) devices topic and create a spark DataFrame for further transformations. Make a note to import the library kafkashaded.org.apache.kafka.common.security.plain.PlainLoginModule. This module is installed by default on Databricks clusters.
import org.apache.spark.sql.functions._

val EventHubs_ConnectionString = "Endpoint=sb://***.servicebus.windows.net/;SharedAccessKeyName=twitter;SharedAccessKey= <shared_access_key>";
val constring = ""$ConnectionString"";
val splchar = """;
val EH_SASL = "kafkashaded.org.apache.kafka.common.security.plain.PlainLoginModule required username=" + "" + constring + "" + " password=" + splchar + EventHubs_ConnectionString + splchar + ";";

val df = spark
      .readStream
      .format("kafka") .option("subscribe", "<your topic>")
      .option("kafka.bootstrap.servers", "<iot_hub_name>.servicebus.windows.net:9093")
      .option("kafka.sasl.mechanism", "PLAIN")
      .option("kafka.security.protocol", "SASL_SSL")
      .option("kafka.sasl.jaas.config", EH_SASL)
      .option("kafka.request.timeout.ms", "60000")
      .option("kafka.session.timeout.ms", "30000")
      .option("kafka.group.id", "$Default")
      .option("failOnDataLoss", "true")
      .load() //Dataframe is loaded untill here
- Following Scala code snippet will write transformed Spark DataFrame to Hyperscale (Citus)
//Create your postgresql configurations
def postgresqlSinkOptions: Map[String, String] = Map(
    "dbtable" -> "public.devicedata", // table
    "user" -> "citus", // Database username
    "password" -> "<database password>", // Password
    "driver" -> "org.postgresql.Driver",
    "url" -> "jdbc:postgresql://<citus_server_group_name>.postgres.database.azure.com:5432/postgres",
    "sslmode" -> "require"
  )

//Writing device data to Citus/Postgres
df.writeStream
      .foreachBatch { (batchdf: DataFrame, _: Long) =>
        batchdf.write
          .format("jdbc")
          .options(postgresqlSinkOptions)
          .mode("Append")
          .save()
      }
      .start()
      .awaitTermination()
Using the Postgres COPY command for super-fast data ingestion
The above code triggers the Postgres INSERT command for ingesting data in batches. With batch INSERT, you can expect throughputs of a few 100s of thousand rows ingested per second. However if you wanted larger throughputs, you can use the Postgres COPY command.
COPY command lets you micro-batch rows periodically (can be as low as every 30 seconds) and ingest data in near real-time. With COPY, some of our customers have seen throughputs up to a few millions of rows ingested per second. However the throughput depends on the data-model (row width) & hardware configuration.
NOTE: Databricks’ JDBC based Postgres driver natively doesn’t support the COPY command. So we wrote a simple scala wrapper that extends the COPY command functionality to Databricks.
Store and query time-series IoT data using Citus on Azure
Citus is PostgreSQL extended with the superpower of distributed tables. This superpower enables you to build highly scalable relational apps. You can start building apps on a single node server group, the same way you would with PostgreSQL. As your app’s scalability and performance requirements grow, you can seamlessly scale to multiple nodes by transparently distributing your tables.
Below are a few best practices you can follow while building your app with Hyperscale (Citus):
- Distribution column: To distribute your tables, you’d need to a pick a column (a.k.a shard key) that decides how data is distributed across nodes. Shard key is the central piece and adds natural dimension to your data. In IoT applications, most of the times the distribution column is the identifier of your devices (say device_id). More on distributed data-modeling can be found in this link.
- Partitioning time-series data: As device data is all time series and has a time dimension, partition your tables based on time. Hyperscale (Citus) provides time series capabilities to create and manage partitions.
- JSONB to store device data: You can use columns with JSONB datatype to store and index semi-structured data. Device telemetry data is typically not structured, every device type has its own distinctive metrics.
- PostGIS for geospatial analysis: If your IoT app requires geospatial features, you can use the PostGIS extension, which Hyperscale (Citus) supports natively.
- Rollups (aka pre-aggregates) for fast analytics: You can use rollups to pre-aggregate raw data and avoid repetitive computations for queries. You can rollup raw data into minutely, hourly OR daily aggregates based on zoom-levels (based on time) in the dashboard.
Interactive visualizations on IoT data using Power BI and Grafana
Power BI with real-time streaming lets you stream data and update dashboards in real time. Any visual or dashboard created in Power BI can display and update real-time data and visuals. As shown in the above reference architecture, you can use serverless Azure functions to periodically query device data in Hyperscale (Citus) and publish that to Power BI for real-time visualizations.
Grafana can be used for building time series dashboards or displaying Event Log (Operational Log) metrics based on time scale. By default, Grafana comes with PostgreSQL integration. For managed Grafana on the cloud you can use Azure Managed Grafana service, which recently went preview.
Get started with Postgres and Citus on Azure to build your own IoT app
To get a hands-on experience of Citus within 5 mins, you can walk through this Azure quickstart. As Citus is fully open source, you can easily download and test Citus on your local machine. Hope you found the blog useful, sharing a few informative links related to building time series apps with Citus.
by Contributed | Jun 13, 2022 | Technology
This article is contributed. See the original author and article here.
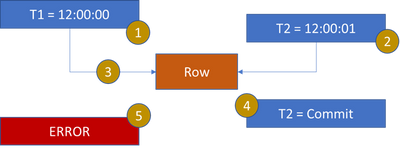
When 2 or more workers are modifying the same row, it is possible to encounter 13535. The time of the begin transaction and the modification are the defining properties. When the transaction begin time is before the latest row modification, error 13535 is encountered.
- T1 starts a transaction
T1 is context switched or client has not submitted the modification request
- T2 starts a transaction, just after T1
T2 updates the row in the table
- T1 attempts to update row and is blocked by T2 or T2 commits transaction before T1 issues the modification
- T2 commits the transaction
- T1 is assigned the lock
T1 detects the temporal update for the row was at 12:00:01 but T1 started its transaction before 12:00:01 and the error is raised.
For such an issue the application needs to determine the desired behavior. If T1 must complete before T2 then the application must sequence and complete the T1 query before the T2 query. If serialization is not required, the application can perform a retry.
DEMO
set nocount on
go
use master
go
drop database temporalTest
go
create database temporalTest
go
use temporalTest
go
create schema Test
go
CREATE TABLE [Temporal](
[TemporalId] [bigint] IDENTITY(1,1) NOT NULL,
[DateModified] [datetime2](7) NOT NULL,
[SysStartTime] [datetime2](7) GENERATED ALWAYS AS ROW START NOT NULL,
[SysEndTime] [datetime2](7) GENERATED ALWAYS AS ROW END NOT NULL,
CONSTRAINT [TemporalId] PRIMARY KEY CLUSTERED ([TemporalId] ASC)
WITH (PAD_INDEX = OFF, STATISTICS_NORECOMPUTE = OFF, IGNORE_DUP_KEY = OFF, ALLOW_ROW_LOCKS = ON, ALLOW_PAGE_LOCKS = ON),
PERIOD FOR SYSTEM_TIME ([SysStartTime], [SysEndTime])
)WITH(
SYSTEM_VERSIONING = ON ( HISTORY_TABLE = [Test].[TemporalHistory] )
)
go
create PROCEDURE mysp
@ID bigint
AS
UPDATE
Temporal
SET
DateModified = GETUTCDATE()
WHERE
TemporalId = @Id
go
INSERT INTO Temporal
(DateModified) VALUES (GETUTCDATE())
go
select * from Temporal
go
select * from Test.TemporalHistory
go
— ostress -E -S.sql19 -Q”temporalTest..mysp 1″ -r999999999 -n4 -q
by Scott Muniz | Jun 13, 2022 | Security, Technology
This article is contributed. See the original author and article here.
Drupal has released security updates to address a Guzzle third-party library vulnerability that does not affect Drupal core but may affect some contributed projects or custom code on Drupal sites. Exploitation of this vulnerability could allow a remote attacker to take control of an affected website.
CISA encourages users and administrators to review Drupal security advisory SA-CORE-011 and apply the necessary updates.

Recent Comments