
by Scott Muniz | Feb 16, 2023 | Security, Technology
This article is contributed. See the original author and article here.
Official websites use .gov
A .gov website belongs to an official government organization in the United States.

Secure .gov websites use HTTPS
A
lock ( )
) or
https:// means you’ve safely connected to the .gov website. Share sensitive information only on official, secure websites.
by Scott Muniz | Feb 16, 2023 | Security, Technology
This article is contributed. See the original author and article here.
CISA has added one new vulnerability to its Known Exploited Vulnerabilities Catalog, based on evidence of active exploitation. This type of vulnerability is a frequent attack vector for malicious cyber actors and poses a significant risk to the federal enterprise. Note: To view the newly added vulnerabilities in the catalog, click on the arrow in the “Date Added to Catalog” column, which will sort by descending dates.
Binding Operational Directive (BOD) 22-01: Reducing the Significant Risk of Known Exploited Vulnerabilities established the Known Exploited Vulnerabilities Catalog as a living list of known CVEs that carry significant risk to the federal enterprise. BOD 22-01 requires FCEB agencies to remediate identified vulnerabilities by the due date to protect FCEB networks against active threats. See the BOD 22-01 Fact Sheet for more information.
Although BOD 22-01 only applies to FCEB agencies, CISA strongly urges all organizations to reduce their exposure to cyberattacks by prioritizing timely remediation of Catalog vulnerabilities as part of their vulnerability management practice. CISA will continue to add vulnerabilities to the Catalog that meet the specified criteria.
by Scott Muniz | Feb 16, 2023 | Security, Technology
This article is contributed. See the original author and article here.
Cisco has released security advisories for vulnerabilities affecting multiple Cisco products. A remote attacker could exploit some of these vulnerabilities to take control of an affected system. For updates addressing lower severity vulnerabilities, see the Cisco Security Advisories page.
CISA encourages users and administrators to review the following advisories and apply the necessary updates.
by Contributed | Feb 15, 2023 | Technology
This article is contributed. See the original author and article here.
It is common that IT personnel tasked with monitoring the health and performance of database systems be given very high privileges such as SQL sysadmin. This enables them to do their job but comes with significant risks. Those privileges enable them to read or modify the data that other users in the organization store in those databases. That data is commonly referred to as “user data”. Sometimes user data can be very sensitive, for example, the consolidated financial information of a public company prior to being disclosed in an earnings report, a technological achievement that gives the company a competitive edge, and customer or employee information that must be protected to comply with privacy regulations. Sensitive data may be leaked or tampered with because of malicious intentions or simply poor security practices. When that happens, the company usually suffers financial damage and litigation against its officers.
Microsoft Purview DevOps policies support the Principle of Least Privilege (PoLP), which simply states that people should be given only the minimum access they need to be able to perform their job and no more. DevOps policies address the scenario of IT personnel tasked with monitoring the health and performance of database systems. This article showcases the experience for Azure SQL Managed Instance, the newest source supported for DevOps policies (soon to enter private preview). Azure SQL Database and SQL Server 2022 are already supported, and the configuration steps are linked at the end.
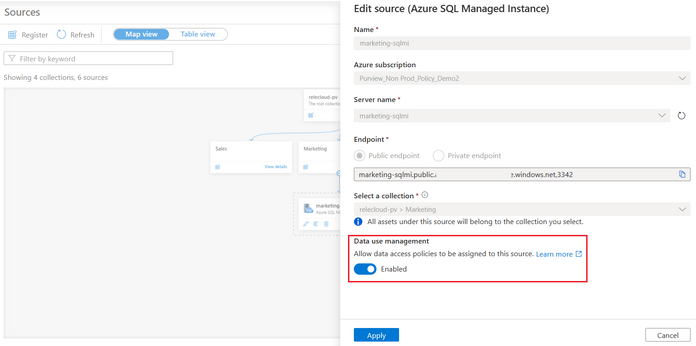
First, register the Azure SQL MI in Microsoft Purview and enable Data use management. This means consenting that you would like to use Microsoft Purview to grant users access to the Azure SQL MI.
Second, navigate to the Data Policy App in Microsoft Purview and then to DevOps policies. Create a policy, selecting the Azure SQL MI data source in the prior step. Once you do that, the Data resource path will show <subscription name > resource-group name > data source name>. Next, select one of two role definitions “SQL Performance Monitor” or “SQL Security Auditor”. Finally, select the Add/remove subjects to specify the Azure AD user(s) or group(s) that should be granted access:

Once you save the policy, Microsoft Purview will communicate it to the Azure SQL MI. It may take up to 5 minutes to be enforced.
To test, you can use SSMS. Connect with one of the AAD users that was granted access and then execute a query to get system metadata (DMVs and DMFs). For example, SQL Performance Monitor grants access to see the virtual file stats or the wait times. SQL Security Auditor grants access to see database encryption keys. An IT user granted SQL Performance monitor user should be able to perform the operations:

Next, try accessing a table in one of the databases. The IT user is denied, which means the crown jewels are protected.

Recommended steps:
- DevOps policies for Azure SQL MI (Private Preview): Click here to test-drive this new experience. Note, your Microsoft Purview account and Azure SQLM MI will be allow-listed after you enroll.
- DevOps policies for Azure SQL Database (Public Preview) and SQL Server 2022 (GA):
by Scott Muniz | Feb 14, 2023 | Security, Technology
This article is contributed. See the original author and article here.
Official websites use .gov
A .gov website belongs to an official government organization in the United States.
Secure .gov websites use HTTPS
A
lock () or
https:// means you’ve safely connected to the .gov website. Share sensitive information only on official, secure websites.

Recent Comments