by Contributed | Apr 13, 2021 | Technology
This article is contributed. See the original author and article here.
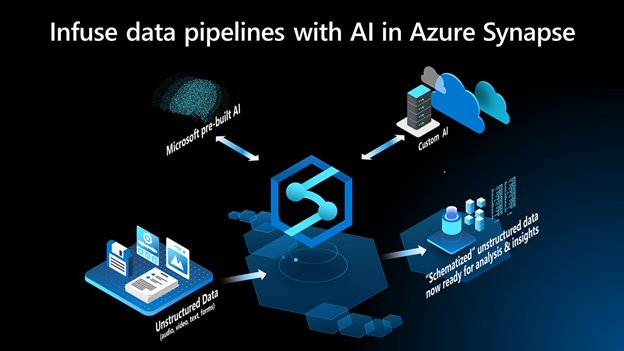
Starting today, Azure Synapse brings the capabilities of Azure AI directly to the Synapse Studio. Customers can now apply AI to analyze structured, semi-structured, and unstructured data like forms, audio, video and text documents without having to write a single line of code or be a data scientist.
“Some of the most useful insight often comes in the form of audio, text, or even images. Without learning ML, or even writing any code, Azure Synapse customers can use AI models built by Microsoft to ‘schematize’ these unstructured or semi-structured document types and analyze them in a structured format,” says John Macintyre, Director of Product for Azure Synapse Analytics.
Being able to use AI to infer structure from data sources previously unavailable for analytics enables customers to expand the analytics landscape, apply common data lineage and management concepts to their unstructured data, and easily derive insights from it. Inferring latent structure from audio, video, and text data structure enables Azure Synapse customers to normalize their data landscape and discover powerful insights that were previously hidden or difficult to analyze.
These AI-infused pipelines automate the task of starting with unstructured data in different formats and languages, normalizing, annotating, and extracting insights.
Getting started
To get started, customers can browse the gallery of pipeline templates in the Knowledge Center in Azure Synapse and select Customer Feedback Analytics. This template enables users to analyze customer feedback by simply adding an AI transformation directly into the data pipeline. It can easily be edited to fit a different scenario like analyzing medical forms, documents, or business forms.
 Figure 1: Knowledge Center in Azure Synapse
A common pattern in most organizations is to mine customer feedback for product improvements, churn analysis, and generate business metrics. For example, a hotel chain may want to understand how routine customer experiences eventually impacts sales. However, most customer engagement data is locked up inside phone calls, texts, online reviews and emails.
Using the integration of Azure Synapse and Azure Cognitive Services, B2C calls can be transcribed, and product or service mentions and their associated sentiment is transformed into structured tables directly in Azure Synapse. Joining insight from reviews or phone calls with historical revenue data enables customers to understand how specific experiences were good or bad for business. This is all possible today within Azure Synapse, no code or machine learning required.
The screenshot below shows the entire data pipeline that makes this possible—including the AI transformation in the red box where opinion mining infers sentiment from reviews.
 Figure 2: “Customer Feedback Analytics” Pipeline Template in Azure Synapse
This next screenshot is a double click on the AI transformation infused into the data pipeline. These activities invoke the Azure Cognitive Services APIs to identify key phrases, entities and perform sentiment analysis on the reviews.
 Figure 3: “Opinion Mining” copy data activity in the data pipeline to invoke API for sentiment analysis
Configuring each of the Cognitive Services endpoints to enrich each review within the dataset.
 Figure 4: Activity in the data pipeline calling the API in Azure Cognitive Services
The final step in the pipeline is to generated a structured representation of the data the enables BI and ad-hoc analytics on the data.
 Figure 5: Databases created by the “Customer Feedback Analytics” already infused with sentiment analysis results
Conclusion
To try the customer feedback analytics sample, visit the Knowledge Center in Azure Synapse, select Pipelines, and then launch Customer Feedback Analytics. The sample demonstrates how you can build data pipeline infused with code-free AI to answer questions like, “What were the most common descriptors or key phrases associated with negative reviews?”
This new feature allows you to leverage pre-built and custom AI models to infer structure from your unstructured data and leverage the same tools to analyze structured and unstructured data. You can now apply AI directly to your data integration workloads in Azure Synapse to harness the latent insights from unstructured data in your organization’s data analytics processes.
Get Started Today
Customers with *qualifying subscription types can now try the serverless SQL and Apache Spark pool resources in Azure Synapse using free quantities until July 31st, 2021.

*Free quantities apply only to the following subscription types: Pay-As-You-Go, Microsoft Azure Enterprise, Microsoft Azure Plan, Azure in CSP, Enterprise Dev/Test. These included free quantities aggregate at the enrollment level for enterprise agreements and at the subscription level for pay-as-you-go subscriptions.
by Contributed | Apr 13, 2021 | Technology
This article is contributed. See the original author and article here.
Earlier today we announced a new set of capabilities for Microsoft Defender for Endpoint that empower organizations to discover and secure network devices and unmanaged endpoints. This is especially critical in the new global hybrid working environment, which exposes the most challenging cybersecurity landscape we’ve ever encountered.
The challenge: unmanaged network devices
We know that users are 71% more likely to be infected on an unmanaged device and connecting from these devices to business networks from offers a high value target for attackers to launch broader attacks from. In recent years, we witnessed several cases where security vulnerabilities in networking gear were actively exploited in the wild by cybercriminals. In some cases, this meant that attackers had the capability to access computers connected directly to corporate networks from the internet (such as CDPwn, EternaBlue, EternalRed).
From a vulnerability management standpoint, the large number of unmanaged network devices deployed in each organization creates a large surface area of attack, representing a significant risk to the entire enterprise. These network devices must be secured and included in each organization’s vulnerability management program. The first step is for an organization to make sure that every network device is discovered, accurately classified, and added to asset inventory.
Network device discovery in Defender for Endpoint
Defender for Endpoint customers can now take advantage of the new network discovery capabilities available in the Device inventory section of the Microsoft 365 security center and Microsoft Defender Security Center consoles. To do so a designated Microsoft Defender for Endpoint device will be used on each network segment to perform periodic authenticated scans of preconfigured network devices. Once discovered, Defender for Endpoint’s threat and vulnerability management capabilities provide integrated workflows to secure discovered switches, routers, WLAN controllers, firewalls, and VPN gateways.
Vulnerability management for network devices
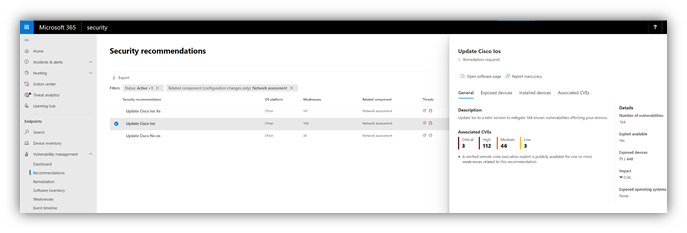
After the network devices are discovered and classified, security administrators will be able to receive the latest security recommendations and review recently discovered vulnerabilities on network devices deployed across their organizations.
Figure 1: Security recommendation to update Cisco operating systems that run on routers, switches, and WLAN controllers

Figure 2: Security recommendation details with all vulnerabilities associated with the Cisco IOS operating system
Solution approach
Network devices are not managed as standard endpoints since Defender for Endpoint does not have a sensor built into the network devices themselves. These types of devices require an agentless approach where a remote scan will obtain the necessary information from the devices. Depending on the network topology and characteristics, a one or more Windows devices onboarded to Microsoft Defender for Endpoint will perform authenticated scans of network devices using SNMP (read-only).
OS coverage for vulnerability assessment
Currently, the following operating systems are supported:
- Cisco IOS, IOS-XE, NX-OS
- Juniper JUNOS
- HPE ArubaOS, Procurve Switch Software
- Palo Alto Networks PAN-OS
Note: Support for additional networking vendors and operating systems will be added over time, based on data gathered from customer usage. Therefore, you are encouraged to configure all your network devices, even if they are not specified in this list.
How to get started
Your first step is to select a device that will perform the authenticated network scans.
- Allocate an assessment device (client or server) that has a network connection to the management port for the target network devices. This can be any Windows device that has been onboarded to Defender for Endpoint. Note: SNMP traffic between the Defender for Endpoint assessment device and the target network devices must be allowed (e.g., by the organization’s firewall).
- Decide which network devices will be assessed for vulnerabilities (e.g., a Cisco switch or a Palo Alto Networks firewall).
- Make sure SNMP read-only is enabled on all configured network devices to allow Defender for Endpoint assessment device to query the configured network devices. Note: ‘SNMP write’ is not needed for the proper functionality of this feature.
- Obtain the IP addresses of the target network devices to be scanned (or the subnets where these devices are deployed).
- Obtain the SNMP credentials of the target network devices (e.g., Community String, noAuthNoPriv, authNoPriv, authPriv). You’ll be required to provide these when configuring a new assessment job.
- Proxy client configuration: No additional configuration is required other than the Defender for Endpoint device proxy requirements.
- The following domains/URLs should be allowed/enabled in your firewall/proxy rules. This is essential to allow the network scanner to be authenticated and work properly. Note: The following user permission option is required to configure assessment jobs: ‘Manage security settings in Security Center’.
login.windows.net
*.securitycenter.windows.com
login.microsoftonline.com
*.blob.core.windows.net/networkscannerstable/*
Install the network scanner
1. In the Microsoft 365 security center console, go to Settings > Endpoints > Assessment jobs page.


2. Download the network scanner and install it on the designated Defender for Endpoint assessment device.

3. Network scanner installation & registration:
- Sign in using a Microsoft account that has the Defender for Endpoint permission called “Manage security settings in Security Center.”. The sign-in process can be completed on the assessment device itself or any other device (i.e., your personal client device).

- To complete the network scanner registration process, copy and follow the URL that appears on the command line, and use the provided installation code to complete the registration process. Note: You may need to change Command Prompt settings to be able to copy the URL.
Enter the code here:

Use your Microsoft account with the required threat and vulnerability management permissions to sign in.

When finished, you should see the following messages in your browser and CMD that state that you have signed into the Microsoft Defender for Endpoint network scan agent application successfully:


Configure a new network assessment job
1. In the Microsoft 365 security center console, go to Settings > Endpoints > Assessment jobs page.

2. Add a new network assessment job.

3. Follow the set-up flow:
- Choose an ‘Assessment job’ name and the ‘Assessment device’ on which the network scanner was installed. This device will perform the periodic authenticated scans.

- Add IP addresses of target network devices to be scanned (or the subnets where these devices are deployed).

- Add required SNMP credentials of the target network devices.


- Save the newly-configured network assessment job to start the periodic network scan.
Scan and add network devices
In the set-up flow, you can perform a one-time test scan to verify that:
- There is connectivity between the Defender for Endpoint assessment device (network scanner) and the configured target network devices.
- The configured SNMP credentials are correct.

Once the results show up, you can choose which devices will be included in the periodic scan. If you skip viewing the scan results, all configured IP addresses will be added to the network assessment job periodic scan (regardless of the device’s response).
TIP: The scan results can also be exported.

Newly-discovered devices will be shown under the new Network devices tab in the Device inventory page (it may take up to ~2hrs after adding an assessment job until the devices are updated).

Thank you for your interest in the network devices discovery and vulnerability management feature. We encourage you to join us in the public preview program. This program lets you test new features in their early phases and enables you to provide feedback that will influence the final product. For those not already enrolled in the program, we encourage you to do so by turning on the preview features. Once enrolled, we look forward to seeing your feedback at: TVM@microsoft.com.
More information about this feature and our broader range of unmanaged devices capabilities can be found in the Microsoft Defender for Endpoint product documentation.

by Contributed | Apr 13, 2021 | Technology
This article is contributed. See the original author and article here.
Earlier today, we announced a new set of capabilities for Microsoft Defender for Endpoint that empower organizations to discover and secure network devices and unmanaged endpoints. This is especially critical in the new global hybrid working environment, which exposes the most challenging cybersecurity landscape we’ve ever encountered. This blog provides more information on the unmanaged endpoint discovery feature while an additional blog provides more information on how to configure the network device discovery feature.
The challenge – unmanaged endpoints
In recent years, the efficacy of Endpoint Protection (EPP) and Endpoint Detection and Response (EDR) platforms has continued to increase. With the rise of unified SIEM and XDR (extended detection and response) solutions, like Microsoft 365 Defender, the level of efficacy that our customers are benefiting from continues to improve. To fully utilize these solutions to defend your environment, it’s critical to have full visibility of all the devices in your organization. You can’t protect what you can’t see!
David Weston, Microsoft Director of Enterprise and OS Security, advises:
“The riskiest threat is the one you don’t know about. Unmanaged devices are literally one of your weakest links. Smart attackers go there first. With work-from-home, the threat has grown exponentially, making discovering and applying security controls to these devices mission critical.”
There have been many examples where unmanaged devices were exploited and led to a breach, such as the Equifax breach. In this case the breach originated via an unpatched vulnerability on an internet-facing server. This might have been easily addressed except for the fact that the server was unmanaged–no one knew it needed patching. Those responsible for the security profiles and policies of these devices were basically unaware of its existence.
Unmanaged endpoint discovery in Microsoft Defender for Endpoint
To address scenarios like this we’re adding unmanaged endpoint discovery to Microsoft Defender for Endpoint to help customers discover and secure unmanaged endpoints on their corporate network. This will help detect and report upon any device seen on a corporate network that can be onboarded and secured by Microsoft Defender for Endpoint.
As part of this new functionality, two forms of discovery are provided including Standard and Basic. For public preview all tenants will initially have Basic discovery configured which uses unicast or broadcast network events captured by the onboarded devices to discover unmanaged endpoints. Basic discovery uses the SenseNDR.exe binary for passive network data collection and no network traffic will be initiated. On May 10, unless otherwise configured by the tenant, we will automatically switch from Basic to our recommended form of discovery which is called Standard discovery. This is an active discovery method where managed devices actively probe the network to identify unmanaged devices. From here the interfaces on discovered devices are leveraged to collect threat, vulnerability and metadata used for device fingerprinting. Standard discovery builds a deeper more complete picture of the discovered devices than Basic mode and and allows for vulnerability assessments.
When you go to Microsoft 365 security console you will see two new tiles available. The first shows “Devices to onboard” and will present all devices seen in the last 30 days. We also check whether the device has been seen more than just once over a 3-day period. This prevents a recommendation appearing to onboard a device that was plugged onto the network once, then won’t be seen again.
The second tile is “Discovered devices in my network” and will be broken down into device types.

Once discovered, the devices will appear in the Device Inventory. Clicking the button to “View recently discovered devices” will take you straight to where we have a new set of filters available where you can apply criteria relevant to these new devices, as shown in the screenshot below:

This data is then used as part of the security recommendations within threat and vulnerability management. You can go to the Security recommendations section under Vulnerability management and type “Onboard” into the Search box to see discovered devices eligible for onboarding:

Once you know about these devices, you can start to onboard them into Defender for Endpoint. This empowers you to close the unmanaged endpoint gap in your environment which is an easy target for attackers. By using the remediation options presented as part of the Security Recommendations, you can open a ticket in Microsoft Endpoint Manager to remediate and onboard the device.
Advanced hunting has also been improved to allow you to query these devices and export data with whatever columns you like:
DeviceInfo
| where Timestamp > ago(7d)
| summarize arg_max(Timestamp, *) by DeviceId
| where OnboardingStatus == ‘Can be onboarded’
| distinct Timestamp, Device Name, DeviceId, OSPlatform, OSDistribution, OSVersion, ReportId
“Timestamp” and “ReportId” lets you run this as a custom detection. For example, you could write a rule to generate an alert whenever a device is connected to a certain subnet.
We have also exposed “Onboarding Status” in the API and in the connector for Azure Sentinel, to provide visibility into security tooling you might have in place.
Enabling discovery
You will see that endpoint discovery is enabled on your tenant through a banner that appears in Device inventory . This banner will be available until the automatic switch from Basic to Standard discovery occurs on May 10th, giving you the option to easily spot and switch over to Standard discovery as soon as you are ready.

If you don’t want Standard discovery to be automatically enabled on May 10, you also have the option to go to Device discovery in settings and select Basic discovery to ensure the automatic change doesn’t occur.

Controlling discovery
Although we recommend using Standard discovery, there may be conditions that justify applying controls to the discovery process. When Standard discovery actively probes the network, it uses two PowerShell scripts. These PowerShell scripts are Microsoft signed, and are executed from the following location:
C:ProgramDataMicrosoftWindows Defender Advanced Threat ProtectionDownloads*.ps
If you are using other security tooling in your environment, there is a possibility these scripts could cause alerts to be raised in those tools. To avoid this situation, we suggest adding the path the scripts are run from to the allow list within your tooling. We also provide customization capabilities around which devices will perform Standard discovery and thus run the scripts. When you enable Standard discovery, the default mode is that all managed Windows 10 devices perform this task. To change this you can leverage a tagging feature which enables you to restrict the execution of the Standard discovery process to only certain devices in your environment.

One caveat: we only recognize tags that have been applied to the device through the portal (or via the API). You cannot utilize tags that have been set via the registry on the device.
You may also have situations where devices are set up as honeypots or have certain networks where you have specific monitoring in place. You can exclude these from Standard discovery and can configure this through the Exclusions tab in Device discovery. There, you can specify either a specific IP address or a subnet to exclude from the Standard discovery mode, although we will still gather details of devices through the passive discovery available in Basic discovery.

Discovering the right devices
One important aspect to this functionality is ensuring it discovers the correct devices. You don’t want to take your laptop home and then see all your smart devices, TVs, gaming consoles, etc., showing up in the device inventory list. Not only does it clutter the inventory, but there are also privacy implications from discovering personal, at home devices.
The good news: there is built-in logic to prevent this, and a level of control to define what networks this discovery process runs against. The logic was designed to differentiate between corporate networks and non-corporate networks, to avoid discovery of private or public devices not controlled by the organization. Strict conditions are in place to ensure such devices won’t be discovered and presented in the portal.
The system differentiates between corporate and non-corporate networks by correlating common network interfaces identifiers among Microsoft Defender for Endpoint onboarded devices.
To add an extra layer of control, the following screenshot displays the Monitored networks tab within Device discovery settings which makes discovered networks visible and enables you to specifically whether to include or exclude them.

Disabling…if you really must!
Finally, if you decide that our new endpoint discovery capability isn’t for you, a switch is available in the Advanced settings page in the Microsoft Defender Security Center that allows you to disable the feature (under “Endpoints” in the settings in the Microsoft 365 security center) . While this isn’t recommended, we recognize some organizations may require due diligence to be performed before taking advantage of the feature.

We’re excited to offer you this new functionality and thank you for your interest in the unmanaged endpoint discovery feature. You will gain enhanced visibility of your estate, and the power to close down a vector of attack that attackers increasingly take advantage of.
We encourage you to join us in the public preview program. This program lets you test new features in their early phases and captures your feedback that will influence the final product. For those not already enrolled in the program, we encourage you to participate by turning on preview features.
Once enrolled, we welcome your feedback. More information about this feature and our broader range of unmanaged devices capabilities can be found in the Microsoft Defender for Endpoint product documentation.
by Contributed | Apr 13, 2021 | Technology
This article is contributed. See the original author and article here.
We’re always adding to our training and certifications portfolio, and now you can discover the new role-based learning paths and modules that we released last month on Microsoft Learn. Look for new ways to build and deepen your skills and then validate them by earning certification. Check out our four new Power Automate modules and a new Finance module. This month, we also have a new learning path (with six modules) that explores how to upgrade from Dynamics AX 2012 to Finance and Operations apps. Work through these and other modules at your own pace. Using free, online training on Microsoft Learn, you can develop new skills to use on the job—and to show your employer that you’re ready to advance your career. If you need help figuring out which training to take, check out the Dynamics 365 learning paths page and the Microsoft Power Platform learning paths page, where you’ll find useful collections, learning paths to get you started, and popular modules.
The following learning paths and modules were released in March 2021.
Power Automate
Finance
Finance and Operations
Learning path/module
|
Role
|
Certification
|
Upgrade Dynamics AX 2012 to Finance and Operations apps
Six modules
|
Solution architect, functional consultant, developer, administrator
|
N/A
|
Compare integrations in Finance and Operations apps with Dynamics AX 2012
(A module in the “Upgrade Dynamics AX 2012 to Finance and Operations apps” learning path)
|
Solution architect, functional consultant, administrator
|
N/A
|
Compare reporting and analytics in Finance and Operations apps with Dynamics AX 2012
(A module in the “Upgrade Dynamics AX 2012 to Finance and Operations apps” learning path)
|
Solution architect, functional consultant, administrator
|
N/A
|
Get started with the extensibility framework in Finance and Operations apps
(A module in the “Upgrade Dynamics AX 2012 to Finance and Operations apps” learning path)
|
Developer, solution architect, functional consultant
|
N/A
|
Tools for code and data upgrade from Dynamics AX 2012 to Finance and Operations apps
(A module in the “Upgrade Dynamics AX 2012 to Finance and Operations apps” learning path)
|
Functional consultant, administrator, solution architect, developer
|
N/A
|
Industry Solutions
Dataverse for Teams
by Contributed | Apr 13, 2021 | Technology
This article is contributed. See the original author and article here.
Some start their workday in email. Some now in Microsoft Teams sifting chats. Either may define a person’s daily communication habits, but it’s the portal that is designed for everyone – the broadest, ongoing two-way dialog across your organization. It’s where people turn to find things like HR answers, IT help, or the latest company news. No matter, the company portal thrives and survives from the curated content top down and through dynamic creations from the bottom up and peer to peer. Let us explore this intranet communications end game and how it began.
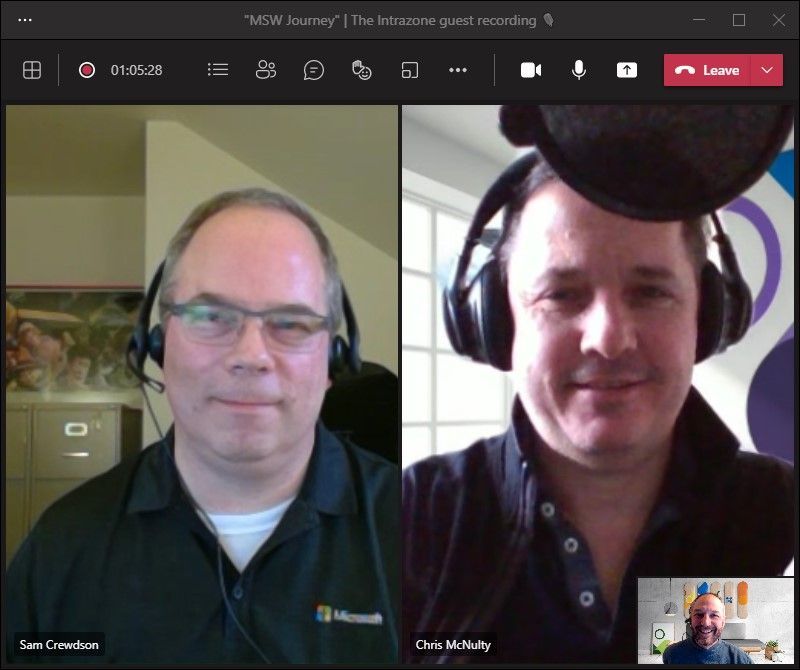
In this episode, Chris and I talk with Sam Crewdson (senior program manager | Microsoft) about his role at Microsoft managing *Microsoft Web* (MSW) on SharePoint. MSW is Microsoft’s internal company portal, built for 163,000 full-time employees. We dig into MSW over time – from on-premises to the cloud, from classic to modern, establishing it as a home site, and now its role within Microsoft Viva Connections inside of Microsoft Teams. Lots of learning and insight from over the years across UX, innovation and consistent listening to employee feedback.
By tuning in, the clarity of your intranet plans, by example, over time, come into 20/20 focus.
Note: Scroll below to see screenshots of what MSW looks like today in a Web browser and in Microsoft Teams leveraging the new Viva Connections technology.
Listen to this episode below:
https://html5-player.libsyn.com/embed/episode/id/18701105/height/90/theme/custom/thumbnail/yes/direction/backward/render-playlist/no/custom-color/247bc1/
Subscribe to The Intrazone podcast! And listen to episode 64 now + show links and more below.
Intrazone guests and co-hosts – clockwise, starting on the left: Sam Crewdson (senior program manager | Microsoft) [guest], Chris McNulty (director | Microsoft) [co-host], and little Mark Kashman (senior product manager | Microsoft) [co-host].
A look at MSW now – both from a modern Web browser and in Teams via our internal use of Microsoft Viva Connections:
 The Microsoft Web (MSW) portal when accessed through a modern browser.
 The Microsoft Web (MSW) portal when accessed from within Microsoft Teams enabled by Microsoft Viva Connections. Note how the Microsoft 365 suite bar experience adapts.
Note: both above entry points to MSW also provide access to the SharePoint app bar with global navigation (not shown for company privacy). To access them, a Microsoft employee need only click one of the top left icons under the main Microsoft 365 app launcher (The ‘Waffle’) in the Web view, and the Microsoft logo from the Teams view.
Links to important on-demand recordings and articles mentioned in this episode:
- Hosts and guests
- Articles and sites
- Events
Subscribe today!
Listen to the show! If you like what you hear, we’d love for you to Subscribe, Rate and Review it on iTunes or wherever you get your podcasts.
Be sure to visit our show page to hear all the episodes, access the show notes, and get bonus content. And stay connected to the SharePoint community blog where we’ll share more information per episode, guest insights, and take any questions from our listeners and SharePoint users (TheIntrazone@microsoft.com). We, too, welcome your ideas for future episodes topics and segments. Keep the discussion going in comments below; we’re hear to listen and grow.
Subscribe to The Intrazone podcast! And listen to episode 64 now.
Thanks for listening!
The SharePoint teams want you to unleash your magic, creativity, and productivity – and be compliant about it all. And we will do this, together, one compliance score point at a time.
The Intrazone links
+ Listen to other Microsoft podcasts at aka.ms/microsoft/podcasts.
![Left to right [The Intrazone co-hosts]: Chris McNulty, director (SharePoint/Viva – Microsoft) and Mark Kashman, senior product manager (SharePoint – Microsoft).](https://www.drware.com/wp-content/uploads/2021/04/fb_image-89.jpeg "Chris-Mark_in-studio.jpg") Left to right [The Intrazone co-hosts]: Chris McNulty, director (SharePoint/Viva – Microsoft) and Mark Kashman, senior product manager (SharePoint – Microsoft).
Left to right [The Intrazone co-hosts]: Chris McNulty, director (SharePoint/Viva – Microsoft) and Mark Kashman, senior product manager (SharePoint – Microsoft).
 The Intrazone, a show about the Microsoft 365 intelligent intranet (aka.ms/TheIntrazone)

Recent Comments