Loop Prevention in Exchange Online Demystified
This article is contributed. See the original author and article here.
We often get questions regarding mail forwarding in Exchange Online. As you already know, Exchange Online is a shared service. We must take care that users cannot take the service down by creating mail loops. It is sometimes a little confusing for our customers that we handle this somewhat differently than in Exchange on-premises organizations. With this blog post we will give you an overview of how we handle possible mail loop scenarios and how this affects your mail flow. If you are the kind of a person that loves digging into the details, this post is for you!
Mail loop insight in the Security & Compliance Center
You may have ended up here because you ran into a possible mail loop scenario. This blog post should help you to get a better understanding about how we handle possible mail loop scenarios, how they can occur and what to do to prevent them. I recommend checking the Fix possible mail loop insight in the Recommended for you area of the Mail flow dashboard in the Security & Compliance Center (protection.office.com) or the converged security portal (security.microsoft.com). It notifies you when a mail loop is detected in your organization.
Read on now if you want to get deeper insights about our loop prevention mechanisms.
Currently stamped and preserved X-headers
It’s important to know that there are some headers which get preserved across Exchange organizational boundaries and most of them will not be removed during transport (neither by Exchange Header Firewall nor using transport rules). These headers are:
- X-MS-Exchange-Inbox-Rules-Loop
- X-MS-Exchange-Transport-Rules-Loop
- X-MS-Gcc-Journal-Report
- X-MS-Exchange-Moderation-Loop
- X-MS-Exchange-Generated-Message-Source
- X-LD-Processed
- X-MS-Exchange-ForwardingLoop
- X-EOPAttributedMessage
- X-EOPTenantAttributedMessage
Please keep in mind that we might change these headers without notice. The purpose of this list is only to provide an overview of different headers we use to prevent loops in the service. Please do not rely on them if you construct business-critical workflows.
To get a better understanding of how loop prevention in Exchange Online works, we will have a look at most of these headers.
X-MS-Exchange-Inbox-Rules-Loop header
First things first: in the cloud, the number of times a message can be redirected, forwarded, or replied to automatically is limited to 1. On-premises Exchange servers are limited to 3 (as documented here).
We set this header for example in the following scenarios:
- User created an inbox rule which forwards the message to another recipient
- User created an inbox rule which redirects the message to another recipient
The value of this header denotes the original recipient of the mail (one which has a mailbox rule to forward to the new recipient in To: header). It looks like this:
X-MS-Exchange-Inbox-Rules-Loop: john.doe@contoso.com
If you run an extended message trace:
Start-HistoricalSearch -ReportType MessageTraceDetail -ReportTitle Inbox-Rules-Loop -MessageID “<1234567890123456789012345678901@AM0PR04MB6531.eurprd04.prod.outlook.com>” -NotifyAddress john.doe@contoso.com -StartDate 05/09/2020 -EndDate 05/10/2020
And you find something like this:
Source: MAILBOXRULE
event_id: THROTTLE
reference: XLoopHeaderCount:1/1
It means that the message got silently dropped because it has reached datacenters X-MS-Exchange-Inbox-Rules-Loop limit which is (as described above) 1.
Mostly important for Exchange Online customers who run an on-premises Exchange organization in a Hybrid configuration: we also check if current recipient mail address is already present within an X-MS-Exchange-Inbox-Rules-Loop header for incoming messages. If that is the case, then we silently drop the message as well (not yet relevant in Exchange Online because the X-MS-Exchange-Inbox-Rules-Loop limit is currently 1 which means we drop the message if any X-MS-Exchange-Inbox-Rules-Loop header exists when the message arrives, regardless of which address the header contains).
X-MS-Exchange-Transport-Rules-Loop header
We set this header in the following scenario:
Mail gets redirected or recipients are added (To, Cc, Bcc) by an Exchange transport rule (ETR)
If the value of this header exceeds its thresholds (in the cloud, the number of times a message can be redirected or forwarded automatically by using a transport rule is limited to 1 – please have a look at Scenario 2 in the Real-life examples – what is the impact on email? how this can happen), we then stop processing, drop the message, log the event, and finally send out an NDR to the original sender like this:
550 5.7.128 TRANSPORT.RULES.RejectMessage; Transport rules loop count exceeded and message rejected
Note: We do not send an NDR to the original sender for any recipient added to Bcc by an Exchange transport rule during the mail flow (we only NDR for To and Cc type recipients).
X-MS-Exchange-Moderation-Loop header
Example scenario when we set this header:
- When a message is forwarded for approval, we stamp this header into the approval message followed by arbitration mailbox SMTP address:
X-MS-Exchange-Moderation-Loop: SPO_Arbitration_fa627f00-12d2-4d68-bd5d-75cd62ead0ee@M365x777241.onmicrosoft.com
- We allow at maximum 1 header. If there are more headers in place, we are going to silently drop the approval message.
You will find the following smtp status logged when running a message trace:
550 5.2.0 Resolver.MT.ModerationLoop; Loop in approval process
X-LD-Processed header
We use this header to track transport processing on a per tenant basis:
- To track potential loops due to mail contact ExternalEmailAddress (TargetAddress) redirection
- If forwarding is configured using the Set-Mailbox -ForwardingSMTPAddress or -ForwardingAddress parameter
If an action like this was detected from our service, we stamp the header followed by the ID of the tenant and a list of strings indicating the list of work that is being tracked.
This may be:
- ExtAddr if we are doing an external redirection by using ExternalEmailAddress
- ExtFwd if we are doing external forwarding by using ForwardingSMTPAddress or ForwardingAddress
If the message is redirected or forwarded to another tenant, we add another X-LD-Processed header containing the tenants ID (we do not replace any existing X-LD-Processed header). If the message comes from an external address and is redirected to another external address, we also stamp the Resent-From header to indicate that Exchange has touched it.
We allow a maximum of 3 loops per tenant for ExternalEmailAddress (TargetAddress) or ForwardingAddress/ForwardingSmtpAddress.
If we exceed the number of forwards, we track the following smtp event (you can find the event by running a message trace). We do not send out an NDR to prevent further loops:
550 5.4.142 RESOLVER.FWD.LoopingTarget; forwarding to a looping external address
We also detect if there is a loop within the directory. You normally should not run into this kind of loop. It can occur, for example, when a mailbox has forwarding configured and ForwardingAddress refers to itself. This job is done while the message is processed. If we detect a loop here, the message will be dropped and we NDR the sender with:
550 5.4.6 RESOLVER.FWD.Loop; there is a forwarding loop configured in the directory
X-MS-Exchange-ForwardingLoop header
This header is added when forwarding happens due to ForwardingSmtpAddress or ForwardingAddress properties set on a mailbox. In the case where the mailbox also has DeliverToMailboxAndForward:$true, when recipient A forwards a message to recipient B, there will be two copies of the message. One to the original recipient A and the other to the forwarded recipient B. The value of the header in the message to the forwarded recipient B will contain <SmtpAddressOfOriginalRecipient>;<TenantGuidOfOriginalRecipient>. The header looks like this:
X-MS-Exchange-ForwardingLoop: JDoe@contoso.com;53bb1ab7-edea-4e35-8c3f-e395807764bf
The purpose of this header is to detect forwarding loops like A forwards to B and B forwards to A. If B attempts to forward to A, the message will be dropped with the smtp response:
550 5.4.142 RESOLVER.FWD.LoopingTarget; forwarding to a looping external address
The message copy to the original recipient A will also have this header added with the value ForwardingHandled;< TenantGuidOfOriginalRecipient>. It looks like this one:
X-MS-Exchange-ForwardingLoop: ForwardingHandled;53bb1ab7-edea-4e35-8c3f-e395807764bf
The purpose of this header with ForwardingHandled value is to prevent forwarding message multiple times in scenarios like Centralized Mail Transport (aka CMT or CMC), where the message to the original recipient is routed out of the service and then back to the service. In a CMC scenario the message will be forwarded first when the message enters the service. When the message gets routed out and sent back to the service, duplicate forwarding will be prevented by looking at this header in the message. Please have a look at Scenario 5 at the end of this post to get a better understanding of the workflow in CMC scenario.
Note: Customers sometimes make use of the X-MS-Exchange-Inbox-Rules-Loop header to check if a message was forwarded to forwarding address or forwarding SMTP address of the mailbox. If you are doing so, you should now use the new X-MS-Exchange-ForwardingLoop header instead.
X-MS-Exchange-Generated-Message-Source header
This header is used to check for loops in Exchange agent-generated messages. In Exchange Online, we do this while they are in submission and smtp process. We make use of this header for example if an automatic reply via inbox rule is in place. We then stamp the following headers:
X-Auto-Response-Suppress: All
X-MS-Exchange-Inbox-Rules-Loop: john.doe@contoso.com
auto-submitted: auto-generated
X-MS-Exchange-Generated-Message-Source: Mailbox Rules Agent
Let us have a closer look at these X-headers:
- X-Auto-Response-Suppress
- Specifies whether a client or server application will forego sending automated replies in response to this message. There are different values available. In case of an automatic reply, Exchange sets the value to All.
- X-MS-Exchange-Inbox-Rules-Loop
- Please have a look at 1) X-MS-Exchange-Inbox-Rules-Loop
- auto-submitted
- Defined in RFC 3834. Let me quote from there:
“The purpose of the Auto-Submitted header field is to indicate that the message was originated by an automatic process, or an automatic responder, rather than by a human; and to facilitate automatic filtering of messages from signal paths for which automatically generated messages and automatic responses are not desirable.”
- X-MS-Exchange-Generated-Message-Source
- Short: This X-header is used to prevent mail loops caused by agent-generated messages.
- Long: If this header is present, it means that the mail you see is an agent-generated message. We check if it does not exceed our limits. We do these checks while the message is processed in submission and smtp. There are different limits in place. If the message is an inter-tenant one (means no intra-tenant organization header exists), we limit this to 3 agents, and they may be the same (for example three times DLP Policy Agent).
You will see multiple agents for example if you have DLP in place and an inbox rule which redirects every message to another mailbox. If your DLP policy matches and you receive a mail notification that gets redirected to another mailbox, you will see something like this:
X-MS-Exchange-Generated-Message-Source: DLP Policy Agent,Mailbox Rules Agent.
If the message is an intra-tenant one, we limit this to a maximum of 2 Exchange agents. Side effect messages are, for example, intra-tenant messages. This kind of messages are generated after a message has been delivered to the mailbox. For example, a message delivered to a mailbox triggers an auto reply or inbox rule that redirects the message to another recipient. In this case, a side effect message is generated. We drop the message if the Exchange agent is the same (for example two times DLP Policy Agent). While in progress, side effect messages are stamped with the following header which is replaced after the message has been delivered.
X-MS-Exchange-Organization-Generated-Message-Source: Mailbox Rules Agent
Some more loop protection insights
We also detect incoming messages that are looping when they pass Exchange Online Protection (EOP). We count every time a message passes through EOP frontdoor and we reject every message that reaches our thresholds. Let me explain this in a little more detail.
To do this, we need some more headers. As this is EOP related work, the headers are named like this:
- X-EOPAttributedMessage
- X-EOPTenantAttributedMessage
- Some more internal loop prevention headers for routing to quarantine and ATP
We increase the X-EOPAttributedMessage header every time the message is processed by EOP frontdoor. It looks like this:
X-EOPAttributedMessage: 1
We also stamp the X-EOPTenantAttributedMessage header with tenant guid and a number which shows how often the message was processed through this tenants EOP. A valid header of a messages that passes EOP for the first time looks like this:
X-EOPTenantAttributedMessage: 543b1ab7-eeea-4a35-8c3f-e396007764bf:0
If the message is re-routed through another tenant (for example, an ETR in Tenant A automatically forwards the message to Tenant B), the X-EOPTenantAttributedMessage header is reset. Anyway, the X-EOPAttributedMessage count is kept and increased. We drop the message if it goes several times through the same tenant (X-EOPTenantAttributedMessage) or when it exceeds a threshold of several more message being routed between different tenants).
If we exceed the number of total hops (which is currently 7 but it but can be changed in the future without being separate announced), you can find the following smtp response logged:
554 5.4.14 Hop count exceeded – possible mail loop ATTR1
If we exceed the hop count within the same tenant (which is currently 3 but can be changed in the future without separate announcement), we then NDR this one out:
554 5.4.14 Hop count exceeded – possible mail loop ATTR34
If you see any of the following smtp responses logged, you then should be open a support case for further investigation. We protocol these if a threshold associated with quarantine or ATP has been reached and a message has been dropped by the service:
454 4.4.15 Hop count exceeded – possible mail loop ATTR39
454 4.4.15 Hop count exceeded – possible mail loop ATTR40
Real-life examples – what is the impact on email?
Here are some examples of how all of this may affect your mail flow:
Scenario 1:
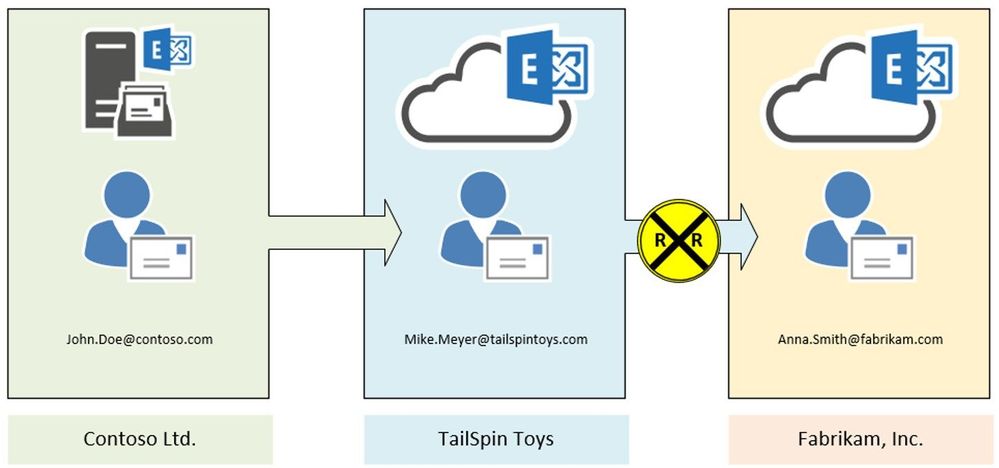
John Doe (Contoso Ltd.) creates an inbox rule to redirect every message to Mike Meyer (TailSpin Toys). Mike in turn has another inbox rule in place to redirect every incoming message to Anna Smith (Fabrikam, Inc.).
Result:
In this case, Exchange stamps the X-MS-Exchange-Inbox-Rules-Loop: John.Doe@contoso.com header after the first redirect is processed. Exchange at TailSpin Toys detects that header (message tracking reference will log XLoopHeaderCount:1/1) and does not redirect the message again. In this case Mike Meyer will not get an NDR. As an administrator you will find this event by running a message trace.
This scenario is one of the most seen and we must be very restrictive because customers can easily build a loop here. Therefore, we restrict this to only 1 redirect/forward by using inbox rules. This limit is hardcoded and cannot be changed. If you make use of Exchange on-premises, it is possible to have up to 3 redirects by inbox rules in place. As an administrator it is your task to protect your users from building loops.

Scenario 2:
In this scenario we make use of two transport rules. The first one, located at Contoso’s Exchange organization, redirects every message addressed to John.Doe@contoso.com and coming from outside the organization, to Mike Meyer at TailSpin Toys company:

At TailSpin Toys there is also a transport rule in place, to Bcc incoming messages to Anna Smith at Fabrikam:

Result:
In this case the message is stamped at transport within Contoso organization. We see the X-MS-Exchange-Transport-Rules-Loop: 1 header. At TailSpin Toys the message is dropped due to X-MS-Exchange-Transport-Rules-Loop: 1 header. If you run a message trace, you will find the following event logged:
550 5.7.128 TRANSPORT.RULES.RejectMessage; Transport rules loop count exceeded and message rejected
Remember: We do not send out an NDR to the original sender. This is because of the second transport rule which is configured to add an additional recipient as BCC into the message. If the second transport rule is configured to add an CC-Recipient or simply redirects the message instead of an additional recipient as BCC, an NDR will be send out to the original sender.

Scenario 3:
In this scenario we are going to have a look at the moderation loop protection. We have a transport rule (2) that forwards every message, send from outside the organization to shared@fabrikam.com, to Anna Smith for approval (3). Anna is going to holiday and so she has created an inbox rule to redirect every message to the marketing team (4). Unfortunately, the marketing distribution list is also moderated.
Result:
In this case, the moderation message is stamped with the X-MS-Exchange-Moderation-Loop header, followed by the smtp address of the arbitration mailbox:
X-MS-Exchange-Moderation-Loop: SPO_Arbitration_fa627f00-12d2-4d68-bd5d-75cd62ead0ee@M365x777241.onmicrosoft.com
The approval request which is forwarded via inbox rule from Anna’s mailbox to the marketing distribution list is dropped and no NDR is send out to the original sender. If you run a message trace, you will find the following smtp response stamped:
550 5.2.0 Resolver.MT.ModerationLoop; Loop in approval process

Scenario 4:
In this scenario we are going to have a look at the X-LD-Processed header and how it works. Assumed we have the following setup: We have two companies – TailSpin Toys and Fabrikam. Both have marketing departments working together. To make this workflow easier, they decide to create mail users for each other company department (Marketing-Fabrikam and Marketing-TailSpin). Unfortunately, someone added the mail users to the local marketing distribution list – and the loop begins.
Result:
What happens here? Someone sends a mail to one of the distribution lists. Exchange expands the list and starts processing the item. For the first time the mail gets processed, we check on transport if any X-LD-Processed header followed by tenants guid is present. If this is not the case, we stamp a header like this:
X-LD-Processed: 6249f43a-676b-4124-a13a-50205140b751,ExtAddr
We do this also for the other tenant. So one more X-LD-Processed header is added:
X-LD-Processed: 53bb1ab7-edea-4e35-8c3f-e395807764bf,ExtAddr
We keep doing this every time the message is processed and at the end (after the message was processed for the 3rd time), the header looks like this:
X-LD-Processed: 6249f43a-676b-4124-a13a-50205140b751,ExtAddr,ExtAddr,ExtAddr
X-LD-Processed: 53bb1ab7-edea-4e35-8c3f-e395807764bf,ExtAddr,ExtAddr,ExtAddr
If the message enters transport again, it will be dropped and NDR is send out to the original sender:
554 5.4.14 Hop count exceeded – possible mail loop ATTR1 [HE1EUR04FT048.eop-eur04.prod.protection.outlook.com]
And so, the loop ends.

Scenario 5:
In this scenario we are going to have a look at the X-MS-Exchange-ForwardingLoop header and how it works. Assumed we have the following setup: Fabrikam has a Hybrid configuration and have also enabled Centralized Mail Transport (CMT; also known as CMC, RouteAllMessagesViaOnPremises enabled on the outbound connector). MX points to the Exchange Online service to make use of our malware and spam protection features. They need to route all outgoing messages through Exchange on-premises because of their mail signature and DLP solution which has not been migrated to cloud yet. Anna Smith of Fabrikam has set ForwardingSmtpAddress to John.Doe@contoso.com as well as DeliverToMailboxAndForward set to $true.
Result:
A message addressed to Anna.Smith@fabrikam.com enters the service (1). We notice that ForwardingSmtpAddress is set to John.Doe@contoso.com as well as DeliverToMailboxAndForward is set to $true. Now message bifurcation kicks in and creates another copy of the message. The message which goes to John.Doe@contoso.com gets stamped (2a) with following header:
X-MS-Exchange-ForwardingLoop: Anna.Smith@fabrikam.com;53bb1ab7-edea-4e35-8c3f-e395807764bf
And is routed through Exchange on-premises to John.Doe@contoso.com. Unfortunately, there is also ForwardingSmtpAddress set on John Doe’s mailbox which points to Anna.Smith@fabrikam.com. The message is now routed to the Exchange Online service again (3a). Here we detect that X-MS-Exchange-ForwardingLoop has already been set with that recipient and tenant guid. Result of this is that we drop the message with smtp response:
550 5.4.142 RESOLVER.FWD.LoopingTarget; forwarding to a looping external address
The original message copy to Anna Smith’s mailbox is also on its way. This message also makes an extra round through Exchange on-premises due to requirement imposed by having CMC enabled and it’s coming from Internet (i.e. not having passed through on-premises yet). Before being sent to on-premises, however, this copy was stamped with a header (2b). It looks a little different to the header mentioned before:
X-MS-Exchange-ForwardingLoop: ForwardingHandled;53bb1ab7-edea-4e35-8c3f-e395807764bf
As you can see, it contains ForwardingHandled instead of the recipient’s e-mail address. We need to do this in order to remember that Forwarding was already applied in cases when the message then has a routing requirement out of the EXO service such as Centralized Mail Transport. When on-premises sends it back to Exchange Online (3b), we now figure out that the X-MS-Exchange-ForwardingLoop header has already been stamped with ForwardingHandled flag. Result of this is that we don’t forward the message again (no RESOLVER REDIRECT event in Message Tracking Log/Message Trace Details Report). The message is finally delivered to Anna Smith’s mailbox (4b).
What if I need to do multiple forwards or redirects for handling business processes?
Glad you asked! Basically, there are 3 ways to go:
- Keep these mailboxes on-premises (which is not a real option if you want to use the awesome features available in Exchange Online). Remember: Some limits are different when using Exchange on-premises.
- Configure redirect via Set-Mailbox -ForwardingSMTPAddress or -ForwardingAddress parameter. As described above, we make use of the X-LD-Processed header in this scenario which allows up to 3 redirects per tenant.
- Make use of Microsoft Power Automate. With Power Automate you can create automated workflows between your favorite apps and services in a centralized way. This includes many email actions when using the Microsoft 365 Outlook Connector. I encourage you to check out the documentation, give it a try and see the power of this Microsoft Power Platform application.

I hope all these insights help you to get a better overview and understanding of how we handle possible loop situations in Exchange Online. It is sometimes a little confusing and may look complicated, but keeping the service running for our customers is a must.
Special thanks to all contributors: Especially to Stan Aleksiev for taking care of the technical review, Arindam Thokder, Dan Li, Guru Prasad, Arnold Kermer and Dmitry Starostin!


Recent Comments