by Contributed | May 6, 2021 | Technology
This article is contributed. See the original author and article here.
This is a step-by-step example of how to use MSI while connecting from Spark notebook based on a support case scenario. This is for beginners in Synapse with some knowledge of the workspace configuration such as linked severs.
Scenario: The customer wants to configure the notebook to run without using the AAD configuration. Just using MSI.
Here you can see, synapse uses Azure Active Directory (AAD) passthrough by default for authentication between resources, the idea here is to take advantage of the linked server synapse configuration inside of the notebook.
Ref: https://docs.microsoft.com/en-us/azure/synapse-analytics/spark/apache-spark-secure-credentials-with-tokenlibrary?pivots=programming-language-scala
_When the linked service authentication method is set to Managed Identity or Service Principal, the linked service will use the Managed Identity or Service Principal token with the LinkedServiceBasedTokenProvider provider._
The purpose of this post is to help step by step how to do this configuration:
Requisites:
- Permissions: Synapse ( literally the workspace) MSI must have the RBAC – Storage Blob Data Contributor permission on the Storage Account.
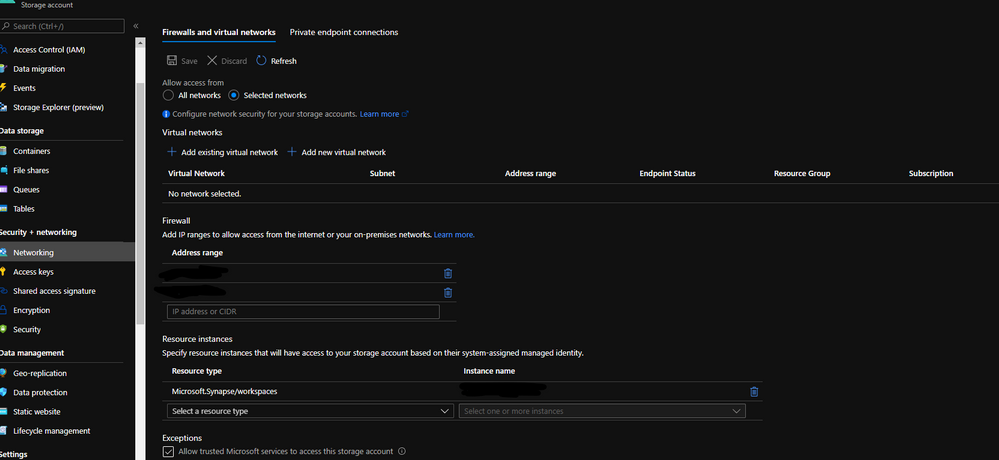
- It should work with or without the firewall enabled on the storage. I mean firewall enable is not mandatory.
Follow my example with firewall enabled on the storage
When you grant access to trusted Azure services inside of the storage networking, you will grant the following types of access:
- Trusted access for select operations to resources that are registered in your subscription.
- Trusted access to resources based on system-assigned managed identity.

Step 1:
Open Synapse Studio and configure the Linked Server to this storage account using MSI:

Test the configuration and see if it is successful.
Step 2:
Using config set point the notebook to the linked server as documented:
val linked_service_name = “LinkedServerName”
// replace with your linked service name
// Allow SPARK to access from Blob remotely
val sc = spark.sparkContext
spark.conf.set(“spark.storage.synapse.linkedServiceName”, linked_service_name)
spark.conf.set(“fs.azure.account.oauth.provider.type”, “com.microsoft.azure.synapse.tokenlibrary.LinkedServiceBasedTokenProvider”)
//replace the container and storage account names
val df = “abfss://Container@StorageAccount.dfs.core.windows.net/”
print(“Remote blob path: ” + df)
mssparkutils.fs.ls(df)
In my example, I am using mssparkutils to list the container.
You can read more about mssparkutils here: Introduction to Microsoft Spark utilities – Azure Synapse Analytics | Microsoft Docs
Additionally:
Following references permissions to Synapse workspace :
That is it!
Liliam UK Engineer
by Contributed | May 6, 2021 | Technology
This article is contributed. See the original author and article here.
The public folder (PF) migration endpoint in Exchange Online contains information needed to connect to the source on-premises public folders in order to migrate them to Office 365. PF migration endpoint can be based on either Outlook Anywhere (for Exchange 2010 public folders) or MRS (for Exchange 2013 and newer public folders).
In this blog post, we discuss PF migration endpoints for Exchange 2010 on-premises public folders. While Exchange 2010 is not supported, we have seen cases where customers still have these legacy Exchange servers and are working on their migrations.
To migrate Exchange 2010 PFs to Exchange Online you would typically follow our documented procedure. If you are reading this post, we assume that you are stuck at Step 5.4, specifically with the New-MigrationEndpoint -PublicFolder cmdlet. If this is the case, this article can help you troubleshoot and fix these issues. Some of this knowledge is getting difficult to find!
Exchange 2010 public folders are migrated to Exchange Online using Outlook Anywhere as a connection protocol. The migration endpoint creation will fail if there are issues with the way Outlook Anywhere is configured or if there are any issues with connecting to public folders using Outlook Anywhere (another sign of this is that Outlook clients cannot access on-premises public folders from an external network).
This means that from a functional perspective, you have an issue either with Outlook Anywhere or with the PF database (assuming that the steps you used to create the PF endpoints were correct).
Let’s look at the steps to troubleshoot PF migration endpoint creation.
Ensure Outlook Anywhere is configured correctly and is working fine
Outlook Anywhere uses RPC over HTTP. Before enabling Outlook Anywhere on the Exchange server, you need to have a Windows Component called RPC over HTTP (see reference here).
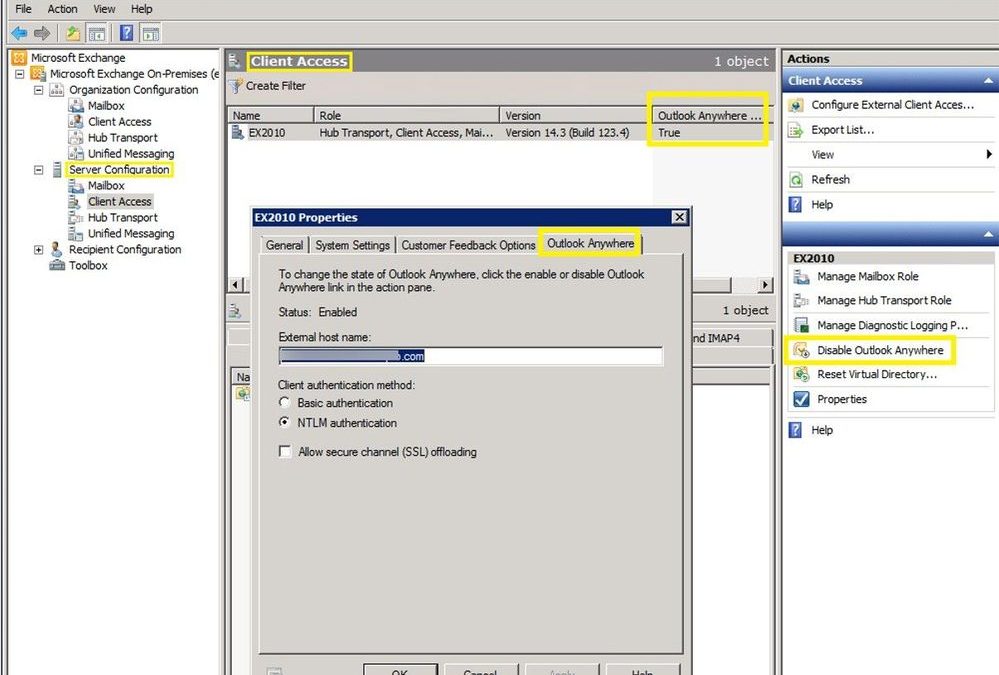
The next step is to check if Outlook Anywhere is enabled and configured correctly. You can run Get-OutlookAnywhere |FL in the Exchange Management Shell or use the Exchange Management Console to see if it is enabled (you would have a disable option if currently enabled):

This is a good and complete article on how to manage Outlook Anywhere.
If Outlook Anywhere is published on Exchange 2013 and servers, it must be enabled on each Exchange 2010 server hosting a public folder database.
Checking Outlook Anywhere configuration:
- External hostname must be set and reachable over the Internet or at least reachable by Exchange Online IP Addresses. Check your firewall rules and public DNS and verify that your users can connect to Exchange on-premises server using Outlook Anywhere (RPC/HTTP) from an external network. You can use Test-MigrationServerAvailability from Exchange Online PowerShell (as explained later in this article) to verify connectivity from EXO to on-premises but keep in mind that when you do this you will be testing only with the EXO outbound IP address used at that moment. This is not necessarily enough to ensure you are allowing the entire IP range used by Exchange Online. Another tool you can use for verifying public DNS and connection to on-premises RPCProxy is the Outlook Connectivity test on Microsoft Remote Connectivity Analyzer. Please note that the outbound IP addresses for this tool (mentioned in Remote Connectivity Analyzer Change List (microsoft.com) are different from the Exchange Online outbound IP addresses, so having a passed test result here does not mean your on-premises Exchange server is reachable by Exchange Online.
- Ensure you have a valid third-party Exchange Certificate for Outlook Anywhere.
- Check that authentication method (Basic / NTLM) is correct on Outlook Anywhere on the RPC virtual directory. Make sure you use the exact Authentication configured in Get-OutlookAnywhere when you build the New-MigrationEndpoint -PublicFolder cmdlet.
- Verify that your registry keys are correct:
The ValidPorts setting at HKLMSoftwareMicrosoftRPCRPCProxy should cover 6001-6004 range:

If you don’t have these settings for ValidPorts and ValidPorts_AutoConfig_Exchange, then you might want to reset the Outlook Anywhere virtual directory on-premises (by disabling and re-enabling Outlook Anywhere and restarting MSExchangeServiceHost). You should do this reset outside of working hours as Outlook Anywhere connectivity to the server will be affected.
As a last resort (if you still don’t see Valid Ports configured automatically), try to manually set them both to the following value: <ExchangeServerNetBIOS> :6001-6004; <ExchangeServerFQDN> :6001-6004; like in the image above. If the values are reverted automatically, then you need to troubleshoot the underlying Outlook Anywhere problem.
The PeriodicPollingMinutes key at HKEY_LOCAL_MACHINESystemCurrentControlSetServicesMSExchangeServiceHostRpcHttpConfigurator – by default the value is (15). It should not be set to 0.

The Rpc/HTTP port key for Store service is set to 6003 under HKEY_LOCAL_MACHINESYSTEMCurrentControlSetservicesMSExchangeISParametersSystem

Verify that your Exchange services are listening on ports 6001-6004. From a command prompt on the Exchange server, run these 2 commands:
netstat -anob > netstat.txt
notepad netstat.txt
In the netstat.txt file, search for ports :6001, :6002, :6003 and :6004 and make sure no services other than Exchange are listening on these ports. Example:

Note: We already assume that services like MSExchangeIS, MSExchangeRPC, MSExchangeAB, W3Svc, etc. are up and running on the Exchange server; you can use Test-ServiceHealth to double check. Also, in IIS manager verify that the Default Web Site and Default Application Pool are started. Finally, verify that your PF database is mounted.
Verify that you are able to resolve both the NetBIOS and FQDN names of the Exchange server(s) hosting the PF database. In my examples above, Ex2010 is the NetBIOS name and Ex2010.miry.lab is the FQDN of my Exchange server.
Verify that users can connect to public folders using Outlook
Let’s say you have you verified that Outlook Anywhere is configured and working fine but you are still unable to create a PF migration endpoint. Configure an Outlook profile for a mailbox in the source on-premises environment (preferably the account specified as source credential) from external network machine and verify that the account can retrieve public folders.
I checked all these, but I still have problems!
We will now get into the next level of troubleshooting section but most of the times, if you managed to cover the above section, you should be fine with creating the PF migration endpoint. If not, let’s dig in further:
Check Outlook Anywhere connectivity test in ExRCA
Use EXRCA and run the Outlook Anywhere test using an on-premises mailbox as SourceCredential.
The tool will identify Outlook Anywhere issues (RPC/HTTP protocol functionality and connectivity on ports 6001, 6002 and 6004, Exchange certificate validity, if your external hostname is a resolvable name in DNS, TLS versions compatible with Office 365, and network connectivity).
Save the output report as an HTML file and follow the suggestions given to address them.
If you are filtering the connection IPs, add the Remote Connectivity Analyzer IP addresses (you can find them in this page here) to your allow list and try the Outlook connectivity test again. Most importantly, ensure that you allow all Exchange Online IP addresses to connect to your on-premises servers.
You can use the Outlook Connectivity test with or without Autodiscover. Here is an example of how to populate the Remote Connectivity Analyzer fields for this test if you want to bypass Autodiscover:

Use the Test-MigrationServerAvailability to test both PF and Outlook Anywhere Connectivity
Test-MigrationServerAvailability command simulates Exchange Online servers connecting to your source server and indicates any issues found.
Connect-ExchangeOnline
Test-MigrationServerAvailability -PublicFolder -RPCProxyServer $Source_OutlookAnywhereExternalHostName -Credentials $Source_Credential -SourceMailboxLegacyDN $Source_RemoteMailboxLegacyDN -PublicFolderDatabaseServerLegacyDN $Source_RemotePublicFolderServerLegacyDN -Authentication $auth
For example, I ran this at 3:03 PM UTC+2 on May 1, 2021. The timestamp is very important to know as we will be checking these specific requests from Exchange Online to Exchange on-premises servers by looking at the IIS and optionally FREB logs, HTTPerr logs and eventually HTTPProxy logs (if the front end is an Exchange 2013 or Exchange 2016 Client Access server). Details on how to retrieve and analyze these logs are in the next section.


Gather Verbose Error from the New-MigrationEndpoint -PublicFolder cmdlet
This step is very important in order to narrow down the issue you are facing, as a detailed error message can tell us where to look further (for example you would troubleshoot an Access Denied error differently from Server Unavailable). You need to make sure you are constructing the command to create the PF migration endpoint correctly.
For this, we go first to the Exchange Management Shell on-premises and copy-paste the following values to Exchange Online PowerShell variables. Examples from my lab:
Exchange Online PowerShell Variable
|
Exchange On-Premises Value
|
$Source_RemoteMailboxLegacyDN
|
Get-Mailbox <PF_Admin>).LegacyExchangeDN
|
$Source_RemotePublicFolderServerLegacyDN
|
(Get-ExchangeServer <PF server>).ExchangeLegacyDN
|
$Source_OutlookAnywhereExternalHostName
|
(Get-OutlookAnywhere).ExternalHostName
|
$auth
|
(Get-OutlookAnywhere).ClientAuthenticationMethod
|
$Source_Credential
|
Credentials of the on-premises PF Admin Account: User Logon Name (pre-Windows2000) in format DOMAINADMIN and password. Must be member of Organization Management group in Exchange on-premises.
|
Then, connect to Exchange Online PowerShell and run this:
# command to create the PF Migration Endpoint
$PfEndpoint = New-MigrationEndpoint -PublicFolder -Name PublicFolderEndpoint -RPCProxyServer $Source_OutlookAnywhereExternalHostName -Credentials $Source_Credential -SourceMailboxLegacyDN $Source_RemoteMailboxLegacyDN -PublicFolderDatabaseServerLegacyDN $Source_RemotePublicFolderServerLegacyDN -Authentication $auth

Supposing you have an error at New-MigrationEndpoint, you would run the following commands to get the verbose error:
# command to get serialized exception for New-MigrationEndpoint error
start-transcript
$Error[0].Exception |fl -f
$Error[0].Exception.SerializedRemoteException |fl –f
stop-transcript
When you run the commands to start/ stop the transcript, you will get the path of the transcript file so that you can review it in a program like Notepad.
Cross-checking on-premises logs at the times you do these tests
IIS logs for Default Web Site (DWS): %SystemDrive%inetpublogsLogFilesW3SVC1 – UTC Timezone
If you don’t find the IIS logs in the default location, check this article to see the location of your IIS logging folder.
After you run Test-MigrationServerAvailability or New-MigrationEndpoint -PublicFolder in Exchange Online PowerShell, go to each CAS and see if you have any RPCProxy traffic in IIS logs at the timestamp corelated with Test-MigrationServerAvailability that would come from Exchange Online. Search for /rpc/rpcproxy.dll entries in Notepad++, for example.
For my Test-MigrationServerAvailability at 3:03 (UTC+2 time zone), I have 2 entries for RPC, port 6003 UTC time zone (13:03):

As you can see, only 401 entries are logged (indicating a successful test). This is because the 200 requests are ‘long-runners’ and are not usually logged in IIS. The 401 entries for port 6003 are a good indicator that these requests from Exchange Online reached IIS on your Exchange server.
If RPC traffic is not found in the IIS logs at the timestamp of the Test-MigrationServerAvailability (for example, MapiExceptionNetworkError: Unable to make connection to the server. (hr=0x80040115, ec=-2147221227), then you likely need to take a network trace on the CAS and if possible on your firewall / reverse proxy when you do test-MigrationServerAvailability.
Now is a good moment to consider the network devices you have in front of your CAS. Do you have load balancer or a CAS array; do you have CAS role installed on the PF server? Collect a network trace on the CAS.
Also check if you have any entries / errors for RPC in HTTPerr logs (if you don’t see it in the IIS logs):
HTTPerr logs: %SystemRoot%System32LogFilesHTTPERR – Server Timezone
Finally, check the Event Viewer. Filter the log for Errors and Warnings and look for events correlated with the timestamp of the failure or related to public folders databases and RPC over HTTP.
Enable failed request tracing (FREB)
Follow this article to enable failed request tracing. If required to write something in the status code, you can put for example a range of 200-599. Then, reproduce the issue and gather the logs from %systemdrive%inetpublogsFailedReqLogFilesW3SVC1

NOTE: Once you have reproduced the problem, revert the changes (uncheck Enable checkbox under Configure Failed Request Tracing). Not disabling this will cause performance problems!
Getting a MapiExceptionNoAccess error?
During a New-MigrationEndpoint or Test-MigrationServerAvailability test you might see a specific (common) error; we wanted to give you some tips on what to do about it.
Error text:
MapiExceptionNoAccess: Unable to make connection to the server. (hr=0x80070005, ec=-2147024891)
What it means:
This is an ‘Access Denied’ error for the PF admin and can happen when credentials or authentication is wrong.
Things to check:
- The correct authentication method is used (either Basic or NTLM).
- You are providing source credentials in domainusername format.
- The source credential provided is a member of Organization Management role group.
- As a troubleshooting best practice, it is recommended to create a new admin account (without copying the old account), make it a member of the Organization Management group, and try creating the PF migration endpoint using that account.
- Run the Outlook Connectivity test on Remote Connectivity Analyzer for domainadmin account and fix any reported errors.
- Check and fix any firewall/reverse proxy issues in the path before the Exchange server.
Thank you for taking the time to read this, and I hope you find it useful!
I would like to give special thanks to the people contributing to this blog post: Bhalchandra Atre, Brad Hughes, Trea Horton and Nino Bilic.
Mirela Buruiana
by Contributed | May 6, 2021 | Technology
This article is contributed. See the original author and article here.
The Workplace Analytics team is excited to announce our feature updates for May 2021. (You can see past blog articles here). This month’s update describes the following new features:
- Collaboration metrics with Teams IM and call signals
- Metric refinements
- Analyze business processes
- New business-outcome playbooks
- More focused set of query templates
- Workplace Analytics now supports mailboxes in datacenters in Germany
Collaboration metrics with Teams IM and call data
In response to customer feedback and requests, we are including data from Teams IMs and Teams calls in several collaboration and manager metrics. Queries that use those metrics will now give clearer insights about team collaboration by including this data from Teams. This change will help leaders better understand how collaboration in Microsoft Teams impacts wellbeing and productivity. It’s now possible to analyze, for example, the change in collaboration hours as employees have begun to use Teams more for remote work, or the amount of time that a manager and their direct report spend a Teams chat.
Changed metrics
The inclusion of Teams data changes the following metrics, organized by query:
In Person and Peer analysis queries
Collaboration hours
Working hours collaboration hours
After hours collaboration hours
Collaboration hours external
Email hours
After hours email hours
Working hours email hours
Generated workload email hours
Call hours
After hours in calls
Working hours in calls
In Person-to-group queries
Collaboration hours
Email hours
In Group-to-group queries
Collaboration hours
Email hours
For complete descriptions of these and all metrics that are available in Workplace Analytics, see Metric descriptions.
Metric refinements
In addition to adding Teams data to the metrics listed in the preceding section, we’ve made some other improvements to the ways that we calculate metrics, and we’ve added new metric filter options, as described here:
- Integration of Microsoft Teams chats and calls into metrics – In the past, the Collaboration hours metric simply added email hours and meeting hours together, but in reality, these activities can overlap. Collaboration hours now reflects the total impact of different types of collaboration activity, including emails, meetings, and – as of this release – Teams chats and Teams calls. Collaboration hours now captures more time and activity and adjusts the results so that any overlapping activities are only counted once.
- Improved outlier handling for Email hours and Call hours – When data about actual received email isn’t available, Workplace Analytics uses logic to impute an approximation of the volume of received mail. We are adjusting this logic to reflect the results of more recent data science efforts to refine these assumptions. Also, we had received reports about measured employees with extremely high measured call hours. This was a result of “runaway calls” where the employee joined a call and forgot to hang up. We have capped call hours to avoid attributing excessive time for these scenarios.
- Better alignment of working hours and after-hours metrics – Previously, because of limitations attributing certain types of measured activity to specific time of day, after-hours email hours plus Working hours email hours and after-hours collaboration hours plus Working hours collaboration hours did not add up to total Email hours or Collaboration hours. We have improved the algorithms for these calculations to better attribute time for these metrics, resulting in better alignment between working hours and after-hours metrics.
- New metric filter options – We’ve added new participant filter options to our email, meeting, chat, and call metrics for Person queries: “Is person’s manager” and “Is person’s direct report.” These new options enable you to filter activity where all, none, or at least one participant includes the measured employee’s direct manager or their direct report. You can use these new filters to customize any base metric that measures meeting, email, instant message, or call activity (such as Email hours, Emails sent, Working hours email hours, After hours email hours, Meeting hours, and Meetings).
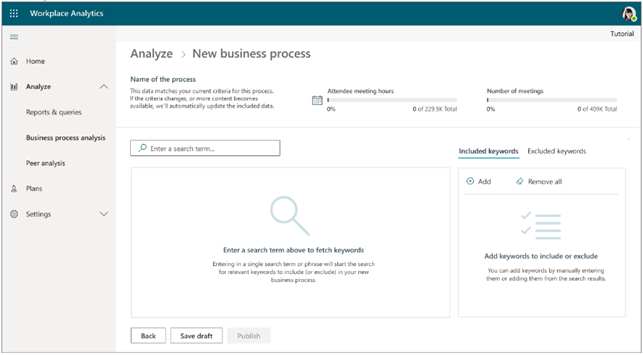
Analyze business processes
When you and your co-workers perform an organized series of steps to reach a goal, you’ve participated in a business process. In this feature release, we are providing the ability to analyze business processes — for example, to measure their cost in time and money. In doing so, we are proviadditional analytical capabilities to customers who would like to study aspects such as time spent on particular tasks (such as sales activities or training & coaching activities), the nature of collaboration by geographically diverse teams, branch-office work in response to corporate-office requests, and so on.
For example, your business might conduct an information-security audit from time to time. Your CFO or CIO might want to know whether too little, too much, or just the right amount of time is being spent on these audits, and whether the right roles of employees have been participating in them. You analyze a real-world business processes such as this by running Workplace Analytics meeting or person queries. And now, as you do this, you can use a digital “business process” as a filter. It’s these business-process filters that you define in the new business—process analysis feature.
The new business-process analysis feature of Workplace Analytics
For more information about business-process analysis in Workplace Analytics, see Business processes analysis.
New business-outcome playbooks
We’ve published four new analyst playbooks that introduce advanced analyses with Workplace Analytics and guide you in how to create and implement them. These playbooks will help you with the following use cases:
- Boost employee engagement – By joining engagement and pulse survey data with Workplace Analytics data, it’s now easier to uncover insights and opportunities around ways of working, employee wellbeing, manager relationships, and teams and networks.
- Improve customer focus and sales enablement – Improve the collaboration effectiveness of your salesforce by augmenting Workplace Analytics with CRM data.
- Enhance operational effectiveness – Identify areas to improve operational effectiveness, including business processes and organizational activity, through process analysis.
- Take insights to action – Drive behavioral change by using Workplace Analytics and MyAnalytics together.

Each playbook provides a framework for conducting the analysis, sample outputs based on real work, and best practices for success to help you uncover opportunities more quickly and create valuable change. You can access the new playbooks through the Resource playbooks link in the Help menu of Workplace Analytics:

More focused set of query templates
To more clearly highlight the high-value and modern query templates that we offer in Workplace Analytics, we have focused the set of available query templates.
Over the past few years, we’ve released numerous query templates that help you solve new business problems and access rich insights. Unfortunately, so many templates appeared that it became challenging to differentiate them and choose the right one for your task. This month, we have removed some of the templates to make it easier to select and run the latest and greatest templates available.
Don’t worry though; the results of queries that you’ve already run, even from retired templates, will continue to appear on the Results page, and any Power BI templates that you’ve already set up will continue to run as expected.

The new, more focused set of available query templates
For more information about Workplace Analytics queries, see Queries overview.
Workplace Analytics supports mailboxes in the Germany Microsoft 365 datacenter geo location
now offers full Workplace Analytics functionality for organizations whose mailboxes are in the Germany Microsoft 365 datacenter geo location. (Workplace Analytics now supports every Microsoft 365 datacenter geo location other than Norway and Brazil, which are expected to gain support soon.) See Environment requirements for more information about Workplace Analytics availability and licensing.
by Contributed | May 6, 2021 | Technology
This article is contributed. See the original author and article here.
Sync Up is your monthly podcast hosted by the OneDrive team taking you behind the scenes of OneDrive, shedding light on how OneDrive connects you to all your files in Microsoft 365 so you can share and work together from anywhere. You will hear from experts behind the design and development of OneDrive, as well as customers and Microsoft MVPs. Each episode will also give you news and announcements, special topics of discussion, and best practices for your OneDrive experience.
So, get your ears ready and Subscribe to Sync up podcast!
In this new world of hybrid work, Yammer offers employees a way to come together socially to share what’s going on in their lives, both inside and outside work. In episode 20, we learn more about Yammer and discuss how OneDrive supports tech engagement among your employees. Out guest is Michael Holste, Product Manager on the Microsoft 365 Product Marketing team responsible for employee engagement, including products like Yammer and Viva connections.
Tune in!
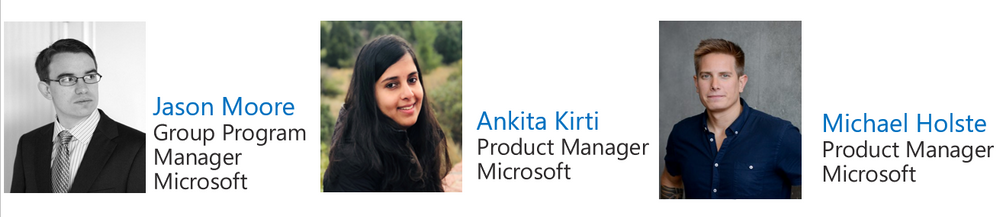
Meet your show hosts and guests for the episode:
Jason Moore is the Principal Group Program Manager for OneDrive and the Microsoft 365 files experience. He loves files, folders, and metadata. Twitter: @jasmo
Ankita Kirti is a Product Manager on the Microsoft 365 product marketing team responsible for OneDrive for Business. Twitter: @Ankita_Kirti21
Michael Holste – PMM Mike Holste is a Product Manager on the Microsoft 365 product marketing team responsible for Employee Engagement, including Yammer and Viva Connections.
Twitter: @Mike_Holste
Quick links to the podcast
Links to resources mentioned in the show:
Be sure to visit our show page to hear all the episodes, access the show notes, and get bonus content. And stay connected to the OneDrive community blog where we’ll share more information per episode, guest insights, and take any questions from our listeners and OneDrive users. We, too, welcome your ideas for future episodes topics and segments. Keep the discussion going in comments below.
As you can see, we continue to evolve OneDrive as a place to access, share, and collaborate on all your files in Office 365, keeping them protected and readily accessible on all your devices, anywhere. We, at OneDrive, will shine a recurring light on the importance of you, the user. We will continue working to make OneDrive and related apps more approachable. The OneDrive team wants you to unleash your creativity. And we will do this, together, one episode at a time.
Thanks for your time reading and listening to all things OneDrive,
Ankita Kirti – OneDrive | Microsoft

Recent Comments