This article is contributed. See the original author and article here.
Hi there!
My name is Teeda, and I am a Support Escalation Engineer on the Windows Performance Team at Microsoft. This blog post provides several suggestions and workarounds when there is difficulty generating a memory dump for bugcheck issues (or even hang scenarios). Special thanks to my colleague, Alisse, for assembling this documentation.
Think about the goal…
Is a bugcheck occurring and you are trying to get a memory dump from that? If so, you can skip the parts about manually triggering a dump. However, you may want to use these settings to test out if you can get a memory dump. This will be faster than waiting for the next bugcheck.
Do you need to crash the machine manually? If so, pay attention to the type of machine (virtualized or physical) and the situation we are working with.
Is this a virtual machine?
VMware machines allow to create a snapshot which can then be converted to a memory dump. Often, this is easier than trying to generate the memory dump manually.
Capture the snapshot in the VMWare console with “Take Snapshot” either at the bugcheck screen or if another issue, at the time of the issue.
On the left-hand side, check the Agree and Download box.
Change the Dropdown to the appropriate OS (vmss2core-sb-8456865.exe).
Click on download.
Once you have downloaded the file, save it on the C drive to a folder called c:Snapshot
Copy the vmss or vmsn/vmem file that you wish to convert to that folder.
Open an elevated command prompt and run the following command:
cd c:Snapshot
For VMs OS until Windows 7/2008R2 use: vmss2core-sb-8456865 –W <snapshot.vmsn/Suspend.vmss> <snapshot.vmem>
For VMs OS Windows 8.1/2012 and above use: vmss2core-sb-8456865 –W8 <snapshot.vmsn/Suspend.vmss> <snapshot.vmem>
Replace the ‘<snapshot.vmsn/Suspend.vmss> <snapshot.vmem>’ with the name of the snapshot.
This process may take a few minutes depending on the size of the snapshot, but it will create a memory.dmp file in the c:snapshots folder.
There is also the option to use the NMI switch in VMWare as an alternative if taking a snapshot is not an option. Please note you will still need to configure for a memory dump whether it be kernel or complete: https://kb.vmware.com/s/article/2149185
Hyper-V Machines allow to save the state of the machine which can then be converted to a memory dump.
To do this, please right click the VM from Hyper-V manager and click “save” in state. There will be saved state files at the location of the hard disk.
To allow the VM to continue running, you will need to right click the server and click start. Please OS version of the host machine as this will be needed to use the correct tool for conversion.
You will need to engage Microsoft to convert the Save state files (.bin/.vsv or .vmrs).
Alternatively, you can also configure for a manual Hyper-V crash using: HKEY_LOCAL_MACHINESYSTEMCurrentControlSetServiceshyperkbdcrashdump HKEY_LOCAL_MACHINESystemCurrentControlSetServiceshyperkbdParameters
For Azure machines, Azure engineers can grab a memory dump or use NMI:
Configure for complete memory dump:
Step 1: Change page file size
Verify the machine has enough free space for 2x the RAM before continuing.
Launch File Explorer, then right-click This PC. Select Properties
Click Advanced system settings on the System page. Make sure you are on the Advanced tab.
Click Settings under the Performance area.
Click the Advanced tab, and then click Change under the Virtual memory area.
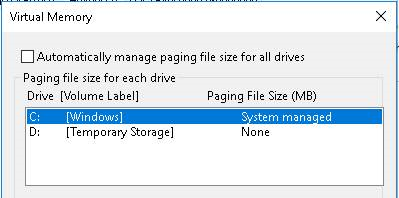
Note: To enable the system partition, you must uncheck “Automatically manage paging file size for all drives check box.”
Select the C: drive for page file location.
Click Custom Size. Set the value of Initial size and Maximum size to the amount of physical RAM that is installed plus 256 megabyte (MB) under the Custom Size button. (RAM*1024 + 256MB = Size in MB)
Click Set, and then click OK.
Step 2: Configure for a complete memory dump file
Go back to Advanced system settings page
Click Settings under the Startup and Recovery, and then make sure complete memory dump is selected.
Note: If you want to enable the complete memory dump option, manually set the CrashDumpEnabled registry entry to 0x1 under the following registry subkey and restart Windows: HKEY_LOCAL_MACHINESYSTEMCurrentControlSetControlCrashControl
Ensure the path is C:WindowsMEMORY.DMP (%SystemRoot%MEMORY.DMP)
Click OK
Reboot VM for settings to take effect
Step 3: Enable Boot Diagnostics for NMI Crash
Login to Azure portal > select VM > Serial Console
Note: Serial Console requires boot diagnostics enabled
So, if not enabled, go to Boot Diagnostics > click Settings > Turn On > Save
Step 4: Send NMI during issue
When computer is in problem state > Serial Console > click Send Command [1] > click Send Non-Maskable Interrupt (NMI) [2]
Click Send NMI
Dump will be generated.
After completes login to VM and dump will be in C:WindowsMEMORY.DMP
For Nutanix machines, please engage the vendor to capture the memory dump.
Do you have the correct configuration?
Step 1: Change your page file size
Verify the machine has enough free space for 2x the RAM before continuing.
Go to Advanced system settings
On the System page, click the Advanced tab.
Click Settings under the Performance area.
Click the Advanced tab, and then click Change under the Virtual memory area.
Note: To enable the system partition, you must click to clear the Automatically manage paging file size for all drives check box.
Select the C: drive for pagefile location.
Click Custom Size. Set the value of Initial size and Maximum size to the amount of physical RAM that is installed plus 256 megabytes (MB) under the Custom Size button.
Click Set, and then click OK three times.
Step 2: Configure for a complete memory dump file
Go back to Advanced system settings
On the System page, click the Advanced tab.
Click Settings under the Writing debugging information area (Startup and Recovery), and then make sure complete memory dump is selected.
If the complete memory dump is not an option here, to enable the complete memory dump option, manually set the CrashDumpEnabled registry entry to 0x1 under the following registry subkey: HKEY_LOCAL_MACHINESYSTEMCurrentControlSetControlCrashControl
Step 3: Apply the settings
Ensure there is more space available on the C drive than there is RAM on the machine.
Please restart the machine for the settings to take effect
Does this machine have a NMI switch? This would be in the Integrated Lights Out (iLO) Web interface. Create a DWORD value called NMICrashDump under HKEY_LOCAL_MACHINESYSTEMCurrentControlSetControlCrashControl and set it to a 1. Then reboot the machine for the setting to take effect.
Keyboard initiated
For a USB keyboard, create the following registry entry:
In HKEY_LOCAL_MACHINESystemCurrentControlSetServiceskbdhidParameters, create a value named CrashOnCtrlScroll, and set it equal to a REG_DWORD value of 0x01.
For a PS/2 Keyboard, create the following registry entry:
In HKEY_LOCAL_MACHINESystemCurrentControlSetServicesi8042prtParameters, create a value named CrashOnCtrlScroll, and set it equal to a REG_DWORD value of 0x01.
Then reboot the machine for the setting to take effect.
Ensure there is enough space to capture the memory dump. We need enough space for the page file, and for the memory dump itself which will be the size of the page file.
Disable the Autoreboot:(HKEY_LOCAL_MACHINESYSTEMCurrentControlSetControlCrashControlAutoReboot)
Change the memory dump location to another spot on a local drive
Ensure the option “Overwrite Any Existing File” (found in Control Panel System) is selected. It is a good idea to leave this box checked and to move or copy the current Memory.dmp file.
There is dump logging
You can create a DWORD registry key HKLMSYSTEMCurrentControlSetControlCrashControlEnableLogFile set to 1. You will need to crash the machine twice, then you will see a dumpstack.log file on the root of the C drive which will keep track of what occurs during the action of writing to the page file.
Is ASR enabled?
Hardware vendors, such as HP, IBM, and Dell, may provide an Automatic System Recovery (ASR) feature. You should disable this feature during troubleshooting. For example, if HP and Compaq’s ASR feature is enabled in the BIOS, disable this feature while you are troubleshooting to generate a complete memory.dmp file. For the exact steps, contact your hardware vendor.
Antivirus and Encryption
Check for any dump filter drivers.
Remove the encryption to test.
What else?
It is possible the paging file on the boot drive is not large enough. To use the “Write Debugging Information To” feature to obtain a complete memory dump file, the paging file on the boot drive must be at least as large as physical memory + 100 MB. When you create a kernel memory dump file, the file is usually around one-third the size of the physical memory on the system. Of course, this quantity will vary, depending on your circumstances.
Also possible there is not room for the Memory.dmp file in the path specified for writing the memory dump.
It is possible that the SCSI controller is bad, or the system crash is caused by a bad SCSI controller board.
If you specify a non-existent path, a dump file will not be written. For example, if you specify the path as C:DumpfilesMemory.dmp and no C:Dumpfiles folder exists, a dump file will not be written.
This article is contributed. See the original author and article here.
Service encryption with Microsoft 365 Customer Key Microsoft 365 provides baseline, volume-level encryption enabled through BitLocker and Distributed Key Manager (DKM) which ensures customer data is always encrypted at rest in the Microsoft 365 service with BitLocker and DKM. Microsoft 365 offers an added layer of encryption at the application layer for content, including data from Exchange Online, SharePoint Online, OneDrive, and Teams, called service encryption.
Microsoft 365 Customer Key is built on service encryption, providing a layer of encryption at the application layer for data-at-rest and allows the organization to provide and control the encryption keys used to encrypt customer data in Microsoft’s datacenters. Customer Key provides an additional protection against viewing of data by unauthorized systems or personnel, complimenting BitLocker disk encrypted in Microsoft datacenters. Customer Key enhances the ability of organizations to meet the demands of compliance requirements that specify key arrangements with the cloud service provider, assisting customers in meeting regulatory or compliance obligations for controlling root keys.
Microsoft 365 Customer Key now supports Microsoft Teams! After providing the keys, Microsoft 365 then uses the provided keys to encrypt data at rest as described in the Online Services Terms (OST). The organization can create a data encryption policy (DEP) and assign it to encrypt certain Microsoft 365 data for all tenant users. While multiple DEPs can be created per tenant, only one DEP can be assigned at a time. For customers already using Customer Key for Exchange Online and SharePoint online, data encryption policies add broader control and now includes support for Microsoft Teams! Once a DEP is created and assigned, it will encrypt the following data for all tenant users:
Teams chat messages (1:1 chats, group chats, meeting chats and channel conversations)
Teams media messages (images, code snippets, video messages, audio messages, wiki images)
Teams call and meeting recordings stored in Teams storage
Teams chat notifications, Teams chat suggestions by Cortana, Teams status messages
User and signal information for Exchange Online
Exchange Online mailboxes that aren’t already encrypted using mailbox level DEPs
Microsoft Information Protection exact data match (EDM) data – (data file schemas, rule packages, and the salts used to hash the sensitive data)
When a DEP is assigned, encryption begins automatically but will take some time to complete depending on size of the tenant. For Microsoft Information Protection and Teams, Customer Key DEP encrypts new data from the time of DEP assignment. We are working to bring support to encrypting past data. For Exchange Online, the DEP starts encrypting all existing and new data. For more details on using Microsoft 365 Customer Key across multiple workloads and how to get started, please see Service encryption with Customer Key.
This article is contributed. See the original author and article here.
We are excited to announce that starting today, Microsoft Defender for Identity alerts are natively integrated into Microsoft 365 security center (security.microsoft.com) with a dedicated Identity alert page format. This marks the first step in our journey to introduce the full Microsoft Defender for Identity experience into the unified Microsoft 365 Defender portal and is a continuation of the convergence motion to integrate protection across domains, which started with Defender for Office 365 and Defender for Endpoint.
The new Identity alert page unlocks value for Microsoft Defender for Identity customers such as better cross-domain signal enrichment and new automated identity response capabilities. It ensures that we can best help our customers to stay secure and help improve the efficiency of security operations. To learn more about Microsoft 365 Defender, check out this dedicated Tech Community blog.
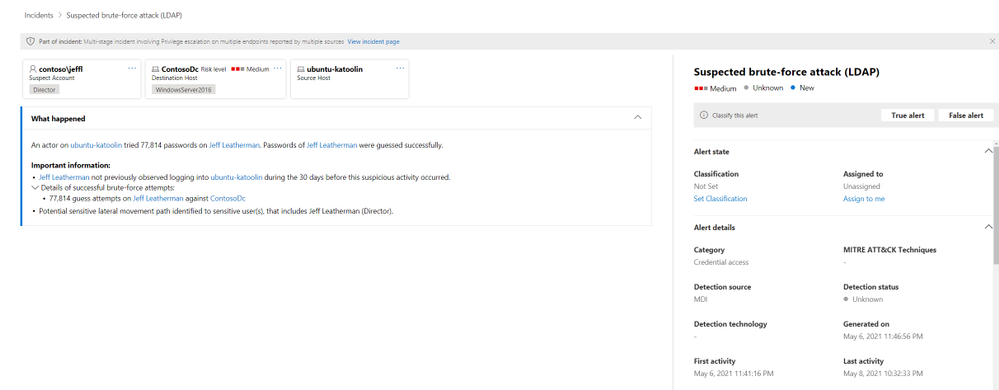
Alerts and investigation
Alerts are a key experience when working with any security product. That’s why Defender for Identity is continuously investing in research and engineering efforts to provide new alerts to attack techniques, tools and vulnerabilities. Starting today, Microsoft Defender for Identity alerts are available to view within the Microsoft 365 Defender portal.
(Figure 1. Alert experience in Microsoft 365 security center)
One of the benefits of investigating alerts through Microsoft 365 security center is that Microsoft Defender for Identity alerts are further correlated with information obtained from each of the other products in the suite. These enhanced alerts are consistent with the other Microsoft 365 Defender alert formats originating from Microsoft Defender for Office 365 and Microsoft Defender for Endpoint. The new page effectively eliminates that need to navigate (‘tab-out’) to another product portal to investigate alerts associated with identity.
(Figure 2. Side panel for device entity that is enriched by both Microsoft Defender for Endpoint and Microsoft Defender for Identity)
The new alert page maintains a similar look and feel to Defender for Identity while adapting to the Microsoft 365 Defender user experience and style.
Not just a new home…
Alerts are now in one common alert queue with Defender for Office 365, Defender for Endpoint, Microsoft Cloud App Security and various compliance workload alerts. Another stand-out feature for alerts originating from Defender for Identity is that they can now trigger the Microsoft 365 Defender automated investigation and response (AIR) capabilities, including automatically remediating alerts and the mitigation of tools and process that can contribute to the suspicious activity.
(Figure 3. Automatic alert investigation based on Microsoft Defender for Identity alert)
How do I get started?
Defender for Identity alerts can easily be accessed from either the Incidents or Alerts queue. Open either of these areas, and then you can filter by Service Sources to see the specific alerts you’re looking for.
(Figure 4. Microsoft 365 security menu)
(Figure 5. Filter options for alert view)
As always, we’d love to know what you think.
Leave us feedback directly on the Microsoft 365 security center
This article is contributed. See the original author and article here.
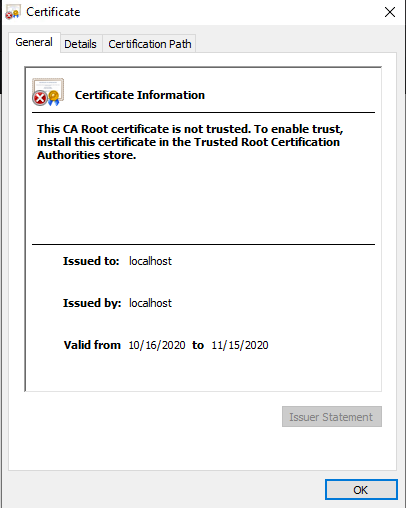
I’ve started using the new Microsoft Teams toolkit, which is a Visual Studio Code extension and generator for Teams applications. One thing I noticed is a little challenge when creating tabs, and that’s due to the requirement to use SSL. The documentation is fine and explains how to trust your local project, but I found it a little painful since the certificates only last 1 month and there’s a different one for each project, so I need repeat the process frequently. Your teammates will need to do that as well.
Here is an alternative approach in which you create your own certificate authority and build certs from that so you can install just one root certificate across all your projects! Each teammate can have their own certs, so you can collaborate as much as you wish and nobody has to go installing certs.
NOTE: Did you know that the Teams Toolkit uses Create React App (CRA) for tabs? Create React App is a toolchain from Facebook (who created React in the first place) it’s very popular and well supported! If you need help, search on “Create React App” and you can find a plethora of helpful articles; this one helped me figure this out!
Step 1: Create and trust a certificate authority (CA)
This step only needs to be done once for as many projects as you wish. It assumes you already have Node.js installed, as required by the Teams Toolkit.
a. Create a safe/private folder somewhere and go there in your favorite command-line tool, and run these commands:
NOTE: 3650 is the number of days your certs will be valid; feel free to change it. You can use –help on mkcert to reveal other options, such as setting an organization name and location (the default org is “Test CA”) and customizing the domain names for your certificate (the default is “localhost,127.0.0.1”).
This will create a new Certificate Authority and a certificate that was issued from it. You should see 4 files:
FILE
DESCRIPTION
ca.crt
Certificate for your new CA
ca.key
Private key for your new CA
cert.crt
Certificate for use in projects
cert.key
Private key for use in projects
b. Now you need to trust the certificate for your new CA; by doing that any cert you create will be trusted with no additional action on your part.
On Windows
Double click on the ca.crt file and click “Install Certificate”.
Choose Local Machine and click next.
Select “Place all certificates in the following store” and then click the “Browse” button. Choose “Trusted Root Certification Authorities” click “OK” to close the dialog box, and then click “Next”.
Restart all instances of your browser to force it to re-read its trusted roots. If in doubt, reboot your computer.
On Mac
Double click on the ca.crt file, which should be found under /Users/[your-name]/. It will launch Keychain Access app.
Enter your password or use Touch ID when prompted.
The new certificate (in this case, “MyOrg”) should be added. Double-click it.
In a new window, expand the Trust section of the certificate details. Select “Always Trust” for every option.
Close the window. Enter your password or use Touch ID again if you are asked. Now the certificate is trusted.
Restart all instances of your browser to force it to re-read its trusted roots. If in doubt, reboot your computer.
On Linux
There are more steps on Linux as most browsers don’t use the operating system’s certificate store, and a tool called certutil is needed to modify the browsers’ cert?.db files. This article explains how to install your new root certificate on Linux.
Step 2 – Add the certs to your project
This is what you need to do for each project.
a. Create a new folder in your project folder (the same level as the package.json file) called .cert. Copy the cert.crt and cert.key files into this folder.
b. Modify your .env file to tell the local web server to use your cert:
HTTPS=true
SSL_CRT_FILE=./.cert/cert.crt
SSL_KEY_FILE=./.cert/cert.key
c. Prevent saving the certs to your git repository by adding a line to the .gitignore file.
.cert
Azure Active Directory SSO Tabs
Tabs that implement Azure Active Directory Single Sign-On need to implement more than just a web page; they need to implement a web service to exchange the SSO token for an access token that the app can use to call downstream services such as the Microsoft Graph. This is explained inthis blog article, orthis one,more clearly than in the documentation.
Whenyo teamsgenerates an SSO tab, this web service is hosted using the same web server as the page itself.
When the Teams Toolkit generates one, however, it creates a separate web service for the web service so there really are two endpoints that need to be SSL enabled. The web service is in a folder calledapi-server. To enable SSL here, follow these steps:
2. Immediately above the lineapp.get(‘/getGraphAccessToken’)inserver.tsorserver.js, add these lines to allow the cross-origin call from the web page (port 3000) to the web service (port 5000):
const cors = require(‘cors’);
app.use(cors({
    origin: process.env.CORS_ORIGIN
}));
3. Near the bottom of the same file, replace the line
app.listen(port);
with this code:
const fs = require(‘fs’); const https = require(‘https’); var privateKey = fs.readFileSync(process.env.SSL_KEY_FILE ); var certificate = fs.readFileSync(process.env.SSL_CRT_FILE);
Each team member needs to do Step 1 on their computer just once. When a developer starts working on a project they can simply copy their .cert folder into their project and go to work.
Many thanks to my colleagueTomomi Imurafor documenting the Mac instructions and providing screen shots.
Do you have ideas on how to do this better, especially in a project team? Please chime in using the comments; thanks!
This article is contributed. See the original author and article here.
Windows Server 2008 R2 achieved end of support via Microsoft on January 14th 2020. In a previous post, steps were detailed on Active Directory Certificate Service migration from 2008 R2 to 2019 but required the new Windows Server 2019 server to have the same name as the previous 2008 R2 server. Many of you have reached out asking for an update of the steps to reflect Active Directory Certificate Service migration from 2008 R2 to 2016 / 2019 containing a different name. A solution has been found and tested with repeatable steps shared below.
NOTE:The following was tested in a lab environment. While the solution was successful it may not reflect your organization’s current setup. Please test the steps below in a lab environment prior to implementing on production.
Step 1: Backup Windows Server 2008 R2 certificate authority database and its configuration
Log in to Windows 2008 R2 Server as member of local administrator group
Go to Start > Administrative Tools > Certificate Authority
Right Click on Server Node > All Tasks > Backup CA
Certification Authority Backup CA
Click Next on the Certification Authority Backup Wizard screen
Click both check boxes to select both items to backup and provide the backup path for the file to be stored
Provide a password to protect private key and CA certificate file and click on next to continue
Click Finish to complete the process
Step 2: Backup CA Registry Settings
Click Start > Run > type regedit and click OK
Expand the key in following path: HKEY_LOCAL_MACHINESYSTEMCurrentControlSetServicesCertSvc
Right click on the Configuration key and click Export
Provide a name, save the backup file and then click on save to complete the backup
Backup CA Registry Settings
Backup of the Certificates is now complete and the files can now be moved to the new Windows 2016 / 2019 server.
CA Backup complete
Step 3: Uninstall CA Service from Windows Server 2008 R2
Navigate to Server Manager
Click Remove Roles under Roles Summary to start the Remove Roles Wizard, and then click Next
Uninstalling a CA
Click to clear the Active Directory Certificate Services check box and click Next
Removing Active Directory Certificate Services
Click Remove on the Confirm Removal Options page
If Internet Information Services (IIS) is running and you are prompted to stop the service before you continue with the uninstall process, click OK
Click Close
Restart the server to complete the uninstall
Step 4: Install Windows Server 2016 / 2019 Certificate Services
*NOTE: The screenshots below show the server name as WS2019 to highlight which server we are working on. This step-by-step highlights screenshots from Windows Server 2019. Windows Server 2016 process is the same with similar screenshots
Log in to Windows Server 2019 as Domain Administrator or member of local administrator group
Navigate to Server Manager > Add roles and features
Click on next to continue in the Add Roles and features Wizard
Select Role-based or Feature-based installation and click next
Keep the default selection from the server selections window and click next
Windows Server 2019 Server Selections
Select Active Directory Certificate Services, click next in the pop up window to acknowledge the required features that need to be added, and click next to continue
Adding Active Directory Certificate Services
Click Next in the Features section to continue
Review the brief description about AD CS and click next to continue
Select Certificate Authority and Certification Authority Web Enrollment, click next in the pop up window to acknowledge the required features that need to be added, and click next to continue
Windows Server 2019 Add Role Services
Review the brief description about IIS and click next to continue
Leave the default and click next to continue
Click Install to begin the installation process
Close the wizard once it is complete
Step 5: Configure AD CS
In this step will look in to configuration and restoring the backup created previously
Navigate to Server Manager > AD CS
In right hand panel it will show message as following screenshot and click on More
AD CS
Click on Configure Active Directory Certificate Service …… in the pop up window
Configure Active Directory Certificate Service
In the Role Configuration wizard, ensure the proper credential for Enterprise Administrator is shown and click next to continue
Select Certification Authority and Certification Authority Web Enrollment and click next to continue
Ensure Enterprise CA is selected the setup type and click next to continue
Select Root CA as the CA type and click next to continue
With this being a migration, select Use existing private key and Select a certificate and use its associated private key and click next to continue
AD CS Configuration
Click Import in the AD CS Configuration window
Select the key backed up during the backup process from windows 2008 R2 server. Browse and select the key from the backup we made and provide the password we used for protection and click OK.
Import Existing Certificate
With the key successfully imported and select the imported certificate and click next to continue
Leave the default certificate database path and click next to continue
Click on configure to proceed with the configuration process
Close the configuration Wizard once complete
Open the Command Prompt in Administrator Mode
Run the following to stop certificate services
net stop certsvc
Open the registry file exported from the Windows 2008 server in Notepad
NOTE:Please ensure you have tested this in lab first prior to completing these steps. While the solution was successful in lab it may not reflect your organization’s current setup and may disrupt your service. Microsoft is not liable for any possible disruption that may occur.
Locate CAServerName and change the value to the name of the NEW 2016 / 2019 Windows Server
Modify registry file
Save the changes in Notepad
Step 6: Restore CA Backup
Navigate to Server Manager > Tools > Certification Authority
Right click on server node > All Tasks > Restore CA
A window will appear confirming the stop of Active Directory Certificate Services. Click OK to continue.
Confirm stop of Active Directory Certificate Services
Click Next to start the Certification Authority Restore Wizard
Click both check boxes to select both items to restore and provide the backup path for the file to be restored from
Certification Authority Restore Wizard
Enter the password used to protect private key during the backup process and click next
Click Finish to complete the restore process
Click Yes to restart Active Directory Certificate Services
Step 7: Restore Registry info
Navigate to the folder containing the backed-up registry key with the newly edited CAServerName value and double click > Run to initialize the restore
Click yes to proceed with registry key restore
Click OK once confirmation about the restore is shared
Step 8: Reissue Certificate Templates
It is now time to reissue the certificate with the migration process now complete.
Under Server Manager, navigate to Tools > Certification Authority
Right click on Certificate Templates Folder > New > Certificate Template to Reissue
From the certificate templates list click on the appropriate certificate template and click OK
This completes the Active Directory Certificate Service migration steps from 2008 R2 to 2016 / 2019 containing a different server name.
The following video also shares steps surrounding this process as well as migrating DNS.


Recent Comments