by Contributed | May 16, 2021 | Technology
This article is contributed. See the original author and article here.
It is common that customers contact the Azure Batch Team to provide instructions on how to install Python using the start task feature. I would like to provide the steps to perform this task in case that someone needs to work in a similar case.
Required steps:
- Get the python release that you want to install.
- Add the installer into a storage container.
- Create the windows pool and define the required start task and the resource files to install the features.
Get the python release that you want to install.
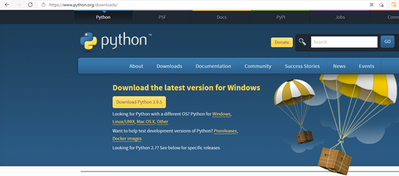
First, download the python installer from the official site (Example below is using the 3.8.0 version for Windows)
Download Python | Python.org
Add the installer into a storage container.
Next step is to upload the installer to a Storage Blob Container, this installer will be downloaded to the Azure Batch Node using the Resource Files Feature in feature steps.
Select your Storage Account and create a new container/ select an existing one, then upload the installer.


Create a Windows Pool, and define the required start task and resource files.
Next step is to create our Windows Batch pool. We will use the required fields to create a pool, which requires to enable the Start task section.

By using the start task run on each compute node as it joins the pool, the task will be executing when the node is added to the pool or when the node is restarted.
Once the start task configuration is enabled, we will need to define the required command line for the installation. We are using the following command line cmd /c “python-3.8.10-amd64.exe /quiet InstallAllUsers=1 PrependPath=1 Include_test=0”
However, you can find all the required command lines to execute the installation in the following link.
3. Using Python on Windows — Python 3.9.5 documentation
It is important to set the User Identity to Pool Autouser, Admin to grant administrative privileges.

Additionally, we need to define the Resource files that Azure Batch downloads to the compute node before running the command line, so once you click on the resource files option you need to click on the “pick storage blob” and it will open an interactive window where you can navigate through your storage explorer and select the installer.

Important: Check the Public access level of the blob container, if you leave it as Private(no anonymous access), like in the above example, you will need to specify the “Include SaS key” when you select the resource file, otherwise you will get authentication problems. However, If the access level is set to Blob or Container it will be public.
If you are using a Private access, then it is required to mark the Include SAS and set an expiration date before adding the Resources files

Finally, once the VM node is ready and the Start task finished, you can access the node using RDP and confirm that python is now installed.


You can execute the following command to confirm that the correct python version is installed.

by Contributed | May 15, 2021 | Technology
This article is contributed. See the original author and article here.
Solving problems is something that “tickles my brain,” says Poornima Nayar.
This inherent love of troubleshooting issues and masterminding solutions is what got the Developer Technologies MVP into tech in the first place, and it is a genuine curiosity that has not subsided more than a decade later.
Now, even with the title of MVP, Poornima continues to upskill and spread the word of its benefits.
“I think there needs to be an awareness that being an MVP is not the end of the learning journey, it is actually the beginning,” she says.
“I think blogs, talks, interviews, short videos introducing technology and above all being approachable to people can help a lot … In short, spread knowledge and show that it is possible.”
Poornima certainly did this shortly after the birth of her daughter.
Upon returning from maternity leave, Poornima felt pressure to dive back into an industry that is known for its breakneck pace of change. To stay in step with the competition, Poornima decided to earn an Azure Certification with MS Learn.
“Having a child totally changed my perspective of learning – learning can be fun! It doesn’t stop the minute you are out of school,” she says.
“I use MS Learn to quickly understand and pick up something new. It gives me that quick starting point to understand a new technology and then build on top of it. I have collected a few badges on MS Learn which is like a little trigger to get me going and make learning fun,” Poornima says.
Today, Poornima is an advocate for upskilling and encourages all tech enthusiasts, regardless of skill level, to never stop learning. One of the best places to get started, Poornima says, is with open-source communities and learning resources.
“Open-source is more about giving than taking. I think it’s the ‘giving’ part that daunts people and this can pose a challenge in having more contributors. The fact that what you contribute or discuss is out there in public is something that can scare people. I have been in that situation myself,” she says.
“It is crucial to educate that open source contribution does not necessarily mean coding alone. There are many more ways to contribute – testing, documentation, issue logging, even giving ideas about a new feature are some of the ways that someone could contribute.”
The most important part, Poornima suggests, is getting involved and learning along the way. For more on Poornima, visit her Twitter @PoornimaNayar

by Contributed | May 15, 2021 | Technology
This article is contributed. See the original author and article here.
Which community project do you maintain?
CLI for Microsoft 365
How does it help people?
It is a cross platform tool which is used by Developers and IT Pros with which you can configure Microsoft 365, manage SharePoint Framework projects and build automation scripts.
What have you been working on lately?
Script for notifying the tenant status for IT Pros
What do you do at work?
I am a consultant for Microsoft 365 services. Apart from that I am also part of a team who primarily develops the Digital workplace Apps related to Microsoft Teams.
Why are you a part of the M365 community?
Because of the Awesome work the Microsoft 365 community is doing selflessly. More than that the inclusiveness which the community provides for all the contributors irrespective of who you are and where you are from. I have seen lot of my peers and colleagues who have got benefited from the work of the community and nothing is better than being part of the community owing to their awesome work across the Microsoft 365 areas.
What was you first community contribution?
First active contribution was back in July 2020 (17 July 2020 to be precise). From then on, there was no looking back for me.
One tip for someone who’d like to start contributing
Do not underestimate your contribution. You may think your contribution is so simple and it will not be beneficial to anyone (Let me confess, I also thought the same initially). With that you are underestimating the power of simplicity. It will be beneficial and may save a lot of time for someone who might be on the other side of the globe and can save his / her / theirs time. Be kind to people who contribute and support and be compassionate. Remember, people who are part of their community is doing this just out of sheer passion and ensure that you show gratitude and empathy.
Remember community is there to help you and to support. I got that during my initial days and I am sure any contributor also will get similar treatment which I have received during my starting days.
by Contributed | May 15, 2021 | Technology
This article is contributed. See the original author and article here.
In this article I’ll go over both of the filters you can find in my React Groups and Teams Filters webpart. The webpart is useful for site managers, admins, and users to find their sites and it’s information. The first filter switches the All Groups in my Organization to My Groups and the second filters the visibility of the groups ( Public/Private/All )
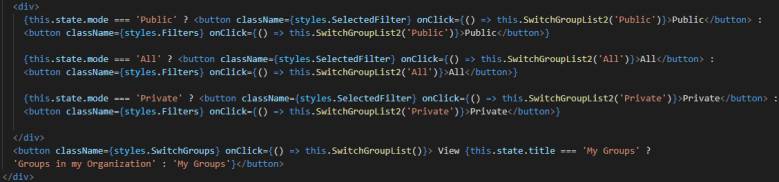
In the screenshot below you can see the code for the buttons.
Visibility Filters
The first three buttons are the visibility filters. They filter the MyGroupResultsFiltered to be the button text you clicked. For example, if you click the ‘Public’ button MyGroupResultsFiltered will be filtered to include only groups with the visibility set as ‘Public’.
Let’s dive deeper into what’s happening. On click of, for instance, Private, the button calls the SwitchGroupList2 function (line 69) and passes through ‘Private’ as a parameter. |
 |
That parameter ‘Private’ is now called ‘Switch’ and next we check if that equals ‘All’.
If it does and you clicked the button titled ‘All’, we want to set the state of AllGroupsresults to the state holding all of the items. We do this because if I were to filter the AllGroupsresults to private and then switch to public and filter that, we’re just filtering a filtered list and you won’t get back any results. AllGroupsresults hold all of the results for Groups in my Organization and AllGroupsresultsFiltered is the filtered version of that list. In other words, when we get back the Groups ( both Groups in my Org and My Groups ) we make a copy of this list that we can filter however we would like and we can call on that list and filter it and assign it to the AllGroupsresultsFiltered value.
If the selected filter is anything other than ‘All’ we go ahead and create a constant that is assigned the filtered list. What this filter does is it maps through AllGroupsresults and checks if every group has the visibility that you selected, keeps the groups that has the visibility, and assigns the value to SwitchedALL. Same thing for MyGroupResults; It maps through MyGroupResults and filters the groups to be the ones that match the visibility you selected. Next, we set the state of AllGroupsresultsFiltered and MyGroupResultsFiltered to be SwitchedALL and SwitchedMY, respectively. In our case, we selected the button with the text ‘Private’ so AllGroupsresultsFiltered and MyGroupResultsFiltered will reflect this change and only show the groups with the visibility ‘Private’.
The last part is, after the if/else statement, we want to set the state ‘mode’ to be the selected filter. We’re doing this so that the button we clicked will have the ‘SelectedFilter’ styling. How we do this is by inputting a ternary operator in the code so that, depending on if the mode equals ‘Private’, we change the styling. If you selected the Private button the SwitchGroupList2 function will set the mode to be ‘Private’ and, consequently, rendering the button with the class ‘Selected Filter’.

Option Filter
On the bottom right of the heading before the groups you will either see a button titled ‘My Groups’ or ‘Groups In My Organization’. |

|
This button allows you to toggle between either displaying groups you are a member of or groups in your organization. On click of this button you call the SwitchGroupList function. ( Not the SwitchGroupList2 function mentioned earlier )
In this function we check if the title in state is ‘Groups In My Organization’. The title is what is displayed, meaning that if the button text is ‘View My Groups’ the title is ‘Groups In My Organization’. |

|
If the title is ‘Groups In My Organization’ we change it to be ‘My Groups’. The opposite also applies- if the title is ‘My Groups’ we go ahead and change it to be ‘Groups In My Organization’.
Why is this part of the code? For two reasons: the first is because we want to toggle the button text and header text between ‘Groups In My Organization’ and ‘My Groups’ and also so that we can display the right information.
 |
In the render there is a ternary operator that checks if the current selected option is ‘My Groups’. |
If this is true it maps through MyGroupResultsFiltered and displays the groups. If not, it renders All of the groups in your organization.
I hope you liked this article and it helped you out with your filters!
You can view the code here: https://github.com/pnp/sp-dev-fx-webparts/tree/main/samples/react-groups-teams
by Contributed | May 14, 2021 | Technology
This article is contributed. See the original author and article here.
With return to work, and hybrid work becoming a reality, familiarity with physical locations is again coming in to play for many organizations. This “back to work” scenario seems to be playing out along three primary scenarios:
- New hires may have never seen an orgs buildings.
- Return workers may be going to new locations as building consolidation efforts have taken place.
- Existing spaces may now be set up for hybrid work with non-dedicated spaces.
Thankfully, organizations can leverage the tremendous power of Microsoft Viva Connections paired with the rich immersive experiences of SharePoint Spaces to:
- Bring impactful, educational, virtual tours to employees that immerse them in the new environments from comfort of home. SharePoint Spaces provides for immersive 360’ tours that can simulate the onsite experience with additional, contextual, information to enrich the experience.
- Light up through Microsoft Viva Connections where the next generation Intranet is brought to employees where they work…. Microsoft Teams.
- Use high quality, low cost, consumer grade devices like the Insta360 One X2, to capture stunning 360’ images and videos that can be leveraged within SharePoint Spaces.
Resources:
Thanks for visiting – Michael Gannotti LinkedIn | Twitter
 Michael Gannotti

Recent Comments