by Contributed | Oct 9, 2023 | Technology
This article is contributed. See the original author and article here.
Taking your machine learning (ML) models from local development into production can be challenging and time consuming. It requires creating a HTTP layer above your model to process incoming requests, integrate with logging services, and handle errors safely. What’s more, the code required for pre- and post-processing, model loading, and model inference vary across models and must integrate smoothly with the HTTP layer.
Today, we are excited to announce the General Availability (GA) and open sourcing of the Azure Machine Learning Inference Server. This easy-to-use python package provides an extensible HTTP layer that enables you to rapidly prepare your ML models for production scenarios at scale. The package takes care of request processing, logging, and error handling. It also provides a score script interface that allows for custom, user-defined, pre- and post-processing, model loading, and inference code for any model.
of the AzureML Inference HTTP Server
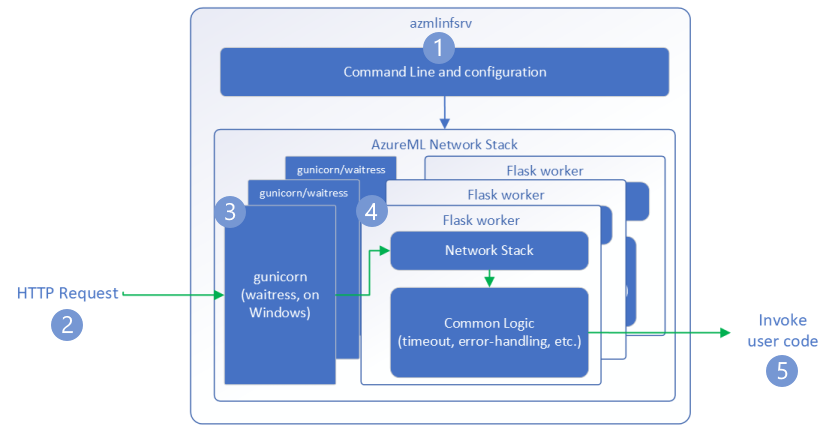
The Azure Machine Learning Inference Server is a Python package that exposes your ML model as a HTTP endpoint. The package contains a Flask-based server run via Gunicorn and is designed to handle production scale requests. It is currently the default server used in the Azure Machine Learning prebuilt Docker images for inference. And, while it is built for production, it is also designed to support rapid local development.
 Figure 1: How the Azure Machine Learning Inference Server Handles Incoming Requests
Score Script
The score script (sometimes referred to as the “scoring script” or “user code”) is how you can provide your model to the server. It consists of two parts, an init() function, executed on server startup, and a run() function, executed when the server receives a request to the “/score” route.
On server startup…
The init() function is designed to hold the code for loading the model from the filesystem. It is only run once.
On request to “/score” route…
The run() function is designed to hold the code to handle inference requests. The code written here can be simple: passing raw JSON input to the model loaded in the init() function and returning the output. Or, it can be complex: running several pre-processing functions defined across multiple files, delegating inference to a GPU, and running content moderation on the model output before returning results to the user.
The score script is designed for maximum extensibility. Any code can be placed into init() or run() and it will be run when those functions are called as described above.
An example score script can be found here – azureml-examples – Github.
Key AzureML Inference Se
Local Score Script Development and Debugging
Developing a complex score script may require iterative debugging and often it’s not feasible to redeploy an online endpoint several times to debug potential issues. The AzureML Inference Server allows you to run a score script locally to test both model loading and inference request handling. It easily integrates with the VS Code debugger and allows you to step through potentially complex processing or inference steps.
Note: To test your docker image in addition to your score script please refer to the AzureML Local Endpoints documentation.
Validation gates for CI/CD Pipeline
The Azure Machine Learning Inference Server can also be used to create validation gates in a continuous integration and deployment (CICD) pipeline. For example, you can start the server with a candidate score script and run a test suite against this local instance directly in the pipeline, enabling a safe, efficient, and automatable deployment process.
Production Deployments
The Azure Machine Learning Inference Server is designed to support production-scale inference. Once local testing is complete, you can feel confident using the score script you developed alongside the Azure Machine Learning prebuilt inference images to deploy your model as an AzureML Managed Online Endpoint.
Safely bring your models into production using the Azure Machine Learning Inference Server and AzureML Managed Inference by referencing the resources below.
Learn More

by Contributed | Oct 7, 2023 | Technology
This article is contributed. See the original author and article here.
Issue
We recently encountered a support case where a customer using In-memory tables in an Azure SQL DB, receives an error message while trying to insert data into the table that also has a clustered columnstore index. The customer then deleted the entire data from the In-memory Tables (With the clustered columnstore index), however it appeared that the Index Unused memory was still not released. Here’s the memory allocation the customer could see:

Error
In addition to the error above- here is the error text:
Msg 41823, Level 16, State 109, Line 1
Could not perform the operation because the database has reached its quota for in-memory tables. This error may be transient. Please retry the operation. See ‘http://go.microsoft.com/fwlink/?LinkID=623028‘ for more information
Workaround
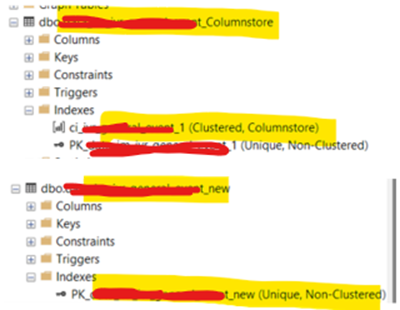
To reproduce the issue, we created two tables in our premium tier Azure SQL DB, one with a clustered columnstore Index while the other just had a regular clustered index. Also, the columnstore index was created with the option- MEMORY_OPTIMIZED=ON.

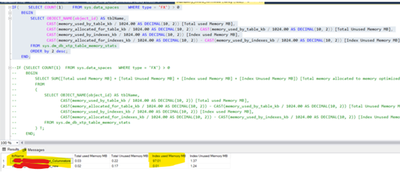
Then we went ahead and inserted data in both the tables and ran the script below to find the memory consumption of the indexes (Notice the 97 MB reported by the Index_Unused_memory column below in the table containing the columnstore Index):
IF( SELECT COUNT(1) FROM sys.data_spaces WHERE type = ‘FX’) > 0
BEGIN
SELECT OBJECT_NAME(object_id) AS tblName,
CAST(memory_used_by_table_kb / 1024.00 AS DECIMAL(10, 2)) [Total used Memory MB],
CAST(memory_allocated_for_table_kb / 1024.00 AS DECIMAL(10, 2)) – CAST(memory_used_by_table_kb / 1024.00 AS DECIMAL(10, 2)) [Total Unused Memory MB],
CAST(memory_used_by_indexes_kb / 1024.00 AS DECIMAL(10, 2)) [Index used Memory MB],
CAST(memory_allocated_for_indexes_kb / 1024.00 AS DECIMAL(10, 2)) – CAST(memory_used_by_indexes_kb / 1024.00 AS DECIMAL(10, 2)) [Index Unused Memory MB]
FROM sys.dm_db_xtp_table_memory_stats
ORDER by 2 desc;
END;

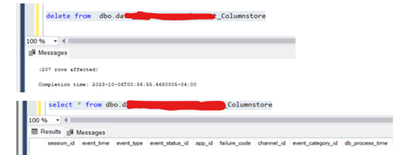
Now we went ahead and deleted all data from the table (with the columnstore Index) and ran the same query above:


The test above proves that it is not the data contained in an In-memory table that consumes the memory, but it is rather the Columnstore Index that consumes the memory and occupies it till the index stays on the table. Even if we delete the data from the table, the memory will still remain in the Index Unused memory. The only possible option to release the Index Unused memory is to drop the clustered Columnstore Index.
Moreover, it is also recommended to use a Columnstore Index only for tables with a lot of data (Millions or even billions) only if using it helps achieve the overall performance levels expected.
References
In-Memory OLTP in Azure SQL Database | Azure Blog | Microsoft Azure
In-memory technologies – Azure SQL | Microsoft Learn
Should table or stored procedure be ported to in-memory OLTP – SQL Server | Microsoft Learn

by Contributed | Oct 6, 2023 | Technology
This article is contributed. See the original author and article here.
This is the next segment of our blog series highlighting Microsoft Learn Student Ambassadors who achieved the Gold milestone, the highest level attainable, and have recently graduated from university. Each blog in the series features a different student and highlights their accomplishments, their experience with the Student Ambassador community, and what they’re up to now.
Today we meet Vidushi Gupta, who recently graduated with a bachelor of computer science from SRM Institute of Science and Technology in India.
Responses have been edited for clarity and length.
When did you join the Student Ambassadors community?
I joined the Student Ambassadors community in January 2021. This was the time when I started to learn about tech communities, and MLSA was my first.
What was being a Student Ambassador like?
Being a Microsoft Learn Student Ambassador was a transformative experience in my tech journey. It provided me with a supportive community and an exceptional program team, creating a safe space for me to learn and grow. Through this opportunity, I not only expanded my knowledge of new technologies but also made significant advancements in my existing tech skills. The program encouraged me to participate in hackathons, where I not only utilized my skills, but also emerged as a winner in some instances. Along the way, I had the privilege of meeting exceptional individuals who shared my passion for technology. Overall, being a Student Ambassador has been an incredible journey, filled with continuous learning, personal growth, and the development of unwavering confidence.
Was there a specific experience you had while you were in the program that had a profound impact on you and why?
During my time as a Microsoft Learn Student Ambassador, there were three experiences that had a profound impact on me. In 2021, I was awarded the Microsoft advocacy sponsorship to attend the Grace Hopper Celebration (GHC). This experience highlighted the importance of diversity and inclusion, and witnessing the safe space provided to women and gender minorities at the conference was inspiring. Since then, I have maintained my association with GHC, attending the conference in 2021 and serving as a mentor in 2022. I am currently aiming to attend the conference again this year.

Vidushi, Gold Student Ambassador, in Amsterdam during her student exchange program experience where she learned how to improve business by using data to drive decisions.
Tell us about a technology you had the chance to gain a skillset as a Student Ambassador. How has this skill you acquired helped you in your post-university journey?
As a Student Ambassador, I collaborated with Jasleen, a fellow Ambassador, on Microsoft’s data science and machine learning curriculums. This experience enhanced my skills in R, a language not commonly used in many projects. Acquiring proficiency in R has been invaluable in developing my data science portfolio and giving me a head start in my career. It has equipped me with the confidence and practical knowledge to tackle data-driven challenges and extract insights from complex datasets.
What is something you want all students, globally, to know about the Microsoft Learn Student Ambassador Program?
The MLSA program is an inclusive community with an amazing and supportive program team. It emphasizes the power of community and peer-to-peer learning, providing a safe space for diverse voices to be heard. Through MLSA, I learned the value of collaborating with fellow ambassadors, gaining support, guidance, and lifelong connections. I encourage all students worldwide to join this program and experience the transformative impact it can have on their tech journey.
What advice would you give to new Student Ambassadors, who are just starting in the program?
Five words – Trust the process and learn.
Look beyond the swag, look at the network you’re going to build, and grow!
Share a favorite quote with us! It can be from a movie, a song, a book, or someone you know personally. Tell us why you chose this. What does it mean for you?
“You v/s You.” This has always been my favorite quote. It always reiterates for me that I am my only competition. This helps me to work on being a little better than what I was yesterday. This quote also helps me to stay away from the comparison loop because yesterday’s Vidushi is my only baseline and no one else is!

Vidushi with fellow Student Ambassadors at the Microsoft office.
Tell us something interesting about you, about your journey.
When I joined, I had already experienced gender discrimination in tech. That experience led me to believe that women have to put in a lot of work to stay at the table. I was disheartened but wanted to get involved with a global community like MLSA to understand the importance of women and gender minorities in tech. I started off being doubtful about tech, even though I enjoyed it. Through my experience in the MLSA program, I became a confident public speaker, a mentor, a tech enthusiast, a data storyteller, a diversity and inclusion evangelist, and so much more!
You can follow Vidushi here:
Personal Portfolio Website: https://vidushig.com
LinkedIn: https://www.linkedin.com/in/vidushi-gupta07
Instagram: https://www.instagram.com/vidzene_
GitHub: https://github.com/Vidushi-Gupta
Twitter: https://twitter.com/Vidushi_Gupta7
by Contributed | Oct 6, 2023 | Technology
This article is contributed. See the original author and article here.
We are excited to announce the availability of Azure AI Language Summarization Container! It comes with both Disconnected and Connected options, along with Commitment Tier pricing. Summarization in Azure AI Language provides ready-for-use solutions with task-oriented and -optimized LLM-powered models to summarize documents and conversation transcripts.
All resources are now LIVE and ready for use. Customers interested in the Disconnected container should go through the gating process to get approved.
This release is a significant step toward democratizing Generative AI and Large Language Models, offering key benefits to our customers:
- With disconnected container, customers with high demands for data security and confidentiality are unblocked to bring the value of summarization to scenarios in a fully disconnected secure environment.
- It is ideal for sensitive use cases where data isolation is critical, such as defense, legal, healthcare, financial industries, intelligence agencies.
- Customers have full control over their environment, minimizing data exposure.
- Organizations is empowered to harness the Cloud summarization capabilities in secure and confidential settings.
- With container, both disconnected and connected option, customers will utilize summarization AI now in more regions and countries, beyond what is supported by the Cloud offering today.
- With Commitment Tier pricing, customers will benefit from
- Cost savings based on their commitment level, making it a cost-effective choice for long term usage.
- Predictability in pricing, making budge planning more straightforward
- Flexible commitment tiers, accommodating the specific needs and usage patterns.
These benefits cater to a wide range of customer needs, ensuring that they can choose the option that best aligns their requirements and preferences.
Please find below for more details and resources about the launch:
by Contributed | Oct 5, 2023 | Technology
This article is contributed. See the original author and article here.
Hi, I’m Jaime Gonzales and I lead the Viva People Science R&D team. Our goal is to enrich the Viva journey with the science of employee happiness and success, to deliver exceptional and impactful experiences for humans at work.
As People Science experts, we are consultants, researchers, analysts, content authors, product consultants, and customer advocates with deep expertise in engagement and employee experience. I’ve worked in HR and OD roles for many years and now love sitting in a product team where we have the scale and reach to improve the lives of millions of people at work.
What is People Science?
I’ve always been fascinated with the idea that businesses win or lose based on the strength of their people. The better the connection between the two, the greater likelihood of success. As organizations seek any advantage to overcome strong economic headwinds, I think this notion is more important than ever. Those who prioritize what makes people feel happy, successful, and motivated to do their best work will find a competitive leg up. This is what People Science is all about – finding the intersection between people’s engagement and business performance.
People Science: our definition at Microsoft Viva
Let’s start with how we at Microsoft Viva think about People Science, and what it means for our customers. People Science is a research-backed and people-centric approach to the study and practice of happiness and success at work. It integrates fields of study like industrial-organizational psychology, organizational development, and occupational psychology with increasingly relevant fields like data science, product management, and design to reimagine an employee experience that drives better individual and organizational outcomes.
How Viva People Science creates value
Viva People Science transforms how people and organizations succeed by building new habits and mindsets. We help people bring their best selves to work so that they can do their best work. First, we invest in building a team of intellectually curious People Scientists who can transform themselves and their customers into People Science pros. We produce industry-leading research that challenges conventional HR practices, leveraging our unique data and expertise. We weave this research into our product and marketing outreach to design a human-centric Viva experience that improves employee engagement and ultimately business performance. As a team, we work to continuously evolve our skills, procedures, services, and toolkits to delight more and more customers and make People Science accessible to everyone.
For customers, we offer professional services to deliver connected insights and enable change
in three key ways:
1. We help customers shape and get buy-in on a tailored strategy that measures and improves aspects of their employee experience most related to engagement and business performance.
2. We help customers become People Science pros, elevating them in their roles and ensuring the partnership’s success.
3. We alleviate customer pain points by infusing our product with deep user empathy and our experience as People Scientists.
My colleagues and I will continue to explore the foundations of People Science with you over the coming months through this blog. But in the meantime, take a minute to watch this video that looks at People Science working with Viva Glint customers. I think it captures the essence of People Science at Microsoft.
Interested in how Viva People Science can support your organization’s success? Learn more here.
Figure 1: How the Azure Machine Learning Inference Server Handles Incoming Requests


Recent Comments