by Contributed | Apr 12, 2021 | Technology
This article is contributed. See the original author and article here.
When I first started in IT, my large organization had an entirely separate “Data Security” team who were responsible for user management – adds/moves/deletes and password resets. They were a small but busy team, handling both calls from users via the helpdesk and requests generated by HR. Apart from using some Active Directory automation scripting with VBScript instead of the GUI, each request was handled individually.
Fast forward to 2021 and as well as replacing those scripts with PowerShell, we can use dynamic groups to maintain the group members based on the attributes of those members.
Why would you use Dynamic Groups?
Using a query-based membership, when you update the attributes of a user or device they will be added to or removed from the dynamic groups that are now relevant to them, without you having to do any other steps. You might have a dynamic group for people who have the same department name or location specified in their user account. You can combine more than one attribute so, for example, the group members have to both be in the Finance department and be located in Brisbane, Australia. You can even create a “direct reports” dynamic group for people who report to the same manager.
Devices can also be group members but you can’t mix both users and devices in the same group. You could create dynamic groups of devices with the same operating system version, Intune device property label or enrolment profile name, for example.
For a full list of supported attribute queries and syntax, visit Dynamic membership rules for groups in Azure Active Directory.
Licensing
Dynamic membership is supported in security groups and Microsoft 365 groups. It requires an Azure AD P1 license for each unique user who is a member of one of or more dynamic groups. This is an overall count though – the P1 license doesn’t have to be assigned to the people you want to be included in dynamic groups, but the total member count of people in dynamic groups must match or be exceeded by the total number of P1 licenses owned by your organization. Some Microsoft 365 license plans include this Azure AD premium functionality – E3, E5, MF1 and MF3. No licenses are required for devices that are members of dynamic groups.
Dynamic Groups in Azure Active Directory
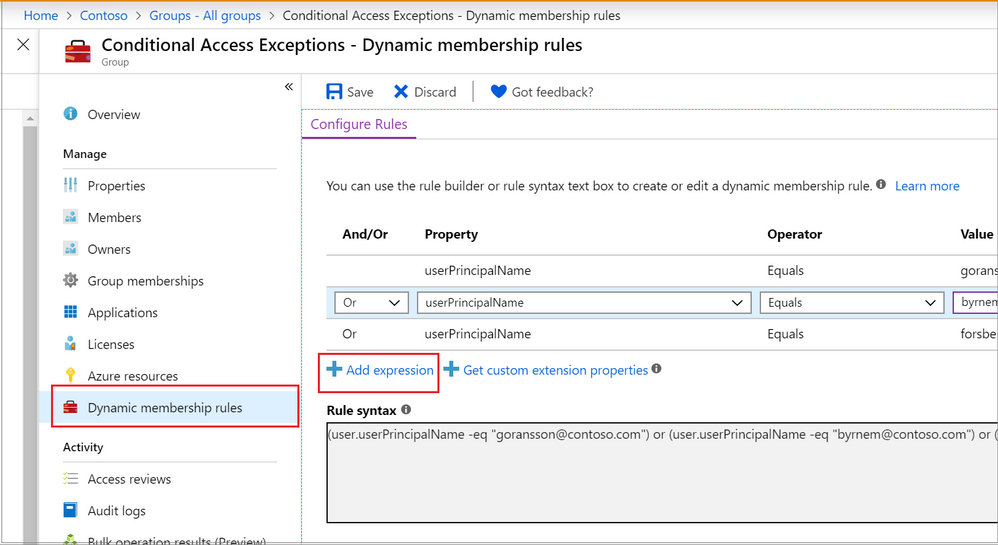
The Azure portal provides a graphical-based rule builder for dynamic membership, which supports adding up to five expressions, and the ability to enter your query string directly into the text editor. You also need to use the text editor for the “direct reports” scenario I mentioned above, setting operator precedence, and for writing more complex rules.
Adding a dynamic membership rule to a group in the Azure Portal
Operator precedence is where we want a part of the query to be evaluated before another part. For example, we can use parenthesis to build a list of matching department names (finance or HR) and add that to the Brisbane location:
user.city -eq "Brisbane"-and (user.department -eq "Finance" -or user.department -eq "HR")
To build more complex queries, you can use the following operators:
-eq -ne -startsWith -notStartsWith -contains -notContains -match –notMatch -in -notIn
-not
-and
-or
-any -all
Example: Direct Reports
This rule maintains members who have their Manager property set to the same Manager ID. The Manager ID is the unique object identifier found in the manager’s profile. It does not support subgroups and can’t be combined with any other membership rules.
Direct Reports for "{objectID_of_manager}" for example Direct Reports for "62e19b97-8b3d-4d4a-a106-4ce66896a863"
Example: On-premises domain membership
If you’re synchronizing identities from Active Directory to Azure Active Directory, you can build dynamic groups based on which Active Directory Domain the user belongs to. This is based on the user’s Security Identifier (SID). You can use PowerShell to query the users with a domain filter to get the start of the SID that you need:
Get-ADUser -Filter * -SearchBase "dc=domain,dc=local" | select Name,SID
Then use the rule syntax that queries Azure AD for the user.onPremisesSecurityIdentifier attribute:
(user.onPremisesSecurityIdentifier -startsWith "S-1-5-21-12345678-1234567891-123456789")
Verifying members of your dynamic group
When an identity attribute of a user or a device changes, Azure AD evaluates all dynamic membership rules that exist in that directory, triggering any relevant membership additions or removals. You can also see the list of current group members via the Azure portal, or use the following PowerShell command for a simple list:
(Get-AzADGroup -DisplayName "<DisplayNameofGroup>" | Get-AzADGroupMember).DisplayName
Note: This requires the Azure Active Directory PowerShell module that you can download here.
In preview, is the ability to validate your rules against up to 20 users or devices. The Validate Rules tab will run your query against your selected target users or devices and confirm if they would meet the requirements to be a group member or not. For more information, visit Validate a dynamic group membership rule (preview) in Azure Active Directory.
Microsoft 365 groups and Microsoft Teams dynamic membership
Microsoft 365 groups (as a group type) provision access across a selection of Microsoft 365 services for a group of people who will be working together. They are designed to prove quick and easy access, removing the administration overhead of an IT Pro needing to set permission on several different Microsoft 365 services, including Teams, a SharePoint Online site, a Planner Plan, a Power BI workspace and a shared mailbox. This group type also supports dynamic membership, created via the Azure Portal the same as you would an Azure AD security group.
By using this group type and dynamic membership, you can add and remove members to a Microsoft Team automatically, without the team owner needing to do any administration tasks.
To achieve this, you can either:
Create your Microsoft 365 group in Azure Active Directory, adding your dynamic membership rule.
Then either create a new team from this group (after giving Azure AD time to update).
Or apply dynamic membership to an existing team by changing its group membership from static to dynamic.
For more details, visit Overview of dynamic membership for Teams.
What about dynamic distribution groups?
Yes, Exchange Online supports dynamic membership for email distribution groups! Unlike security groups, the group membership is calculated each time a message is sent to the group. To set up and manage dynamic distribution groups, you need to use the Exchange Admin Center or Exchange Online PowerShell.
This example creates a dynamic group of Full Time Employees by querying a custom attribute:
New-DynamicDistributionGroup -Name "Full Time Employees" -RecipientFilter "(RecipientTypeDetails -eq 'UserMailbox') -and (CustomAttribute10 -eq 'FullTimeEmployee')"
For details, visit Manage dynamic distribution groups.
You also need to use Exchange Online PowerShell to query the list of group members at this point in time, as they can’t be viewed in the Exchange Admin Center or the Azure Portal:
$FTE = Get-DynamicDistributionGroup "Full Time Employees"
Get-Recipient -ResultSize Unlimited -RecipientPreviewFilter $FTE.RecipientFilter -OrganizationalUnit $FTE.RecipientContainer | Format-Table Name,Primary*
Check out View members of a dynamic distribution group for more details.
Conclusion
Dynamic group membership is a powerful feature, but like any technology capability it requires planning and alignment with your organization’s needs and its business processes. What scenarios do you have where dynamic groups would be useful? Need help writing more complex queries? Let us know in the comments!
by Contributed | Apr 12, 2021 | Technology
This article is contributed. See the original author and article here.
About a year ago, we conducted a survey and requested feedback on UserVoice about management pack for SCOM. Based on all the feedback that we received and constant input from Microsoft support, SCOM PG prioritized those requests, valued its outcomes, and planned few activities.
- One activity was reviving old but important old MPs which are extensively used by customers, but they lacked updates. Example: Windows Cluster, Exchange, HyperV.
- Another activity was to prevent customers using multiple MPs for different versions of a single workload by transitioning to Version agnostic MP. Example: Windows OS, DPM, ADCS.
- Most importantly, develop MPs for newer 1P Microsoft. Example: M365, AzStackHCI
Looking at the above plan, we updated and released below Management Packs over the past few months. Additionally, work is in progress for Management Pack on monitoring Microsoft 365, Azure Stack HCI and many more. If you are want to be part of the early testers of these MPs, please write to us at systemcenterfeedback@microsoft.com.
MP Name
|
Link
|
Version
|
MP Name in Catalog
|
Change details
|
|---|
S2D
|
100782
|
1.0.47.1
|
Storage Spaces Direct 2016+
|
Fixed multiple cookdown and performance issues.
|
DPM
|
56560
|
5.0.1401.2
|
Data Protection Manager 2016 and above
|
Added DPM Deduplication Management pack and fixed DPM executive summary issue.
|
ADCS
|
56671
|
10.0.0.1
|
Active Directory Certification Services 2016 and above
|
Fixed TLS 1.0 issue with Topology discovery and published the MP as version agnostic for Windows Server 2016 and above.
|
MP Recommendation
|
NA
|
10.19.10304.1
|
Management Pack Recommendations
|
Added Dell EMC Server lightweight discovery to MP recommendations.
|
Cluster 2012 MP
|
2268
|
10.0.6.6
|
Windows Server Cluster
|
Removed v. 10.0.6.0, added language support for v. 10.0.6.6.
|
Win OS (2012 R2 and Earlier)
|
9296
|
6.0.7326.0
|
Core OS
|
“Volume Name” property discovery issue has fixed for Logical Disks.
|
Win OS (2016 and above)
|
54303
|
10.1.0.5
|
Core OS 2016 and above
|
· Non-physical NIC’s discovery issue has fixed in Windows Server 2016 and above Network Adaptor discovery.
· Display strings are updated from “2016 and 1709+” to “2016 and above”
|
ADRMS (2016 and above)
|
55655
|
10.0.0.1
|
Active Directory Rights Management Services 2016 and above
|
The MP has been verified against ADRMS for Windows Server 2016 and above operating systems and branded as version agnostics.
|
Azure
|
50013
|
1.8.0.5
|
Microsoft Azure
|
Multiple issues fixed.
|
We also recognize the need to service Management Pack on a regular basis and, given the plethora of monitoring workloads SCOM caters to, we plan to build a robust and agile way of improving MPs. Getting constant inputs from customers, community and MVPs have immensely given us the energy to push our efforts in the right direction and we greatly appreciate that. We look forward to suggestions in delivering, developing, and improving MPs on a faster basis. After all, change should always be constant.
Feel free to share your comments in the below section and you can write to us at systemcenterfeedback@microsoft.com too.
by Contributed | Apr 12, 2021 | Technology
This article is contributed. See the original author and article here.
Introduction
Sometimes we have a requirement to get reports of users and their roles on the SharePoint site and we have to export to CSV/Excel format. To achieve this solution we will use PnP Powershell.
Let’s see step-by-step implementation:
Implementation
- Open Windows Powershell ISE
- Create a new file and write a script
Now we will see all the steps which we required to achieve the solution:
1. We will read the site URL from the user
2. Then we will connect to the O365 admin site and then we will connect to the site which the user has entered
3. Create a function to get user and their roles and store it in an array
4. And we will export the array to CSV format
So in the end, our script will be like this,
$basePath = "E:ChandaniBlogsUserRolesPS"
$dateTime = "{0:MM_dd_yy}_{0:HH_mm_ss}" -f (Get-Date)
$csvPath = $basePath + "userdetails" + $dateTime + ".csv"
$adminSiteURL = "https://*****-admin.sharepoint.com/" #O365 admin site URL
$username = #Email ID
$password = "********"
$secureStringPwd = $password | ConvertTo-SecureString -AsPlainText -Force
$Creds = New-Object System.Management.Automation.PSCredential -ArgumentList $username, $secureStringPwd
$global:userRoles = @()
Function Login() {
[cmdletbinding()]
param([parameter(Mandatory = $true, ValueFromPipeline = $true)] $Creds)
#connect to the O365 admin site
Write-Host "Connecting to Tenant Admin Site '$($adminSiteURL)'" -f Yellow
Connect-PnPOnline -Url $adminSiteURL -Credentials $Creds
Write-Host "Connection Successfull" -f Yellow
}
Function StartProcessing {
Login($Creds);
GetUserRoles
}
Function GetUserRoles {
try {
$siteURL = Read-Host "Please enter site collcetion URL"
Write-Host "Connecting to Site '$($siteURL)'" -f Yellow
Connect-PnPOnline -Url $siteURL -Credentials $Creds
$web = Get-PnPWeb -Includes RoleAssignments
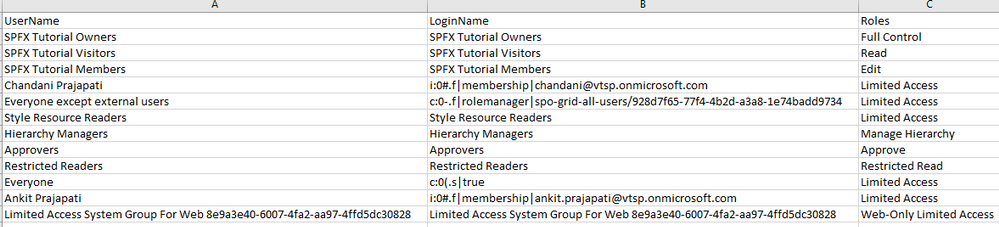
foreach ($roles in $web.RoleAssignments) {
$member = $roles.Member
$loginName = get-pnpproperty -ClientObject $member -Property LoginName
$title = get-pnpproperty -ClientObject $member -Property Title
$rolebindings = get-pnpproperty -ClientObject $roles -Property RoleDefinitionBindings
$roleName = $($rolebindings.Name)
$global:userRoles += New-Object PSObject -Property ([ordered]@{
UserName = $title
LoginName = $loginName
Roles = $roleName
})
}
}
catch {
Write-Host -f Red "Error in connecting to Site '$($TenantSite)'"
}
Write-Host "Exporting to CSV" -ForegroundColor Yellow
$global:userRoles | Export-CSV $csvPath -NoTypeInformation
Write-Host "Export to CSV successfully!" -ForegroundColor Yellow
}
StartProcessing
Output
Summary
So in this article, we have seen how to get users and their roles from any SharePoint site collection and convert it in CSV format.
Hope this helps! If it is helpful to you then share it with others.
Sharing is caring!
by Contributed | Apr 12, 2021 | Technology
This article is contributed. See the original author and article here.
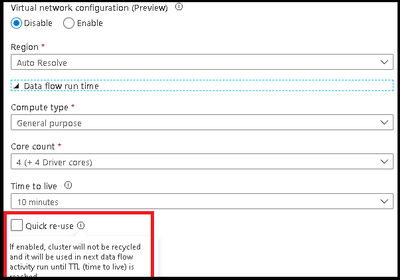
ADF has added a new option in the Azure Integration Runtime for data flow TTL: Quick re-use. This feature is currently available as a public preview. By selecting the re-use option with a TTL setting, you can direct ADF to maintain the Spark cluster for that period of time after your last data flow executes in a pipeline. This will provide much faster sequential executions using that same Azure IR in your data flow activities. You may find that parallel data flow executions or data flows that take have long execution times, will be better served as single job clusters without a TTL.
In the video below, I will walk you through how to use your TTL settings in the Azure IR so you can take your data flow sequential pipelines and move from 1-2 min warm pool startup times to activities that start in seconds:


Recent Comments