by Contributed | May 25, 2021 | Technology
This article is contributed. See the original author and article here.
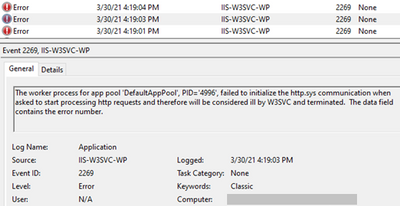
For an issue I worked on, the application pool kept stopping with Event ID 2269, 5139, and 5002. The errors and warnings I saw in Event Viewer are below.
Event 2269
The worker process for app pool 'DefaultAppPool' failed to initialize the http.sys communication when asked to start processing http requests

Event 5139
A listener channel for protocol 'http' in worker process serving application pool 'DefaultAppPool' reported a listener channel failure.

Event 5002
Application pool 'DefaultAppPool' is being automatically disabled due to a series of failures
Solution
Check if the application pool identity has “Bypass traverse checking” permission. This is group-policy permission to determine which users can traverse folders even if they don’t have permission on folders.
To give “Bypass traverse checking” permission:
- Go to “Start > Run”, type “gpedit.msc”
- Follow “Computer Configuration > Windows Settings > Security Settings > Local Policies > User Rights Assignment”
- Right click “Bypass traverse checking” and click “Properties”
- Click “Add User or Group”. Add these users and groups: Everyone, Users, IIS_IUSRS, IIS AppPoolDefaultAppPool
- Restart the server
- Open the same window and make sure the users/groups you added are still there
- Test the application

If this doesn’t work, use “netstat” and see if there are port conflicts. There might be network and file structure related issues as well
Note: With the steps above, we added more users than we should. This is for testing only. You can later harden this configuration.
by Contributed | May 25, 2021 | Technology
This article is contributed. See the original author and article here.
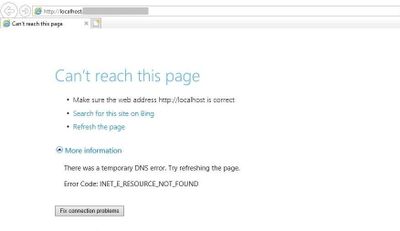
You may come across this error message when you access your website: “Can’t reach this page. There was a temporary DNS error. Error code: INET_E_RESOURCE_NOT_FOUND”
Solution
As the error mentions, there might be a problem with the DNS record of your application. However, for the issue I worked on, the root cause was the corruption in the IE registry setting.
We renamed the Connections container in the registry key below. After a server restart, a new Connections container was created and the application started working.
HKEY_LOCAL_MACHINE > Software > Microsoft > Windows > CurrentVersion > Internet Settings > Connections
My guess is that an Windows update or another system-level change can cause this issue.
by Contributed | May 25, 2021 | Technology
This article is contributed. See the original author and article here.
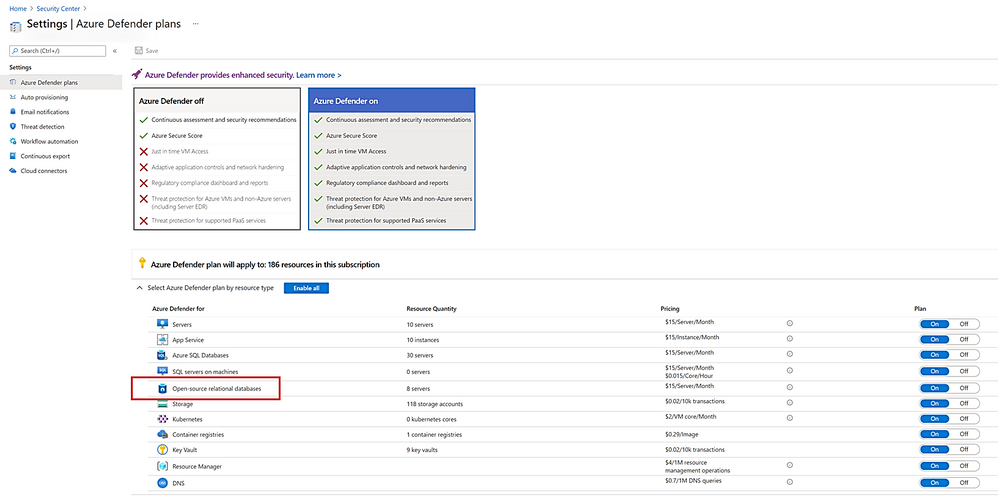
We recently announced the general availability of Azure Defender for SQL to protect SQL Servers in Azure, on premises, and in multi-cloud deployments on Amazon Web Services (AWS) and Google Cloud Platform (GCP). Today we are happy to announce we are expanding Azure Defender’s SQL protection to open-source relational databases. Azure Defender for open-source relational databases is now generally available for use with Azure Databases for MySQL, PostgreSQL, and MariaDB single servers.
Attackers often laterally traverse within organizations to discover and exfiltrate data, wherever it is stored, making open-source databases and SQL Server common targets. With Azure Defender, you can now protect your SQL Servers, as well as your open-source databases, expanding and strengthening your protection across your entire SQL estate. We recommend you protect your production instances of SQL and open-source databases with Azure Defender as part of your overall security strategy.
Protect your SQL estate with Azure Defender today
Azure Defender for open-source relational databases constantly monitors your servers for security threats and detects anomalous database activities indicating potential threats to Azure Database for MySQL, PostgreSQL and MariaDB. Some examples are:
- Granular detection of brute force attacks
- Azure Defender for open-source relational databases provides detailed information on attempted and successful brute force attacks. This lets you investigate and respond with a more complete understanding of the nature and status of the attack on your environment.
- Behavioral alerts detection
- Azure Defender for open-source relational databases alerts you to suspicious and unexpected behaviors on your servers, such as changes in the access pattern to your database.
- Threat intelligence-based detection
- Azure Defender leverages Microsoft’s threat intelligence and vast knowledge base to surface threat alerts so you can act against them.
Azure Defender for Open-Source Databases is just one component of the Azure Defender stack, which also protects SQL Servers, virtual machines, storage, and containers. In addition, you will benefit from centralized management for security, integration with Azure Secure Score, and native integration with Azure Sentinel.
Get started today!
Protect your Azure open-source databases today and expand your organization’s protection. To learn more, visit our documentation page. To learn more about Azure Defender visit our website. Follow us at @MSFTSecurity for the latest news and updates on cybersecurity.
by Contributed | May 25, 2021 | Technology
This article is contributed. See the original author and article here.
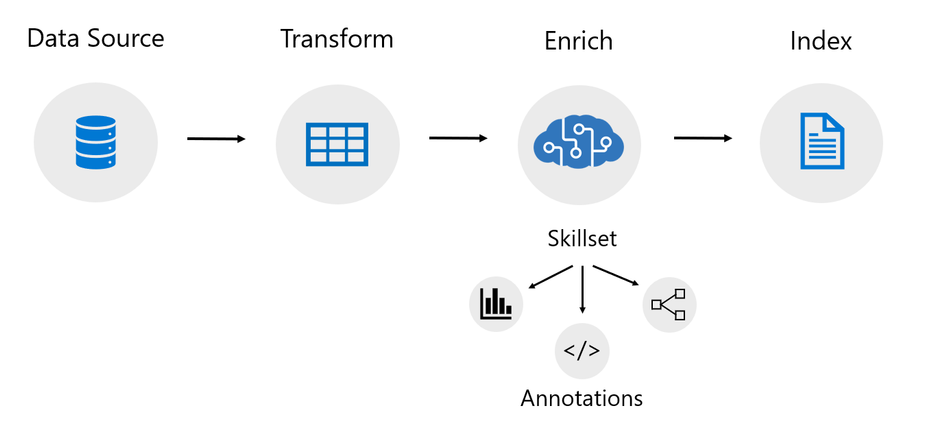
An indexer in Azure Cognitive Search is a crawler that extracts searchable text and metadata from a data source and populates a search index using field-to-field mappings between source data and your index. This approach is sometimes referred to as a ‘pull model’ because the service pulls data in without you having to write any code that adds data to an index. Indexers also drive the AI enrichment capabilities of Cognitive Search, integrating external processing of content en route to an index. Previously, indexers mostly just supported Azure data sources like Azure blobs and Azure SQL.
Today we’re excited to announce the following updates related to data source support!
New preview indexers
- Amazon Redshift (Powered by Power Query)
- Cosmos DB Gremlin API
- Elasticsearch (Powered by Power Query)
- MySQL
- PostgreSQL (Powered by Power Query)
- Salesforce Objects (Powered by Power Query)
- Salesforce Reports (Powered by Power Query)
- SharePoint Online
- Smartsheet (Powered by Power Query)
- Snowflake (Powered by Power Query)
GA indexers
- Azure Data Lake Storage Gen2
Power Query Connectors
Power Query is a data transformation and data preparation engine with the ability to pull data from many different data sources. Power Query connectors are used in products like Power BI and Excel. Azure Cognitive Search has added support for select Power Query data connectors so that you can pull data from more data sources using the familiar indexer pipeline.
You can use the select Power Query connectors just like you would use any other indexer. The Power Query connectors integrated into Azure Cognitive Search support change tracking, skillsets, field mappings, and many of the other features that indexers provide. They also support transformations.
These optional transformations can be used to manipulate your data before pulling it into an Azure Cognitive Search index. They can be as simple as removing a column or filtering rows or as advanced as adding your own M script.
To learn more about how to pull data from your data source using one of the new Power Query indexers, view the following tutorial:
SharePoint Online Indexer
The SharePoint Online indexer allows you to pull content from one or more SharePoint Online document libraries and index that content into an Azure Cognitive Search index. It supports many different file formats including the Office file formats. It also supports change detection that will by default identify which documents in your document library have been updated, added, or deleted. This means that after the initial ingestion of content from your document library, the indexer will only process content that has been updated, added, or deleted from your document library.
To learn more about how to pull data from your SharePoint Online document library, view the following tutorial:
Getting started
To get started with the new preview indexers, sign up using the below form:
https://aka.ms/azure-cognitive-search/indexer-preview
For more information, see our documentation at:
by Contributed | May 25, 2021 | Technology
This article is contributed. See the original author and article here.
We are excited to announce that Azure Spot VMs are now supported in Azure Databricks. Together, Spot VMs and Azure Databricks help innovative customers like aluminium and energy producer Hydro to accelerate data + AI workloads while optimizing costs. This will allow you to access unused Azure compute capacity at deep discounts—up to 90 percent compared to pay-as-you-go prices.* This feature is GA in all regions where Azure Databricks is available today.
How can you use and save cost using this feature? With Azure Spot VMs, you can access unused Azure compute capacity at deep discounts. Discounts vary based on region, VM type, and availability of compute capacity when your workload is deployed. You pay up to the maximum price that you optionally agree to in advance. You can specify the use of Spot VMs for your clusters and pools via the Databricks UI or Rest API.
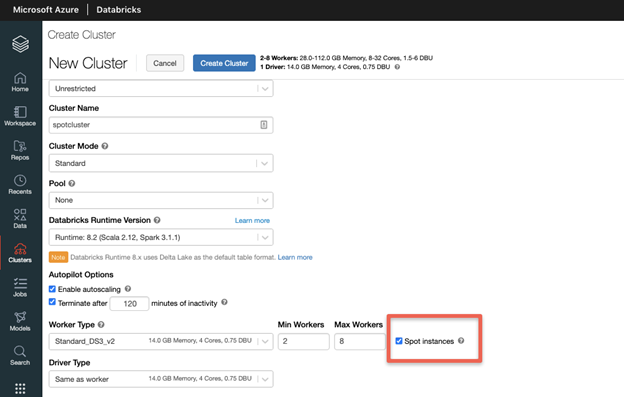
Create an Azure Databricks cluster with Spot VMs using the UI
When you create an Azure Databricks cluster, select your desired instance type, Databricks Runtime version and then select the “Spot Instances” checkbox as highlighted below.
Spot VMs are ideal for workloads that can be interrupted, providing scalability while reducing costs. Azure Databricks automatically handles the termination of Spot VMs by starting new pay-as-you-go worker nodes to guarantee your jobs will eventually complete. This provides predictability, while helping to lower costs.
When a cluster is created with Spot instances, Databricks will allocate Spot VMs for all worker nodes, if available. The driver node is always an On-Demand VM. During your workload runs, Spot VMs can be evicted when Azure no longer has available compute capacity and must reallocate its resources. Spot VMs will also be evicted when the current price exceeds the maximum price that you optionally agreed to pay before the VMs were allocated. In either case, pay-as-you-go instances will automatically replace any evicted Spot VMs.
Create an Azure Databricks cluster with Spot VMs using the REST API
With the Azure Databricks Clusters REST API, you have the ability to choose your maximum Spot price and fallback option if Spot instances are not available or are above your maximum price. Create a bearer token in the Databricks UI. This will be used to authenticate when making your API call.

Create an Azure Databricks warm pool with Spot VMs using the UI
You can use Azure Spot VMs to configure warm pools. Clusters in the pool will launch with spot instances for all nodes, driver and worker nodes. When creating a pool, select the desired instance size and Databricks Runtime version, then choose “All Spot” from the On-demand/Spot option.


At any point in time when Azure needs the capacity back, the Azure infrastructure will evict Azure Spot Virtual Machines with 30 seconds notice. Databricks will attempt to replace the evicted Spot Virtual Machines, if unsuccessful, on-demand VMs are deployed to replace evicted Spot VMs.
Create a warm pool with Spot VMs using the Instance Pools API
The Instance Pools API can be used to create warm Azure Databricks pools with Spot VMs. In addition to the options available in the Azure Databricks UI, the Instance Pools API enables you to specify a maximum Spot VM price and fallback behavior if Spot VM capacity is unavailable.
Spot Pricing, Trends and Eviction Rates
Spot VM pricing can be viewed for all series on the Linux VM pricing page. The last column in the tables under each series type shows the savings based on region.

On the Databricks pricing page, you can view the ‘Pay As You Go Total Price’ (PAYG) and ‘Spot (%Savings) Total Price’. Note that the DBU price does not change with the use of Spot VMs. Savings are from discounts on Spot VMs only. Please note that Spot VMs pricing does not include network, storage or other resources, which are billed separately.
- Pay As You Go Total Price = Pay As You Go Price + DBU Price
- Spot Total Price = Spot VM Price (% Savings of PAYG) + DBU Price

Customers can also look at Spot VM pricing trends for the last 3 months and eviction rate. To see this, navigate to the Create a virtual machine page within the Azure Portal and click the “View pricing history and compare pricing in nearby regions” link. This will show you historical pricing and eviction rate for the regions and instances you select.

Learn more about using Azure Spot VMs with Azure Databricks by viewing the documentation: Azure Spot VMs, Azure Databricks Clusters, Azure Databricks Clusters API, Azure Databricks pools and Instance Pools API . To get started with Azure Databricks, visit the Azure Databricks page and attend up-coming Azure Databricks events.
*Actual discounts may vary based on region, VM type, and Azure compute capacity available when the workload is deployed. Please note that Spot VMs pricing does not include network, storage or other resources, which are billed separately.

Recent Comments