by Contributed | May 31, 2021 | Technology
This article is contributed. See the original author and article here.
According to MSDN article, ‘DISABLE_PARAMETER_SNIFFING’ instructs Query Optimizer to use average data distribution while compiling a query with one or more parameters. This instruction makes the query plan independent on the parameter value that was first used when the query was compiled. This hint name is equivalent to trace flag 4136 or Database Scoped Configuration setting PARAMETER_SNIFFING = OFF.
Looks like it’s a pretty good hint, However, it doesn’t means you can resolve all parameter sniffing issue by using this query hint.
Actually, the sentence ‘Query Optimizer to use average data distribution while compiling a query with one or more parameters’ is not 100% correct. It really depends on what symbol you used in the where clause.
‘DISABLE_PARAMETER_SNIFFING’ is a replacement of variable, these two have exactly same effect. If you are not familiar with selectivity of variable, please review my post Selectivity and Estimated Row: Variable – Microsoft Tech Community
I’m going to use AdventureWorks 2019 in this post.
——————–Please run this script—————
use AdventureWorks2019
go
IF exists(select 1 from sys.tables where name=’SalesOrderDetail’ and schema_id=schema_id(‘dbo’))
drop table SalesOrderDetail
go
select * into SalesOrderDetail from [Sales].[SalesOrderDetail]
go
create statistics iProductID ON SalesOrderDetail(productid) with fullscan
Go
dbcc traceon(3604,2363)
——————–Please run this script—————
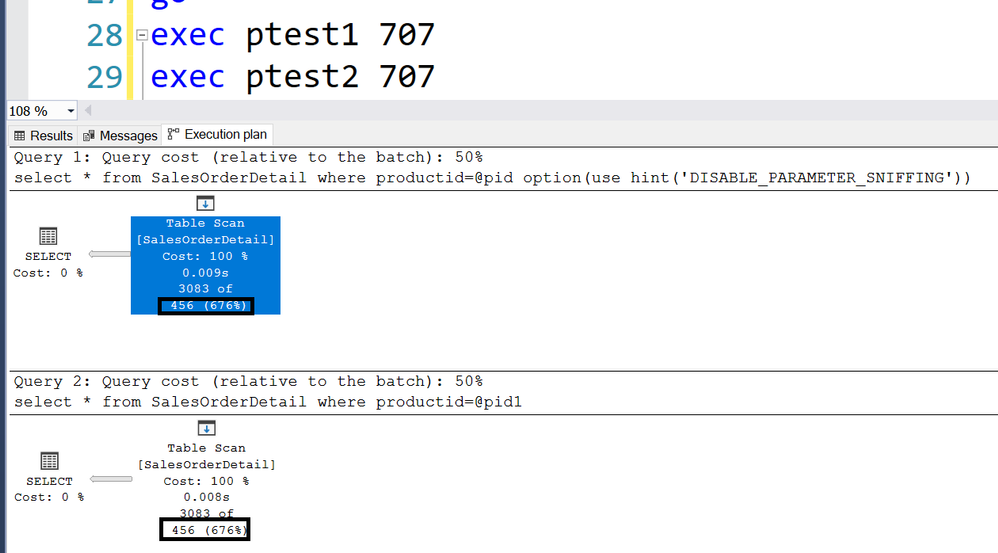
For example, following two stored procedure returns exactly same Estimated rows 456.
create proc ptest1
@pid int
as
select * from SalesOrderDetail where productid>=@pid option(use hint(‘DISABLE_PARAMETER_SNIFFING’))
go
create proc ptest2
@pid int
as
declare @pid1 int =@pid
select * from SalesOrderDetail where productid=@pid1
Go
Trace flag 2363 displays more detail about the selectivity.

———————————-trace flag 2363 output———————————-
Begin selectivity computation
Input tree:
LogOp_Select
CStCollBaseTable(ID=1, CARD=121317 TBL: Sales.SalesOrderDetail)
ScaOp_Comp x_cmpEq
ScaOp_Identifier QCOL: [AdventureWorks2019].[Sales].[SalesOrderDetail].ProductID
ScaOp_Identifier COL: @pid
Plan for computation:
CSelCalcHistogramComparison(POINT PREDICATE)
Loaded histogram for column QCOL: [AdventureWorks2019].[Sales].[SalesOrderDetail].ProductID from stats with id 3
Selectivity: 0.0037594
Stats collection generated:
CStCollFilter(ID=2, CARD=456.079)
CStCollBaseTable(ID=1, CARD=121317 TBL: Sales.SalesOrderDetail)
End selectivity computation
———————————-trace flag 2363 output———————————-
121317*0.0037594=456
Please review Selectivity and Estimated Row: Variable – Microsoft Tech Community for other inequations.
by Contributed | May 31, 2021 | Technology
This article is contributed. See the original author and article here.
Whether you are using Microsoft Azure for development, for production workloads, or for both, it’s important to consider the security of the connections to those cloud systems. Virtual private networks are often used to encrypt traffic between a device and Azure using a private tunnel over the public internet – especially for information and systems you don’t want to be made available to the public or open to the possibility of being captured and read. At scale, a site-to-site VPN can be configured to the internet router used by an office (or home office) so the VPN connection can be used by all the devices on that network. But you can also set up a point to site VPN between just one device and Azure – especially useful for laptops and staff who travel or work from home.
Establishing a VPN connection requires some sort of authentication method – commonly a certificate or a username & password. Microsoft Azure point-to-site connections support Azure certificate authentication, authentication with a RADIUS server, or Azure Active Directory authentication with the OpenVPN(r) protocol. Active Directory authentication was limited to only Windows clients, but we’ve just announced a public preview of this capability for macOS.
This means that your macOS device will be able to establish a point-to-site VPN connection to Microsoft Azure using authentication with your Azure Active Directory credentials. And because you’re using native Azure AD authentication, the additional security features of user-based risk policies, conditional access and multi-factor authentication can now also apply from your Mac device when connecting to the VPN. So, for example, you could ensure that macOS VPN connections are only established from allowed locations, or that other locations force a multi-factor-authentication challenge. Note: while authenticating your VPN with Azure Active Directory does not require any additional Azure AD licensing, some of the premium features (like conditional access) do have Azure AD licensing requirements – check the linked feature documentation for details.
Remember: Public preview features are subject to change and don’t come with a Service Level Agreement. Learn more at Choose the right Azure services by examining SLAs and service lifecycle.
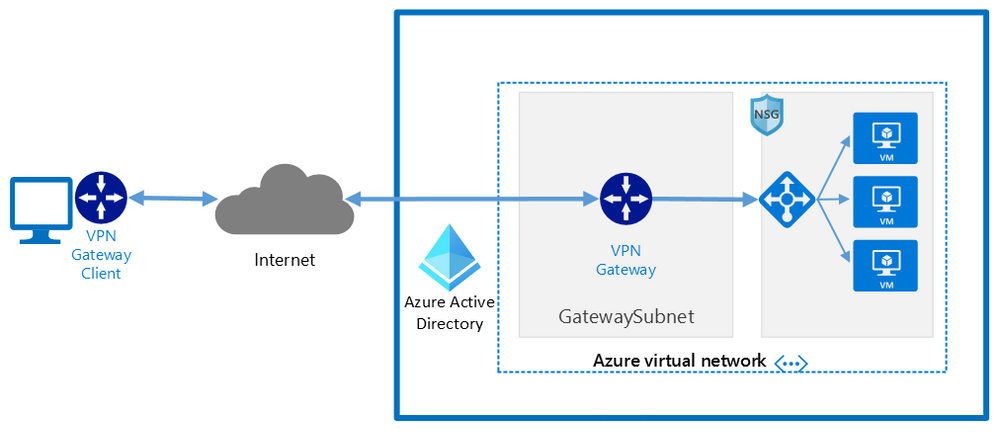
Components of a Microsoft Azure Point-to-Site VPN from macOS with Azure Active Directory authentication
A point-to-site VPN connection from macOS to Microsoft Azure requires:
- An Azure Active Directory tenant
- An Azure virtual network
- An Azure virtual network gateway, with the correct point-to-site configuration.
- A macOS device with a correctly configured Azure VPN Client application.
Network architecture showing a point to site VPN from macOS to Microsoft Azure
The detailed steps
Detailed documentation for each of steps is provided at Microsoft Docs and is updated should the product feature or steps change, but I’ll link to each step in the process here. To implement a VPN client for point-to-site OpenVPN protocol connections from macOS (preview):
Configure an Azure Active Directory tenant.
Register the Azure VPN “Enterprise application”
Create a virtual network
Create a virtual network gateway
Note: You can use an existing virtual network or virtual network gateway if you already have one.
Configure the virtual network gateway & download the VPN client (steps 9-13)
Then on the macOS device:
Install the “Azure VPN Client” application from the Apple Store
Import the connection profile (using azurevpnconfig.xml from the VPN client you downloaded)
Now, when you connect to the Azure VPN, you’ll be promoted for your Azure Active Directory credentials!
 Azure AD sign-in for the macOS VPN to Azure
Conclusion:
VPNs are an important component of network security, especially with a remote and mobile workforce. Azure Active Directory authentication for the VPN for macOS devices is easy to configure and lets you take advantage of other Azure AD security features you may be using for other devices in your organisation.
Learn more:
What is a VPN Gateway?
Explore Azure networking services
Architect network infrastructure in Azure
Implement network security in Azure
by Contributed | May 31, 2021 | Technology
This article is contributed. See the original author and article here.
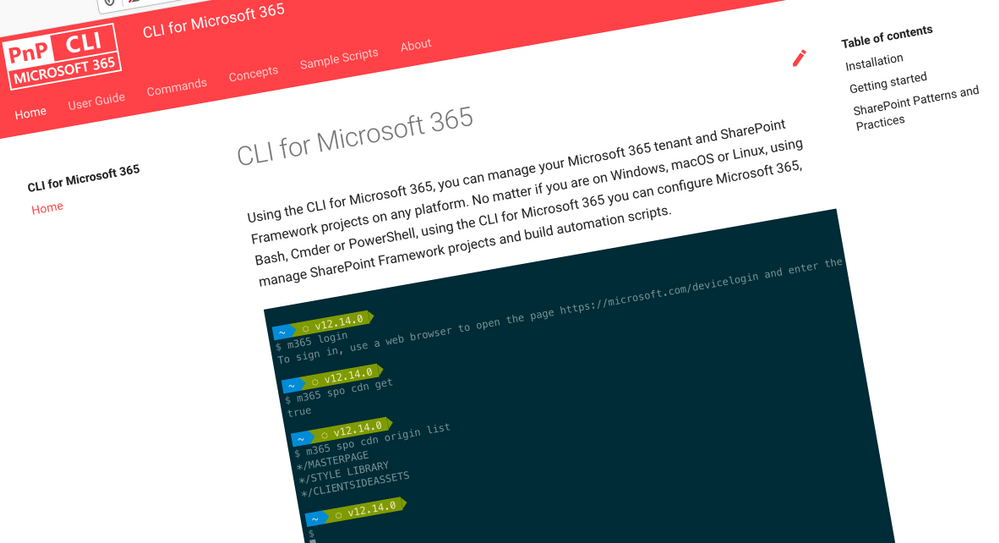
CLI for Microsoft 365
Manage Microsoft 365 and SharePoint Framework projects on any platform
CLI for Microsoft 365 is a cross-platform CLI that allows you to manage various configuration settings of Microsoft 365 and SharePoint Framework projects no matter which operating system or shell you use.
While building solutions for Microsoft 365 expands beyond the Windows operating system, managing many of the platform settings is possible only through PowerShell on Windows. As more and more users work on non-Windows machines, it’s inconvenient for them to have to use a Windows virtual machine to configure their tenants. With the CLI for Microsoft 365, you can configure your tenant no matter which operating system you use. Additionally, using CLI for Microsoft 365, you can manage your SharePoint Framework projects.
New version of CLI for Microsoft 365 – v3.10
Following our monthly release cadence, we’ve released a new version of the CLI for Microsoft 365 with some new capabilities. Here are a few of the most noteworthy additions.
Changes
We’ve continued improving CLI building upon the changes we’ve introduced in the previous version.
Added support for printing errors as JSON in JSON output
When scripting using the CLI, it is common to use the JSON output from commands which makes it easier to work with command responses. In the example below that uses PowerShell we can convert the JSON response into a PowerShell object using the ConvertFrom-Json cmdlet.
$lists = m365 todo list list -o json | ConvertFrom-Json
However if an error was thrown, the CLI would return the error as a plain text string and this can be inconvenient as your script is expecting a JSON response.
To help with error handling when using this approach, we have added support for changing the default error output type to JSON. To set the default output type for errors, execute:
m365 cli config set --key printErrorsAsPlainText --value false
Enhanced spo site apppermission commands
When working with site app permissions using the CLI we previously did not return information about the app roles which can be defined, therefore we have added returning the app roles when using the spo site apppermission get and spo site apppermission list commands in the response.
New Commands
Gets Azure AD app registration roles
When creating applications that use Azure AD authentication we can define custom roles that we can assign permissions to users or apps. The application defines and publishes the app roles and interprets them as permissions during authorization.
To return the roles published by an Azure AD application registration by its name, execute:
m365 aad app role list --appName "My app"
Get the value of a CLI for Microsoft 365 configuration option
We recently announced that we added support for configuring the CLI to your own preferences using the cli config set command, this enables you to change some of the default settings such as changing all command outputs to be JSON rather than text.
To return the current value of a CLI configuration option, execute:
m365 cli config get --key output
Upload files using Microsoft Graph
The ability to upload files has been possible in the CLI for some time using the spo file add command, this command however uses SharePoint-based APIs to perform the upload and does not support new authorisation features such as the ability to control app access to specific site collections using the Sites.Selected permission scope.
To add support for the new permission scope, we have added a new command that uses the Microsoft Graph in its implementation, the existing spo file add command will remain to provide backwards compatibility.
To add a file to a specific site, execute:
m365 file add --filePath file.pdf --folderUrl "https://contoso.sharepoint.com/Shared Documents"
Remove a specified Power App
Microsoft Power Apps is a popular no/low code business application development platform in Microsoft 365 and managing apps created by business users is an important maintenance tasks for administrators. We have extended our support for Power Apps by introducing a command to remove Power Apps from an environment.
To remove a specified Microsoft Power App, execute:
m365 pa app remove --name 3989cb59-ce1a-4a5c-bb78-257c5c39381d
Updates a specific application permission for a site
The Microsoft Graph gives us the ability to create site permissions on SharePoint Online or OneDrive sites, which has been possible in the CLI using the spo site apppermission add command, however it was not possible to update these registrations so we have added a new command to add that support.
To update a specific application permission by its name on a given site collection, execute:
m365 spo site apppermission set --siteUrl https://contoso.sharepoint.com/sites/project-x --appDisplayName Foo --permission read
New script samples
CLI for Microsoft 365 is a great tool both for quick adjustments to the configuration of your Microsoft 365 tenant as well as automating more complex tasks. Because CLI for Microsoft 365 is cross-platform you can use it on any OS and in any shell. To help you get started using the CLI for Microsoft 365 for automation scenarios, we started gathering some sample scripts.
If you have any scripts that you use frequently, please share them with us so that we can learn more about the common automation scenarios.
Replace user in Microsoft 365 Group or Microsoft Team with another user
When an employee leaves an organisation you may want to find and replace the employee account with another account.
This script helps update the membership by accepting the old user to be replaced, the new user that will be added and a CSV file containing the groups or teams to be iterated over.
Monitor site collection storage usage
As a SharePoint Administrator one of your tasks is to ensure that the storage being used in your Microsoft 365 tenant does not exceed the allowance of your tenant so this does not negatively impact daily usage.
This
script helps by iterating over all SharePoint Online sites in your Microsoft 365 tenant, listing any sites that are over a defined storage threshold and emails the results to a specific email address.
Add multiple folders in libraries using a CSV file
When adding files into SharePoint Online, a common task is to create a defined folder structure in target document libraries within a target SharePoint Online site before adding the files.
This
script helps by showing how to create folder structures in different document libraries using a CSV file as an input.
Replace SharePoint Online Site Collection Administrator with another user
When an employee leaves an organisation you may want to find and replace the employee account with another account.
The
script helps by removing a user from a given SharePoint Online site collection and adds a new user as a Site Collection Administrator.
Search Power Automate Flows for specific connections
Microsoft Power Automate is a very powerful workflow tool in Microsoft 365 which use connectors to integrate with different platforms, a common connector that is used is the SharePoint Online connector which help simplify requests made to SharePoint Online, however it can be difficult to get a view of which Power Automate Flows are connected to specific SharePoint Online sites.
This
script helps by iterating over all Power Automate Flows in your Microsoft 365 tenant, searches the exported Flows for a given Site Collection URL and returns the results.
Contributors
This release wouldn’t be possible without the help of (in alphabetical order)
Thank you all for the time you chose to spend on the CLI for Microsoft 365 and your help to advance it!
Work in progress
Here are some things that we’re currently working on.
More commands, what else
Microsoft 365 is evolving and new capabilities are being released every day. With CLI for Microsoft 365, we aim to help you manage your tenant on any platform in a consistent way, no matter which part of Microsoft 365 you interact with. While we keep adding new commands to CLI for Microsoft 365 each release, we still barely scratched the surface with what’s possible in Microsoft 365. In the upcoming versions of the CLI for Microsoft, you can expect us to add more commands across the different workloads in Microsoft 365.
Updating Azure AD apps
Recently, we introduced a command to easily create Azure AD app registrations. Because they’re backbone of every app you’d build on Microsoft 365, we think you should be able to create them as easily as possible. So with CLI for Microsoft 365, you can create a fully configured Azure AD app for the most common scenarios with just one line of code.
We’re currently working on adding support for updating Azure AD app registration which will be helpful for example when building apps for Microsoft Teams. Stay tuned!
Script examples
In every release of the CLI for Microsoft 365, we introduce new commands for managing Microsoft 365. With over 350 commands across the different Microsoft 365 services, the CLI for Microsoft 365 has become a powerful tool, not just for managing your tenant but also for automating your daily work.
We’d love to show you how you can use the CLI for Microsoft 365 to build automation scripts in PowerShell Core and Bash. If you have any scripts using SPO or PnP PowerShell that you use frequently, please share them with us so that we can learn more about the common automation scenarios.
‘ensure’ commands
Recently, we shipped our first ensure command – an easy way to help you that a site with specific settings exists. If it doesn’t, CLI creates it for you, if it does, CLI ensures it has the right properties. All in one line of code. We’d love to hear from you how you like it and if it’s something you’d like us to implement for other commands as well.
Try it today
Get the latest release of the CLI for Microsoft 365 from npm by executing:
npm i -g @pnp/cli-microsoft365
Alternatively, you can get the latest release from Docker by executing:
docker run --rm -it m365pnp/cli-microsoft365:latest
If you need more help getting started or want more details about the commands, the architecture or the project, go to aka.ms/cli-m365.
If you see any room for improvement, please, don’t hesitate to reach out to us either on GitHub or twitter.
by Contributed | May 30, 2021 | Technology
This article is contributed. See the original author and article here.
Pre-requirements:
Before we start please read this .Net send and receive Service Bus message , Service Bus message size limit and .Net AttachmentPlugin Simple code.
Following the first document you may understand how to set up a .Net project to send and receive service Bus messages. However, it has limitation for the size of message, Standard pricing tier 256 KB and premium pricing tier 1MB. Then how about the message above 1MB? You may receive an error message about “QuotaExceededException” when your message above the limit. So how to resolve this issue when you need to send message above 1MB?
We plan to release a preview function that allow users send and receive messages up to 100 MB. But currently we don’t have an estimated time. This blog is to explain how to use an AttachmentPlugin in .Net program to send and receive message above 1MB. This is a work around only implement in .Net program. If your system is using other languages like Python, Java and so on, we suggest you separating the messages and change the size of the messages.
Now, let’s talk about how to use this AttachmentPlugin.
Preparation:
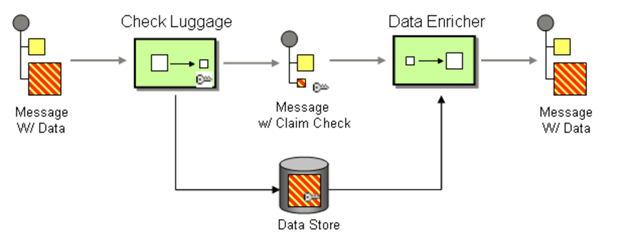
The work principle of this AttahchmentPlugin is implement Claim Check pattern with Azure Storage. It based on this pattern to store message data in Azure Storage Account Container (data Store) and pass a Claim Check to Azure Service Bus. Azure Service Bus can use the Claim Check to retrieve the stored information.
- This Plugin is to save the message to Storage Account, so you need to have an Azure Storage Account first.
- Then you can get the AttachmentPlugin from Microsoft Visual Studio “Manage Nugget Packages” and search for “ServiceBus.AttachmentPlugin”. Or if you are using Nuget Package Manager Console, you can use this script in below to install it.
PM> Install-Package ServiceBus.AttachmentPlugin

Test:
Parameters :
- Service Bus Connection String: You can get it from Azure Portal, your Service Bus Namespace “Shared access Policies”

- Your Service Bus Queue name or Service Bus Topic name and Subscription name
- Storage Account Connection String: you can get from Azure portal. Check your storage account “Access key”.

- And Storage Account Container name.
Program:
After getting all the values, then you can try to use this sample program to send and receive messages.
using System;
using System.Collections.Generic;
using System.Linq;
using System.Text;
using ServiceBus.AttachmentPlugin;
using System.Threading.Tasks;
using Microsoft.Azure.ServiceBus;
using Microsoft.Azure.ServiceBus.Core;
namespace ServiceBusAttachmentPlugin
{
class Program
{
const string ServiceBusConnectionString = “<your Service Bus Connection String >”;
const string ServiceBusQueueName = “<your Service Bus Queue name >”;
const string StorageConnectionString = “<your Storage Account Connection String >”;
const string StorageContainerName = “<your Storage Account Container Name>”;
const string ServiceBusTopicName = “<your Service Bus topic name>”;
const string ServiceBusSubscriptionName = “<your Service Bus subscription name>”;
private static async Task MainAsync()
{
var sender = new MessageSender(ServiceBusConnectionString, ServiceBusQueueName);
var config = new AzureStorageAttachmentConfiguration(StorageConnectionString, StorageContainerName);
sender.RegisterAzureStorageAttachmentPlugin(config);
byte[] msgBytes = Encoding.ASCII.GetBytes(“Test message”);
await sender.SendAsync(new Message(msgBytes));
/*If you want to receive message from Service Bus Topic/Subscription, you need to use this EntityNameHelper to get subscriptionPath, then use MessageReceiver() function to receive message .*/
//string subscriptionPath = EntityNameHelper.FormatSubscriptionPath(ServiceBusTopicName, ServiceBusSubscriptionName);
//IMessageReceiver receiver = new MessageReceiver(ServiceBusConnectionString, subscriptionPath, ReceiveMode.ReceiveAndDelete);
var receiver = new MessageReceiver(ServiceBusConnectionString, ServiceBusQueueName, ReceiveMode.ReceiveAndDelete);
receiver.RegisterAzureStorageAttachmentPlugin(config);
var taskrc = await receiver.ReceiveAsync();//Here we use ReceiveAndDelete mode first, if you need use Peeklock mode, please complete the message.
var message = taskrc.Body;
// await receiver.CompleteAsync(message.SystemProperties.LockToken);
}
static void Main(string[] args)
{
MainAsync().GetAwaiter().GetResult();
}
}
}
Attentions:
- You can use your own way to serialize your message, like use function JsonConvert.SerializeObject(). But you need to deserialize the object to your message when you receive it.
- This sample code use SendAsync() and ReceiveAsync() functions, so we need use “await” to make sure the message complete. For the difference between sync and Async please read my previous blog Service Bus –Complete Message Asynchronously or Synchronously? – Microsoft Tech Community
- We use RecivedAndDelete mode to receive the message, if you need use PeekLock mode, please remember to complete the message. For example in Microsoft.Azure.ServiceBus use receiver.CompleteAsync(message.SystemProperties.LockToken).Please check Service Bus Receive mode and .Net example for more examples.
Results:
- After using the sample code, we sent messages successfully. You can find your message in Azure portal->Service Bus explorer. But it only can Peek 32 messages.

- You also can check your messages from Service Bus Explorer application, you can download it from GitHub Service Bus Explorer. You can use your Service Bus Connection String to connect your Service Bus. You would get more details about this message.

- In addition, these messages will save to your Storage Account container. You can also check it from your container.

In conclusion, this Service Bus AttachmentPlugin is a work around to send and receive messages above 1MB. You need to keep them before you want to receive these messages. And if you received the message from Service Bus the blobs would still in the Azure Storage Account. If you need to delete them when Azure Service Bus receive the message you can add functions to delete it from Storage Account. It would have additional cost in Storage Account, so it would be the limit for this Service Bus AttachmentPlugin. You can weigh your own interests to make decisions.
by Contributed | May 30, 2021 | Technology
This article is contributed. See the original author and article here.
Today we are pleased to announce the general availability of Azure Spring Cloud support in the Terraform Azure Provider. Azure Spring Cloud is a platform for deploying and managing Spring Boot and Spring Cloud-powered services and software built on Microsoft Azure. It is a fully managed microservice development with built-in service discovery and configuration management, jointly built, operated, and supported by Microsoft and VMware.
Additional information about this service can be found within this blog post from Josh Long, and the Azure Spring Cloud documentation.
How To Get Started
Azure team at Microsoft and the Terraform team at HashiCorp has been working together polishing this support since we added the first resource one year ago. It’s now covering almost everything about Azure Spring Cloud including lifecycle management, VNet Injection and integration with some other Azure services. We encourage you to try out this support and use it in production like many of our top customers already doing. In order to use Azure Spring Cloud in the Terraform Azure provider, you will need:
To get an App up and running in Azure Spring Cloud you will need to employ a few new resources like shown in below examples:
- azurerm_resource_group as a container that holds all related resources for this Azure solution
- azurerm_spring_cloud_service to provision a service instance with Config Server settings
- azurerm_spring_cloud_app to provision an app with HTTPS only public endpoint and AAD Managed Identity enabled
- azurerm_spring_cloud_java_deployment to provision a deployment running 2 instances with 2 vCPU cores and 4GB memory
- azurerm_spring_cloud_active_deployment to activate the deployment so that it will start receiving traffics coming to the app
provider "azurerm" {
  features {}
}

resource "azurerm_resource_group" "example" {
  name     = "example-resources"
  location = "West Europe"
}

resource "azurerm_spring_cloud_service" "example" {
  name                = "example-springcloud"
  resource_group_name = azurerm_resource_group.example.name
  location            = azurerm_resource_group.example.location

  config_server_git_setting {
    uri          = "https://github.com/azure-samples/spring-petclinic-microservices-config"
    label        = "master"
    search_paths = ["."]
  }
}

resource "azurerm_spring_cloud_app" "example" {
  name                = "example-springcloudapp"
  resource_group_name = azurerm_resource_group.example.name
  service_name        = azurerm_spring_cloud_service.example.name
  is_public           = true
  https_only          = true

  identity {
    type = "SystemAssigned"
  }
}

resource "azurerm_spring_cloud_java_deployment" "example" {
  name                = "default"
  spring_cloud_app_id = azurerm_spring_cloud_app.example.id
  cpu                 = 2
  memory_in_gb        = 4
  instance_count      = 2
  jvm_options         = "-XX:+PrintGC"
  runtime_version     = "Java_11"

  environment_variables = {
    "Env" : "Staging"
  }
}
Start from here you can easily empower your Azure Spring Cloud apps with various enterprise ready Azure services. For example, below configurations streams all the system logs and metrics to an Azure Storage account for further visualization and analysis.
resource "azurerm_storage_account" "example" {
  name                     = "examplestorage"
  resource_group_name      = azurerm_resource_group.example.name
  location                 = azurerm_resource_group.example.location
  account_tier             = "Standard"
  account_replication_type = "GRS"
}

resource "azurerm_monitor_diagnostic_setting" "example" {
  name               = "example-monitor-setting"
  target_resource_id = azurerm_spring_cloud_service.example.id
  storage_account_id = azurerm_storage_account.example.id

  log {
    category = "SystemLogs"
    enabled  = true

    retention_policy {
      enabled = false
    }
  }

  metric {
    category = "AllMetrics"

    retention_policy {
      enabled = false
    }
  }
}
As another most used scenario, below Azure Monitor configurations enable Auto-scale-out for the deployment. The instance number will be automatically increased whenever the average CPU consumption is greater than 75%.
resource "azurerm_spring_cloud_active_deployment" "example" {
  spring_cloud_app_id = azurerm_spring_cloud_app.example.id
  deployment_name     = azurerm_spring_cloud_java_deployment.example.name
}

resource "azurerm_monitor_autoscale_setting" "test" {
  name                = "acctestautoscale-cz"
  resource_group_name = azurerm_resource_group.example.name
  location            = azurerm_resource_group.example.location
  target_resource_id  = azurerm_spring_cloud_java_deployment.example.id
  enabled             = true
  profile {
    name = "metricRules"
    capacity {
      default = 2
      minimum = 2
      maximum = 6
    }
    rule {
      metric_trigger {
        dimensions {
          name     = "AppName"
          operator = "Equals"
          values   = [azurerm_spring_cloud_app.example.name]
        }

        dimensions {
          name     = "Deployment"
          operator = "Equals"
          values   = [azurerm_spring_cloud_java_deployment.example.name]
        }

        metric_name        = "AppCpuUsage"
        metric_namespace   = "microsoft.appplatform/spring"
        metric_resource_id = azurerm_spring_cloud_service.example.id
        time_grain         = "PT1M"
        statistic          = "Average"
        time_window        = "PT5M"
        time_aggregation   = "Average"
        operator           = "GreaterThan"
        threshold          = 75
      }
      scale_action {
        direction = "Increase"
        type      = "ChangeCount"
        value     = 1
        cooldown  = "PT1M"
      }
    }
  }
}
Further Information
For more information on how to use Azure Spring Cloud features in Terraform, check out the provider documentation in the Terraform Registry. If you experience any issues, please report them on the Terraform Azure provider issue tracker. We would love to hear your feedback!

Recent Comments