– Coming up, if you’re new to Power Apps, or maybe it’s been a while since you built your last one, we’re joined today by Program Manager Emma Cooper to look at the latest updates to the app authoring experience, from the new modern app designer that makes it easier to build model-driven app experiences with custom pages, then generating Power Fx formulas that write themselves when you specify what you want using natural language, and also a lot more. So, Emma, thanks for joining us on Microsoft Mechanics today.
– Thank you so much for having me.
– So I think most people will be familiar with the drag-and-drop PowerPoint-like experience of creating canvas apps, but now with model-driven apps, with the latest round of updates, we’ve made things a lot easier.
– Yeah, that’s right. We’ve re-imagined how to make model-driven apps far more accessible and easier to build. In Power Apps, like you mentioned, there’s really two types of apps. There’s the canvas app, where you’re literally building out the app experience by inserting controls and then binding them to data, or what we’re covering today with model-driven apps, where we’ve worked really hard to simplify the authoring experience. For example, the app in this case is generated from the data and relationships you have in your tables in Dataverse. And with the modern app designer, just as you’ve always been able to do with canvas apps, we’ve also made it far easier for you to customize the user experience.
– Okay, and model-driven apps, in many respects, because they start from the data source, they can quickly get more sophisticated, but still be really easy to build. And by the way, if you’re new to Dataverse, it’s a powerful and managed data backend really for any data that your apps and services can use. So in fact, we actually did a show on this recently with Mark Mercuri that you can check out at aka.ms/MechanicsDataverse. But Emma, can you walk us through an example?
– Yeah, I’d be happy to. So I’m going to show you what the US-based office supply retailer Office Depot is doing. And so they’ve built a power dev platform that allows literally dozens of their maker citizen developers at Office Depot to build apps that boost their everyday productivity, as well as make them discoverable inside of Teams. So let me show you what they’ve built. And so here you can see they have a model-driven Power App with custom pages to help them with their new project requests. And this provides a modern experience on top of their legacy system and process. And so it can create new requests and is themed with Office Depot’s branding. The app also lets them manage requests with a sophisticated search and filter inside of this grid. It’s using Dataverse on the backend and these experiences help classify costs and approve budget requests. And so here you can add line items. For example, I can add the finance type, the location, determine the team, resource type, and specifics for resources and timing. And something really cool, it calculates for you what the budget is going to be using Power Fx and Excel-based expression language.
– Right, and this app actually looks pretty great. What’s the experience then now to build out something like this?
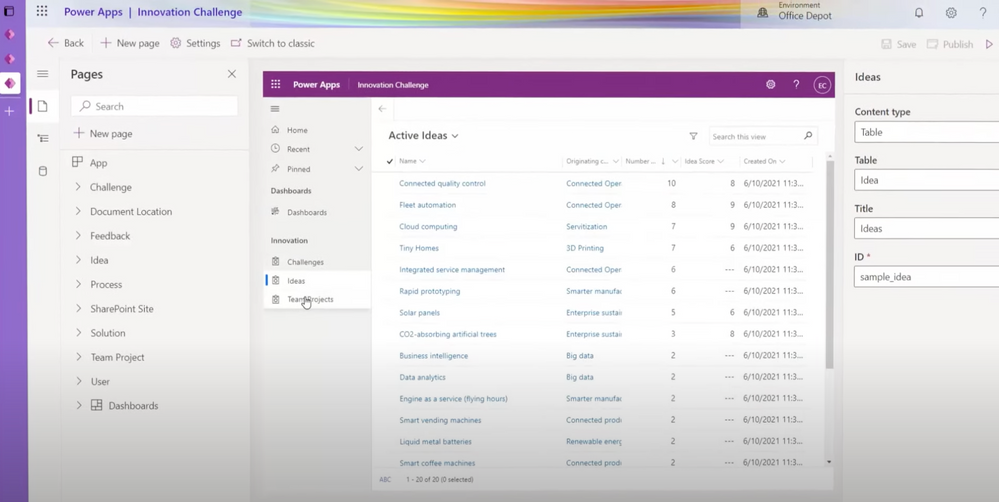
– Yeah, it’s pretty easy to get started. All you need to do is go to make.powerapps.com and select build a model-driven app from blank. And we’ll use the newly released modern app designer. I’ll name this app Project Requests App and then hit Create. Now there’s a lot of different components for how an app comes together and we’ve taken and simplified these concepts into pages that you add to your app, which is usually easier for most people to understand. And so I’ll add a new page and there’s a few different options here to choose from based on the experience that I want. A table-based view and form will give us the rich, sophisticated grid and form on top of the Dataverse table. And a dashboard gives us a page of charts for analyzing our data, while a custom page lets us build from scratch to make whatever we want. And so here I’ll choose table-based view and form because I want that rich grid layout to view and search my Project Requests. And so right here, we get a view of all of the tables of corporate data available in Dataverse, so you can easily add whatever you want from your Dataverse environment. So I’ll search for project requests and I’ll select the project request table. And just like that, it populates a grid and a form generated from data with search and filtering and more. And you notice that we didn’t drag or drop components, write any formulas, or build any code. This is a fully working app right out of the box. And I can even interact with the preview and see how the app will behave right away. So I’ll add a new project request, say, for new equipment, and I can save that and see it reflected. And so if I wanted to, I could publish this app right now for my team to use. And by default, as I change the app dimensions, you’ll see that its layout is also responsive. And in this authoring experience, I can test it out on different form factors like desktop, tablet, or phone to see how it will look. And I’ll pick desktop here. I can continue to customize my app by selecting edit on one of my views. I can drag and drop to reorder the columns and sort the data. Now I can edit my forms in the same way and add columns if I need to. And so going back to my form, I’ll add a column for audit requested. I can even add additional columns to the underlying Dataverse table right in line here as well for capturing additional data. So I’ll add one now called reviewer comments.
– So you were able to update how the form looks and really edit the table itself all in line, but what else have you and the team done to make it easier to customize the user experience?
– Well, now you can also build a custom page and add it to your app. And so this is a brand new capability that allows you to leverage the power of the canvas inside of a model-driven app. I’ll go back to our page selection and choose custom and create a new custom page. So custom pages use the same technology as canvas apps where you can drag and drop controls or custom components onto the screen and lay them out just as you like. I can add Office Depot’s header with custom branding and I can update the text, like changing the page title to new request. I’ll add a progress indicator, showing the state for the request, and then a footer to show the totals, followed by a form to edit the data for this request. I can also connect to hundreds of different data sources, but for this one, I want to connect to my project requests in Dataverse. And so now we need a way to go see all of the requests on our project request view in the model-driven app. I’ll add a button, and update it to say see all requests. So we can use Power Fx low-code formulas for any custom logic. And at the top here, we have a formula bar that’s very similar to Excel, and that’s intentional since Power Fx is based on Excel. So let me show you how this works. In this case, I want to navigate to the project requests view when someone selects this button, and that’s a perfect case for the navigate function. So I’ll type navigate, then project, and that will show me a list of options to view. And I’ll choose this one for project requests views, and I’ll add a dot to drill in one level deeper and choose active project requests. And notice how the smart IntelliSense helped me complete that formula.
– And I really see what you mean by the convergence and the authoring experience across Power Apps and now model-driven apps. Then you also have the ability to bring in more custom capability with Power Fx and that transforms things even further. But for those people who might be new to Power Fx, can you explain what it is and how it’s useful?
– Yeah, absolutely. Power Fx is an open source formula language for low code that’s based on Excel. And the reason it’s so powerful is that while point-and-click tools are great for assembling workflows, many real-world solutions need a layer of custom logic. And that custom logic is where many low-code platforms hit a cliff to require traditional code. With Power Fx, you can build this custom logic yourself, which uses your knowledge of Excel. For example, here I’m adding up values like using the familiar SUM expression to calculate the total cost of each project request, just like I would in an Excel sheet. And we’ve been working hard on integrating Power Fx with more products across the Power Platform, and one of these places we can take a look at is model-driven commanding. So when I look at my model-driven app, there’s a list of commands that appears on the top of forms and grids that let users perform actions. And I can edit these with the new command designer. So for Office Depot, they need to flag a request for audit on their form. So to do that, I’ll click in the ellipse and choose edit command bar, and then I’ll select the main form. There are default commands, like create new or save, however quite often there are custom behaviors that are needed in processes, like our flag for audit command. So previously, all of this logic was handwritten and tended to be really error prone. And now with the new designer, it’s as easy as adding a new command. I’ll call it flag for audit and I can choose an icon. The next thing I’ll want to do here is add the Power Fx expression to update the record. So I’ll use the patch function to update an existing field. And there’s a lot of functions that you can choose from, and I’m just scratching the surface here. You can get a full list of the Power Fx functions available at aka.ms/powerfxfunctions.
– So now you’ve got a very rich data-driven experience that’s fully customized and you also leveraged Power Fx to create custom actions and logic.
– Right, and what’s exciting is that you don’t even need to know Power Fx or Excel to be able to do any of this. We’ve also made it easier than ever to create those experiences using AI tools like GPT-3 and PROSE to help automatically generate those Power Fx formulas. So OpenAI GPT-3 is one of the most advanced natural language AI models on the planet. And it’s been fine tuned to understand natural language and how Power Fx formulas are constructed, allowing a maker to describe the logic just like they would to a coworker or a friend, and then the code writes itself. You can do this by using the ideas capability in Power Apps Studio. So here, I’ll select ideas on this gallery. Now I can just tell Power Apps what I’d like to see. For example, with Office Depot, I can say, show me project requests. It suggests the name of the table in the app that cost, and I’ll choose total expense cost, more than 10,000 or have an ongoing expense. Based on this input and the context from the app, such as your table and controls, Power Apps will generate the most relevant Power Fx formula for you to select from, filtering out results that can’t pass the formula syntax check and now I can select this formula that I want to use and see it update. And so it’s really that easy.
– And you also mentioned though, that Office Depot are making these apps available in Microsoft Teams. How does that work?
– Yeah, they are, and this greatly helps increase the level of discoverability of these apps by users. And so with just a few clicks, I can add an app to a Teams channel with our teams who works on these projects. I’ll add a tab, select Power Apps, and then search and filter to select our Project Requests app. I’ll hit save, and now everyone can find and use the app inside one of their Teams channels from their device of choice.
– So lots of great updates to make it easier, not just to build apps, but also to bring in advanced functionality all in a really low-code way. So where can people go to learn more?
– Well, the best way to learn is to try out these capabilities for yourself, and everything I’ve shown you here today is rolling out over the next several weeks. You can also check out aka.ms/powerappsresources for tips and tricks and more guidance.
– Thanks, Emma, for sharing all of these updates. And of course, keep watching Microsoft Mechanics for the latest news and updates from Microsoft. And subscribe to our channel if you haven’t already. And as always, thanks so much for watching.


Recent Comments