by Contributed | Jul 21, 2021 | Technology
This article is contributed. See the original author and article here.
This blog is part of the Change Data Capture in Azure SQL Databases Blog Series, which started with the announcement on releasing CDC in Azure SQL Databases in early June 2021. You can view the release announcement here: https://aka.ms/CDCAzureSQLDB
Introducing Change Data Capture in Azure SQL Databases
Change data capture (CDC) provides historical change information for a user table by capturing both the fact that Data Manipulation Language (DML) changes (insert / update / delete) were made and the changed data. Changes are captured in real time by using a capture process that reads changes from the transaction log and places them in corresponding change tables. These change tables provide a historical view of the changes made over time to source tables. CDC functions enable the change data to be consumed easily and systematically.
CDC is now available in public preview in Azure SQL, enabling customers to track data changes on their Azure SQL Database tables in near real-time. Now in public preview, CDC in PaaS offers similar functionality to SQL Server and Azure SQL Managed Instance CDC, providing a scheduler which automatically runs change capture and cleanup processes on the change tables.
Streaming Change Data to External Targets
Data integration platforms such as Striim can integrate with your CDC-enabled Azure SQL Database to stream data changes to diverse targets in real-time.
“Real-time information is vital to the health of enterprises,” says Codin Pora, VP of Technology and Partnership at Striim. “Striim is excited to support the new change data capture (CDC) capabilities of Azure SQL Database and help companies drive their digital transformation by bringing together data, people, and processes. Striim, through its Azure SQL Database CDC pipelines, provides real-time data for analytics and intelligence workloads, operational reporting, ML/AI implementations and many other use cases, creating value as well as competitive advantage in a digital-first world. Striim builds continuous streaming data pipelines with minimal overhead on the source Azure SQL Database systems, while moving database operations (inserts, updates, and deletes) in real time with security, reliability, and transactional integrity.”
To learn more about using Striim for real-time ETL to Azure SQL Databases, go here. You can also try out setting up an ETL pipeline to your chosen Azure SQL Database by using Striim’s free trial.
Current Use Case
For this tutorial, we will use Striim to send CDC change data from an Azure SQL Database to another Azure SQL Database target in a separate region. The source database is enabled for CDC. Apart from that, each table that is tracked for data changes is enabled for CDC. To learn more about enabling and disabling CDC on databases and tables, go here.
Striim will connect to the source database and will push CDC changes from the change tables to the downstream target. This can be helpful for customer scenarios such as global data synchronization (i.e. keep databases in different regions around the world synchronized) or distributed applications (i.e. synchronize data across databases that store diverse workloads).
Steps for Sending CDC Data Changes from an Azure SQL Database with Striim
- Create, purchase and deploy your solution by following these steps: Striim with Azure Storage or SQL Database
- In the Striim web GUI, go to the Apps section.
- Click on the Add App button to start a new app. Given our scenario, we will start a new app from scratch by clicking on the Start From Scratch button. Depending on your use case, you might need one app to run an initial snapshot of your source database and one separate app to replicate incremental changes using CDC. For this scenario, you will get zero downtime migration. However, you might decide to execute your initial load outside of Striim by using backup and restore tools. For the purposes of this demo, we will have two apps – one for running an initial load (SQLDBInitLoadTest app) and one for replicating incremental changes from source to target database, for which CDC needs to be enabled on the source database (SQLDBCDCTest app).
- We will start with the SQLDBInitLoadTest app configuration. In the Name your App section, give your app a name and a namespace (namespaces are logical groupings of applications). Click Save. 5. From the drag-and-drop Striim web UI, select your source, which in our case will be SQLDbInitLoad_source DatabaseReader. Learn more about Database Readers here. Configure the Adapter, Connection URL (JDBC), Username, Password, and the Output, which can be either new or existing. You can select the Tables to read from as well. In our case, we will send the initial load to the SQLDbInitLoad_stream, which will send it down to target.
- When configuring the target, in our case SQLDbInitLoad_target, edit the Adapter (DatabaseWriter), Connection URL (JDBC), Username, Password, Tables (comma-separated pairs of source-target tables).
- Once you have configured the source, stream, and target, Deploy the app and Start the app. The initial snapshot of the source database should show up in the target database. In case there are errors starting the app, you can use the Message Log for debugging, then Undeploy the app and Resume again once the errors have been fixed. In case of networking errors, make sure that your Client IP address is allowed to access the database server; you can enable access within the Azure Portal (Update Server Firewall Rules).
- As your application is running, you can monitor the progress for the replication, as seen in the screenshot below. Once the initial load is completed, you should check your target database and see that it’s in sync with the source.
- Now that the initial load is complete, we will configure the app for replicating incremental changes from source to target. For this step, CDC must be enabled on the source database and tracked tables. To learn more about enabling and disabling CDC on databases and tables, go here.
- Similar to configuring your source/stream/target on the SQLDbInitLoadTest app, now go to the SQLDBCDCTest app and configure your source (SQLDBCDC_source), stream (SQLDBCDC_stream), and target (SQLDBCDC_target).
- Deploy and Start app. Your incremental data changes should be replicating to the target.
One of the benefits of Striim is that it supports in-flight transformations and processing as the data flows through its in-memory data pipelines for filtering, aggregating, enrichment, and alerting in real time. Many transformations are available out of the box as a drag-and-drop item from the Striim Flow Designer for a variety of popular operations, Striim Continuous Query (CQ) functionality allows users to write their own custom SQL code to run and act on their streaming data as it flows through the pipeline.
Blog Series for Change Data Capture in Azure SQL Databases
We are happy to continue the bi-weekly blog series for customers who’d like to learn more about enabling CDC in their Azure SQL Databases! This series explores different features/services that can be integrated with CDC to enhance change data functionality.

by Contributed | Jul 20, 2021 | Business, Microsoft 365, Microsoft Teams, Technology
This article is contributed. See the original author and article here.
This year we have seen into each other’s homes, with surprise guest appearances from our kids and pets. We have learned about each other, how we can work effectively from home or from anywhere, and what we can achieve when we come together with purpose and empathy. Technology has been our enabler, bringing us closer together through a…
The post Closer together in Tokyo: How Microsoft Teams created a shared virtual experience appeared first on Microsoft 365 Blog.
Brought to you by Dr. Ware, Microsoft Office 365 Silver Partner, Charleston SC.
by Contributed | Jul 19, 2021 | Technology
This article is contributed. See the original author and article here.
The use case is as follows: I have water meter telemetry I would like to do analytics on.
Events are ingested from water meters and collected into a data lake in parquet format. The data is partitioned by Year, Month and Day based on the timestamp contained in the events themselves and not based on the time of the event processing in ASA as this is a frequent requirement.
Events are sent from the on premise SCADA systems to Event Hub then processed by Stream Analytics which then can easily:
- Convert events sent in JSON format into partitioned parquet.
- Portioning is based on Year/Month/Day.
- Date used for partitioning is coming from within the event.
The result can immediately be queried with serverless Synapse SQL pool.
Input Stream
My ASA input stream named inputEventHub is plugged into an Event Hub in JSON format.
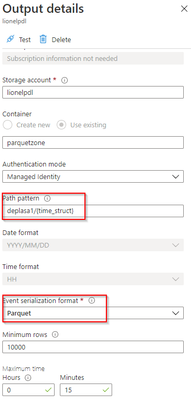
Output Stream
The output stream is the interesting part and will define the partition scheme:
We see that its path pattern is based on a pseudo column named “time_struct” and all the partitioning logic is in the construct of this pseudo column.
Let’s have a look at the ASA query:


We can see now that the pseudo_column time_struct contains the path, ASA understands it and processes it literally including the “/” sign.
Here is the query code:
select
    concat('year=',substring(createdAt,1,4),'/month=',substring(createdAt,6,2),'/day=',substring(createdAt,9,2)) as time_struct,
    eventId,
    [type],
    deviceId,
    deviceSequenceNumber,
    createdAt,
    Value,
    complexData,
    EventEnqueuedUtcTime AS enqueuedAt,
    EventProcessedUtcTime AS processedAt,
    cast(UDF.GetCurrentDateTime('') as datetime) AS storedAt,
    PartitionId
into
    [lionelpdl]
from
    [inputEventHub]
After few days of processing the output folder looks like this as a result:


Query results with serveless SQL and take advantage of partitioning
Now I can directly query my Output Stream with serverless SQL:

We can also notice that the metadata functions are fully functional without any additional work. For example I can run the following query using filepath metadata function:
  SELECT top 100
    [result].filepath(1) AS [year]
    ,[result].filepath(2) AS [month]
    ,[result].filepath(3) AS [day]
    ,*
FROM
    OPENROWSET(
        BULK 'https://lionelpdl.dfs.core.windows.net/parquetzone/deplasa1/year=*/month=*/day=*/*.parquet',
        FORMAT='PARQUET'
    ) AS [result]

where [result].filepath(2)=6
  and [result].filepath(3)=23
Spark post processing
Finally, to optimize my query performance I can schedule a Spark job which processes daily all events from the previous day, compacts them into fewer and larger parquet files.
As an example, I’ve decided to rebuild the partitions with files containing 2 million rows.
Here are 2 versions of the same code:
PySpark notebook (for interactive testing for instance)
from pyspark.sql import SparkSession
from pyspark.sql.types import *
from functools import reduce
from pyspark.sql import DataFrame
import datetime

account_name = "storage_account_name"
container_name = "container_name"
source_root = "source_directory_name"
target_root = "target_directory_name"
days_backwards = 4 #number of days from today, typicaly, as a daily job it'll be set to 1
adls_path = 'abfss://%s@%s.dfs.core.windows.net/%s' % (container_name, account_name, source_root)

hier = datetime.date.today() - datetime.timedelta(days = days_backwards)
day_to_process = '/year=%04d/month=%02d/day=%02d/' % (hier.year,hier.month,hier.day)
file_pattern='*.parquet'

print((adls_path + day_to_process + file_pattern))

df = spark.read.parquet(adls_path + day_to_process + file_pattern)

adls_result = 'abfss://%s@%s.dfs.core.windows.net/%s' % (container_name, account_name, target_root)

print(adls_result + day_to_process + file_pattern)

df.coalesce(1).write.option("header",True)
        .mode("overwrite")
        .option("maxRecordsPerFile", 2000000)
        .parquet(adls_result + day_to_process)
Spark job (with input parameters scheduled daily)

import sys
import datetime
from pyspark import SparkContext, SparkConf
from pyspark.sql import SparkSession
from pyspark.sql.types import *
from functools import reduce
from pyspark.sql import DataFrame

if __name__ == "__main__":

	# create Spark context with necessary configuration
	conf = SparkConf().setAppName("dailyconversion").set("spark.hadoop.validateOutputSpecs", "false")
	sc = SparkContext(conf=conf)
	spark = SparkSession(sc)

	account_name = sys.argv[1] #'storage_account_name'
	container_name = sys.argv[2] #"container_name"
	source_root = sys.argv[3] #"source_directory_name"
	target_root = sys.argv[4] #"target_directory_name"
	days_backwards = sys.argv[5] #number of days backwards in order to reprocess the parquet files, typically 1

	hier = datetime.date.today() - datetime.timedelta(days=int(days_backwards))

	day_to_process = '/year=%04d/month=%02d/day=%02d/' % (hier.year,hier.month,hier.day)
	file_pattern='*.parquet'

	adls_path = 'abfss://%s@%s.dfs.core.windows.net/%s' % (container_name, account_name, source_root)

	print((adls_path + day_to_process + file_pattern))

	df = spark.read.parquet(adls_path + day_to_process + file_pattern)
	#display (df.limit(10))
	#df.printSchema()
	#display(df)
	adls_result = 'abfss://%s@%s.dfs.core.windows.net/%s' % (container_name, account_name, target_root)

	print(adls_result + day_to_process + file_pattern)

	df.coalesce(1).write.option("header",True)
		.mode("overwrite")
		.option("maxRecordsPerFile", 2000000)
		.parquet(adls_result + day_to_process)
Conclusion
In this article we have covered:
- How to easily use Stream Analytics to write an output with partitioned parquet files.
- How to use serverless Synapse SQL pool to query Stream analytics output.
- How to reduce the number of parquet files using synapse Spark pool.
Additional resources:
by Contributed | Jul 19, 2021 | Technology
This article is contributed. See the original author and article here.
Over 95 percent of Fortune 500 companies are transforming their businesses using Azure, relying on an enterprise-grade infrastructure and deep integration with the rest of the Microsoft Cloud. The Azure Migration and Modernization Program (AMMP) has helped thousands of customers unlock the benefits of the cloud, with the right mix of expert guidance and best practices to migrate to Azure. We’ve learned through this journey that customer environments are diverse and complex – there are workloads that can be migrated and there are others that must stay on-premises due to regulatory, data sovereignty, and latency requirements. Whatever the reason, it’s clear that a hybrid approach is a reality for most companies.
Customers tell us that a key challenge with hybrid adoption is consistent management, governance, and security across distributed locations. With Azure Arc, you can organize, govern and secure your servers and Kubernetes clusters across data centers, the edge, and multi-cloud environments, in a consistent manner, along your migration journey.
To demonstrate this, today we are excited to share a new Microsoft Mechanics video with Matt McSpirit and Jeremy Chapman who will show how your resources in the Cloud can work seamlessly with resources on-premises under a single management plane enabled by Azure Arc. Check it out today!
Get started with Azure Arc


Recent Comments