by Contributed | Jan 19, 2022 | Technology
This article is contributed. See the original author and article here.
Azure Firewall is a managed stateful network security service that recently became generally available for premium features across most Azure regions, providing capabilities such as TLS inspection, URL filtering and more
Across the different virtual networks and subscriptions, rules are created for network segmentation and access control. Managing the network traffic may require you to audit rules for utilization, flow hit count or require a previous working configuration.
This runbook will help create instantaneous back-up copies of Azure Firewall with the Firewall Policy and when scheduled with an automation account, you can take daily/weekly snapshots and store them in a specified path.
For this runbook, Azure blob storage will be used to store Azure Firewall configuration for both network infrastructure and firewall policy at the time of the dump. You can edit the template to specify another storage method. We also discuss how to redeploy a firewall to a known configuration using one of the backed-up templates. For more information on other network resources that you may like to adapt to this runbook, please see the Export-AzResourceGroup module.
Requirements
- Automation account
- Storage Account
- Runbook
Set up Automation account
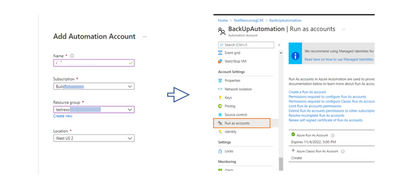
Go to the Search bar and type Automation account. Create a New Automation account. When done, go to the Automation account and in the Settings blade, under Account settings, create a “Run As” account. This provide the service principal access that will be used to auto-login into our script later.
This runbook is a PowerShell module and we need to confirm that we have access to network and resources modules. On the Automation account blade which you have just created, go to Modules and then search the Gallery to import the following three requisites:
– Az.Account
– Az.Network
– Az.Resources

Create Storage account
Next, we create a storage account to store each back-up created in Azure Blob storage. Go to the search bar for resources and search for Storage Account. Create a Storage account. Select Cool storage mode

Next, we create the Runbook.
On the Automation account blade, click on Runbooks and create one. Here below, I have created AzFwBackUp.

After creating the runbook, copy the code from our Azure Network Security Github repository and paste it in line one. This code has three functions: 1. Create storage, 2. Export the firewall configuration, and save in the storage, and 3. Purge the older backups. It uses the Get-AzFirewall and Get-AzFirewallPolicy cmdlet to create snapshot instances.
Click Save and then click on Test Plane.

On the next page, you will be prompted for a few parameters which you have set up earlier:
- Provide the resource group name, Azure Firewall name and Firewall Policy name, obtainable in your Resource group
- Provide storage account name that was created in the step earlier above and the storage key. The storage key can be obtained under “Access Keys” in the Storage Account blade (see image below).
- Give it a Blob container name and specify a retention date. Back-ups older than this date will be deleted at next run.

Test the script
Click Start to begin the dry run to confirm you can store a copy of the current configuration. Once done, you can then proceed to create a schedule to make this run periodically.

The back-up should be available in your Storage -> Container in .json format.
Create a schedule
To create a schedule, go to the Runbook that was created, at the Runbook blade, select Schedules -> Add a Schedule. Give it a name and select “Recurring” Configure for every week or month.

Click to “Link the schedule to the runbook.” Select the runbook you have created and then click “Configure parameters and run settings,” Fill this form as done earlier.
The Runbook should now be all set to create back-ups in. json template that may be used to restore the firewall to an earlier configuration. The storage account should now store your back-ups as specified.

Restore Azure Firewall
To restore an Azure firewall (firewall infrastructure and firewall policy) to an earlier configuration, run the following syntax in your Cloud shell:
New-AzResourceGroupDeployment -name $azurefirewallname -ResourceGroupName $resourcegroupname -TemplateFile $filepath
Note that Rule Collection Groups or RCGs are treated as dependency objects and these objects cannot be deployed in parallel. Collection groups all reference the policy as dependant (dependsOn in the arm template).
This means it will first update policy and then try to update all rule collection groups in parallel. This may fail due to the policy dependency issue. (This is currently by ARM (Azure Resource Manager) design and a roadmap item).
Hence, rule collection groups must be deployed one after the other using the “depends on” tag in your firewall backup file.
As an example, the Rule Collection Group would have to be edited using the rule processing order.
The format is to first specify the Firewall Policy name, then Policy RCG object.
      "type": "Microsoft.Network/firewallPolicies/ruleCollectionGroups",

      "apiVersion": "2020-11-01",

      "name": "SOC-NS-FWPolicy_premium/DefaultNetworkRuleCollectionGroup",

      "location": "westus2",

      "dependsOn": [

        "[resourceId('Microsoft.Network/firewallPolicies', 'SOC-NS-FWPolicy_premium')]",

   "[resourceId('Microsoft.Network/firewallPolicies/ruleCollectionGroups', 'SOC-NS-FWPolicy_premium','DefaultDnatRuleCollectionGroup')]"

      ]
(Also, confirm that the KeyVault information is not missing after the redeployment is complete)
In summary, you may need to export firewall settings when creating child policies, restoring from a wrong configuration, auditing rules etc. By setting up frequent back up schedule, you can create a historical record of your configuration.
For more information about Azure firewall use cases and governance information, see the Azure Network Security TechCommunity blog
by Contributed | Jan 18, 2022 | Technology
This article is contributed. See the original author and article here.
Hello again! I’m Jeff Sakowicz, Principal Program Management Lead for Application Platform Security within the Microsoft Identity team. Our team’s goal is to foster a secure, trustworthy, and thriving app ecosystem. Part of achieving this goal is enabling apps to support a Zero Trust security model.
This is the second post in our series on why Zero Trust matters for developers. In the previous post, I introduced the Zero Trust principles and how they apply to identity and access management. In this post, I will focus on how you can design apps using the principle of least privileged access with the Microsoft identity platform.
Why should you care about using least privileged access?
In short, by limiting what your app has permission to do, you reduce the potential blast radius of attacks and increase adoption of your apps by customers. In our experience, IT administrators are sensitive to the levels of permission being requested by applications and are applying more scrutiny when deciding whether to grant a given app permissions. When you create an app that asks for a lot of permissions, it will be less likely to be approved or could be denied altogether.
What is overprivilege and what is an overprivileged app?
When an entity asks for, and in some cases is granted, more permissions than it needs, we call it “overprivileged.” In this post we will focus exclusively on overprivileged applications with respect to OAuth2.0 permissions in the Microsoft Identity platform and use example scenarios of client apps that call the Microsoft Graph API. That said, principles in this blog do apply to other permission models and APIs – we’ll cover this more in future posts.
Overprivilege occurs when an app has requested and been granted unused or reducible permissions:
- Unused permission: Permission that is not necessary at all for the desired tasks. For example, a calendar app that obtains the Files.ReadWrite.All permission but doesn’t integrate with any Files APIs has unused permissions.
- Reducible permission: Permission that has a lower-privileged alternative that would still provide the access for required tasks. For example, consider an application that needs to read files from the signed-in user’s OneDrive, but never needs to create new files or modify existing ones. If this app has requested and been granted Files.ReadWrite.All, it has a reducible permission. Instead, it should be requesting Files.Read.
What are the goals in combatting overprivileged apps?
There are three main goals for us in the Microsoft Identity team in terms of combatting overprivileged apps:
- Help developers to build trustworthy apps that are adopted smoothly by avoiding excessive permissions, since requesting unnecessary privileges creates friction with users, IT, and policies applied to app consent within an environment.
- Help IT Admins and other decision makers understand how to identify, request, and grant least privileged permissions in their organization to limit overprivileged apps.
- Prevent attackers from gaining elevated privileges that increase the scope of compromise and enable lateral movement within an environment.
How can you ensure your apps become least privileged?
Here are three high level best practices for developers and IT Admins to keep in mind when thinking about adhering to the least privileged principle for applications:
- Prevent overprivilege by avoiding unused and reducible permissions. Fully understand the permissions required for the API calls that your application needs to make, and only request what is necessary to enable your scenario.
- Audit the privileges that have been previously granted to existing apps in your app portfolio on a regular basis, identifying opportunities for privilege reduction or removal. This means IT admins audit the permissions consent granted to apps within their tenant and developers review the permissions that their apps are requesting.
- Remediate by updating apps to stop requesting unused and reducible permissions and revoke previously granted permissions that are no longer necessary.
Microsoft has tools that help you with this process. For example, when Then, you can find the corresponding permissions from least to most privileged for Microsoft Graph by using this handy permissions reference.
Learn more about specific steps in the documentation here: https://aka.ms/least-privilege.
How to start building Zero Trust readiness
To even learn more, check out the new guidance for developers we’ve published to the Zero Trust Guidance Center. It includes new development and integration resources for developing Zero Trust-ready apps.
For more details, read the full whitepaper for developers that can be downloaded here: Zero Trust for the Microsoft Identity developer
Learn more about Microsoft identity:
by Contributed | Jan 17, 2022 | Technology
This article is contributed. See the original author and article here.
Microsoft 365 Community (PnP) January 2021 update is out with a summary of the latest guidance, samples, and solutions from Microsoft or from the community for the community. This article is a summary of all the different areas and topics around the community work we do around Microsoft 365 ecosystem during the past month. Thank you for being part of this success.
Sharing is caring!
What is Microsoft 365 Community (PnP)
Microsoft 365 PnP is a nick-name for Microsoft 365 platform community activities coordinated by numerous teams inside of the Microsoft 365 engineering organizations. PnP is a community-driven open-source initiative where Microsoft and external community members are sharing their learning’s around implementation practices for Microsoft 365.
Topics vary from Microsoft Viva, Microsoft Graph, Microsoft Teams, Power Platform, OneDrive and SharePoint. Active development and contributions happen in GitHub by providing contributions to the samples, reusable components, and documentation for different areas. PnP is owned and coordinated by Microsoft engineering, but this is work done by the community for the community.
The initiative is facilitated by Microsoft, but we have multiple community members as part of the PnP team (see team details in end of the article) and we are always looking to extend the PnP team with more community members. Notice that since this is open-source community initiative, so there’s no SLAs for the support for the samples provided through GitHub. Obviously, all officially released components and libraries are under official support from Microsoft.
Main resources around Microsoft 365 Community:
✍ Latest Dev Blog posts
Here are the latest blog posts and announcements around Microsoft 365 development topics from https://developer.microsoft.com/en-us/microsoft-365/blogs.
Latest community posts at https://aka.ms/m365pnp/community/blog
Community call recording blog posts:
Microsoft 365 Developer Podcasts
In the Microsoft 365 Developer Podcast, Jeremy Thake and Paul Schaeflein talk Microsoft 365 with fellow industry experts. The show formerly known as Office 365 Podcast is back! New episodes out soon!
blog
Microsoft 365 PnP Weekly Podcasts and vlogs
PnP Weekly is a recurrent podcast with visitors where Vesa and Waldek talk about the latest news and announcements in Microsoft 365 and SharePoint areas.
Community Calls
There are numerous different community calls on different areas. All calls are being recorded and published either from Microsoft 365 Developer or Microsoft 365 Community (PnP) YouTube channels. Recordings are typically released within the following 24 hours after the call. You can find a detailed agenda and links to specific covered topics on blog post articles at the Microsoft 365 developer blog when the videos are published.
- Microsoft 365 Platform Call – https://aka.ms/m365-dev-call – Updates and demos from Microsoft as weekly call on Tuesdays – topics vary from Microsoft Teams, Microsoft Graph, Power Platform, SharePoint, OneDrive and more
- Adaptive Cards https://aka.ms/adaptivecardscommunitycall – Updates and news around Adaptive Cards with live demos
- Microsoft identity platform https://aka.ms/IDDevCommunityCalendar – Latest on the identity side
- Office Add-ins https://aka.ms/officeaddinscommunitycall – News and community work around Office add-ins with live demos
- PowerApps https://aka.ms/PowerAppsMonthlyCall – Monthly summary on PowerApps community with live demos
- M365 Community Call https://aka.ms/spdev-sig-call – Bi-weekly – General topics on Microsoft 365 Dev from various aspects – Microsoft Teams, Microsoft Graph Toolkit, Provisioning, Automation, Scripting, Power Automate, Solution design
- Viva Connections & SharePoint Framework Community call https://aka.ms/spdev-spfx-call – Bi-weekly – Consists of topics around SharePoint Framework and JavaScript-based development in the Microsoft Teams and in SharePoint platform.
If you are interested in doing a live demo of your solution or sample in these calls, please do reach out to the PnP Team members (contacts later in this post) and they are able to help with the right setup. These are great opportunities to gain visibility for example for existing MVPs, for community members who would like to be MVPs in the future or any community member who’d like to share some of their learnings.
Microsoft 365 Community (PnP) Ecosystem in GitHub
Most of the community driven repositories are in the PnP GitHub organization as samples are not product specifics as they can contain numerous different solutions or the solution works in multiple different applications.
- Microsoft Graph Toolkit – Repository and project on Microsoft Graph Toolkit controls – welcomes community contributors
- PnPjs – PnPjs Framework repository
- CLI Microsoft 365 – Cross-OS command line interface to manage Office 365 tenant settings
- generator-spfx – Open-source Yeoman generator which extends the out-of-the-box Yeoman generator for SharePoint with additional capabilities
- generator-teams – Open-source Microsoft Teams Yeoman generator – Bots, Messaging Extensions, Tabs, Connectors, Outgoing Web hooks and more
- teams-dev-samples – Microsoft Teams targeted samples from community and Microsoft engineering
- script-samples – Scripting samples for automating operations in Microsoft 365 with PowerShell modules or CLIs
- Sharing is Caring – Getting started on learning how to contribute and be active on the community from GitHub perspective.
- pnpcore – The PnP Core SDK is an SDK designed to work against Microsoft 365 with Microsoft Graph API first approach
- powershell – PnP PowerShell module which is PowerShell Core module targeted for Microsoft 365
- pnpframework – PnP Framework is a .Net Standard 2.0 library targeting Microsoft 365 containing the PnP Provisioning engine and a ton of other useful extensions
- spfx-reference-scenarios – Samples for the Microsoft Teams and Viva Connections, implemented using SharePoint Framework
- sp-dev-fx-aces – Samples on the Adaptive Card Extensions for Microsoft Viva
- sp-dev-fx-webparts – Client-side web part samples from community and Microsoft engineering
- sp-dev-fx-extensions – Samples and tutorial code around SharePoint Framework Extensions
- sp-dev-fx-library-components – Samples and tutorial code around the SharePoint Framework library components
- sp-starter-kit – Starter kit solution for SharePoint modern experiences
- sp-dev-build-extensions – Different build extensions like gulp tasks and gulp plugins from the community and engineering around SharePoint development
- sp-dev-solutions – Repository for more polished and fine-tuned reusable solutions build with SharePoint Framework
- sp-dev-samples – Repository for other samples related on the SharePoint development topics – WebHooks etc.
- sp-dev-fx-controls-react – Reusable content controls for SharePoint Framework solutions build with React
- sp-dev-fx-property-controls – Reusable property pane controls to be used in web parts
- list-formatting – Open-source community-driven repository for the column and view formatting JSON definitions
- sp-dev-site-scripts – Open-source community-driven repository for community Site Designs and Site Scripts
- sp-dev-modernization – Tooling and guidance around modernizing SharePoint from classic to modern
- sp-power-platform-solutions – Solution and sample code for SharePoint Power Platform solutions
- powerfx-samples – Samples that demonstrate different usage patterns for the Power Fx low-code programming language
- powerapps-samples – Samples that demonstrate different usage patterns for Power Apps
- powerautomate-samples – Samples that demonstrate different usage patterns for Power Automate
- powerva-samples – Samples that demonstrate different usage patterns for Power Virtual Agents
- AdaptiveCards-Templates – Samples on showcasing the art of possible with adaptive cards
All SharePoint specific repositories or services supported directly by Microsoft are located in the SharePoint GitHub organization
Classic PnP named repositories – older tooling
- PnP-Tools – Tools and scripts targeted more for IT Pro’s and for on-premises for SP2013 and SP2016
- PnP-Provisioning-Schema – PnP Provisioning engine schema repository
Repositories in the GitHub Microsoft Search organization controlled by the PnP initiative
Other related resources from GitHub
What’s supportability story around the community tooling and assets?
Following statements apply across all of the community lead and contributed samples and solutions, including samples, core component(s) and solutions, like SharePoint Starter Kit, yo teams or PnP PowerShell. All Microsoft released SDKs and tools are supported based on the specific tool policies.
- PnP guidance and samples are created by Microsoft & by the Community
- PnP guidance and samples are maintained by Microsoft & community
- PnP uses supported and recommended techniques
- PnP is an open-source initiative by the community – people who work on the initiative for the benefit of others, have their normal day job as well
- PnP is NOT a product and therefore it’s not supported by Premier Support or other official support channels
- PnP is supported in similar ways as other open source projects done by Microsoft with support from the community by the community
- There are numerous partners that utilize PnP within their solutions for customers. Support for this is provided by the Partner. When PnP material is used in deployments, we recommend being clear with your customer/deployment owner on the support model
Please see the specifics on the supportability on the tool, SDK or component repository or download page.
Microsoft 365 PnP team model

In April 2020 we announced our new Microsoft 365 PnP team model and grew the MVP team quite significantly. PnP model exists for having more efficient engagement between Microsoft engineering and community members. Let’s build things together. Your contributions and feedback is always welcome! During August, we also crew the team with 5 new members. PnP Team coordinates and leads the different open-source and community efforts we execute in the Microsoft 365 platform.
We welcome all community members to get involved on the community and open-source efforts. Your input do matter!
- New Microsoft 365 Patterns and Practices (PnP) team members – November 2021 – Geetha Sivasailam (Artis Consulting) | @GSiVed, Natalie Pienkowska (Microsoft) | @NataliePienkow1, Derek Cash-Peterson (Sympraxis Consulting) | @Spdcp, João J. Mendes (Valo) | @joaojmendes, Joel Rodrigues (Storm Technology) | @JoelFMRodrigues, Rick Van Rousselt (Advantive) | @RickVanRousselt, Stephan Bisser (Solvion) | @stephanbisser, Tetsuya Kawahara | @techan_k, and Thomas Gölles (Solvion) | @thomyg
- New Microsoft 365 Patterns and Practices (PnP) team members – May 2021 – Gautam Sheth (Valo) and Patrick Lamber (Experts Inside AG)
- New Microsoft 365 Patterns and Practices (PnP) team members – February 2021 – April Dunnam (Microsoft), Emily Mancini (Sympraxis Consulting) and Veronique Lengelle (CPS)
- New Microsoft 365 Patterns and Practices (PnP) team members – December 2020 – Luise Freese and Sébastien Levert
- New Microsoft 365 Patterns and Practices (PnP) team members – August 2020 – Albert-Jan Schot (BLIS Digital), Koen Zomers (Microsoft), Paul Bullock (CaPa Creative), Rabia Williams (Microsoft) and Yannick Plenevaux (PVX Solutions)
Got feedback, suggestions or ideas? – Please let us know. Everything we do in this program is for your benefit. Feedback and ideas are more than welcome so that we can adjust the process for benefitting you even more.
Microsoft 365 PnP Recognition Program

We are excited to announce new community contributor program for all the active community members. Through this program you can get officially acknowledged with the a Credly badge around your work on our open-source and community channels. See more from
https://aka.ms/m365pnp-recognition. Thank you for being part of this journey with us.
⚙ Area-specific updates
These are different areas which are closely involved on the community work across the PnP initiative. Some are lead and coordinated by engineering organizations, some are coordinated by the community and MVPs.
Microsoft Graph Toolkit

Microsoft Graph Toolkit is engineering lead initiative, which works closely with the community on the open-source areas. The Microsoft Graph Toolkit is a collection of reusable, framework-agnostic web components and helpers for accessing and working with Microsoft Graph. The components are fully functional right of out of the box, with built in providers that authenticate with and fetch data from Microsoft Graph.
All the latest updates on the Microsoft Graph Toolkit is being presented in our bi-weekly Microsoft 365 Generic Dev community call, including the latest community contributors.
Microsoft 365 Community docs

Community docs model was announced in the April 2020 and it’s great to see the interest for community to help each other by providing new guidance on the non-dev areas. See more on the announcement from the SharePoint blog – Announcing the Microsoft 365 Community Docs. We do welcome contributions from the community – our objective is to build a valuable location for articles from Microsoft and community together.
New articles
Have ideas for articles or want to contribute yourself? – Get involved! Here are also some additional resources explaining the model more detailed.
SharePoint Framework development samples

These are the updated SharePoint Framework samples which are available from the different repositories.
How to find what’s relevant for you? Take advantage of our SharePoint Framework web part and extension sample galleries – also includes solutions which work in Microsoft Teams
Microsoft Teams community samples

These are samples which have been contributed on the community samples since last summary. We do welcome all Microsoft Teams samples to this gallery. They can be implemented using in any technology.
- Numerous adjustments on existing samples and solutions
If you are interested on Microsoft Teams samples, we have just released also new Microsoft Teams sample gallery. Contributions to Microsoft Teams samples is also more than welcome. This gallery already surfaces all Microsoft samples, Microsoft Teams app templates and community samples.
Power Platform samples

There was also numerous smaller updates on the different Power Platforms samples. See more details on available samples from following location
If you have any existing samples which you’d be willing to share with others – please submit a pull request or contact the PnP team members to get started on getting more closely involved on this initiative. Here to help.
Microsoft 365 Script Samples

We have released new Microsoft 365 Script Sample gallery within past month. We welcome all scripts on Microsoft 365 automation to this centralized repository, targeted to help to manage and automate day-to-day operations.
Here are the latest updates on the Script Samples
If you have any existing scripts which you’d be willing to share with others – please submit a pull request or contact the PnP team members to get started on getting more closely involved on this initiative.
Independent Connectors Program

Microsoft Power Platform comes with a huge variety of already built-in connectors and also provides you with the ability of creating your own custom connectors. As of July 2021, anyone can submit the connectors they built to Microsoft Power Platform so that they can be used by others as well. Previously, only API owners could publish their connectors. The Independent Publisher Connector Program’s mission is to bring the best together: the best people, connecting great ideas to data, apps, and flows. We want to make it easier for connector developers to collaborate on connectors.
For more information, you can watch this video on Publish a connector to the Publish a connector to the Power Platform with Independent Publisher Connector Program gram and check out Microsoft Power Platform Connectors on GitHub
These are the latest connectors:
Sharing is Caring initiative

The “Sharing Is Caring” imitative is targeted for learning the basics around making changes in Microsoft Docs, in GitHub, submitting pull requests to the PnP repositories and in GitHub in general. Take advantage of this instructor lead training for learning how to contribute to docs or to open-source solutions. Everyone is welcome to learn how to get started on contributing to open-source docs or code!
- See more from the guidance documentation – including all upcoming instructor lead sessions which you can participate!
✍ Different Microsoft 365 related open-source initiatives build together with the community
See exact details on the latest updates from the specific open-source project release notes. You can also follow up on the project updates from our community calls. There are numerous active projects which are releasing new versions with the community even on weekly basis. Get involved!
- Microsoft Look Book – Discover the modern experiences you can build with SharePoint in Microsoft 365. Look book provides design examples for SharePoint Online which can be automatically provisioned to any tenant in the world. See more from https://lookbook.microsoft.com. This service is also provided as open-source solution sample from GitHub.
- yo teams – Open-source Yeoman generator for Microsoft Teams extensibility. Supports creation of bots, messaging extensions, tabs (with SSO), connectors and outgoing Webhooks. See more from https://aka.ms/yoteams.
- PnP Framework – .NET Standard 2.0 SDK containing the classic PnP Sites Core features for SharePoint Online. More around this package from GitHub.
- PnP Core SDK – The PnP Core SDK is an SDK designed to work for Microsoft 365 with Graph API first approach. It provides a unified object model for working with SharePoint Online and Teams which is agnostic to the underlying API’s being called. See more around the SDK from documentation.
- PnP PowerShell – PnP PowerShell is a .NET Core 3.1 / .NET Framework 4.6.1 based PowerShell Module providing over 400 cmdlets that work with Microsoft 365 environments and more specifically SharePoint Online and Microsoft Teams. See more details from documentation.
- Reusable SharePoint Framework controls – Reusable controls for SharePoint Framework web part and extension development. Separate projects for React content controls and Property Pane controls for web parts. These controls are using Office UI Fabric React controls under the covers and they are SharePoint aware to increase the productivity of developers.
- CLI for Microsoft 365 – Cross-OS command line interface to manage Office 365 tenant settings. See release notes for latest updates.
- PnPJs – PnPJs encapsulates SharePoint REST APIs and provides a fluent and easily usable interface for querying data from SharePoint sites. It’s a replacement of already deprecated pnp-js-core library. See changelog for the latest updates.
- PnP Provisioning Engine and PnP CSOM Core – PnP provisioning engine is part of the PnP CSOM extension. They encapsulate complex business driven operations behind easily usable API surface, which extends out-of-the-box CSOM NuGet packages. See changelog for the latest updates.
- PnP PowerShell – PnP PowerShell cmdlets are open-source complement for the SharePoint Online cmdlets. There are more than 300 different cmdlets to use and you can use them to manage tenant settings or to manipulate actual SharePoint sites. They See changelog for the latest updates.
- PnP Modern Search solution – The PnP ‘Modern Search’ solution is a set of SharePoint Online modern Web Parts allowing SharePoint super users, webmasters and developers to create highly flexible and personalized search based experiences in minutes. See more details on the different supported capabilities from https://aka.ms/pnp-search.
- Modernization tooling – All tools and guidance on helping you to transform you SharePoint to modern experiences from http://aka.ms/sppnp-modernize.
- SharePoint Starter Kit v2 – Building modern experiences with Microsoft Teams flavors for SharePoint Online and SharePoint 2019 – reference solution in GitHub.
- List formatting definitions – Community contributed samples around the column and view formatting in GitHub.
- Site Designs and Site Scripts – Community contributed samples around SharePoint Site Designs and Site Scripts in GitHub.
- DevOps tooling and scripts – Community contributed scripts and tooling automation around DevOps topics (CI/CD) in GitHub.
- Teams provisioning solution – Set of open-source Azure Functions for Microsoft Teams provisioning. See more details from GitHub.
✍ Documentation updates
Please see all the Microsoft 365 development documentation updates from the related documentation sets and repositories as listed below:
Microsoft 365 Developer and Microsoft 365 Community YouTube video channels
You can find all Microsoft 365 related videos on our YouTube Channel at http://aka.ms/m365pnp/videos or at Microsoft 365 Dev. These channels contains already a significant amount of detailed training material, demo videos, and community call recordings.
Here are the new Microsoft demo or guidance videos released since the last monthly summary:
Community demos as following:
Key contributors to the January 2021 update
Here’s the list of active contributors (in alphabetical order) since last release details in GitHub repositories or community channels. PnP is really about building tooling and knowledge together with the community for the community, so your contributions are highly valued across the Microsoft 365 customers, partners and obviously also at Microsoft.
Thank you for your assistance and contributions on behalf of the community. You are truly making a difference! If we missed someone, please let us know.
Companies: Here’s the companies, which provided support the community initiative for this month by allowing their employees working for the benefit of others in the community. There were also people who contributed from other companies during last month, but we did not get their logos and approval to show them in time for these communications. If you still want your logo for this month’s release, please let us know and share the logo with us. Thx.

Microsoft people: Here’s the list of Microsoft people who have been closely involved with the PnP work during last month.
MVP Community team
MVP Community team (PnP Team) manages the PnP community work in the GitHub and also coordinates different open-source projects around Microsoft 365 topics. PnP Team members have a significant impact on driving adoption of Microsoft 365 topics. They have shown their commitment to the open-source and community-driven work by constantly contributing to the benefit of the others in the community.
Thank you for all that you do!
Here are the Microsoft Internal PnP Core team members:
Next steps
See all of the available community calls, tools, components and other assets from https://aka.ms/m365pnp. Get involved!
Got ideas or feedback on the topics to cover, additional partnerships, product feature capabilities? – let us know. Your input is important for us, so that we can support your journey in Microsoft 365.
“Sharing is caring!”
Microsoft 365 Community (PnP) – January 13th 2021
by Contributed | Jan 15, 2022 | Technology
This article is contributed. See the original author and article here.
I recently learned how to work with APIs and the different methods to call them. I started with a straight forward example that’s not too complex. I used an open API (that means I don’t need authentication for my request) to get the number of the day from a website called MathTOOLS. I want this number of the day to be posted as a chat message in Microsoft Teams.
Let’s start with some theory first
Whats an API?
API is an acronym for Application Programming Interface and they allow applications to communicate with each other and exchange data. An API lists operations that it can perform and which you can use, if you know how to trigger them. Usually the operations are…
– GET (read)
– POST (write)
– PUT (update)
– PATCH (update, but only partially)
– DELETE (remove)
How to address APIs?
An API is an interface that you can call and communicate with. You can perform different operations, like getting data, writing things, and so on. But you need to know the correct language, that the API will understand, you need to know the correct direct dial and You need to know what to tell the API to make it do what you want it to do. The language you need is HTTP, which is an acronym for Hypertext Transfer Protocol.
If the browser on your computer wants to communicate with a server somewhere on the world, it sends an HTTP request (it asks politely) and when we did everything in the right way, we will get a polite answer, an HTTP response.
An HTTP request gives us the ability to communicate with an API. So much for the theory, now let’s get our hands dirty :clapping_hands: and let’s see how it looks in Power Automate.
HTTP request
As I mentioned earlier an HTTP request consists of a view things. We will need a…
– Method
– URL
– Headers
– and a body
Method
Luckily we know the methods already.
Method |
Action |
GET |
read |
PUT |
update |
POST |
write |
PATCH |
update partially |
DELETE |
remove |
In this use case we want to get the number of the day, so we choose the GET method.
URL
Now for the URL we need to know the URL (kind of obvious, isn’t it :beaming_face_with_smiling_eyes:) of the service we want to address. But not only that, we will also need the endpoint. This is something like the direct call, putting you to that exact point that you want. Usually an API will tell you how the endpoint looks:
The endpoint of the website MathTOOLS is `https://api.math.tools`, but if we read carefully (I usually struggle with that :smiling_face_with_halo:), we get more details for the API of the number of the day:
The endpoint for the number of the day is `https://api.math.tools/numbers/nod`. The API documentation even provides us with the information of how the HTTP response will look like:
It’s a very long JSON object (if you want to get started with JSON, I recommend the amazing blog from Bob German Introduction to JSON.
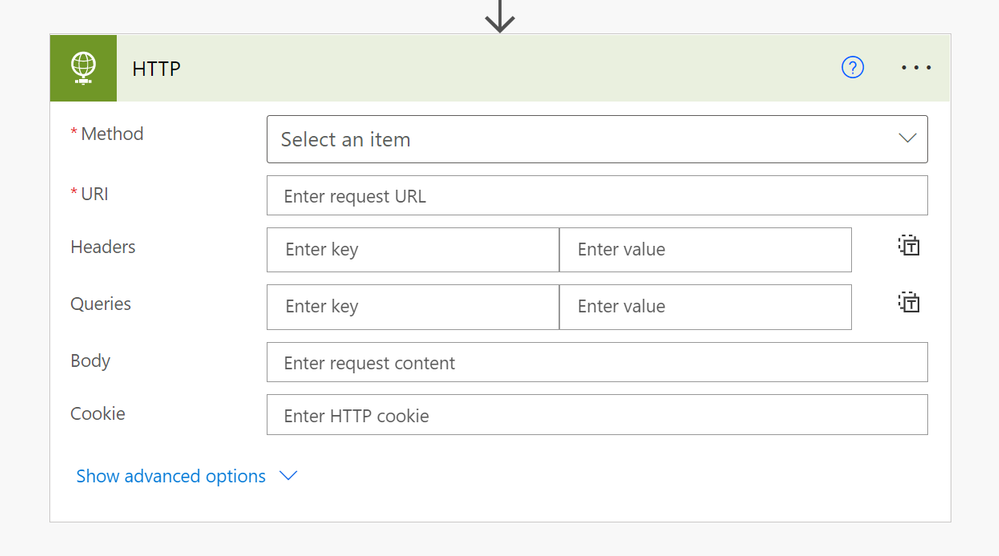
But let’s stay at our HTTP request in Power Automate. We know the Method, we know the URL and we know that we don’t need any authentication. That means we can fill out all mandatory fields in that flow action and it looks like this:
Let’s run this flow on a daily basis and see what the result looks like:
(Since you can hardly see the result, I paste the body here once again)
And that’s it, we used an HTTP request to GET information from a API. Now for the last part of this blog, we want to use some information from this result to be posted in a chat in Teams.
Use a certain information from a JSON object in a chat message
Now it would make a lot of sense, if we cover the question, how to use a certain information from that JSON object in, let’s say a chat message, right?
Let’s say, we want to post the number of the day in a daily Microsoft Teams chat. We need just two steps for that:
1. put the information of that JSON file in a variable, so it’s always up to date
2. use that variable in message in a Microsoft Teams chat
To use a certain information in a variable, you first need to initialize a variable and fill out all the information:
Name: I called mine NrOfDay
Type: We want to use a string here (a string is a sequence of characters, that can include letters or numbers, but it will be recognized as a “text”)
Value: Here we want to define the value of this variable. In our case that means that particular information from this long JSON object.
We want the value of the property “number”
Notice, that this JSON element consists of three different objects. We have the objects “success”, “copyright” and “content”. The object “content” contains an object called “nod”, which contains two more objects called “category” and “numbers”.
As stated earlier, we want the value of the property “number”, which is located in the object “numbers” (which is part of the object “nod”, which is part of the object “content”).
Now we can tell our variable in Power Automate the exact location of the value we want to use in this variable. The expression to “navigate” to the value of this property looks like this:
`body(‘HTTP_-_GETnon’)[‘contents’][‘nod’][‘numbers’][‘number’]`
The first part (`body(‘HTTP_-_GETnon’)`) tells where we want to look, the later parts are navigating through the JSON object until we reach the exact object and the exact property. With this method you can get any value of any JSON object you like.
Now you can build in the variable in a “Post message in a chat or channel” action as dynamic content in Flow and it will always show the value of the property of that JSON object.
That’s it. That is how you call an API, get a JSON object back and use certain values from that object in Power Automate. I hope you liked it and it helps you. If anything is unclear, or you have questions, please feel free to reach out to me. Easiest way would be twitter :*
As I mentioned in the beginning, I will further work with APIs. If you want to learn more, here’s what I’m going to work on next. If you have specific questions, please ask me or make suggestions. I’m always eager to learn new things.
Next API topic: What’s a custom connector, where is the difference between a http request and a custom connector and when to use what.
by Contributed | Jan 14, 2022 | Technology
This article is contributed. See the original author and article here.
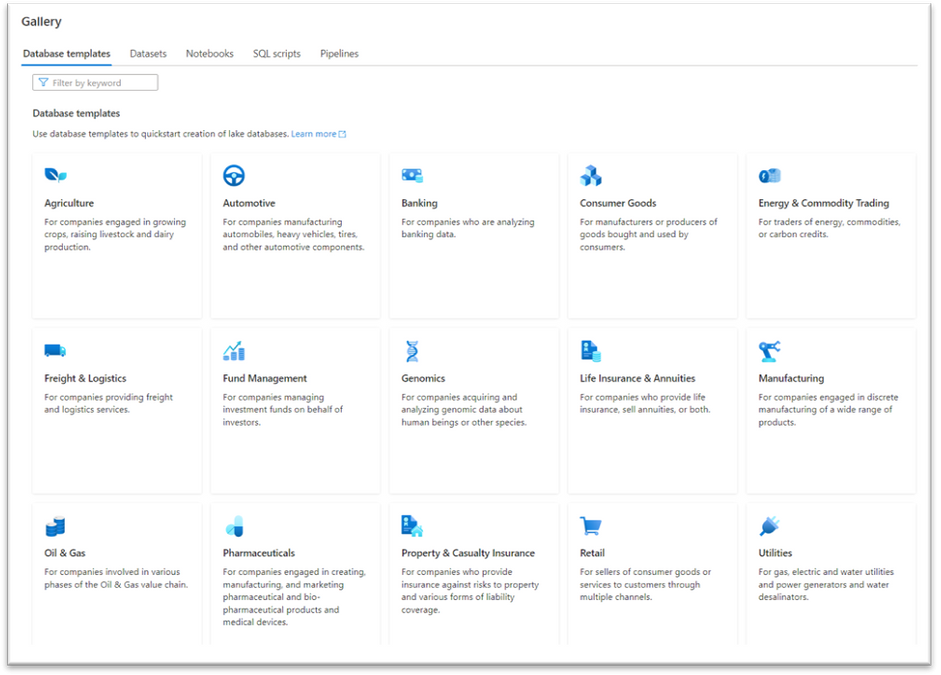
In response to the enthusiastic adoption of the eleven Synapse Database Templates for which we announced availability, in public preview, in November and December 2021, we’re pleased to announce today that we are making available, in public preview, additional Synapse Database Templates for four more industries:
- Automotive Industries
- Genomics
- Manufacturing
- Pharmaceuticals
The Synapse Database Template for Automotive Industries is a comprehensive data model that addresses the typical data requirements of organizations engaged in manufacturing automobiles, heavy vehicles, tires, and other automotive components.
The Synapse Database Template for Genomics is a comprehensive data model that addresses the typical data requirements of organizations engaged in acquiring and analyzing genomic data about human beings or other species.
The Synapse Database Template for Manufacturing is a comprehensive data model that addresses the typical data requirements of organizations engaged in either discrete or continuous manufacturing of a wide range of products. Portions of this database template are also included as part of the previously announced Consumer Goods database template and in the Automotive Industries and Pharmaceuticals database templates being announced today so companies in those industries will likely prefer to use those database templates rather than the general purpose Manufacturing industry database template as they contain additional content specific to those industries in addition to the content contained in the general Manufacturing database template.
The Synapse Database Template for Pharmaceuticals is a comprehensive data model that addresses the typical data requirements of organizations engaged in creating, manufacturing, and marketing pharmaceutical and bio-pharmaceutical products and medical devices.
Most of the Synapse database templates contain many different business areas that together comprise each of these very large industry-specific data models. For example, in addition to business areas such as Product, Inventory, and Human Resources, there is also an Emissions business area which provides support for data used to report greenhouse gas emissions (including scope 1, scope 2, and scope 3 emissions), an area of significant focus for many of our large customers.
These 4 additional database templates can be accessed now in Azure Synapse either in the gallery or by creating a new lake database from the Data tab and selecting + Table and then From template.

Learn more:


Recent Comments