by Contributed | Feb 22, 2022 | Technology
This article is contributed. See the original author and article here.
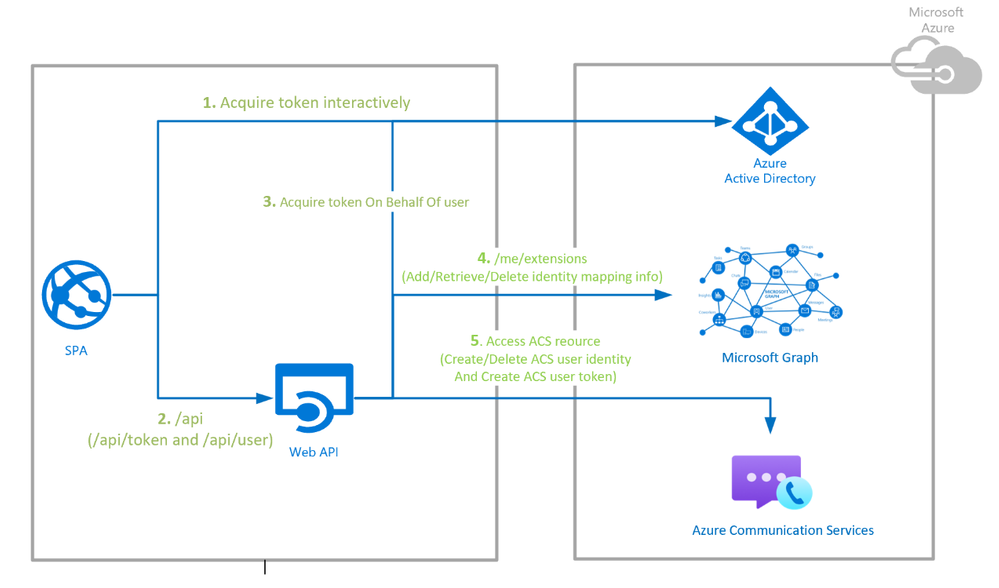
We’re releasing a new service sample to help you build secure voice, video, and chat applications. This sample provides you with an easy to deploy, trusted authentication service to generate Azure Communication Services identities and access tokens. It is available for both node.js and C#.
Azure Communication Services is designed with a bring-your-own-identity (BYOI) architecture. Identity and sign-on experiences are core to your unique application. Apps like LinkedIn have their own end-user identity system, while healthcare apps may use identity providers as part of existing middleware, and other apps may use 3rd party providers such as Facebook.
We’ve designed the ACS identity system to be simple and generic, so you have the flexibility to build whatever experience you want.
This new sample uses Azure App Service to authenticate users with Azure Active Directory (AAD), maps those users to ACS identities using Graph as storage, and finally generates ACS tokens when needed. We chose AAD for this sample because it’s a popular access management back-end, recognized for its security and scalability. It also integrates with 3rd party identity providers and OpenID interfaces. But you can use this sample as a launching point for integrating whatever identity provider or external system you want.
The sample provides developers a turn-key service which uses the Azure Communication Service Identity SDK to create and delete users, and generate, refresh, and revoke access tokens. The data flows for this sample are diagrammed below, but there is a lot more detail in GitHub with both node.js and C# repositories. An Azure Resource Manager (ARM) template is provided that generates the Azure subscription and automate deployment with a few clicks.
This identity service is only one component of a calling or chat application. Samples and documentation for other components and the underlying APIs are below.
Please hit us up in the comments or Microsoft Q&A if you have questions about building apps!
by Contributed | Feb 21, 2022 | Technology
This article is contributed. See the original author and article here.
In this tutorial, you learn to:
- Set up an Azure Static Web Apps site for a Vanilla API sample app
- Create a Bitbucket Pipeline to build and publish a static web app
Prerequisites
- Active Azure account: If you don’t have one, you can create an account for free.
- Bitbucket project: If you don’t have one, you can create a project for free.
- Bitbucket includes Pipelines. If you haven’t created a pipeline before, you first have to enable two-step verification for your Bitbucket account.
- You can add SSH Keys using the steps here
NOTE – The static web app Pipeline Task currently only works on Linux machines. When running the pipeline mentioned below, please ensure it is running on a Linux VM.
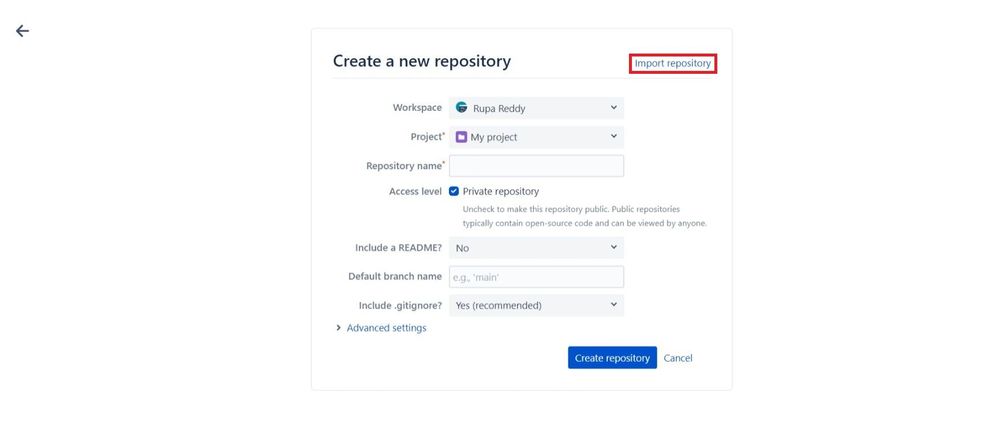
Create a static web app project in Bitbucket
NOTE – If you have an existing app in your repository, you may skip to the next section.
- After creating a new project, select Create repository and then click on Import repository.
- Select Import repository to import the sample application.

Create a static web app
- Navigate to the Azure portal.
- Select Create a Resource.
- Search for Static Web Apps.
- Select Static Web Apps.
- Select Create.
- Create a new static web app with the following values.
Setting
|
Value
|
Subscription
|
Your Azure subscription name.
|
Resource Group
|
Select an existing group name, or create a new one.
|
Name
|
Enter myBitbucketApp.
|
Hosting plan type
|
Select Free.
|
Region
|
Select a region closest to you.
|
Source
|
Select Other.
|
|
|

- Select Review + create
- Select Create.
- Once the deployment is successful, select Go to resource.
- Select Manage deployment token.
- Copy the deployment token and paste the deployment token value into a text editor for use in another screen.
NOTE – This value is set aside for now because you’ll copy and paste more values in coming steps.

Create the Pipeline in Bitbucket

- In the Create your first pipeline screen, select Starter pipeline.

NOTE –  If you are not using the sample app, the values for  APP_LOCATION, API_LOCATION, and OUTPUT_LOCATION  need to change to match the values in your application.
Note that you have to give the values for  APP_LOCATION, API_LOCATION, and OUTPUT_LOCATIONonly after  $BITBUCKET_CLONE_DIR  as shown above.  i.e. $BITBUCKET_CLONE_DIR/<APP_LOCATION>
The API_TOKEN value is self-managed and is manually configured.
Property
|
Description
|
Example
|
Required
|
app_location
|
Location of your application code.
|
Enter / if your application source code is at the root of the repository, or /app if your application code is in a directory called app.
|
Yes
|
api_location
|
Location of your Azure Functions code.
|
Enter /api if your app code is in a folder called api. If no Azure Functions app is detected in the folder, the build doesn’t fail, the workflow assumes you don’t want an API.
|
No
|
output_location
|
Location of the build output directory relative to the app_location.
|
If your application source code is located at /app, and the build script outputs files to the /app/build folder, then set build as the output_location value.
|
No
|
- Select Add variables.
- Add a new variable in Deployments section.
- Name the variable deployment_token (matching the name in the workflow).
- Copy the deployment token that you previously pasted into a text editor.
- Paste in the deployment token in the Value box.

- Make sure the Secured checkbox is selected.
- Select Add.
- Select Commit file and return to your pipelines tab.
- You can see that the pipeline run is in progress with name Initial Bitbucket Pipelines configuration.
- Once the deployment is successful, navigate to the Azure Static Web Apps Overview which includes links to the deployment configuration. Note how the Source link now points to the branch and location of the Bitbucket repository.
- Select the URL to see your newly deployed website.

Clean up resources
Clean up the resources you deployed by deleting the resource group.
- From the Azure portal, select Resource group from the left menu.
- Enter the resource group name in the Filter by name field.
- Select the resource group name you used in this tutorial.
- Select Delete resource group from the top menu.
Additional resources
by Contributed | Feb 19, 2022 | Technology
This article is contributed. See the original author and article here.
Today, I worked on an interesting service that our customer faced the following error message “Error code 0xA190; state 41360 – Could not find any endpoints.” using SqlCmd/ODBC in combination with -G to connect to Azure Active Directory.
We have the following environment:
- ReadHat Enterprise version 7.9
- Customer is using a 3rd party tool to validate the users called PingFederated.
Troubleshooting done:
- Using other driver JDBC our customer is able to connect.
- Using sqlcmd in Windows Operating System is able to connect.
- Taking a network trace with tcpdump we were able a connectivity and reset the connection due to this error.
- Without using PingFederated in Linux using the native Azure Active Directory call the connection is success.
In this such situation, we engaged our colleagues of Azure Product Team lient Tools and they identified an issue with ODBC and Pingfederated that has been resolved in version 17.9+ as you could see in this URL: List of bugs fixed – ODBC Driver for SQL Server | Microsoft Docs . Installing, for example, the version 18.0 the issue has been fixed too.
Enjoy!
by Contributed | Feb 18, 2022 | Technology
This article is contributed. See the original author and article here.
Does achieving your organization’s regulatory and compliance requirements keep you up at night? Do you wonder how you will ever be able to adhere to all the controls and ensure your companies compliance with required regulations? Do you want to ensure that you are on top of your compliance game and that the appropriate policies and guidance are followed and enforced? Look no further, Microsoft Compliance Manager (MSCM) is the tool to help you achieve these goals and more. This training is designed to help guide you from fundamental concepts on your MSCM journey to Advanced concepts. Once completed you will have a firm understanding of the tool, its capabilities, and use.
Microsoft Compliance Manager has a ton of data, tutorials, videos etc. that can sometimes be overwhelming. Leaving you asking questions such as “where do I start”, “how do I achieve compliance”, “how do I recognize when my organization falls out of compliance”. We’ve sifted through the vast resources Microsoft has to offer for MSCM and developed this training to guide you – all in one location, in a simple easy to follow format! If there is anything we can do to improve this training, please do not hesitate to leave a comment below and we will be sure to review it.
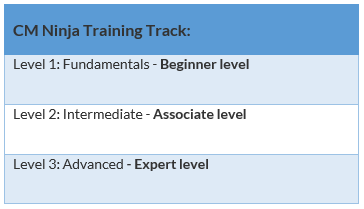
The overall structure of this training is split into 3 main knowledge levels. They are:
After each level, we will offer you a knowledge check based on the training material you have just finished! Since there’s a lot of content, the goal of the knowledge checks is to help ensure understanding of the key concepts that were covered. Lastly, there’ll be a fun certificate issued at the end of the training! Disclaimer: This is not an official Microsoft certification and only acts as a way of recognizing your participation in this training content.
We plan to update this training on a quarterly basis to ensure that you all have the latest and the greatest training materials. Please do check back often for new training content. The newly added training content will be tagged with “[New!]” at the end of the training title. For those of you who have already gone through the training before, you can view those [New!] training contents directly.
 Docs on Microsoft Docs on Microsoft
|
 Blogs on Microsoft Blogs on Microsoft |
 Product videos Product videos
|
 Webcast recordings Webcast recordings |
 Tech Community Tech Community
|
 Interactive guides Interactive guides |
⤴ External Sites
|
 GitHub GitHub |
Module 1. MSCM – Fundamentals [Beginner Level]
Training Title
|
Description
|
Resources
|
MSCM Overview: Introduction to Microsoft Compliance Manager
|
In this track we will show where MSCM fits in the overall M365 ecosystems and discuss its high-level components.
|
 MSCM Introduction Video MSCM Introduction Video
 MSCM MSCM |
Getting started with MSCM
|
In this track we will go over best practices and pre-deployment planning considerations to include key MSCM service features and capabilities.
|
 Introduction to MSCM Introduction to MSCM
Compliance Manager Quick Start
 Deployment Acceleration Guide Deployment Acceleration Guide
|
Assessment Types and working with assessments (workflow and tracking)
|
In this track we will discuss the different assessment types in MSCM, how you can use them to help your organization succeed and use MSCM for continuous monitoring / assessment.
|
Build and Manage Assessments in MSCM
|
Automated Compliance Scoring
|
In this track we will discuss your overall scope, setup / run automated testing, evaluate your automated score (understanding it), and gain a firm understanding of improvement actions, user history and automated testing.
|
Compliance Score Calculation |
Assigning Improvement Actions & action types (RBAC)
|
In this track we will discuss how you assign remediation and score improvement tasks to different personnel within your organization.
|
Assign and complete improvement actions in MSCM
 MSCM Interactive guide, review from 2 minutes 12 seconds to 38 seconds MSCM Interactive guide, review from 2 minutes 12 seconds to 38 seconds |
MSCM Recommendation Wizard
|
In this track we will give you a good starting place to understand your organization’s regulatory and compliance requirements. By asking a few brief questions we can show you the templates that may apply to your organization!
|
 MSCM Recommendation Wizard Tutorial MSCM Recommendation Wizard Tutorial |
Automation with MSCM
|
In this track we will explore how you can automate your MSCM capability and ensure you have up to date knowledge of your current regulatory compliance status.
|
Material for this track is currently in development – stay tuned!
|
Knowledge Check – Microsoft Compliance Manager Fundamentals
Module 2. MSCM – Intermediate [Associate Level]
Knowledge Check – Microsoft Compliance Manager Intermediate
Module 3. Microsoft Compliance Manager – Advanced [Expert Level]
Knowledge Check – Microsoft Compliance Manager Advanced
Once you’ve finished the training and the knowledge checks, please go to our attestation portal to generate your certificate – you’ll see it in your inbox within 3 to 5 business days. Attestation Portal Link
We have a great lineup of updates for the next rendition (next quarter). If you’d like anything covered, please comment below. In addition, please reach out to us if you have any content that you would like to include as well.
We hope you all enjoy this training!
Feedback
Let us know if you have any feedback or relevant use cases/requirements for this portion of Microsoft Defender for Cloud Apps by emailing mipcompcxe@microsoft.com and mention the core area of concern.
Learn More
For further information on how your organization can benefit from Microsoft Compliance Manager:

by Contributed | Feb 17, 2022 | Business, Microsoft 365, Microsoft Viva, Technology
This article is contributed. See the original author and article here.
We are excited to share that Microsoft is bringing the Glint solution into Microsoft Viva to make listening and acting on employee feedback an integral part of how businesses engage and develop their talent in the new era of hybrid work.
The post Microsoft Viva and Glint will empower businesses to put their employees first appeared first on Microsoft 365 Blog.
Brought to you by Dr. Ware, Microsoft Office 365 Silver Partner, Charleston SC.

Recent Comments