by Contributed | Apr 7, 2022 | Technology
This article is contributed. See the original author and article here.
In our continued effort to improve collaboration in Visio for the web, we’re excited to announce the availability of the popular Office feature, @mentions. This capability makes it easier to collaborate on shared diagrams by giving you the ability to get someone’s attention directly within the comments pane and pull them into the file where you need their input.
Here’s how it works
To get started, sign in to visio.office.com and open an existing Visio file saved on SharePoint or OneDrive. By default, the file will open in Visio Viewer. To add a new comment to the page itself, select Comments > New. You can also add a new comment to any object on the page, such as a shape or connector by selecting the object and then selecting Comments > New.
Example of a new comment being created in Visio Viewer.
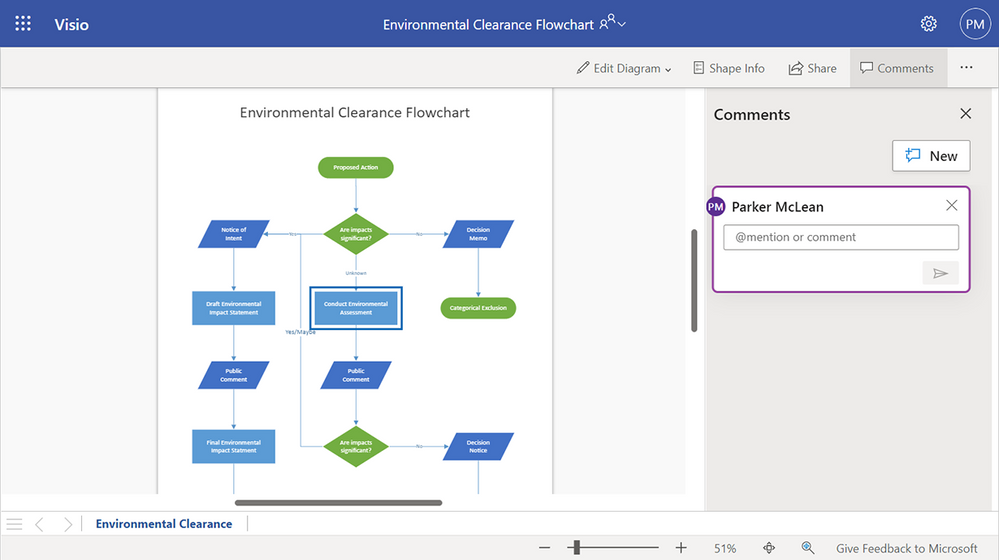
Alternatively, you can open the file in Visio Editor by selecting Edit Diagram > Edit in Browser. Right-click anywhere on the page or on any object on the page and add a new comment by selecting New Comment from the floating context menu that appears on right-click or from the Insert or Review tab > New Comment. Type “@” and the first few letters of the person’s first or last name. You’ll see a drop-down list of contacts that updates as you type more characters. Select the name of the person you’d like to tag.
 Example of a list of names that auto-populates when using the @mention feature in Visio for the web.
To be more casual, you can delete everything except the person’s first name in the @mention. To include more people, type “@” again and mention someone else.
 Example of a posted comment using the @mention feature in Visio for the web.
Note, if the person you are mentioning does not already have permission to open the Visio file, you will be asked to provide them with access.
 Example of the Share dialogue box that appears when a recipient does not have access to a file.
An email notification that includes a preview of the comment thread and diagram will automatically be sent to the person(s) you tag. In addition, the email notification includes a link that will take them to the comment in the file. This link will open the file in Visio Viewer, bringing them directly into the diagram and into the conversation. The person can either reply to the comment thread directly in Visio Viewer or open the diagram in Visio Editor by selecting Edit in Browser from the Edit Diagram drop-down.
 Example of an email notification showing a preview of the comment thread and flowchart, as well as a direct link to view the comment in the document.
If someone gets mentioned more than once in a short period of time, they will receive a batch of notifications in a single summary email.
Availability
The ability to @mention your colleagues in a Visio file is now available in the Viewer and Editor in both Visio for the web and Microsoft Teams.
Requirements and known limitations
- The file must be saved in SharePoint or OneDrive.
- Tenants with Conditional Access will not be able to create @mentions. Please contact your IT Administrator for more information.
- The @mentions feature does not work for guest or external accounts—you cannot @mention such accounts, nor can guest or external accounts @mention collaborators in Visio files outside of their tenant.
- Files containing @mentions can be opened in the Visio desktop app; however, any @mentions will appear as plain text. If a comment containing an @mention is edited, the @mention will be permanently converted to plain text.
Give us your feedback! Please tell us about your experience with @mentions in Visio for the web by leaving a comment below, sending feedback via the Visio Feedback portal, or submitting feedback directly in the Visio web app using “Give Feedback to Microsoft” in the bottom right corner. Follow us on Twitter and LinkedIn to stay informed with the latest updates for Visio.
Continue the conversation by joining us in the Microsoft 365 Tech Community! Whether you have product questions or just want to stay informed with the latest updates on new releases, tools, and blogs, Microsoft 365 Tech Community is your go-to resource to stay connected!
by Contributed | Apr 6, 2022 | Technology
This article is contributed. See the original author and article here.
In many situations, we used to work on performance issue that following the best practices might be resolved by customers. In this article we would like to share a PowerShell Script that checks some best practices for Azure SQL Database and Managed Instance.
We would like to suggest this PowerShell script that you could find out in this URL that contains initial checks we are facing a performance issue. This PowerShell Script is covering the following best practices:
- Check if we have any automatic tuning recomendations . Based on the results of the execution of sys.dm_db_tuning_recommendations DMV informs if your database has any recomendations to apply in your database based on the workload analysis done by the SQL Server engine.
- Check if we have have statistics that are out-of-dated Based on the results of the execution of sys.stats and sys.dm_db_stats_properties DMVs inform if any statistics, automatic , user created or associated with an index has the following conditions: If the rows sample is different than the number of rows (this situation may be indicated that the statistics has been updated automatic by SQL Server using a sample or if the statistics has been update more than 15 days ago.
- Check if you have any TSQL that was cancelled or aborted. For example, after expiring of execution command timeout. This check is based on QDS DVM call sys.query_store_runtime_stats.
- Check if you have missing indexes. Based on the results of the execution of sys.dm_db_missing_index_xxx informs if you have any missing indexes that helps you to improve the execution of your query.
- Check the setting value of MAXDOP. Based on the results of the sys.database_scoped_configurations DMV check if the value of MAXDOP is 0.
- Check the fragmentation of the indexes. Based on the results of sys.dm_db_index_physical_stats DMV check if the fragmentation of the indexes is more than 50 percent.
Basically, once you have download this PowerShell script, you need to provide the details of your server, database, user, password and destination folder. You could fill up directly these parameters in the PowerShell script if you need to perform more time this process. This PowerShell script only will ask those parameters if they are missing. Also, you could specify as a command line.
Once the process is executed, this PowerShell script will save a file called PerfChecker.Log in the destination folder chosen. Every execution this file will be deleted and created a new one.
This project is public and all the contributions to make more accesible, easy and effective will be very welcome.
Enjoy!
by Contributed | Apr 5, 2022 | Technology
This article is contributed. See the original author and article here.
We are very happy to announce that we have enabled evaluation licenses for our WebSphere on Azure Virtual Machines (VMs) Marketplace solutions. The solutions are jointly developed and supported by IBM and Microsoft. We have also added support for standalone WebSphere Base instance on VMs deployments. In addition, we have integrated a sample getting started application into our WebSphere Liberty/Open Liberty on Azure Kubernetes Service (AKS)/Azure Red Hat OpenShift (ARO) solutions. These changes make getting started with WebSphere and Azure even easier. Evaluate the WebSphere on Azure solutions for full production usage and reach out to collaborate on migration cases.
WebSphere Base Standalone Instance on VMs
IBM and Microsoft previously released a Marketplace solution to automate WebSphere Network Deployment (ND) cluster deployments on VMs. We now have an additional offer targeting single instance deployments of WebSphere Base on VMs. The solutions automatically provision a number of resources including virtual network, storage, network security group, Java, Linux, and WebSphere. With minimal effort, you can set up a fully functional WebSphere deployment including the Console. The solutions support WebSphere 9.0.5 on Red Hat Enterprise Linux (RHEL) 8.3.
The solutions enable a variety of robust production-ready deployment architectures. Once the initial provisioning is complete, you can fully customize the deployment including integrating with a wide range of Azure services.
Evaluation Licenses for WebSphere on VMs
The WebSphere traditional on VMs solutions primarily follow a Bring Your Own License model. You must have the appropriate licenses from IBM and be properly licensed to run production workloads on Azure. The solutions ensure that you have adequate WebSphere entitlements. Now you can also use evaluation licenses for both WebSphere ND and Base. This enables key use cases such as exploration, prototyping, and trial. With the evaluation option, it is possible to apply WebSphere entitlements to a deployment later on.

Liberty on ARO/AKS Sample Application
In addition to WebSphere traditional on VMs solutions, IBM and Microsoft have previously released Marketplace solutions targeting WebSphere Liberty/Open Liberty on AKS and ARO. Similar to the VM solutions, the AKS/ARO solutions enable you to focus on developing and deploying your containerized applications instead of initial provisioning and configuration of Java and Azure resources. The resources automatically provisioned by these solutions include virtual networks, an ARO/AKS cluster, the OpenShift Container Registry (OCR)/Azure Container Registry (ACR), and the Liberty Operator. The solutions can optionally deploy a Docker image that includes Open Liberty or WebSphere Liberty and your application. The image must be anonymously accessible from a registry such as Docker Hub. In addition, we now have an option in the solutions to deploy an IBM provided Liberty sample application. The sample application helps you get started with Liberty, containers, and Azure with minimal prior knowledge required.

Note, WebSphere Liberty is available as a limited trial option before entitlement must be applied to the deployment. Open Liberty is open source and free to use unsupported. You can also use Open Liberty supported through WebSphere Liberty entitlements.
Get started with WebSphere on Azure
Explore the WebSphere on Azure solutions, provide feedback, and stay informed of the roadmap. You can also take advantage of hands-on help from the engineering team behind these solutions. The opportunity to collaborate on a migration scenario is completely free while the solutions are under active initial development.

by Contributed | Apr 5, 2022 | Business, Microsoft 365, Technology
This article is contributed. See the original author and article here.
Today, we are sharing details with our customers about the future of Windows and how we are developing new experiences to enhance the way we work today, and in the future.
The post New experiences in Windows 11 and Windows 365 empower new ways of working appeared first on Microsoft 365 Blog.
Brought to you by Dr. Ware, Microsoft Office 365 Silver Partner, Charleston SC.
by Contributed | Apr 5, 2022 | Business, Enterprise Mobility + Security, Microsoft 365, Microsoft Endpoint Manager, Microsoft Intune, Technology, Windows, Zero Trust
This article is contributed. See the original author and article here.
The changes from the past two years in working patterns and, consequently, enterprise IT architecture have created new customer needs, as well as more third-party solutions, for all “purse and purposes.” Today, we are announcing our plans to deliver new management functionality in Microsoft Endpoint Manager that will further simplify how organizations manage and protect their user computing landscape.
The post Ease the burden of managing and protecting endpoints with Microsoft advanced solutions appeared first on Microsoft 365 Blog.
Brought to you by Dr. Ware, Microsoft Office 365 Silver Partner, Charleston SC.

Recent Comments