Getting rid of credentials in Azure – Part 4 (Kubernetes)
This article is contributed. See the original author and article here.
The journey to rid ourselves of credentials in Azure continues, and this time we’ll tackle a much in demand service – Azure Kubernetes Service (AKS). Because while Azure App Services, which we have covered in previous parts, are nice and dandy they simply don’t serve all your microservice needs.
AKS is kind of a double feature when it comes to going credless:
- The first is what we’ve been doing up until now. The provisioning and configuration of the cluster is handled by a GitHub Action which is trusted by Azure through using a federated credential.
- The second is that Kubernetes is a system of its own and part of that is having a credential and identity model inside the cluster regardless of Azure. This can in turn be configured to have Azure trust the cluster and create a bridge between the cluster components and Azure resources.
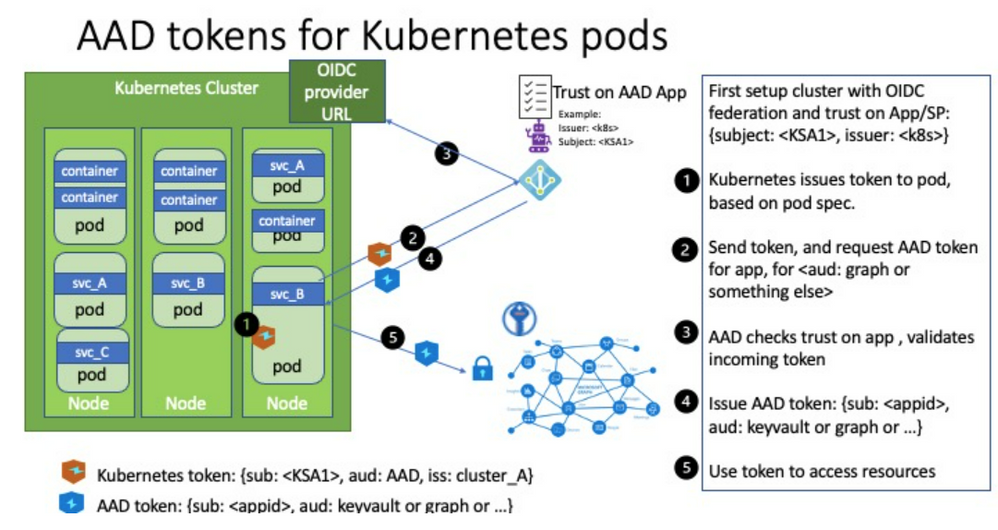
We covered managed identities in the last part so you might be thinking what’s different about this. Well, you can use managed identities where you want the cluster resource itself having access to Azure, but this doesn’t necessarily extend into the containers running in the cluster. Workload identities allows us to inject Azure AD identities into individual pods to have them perform tasks without dealing with client ids and secrets directly.
For instance it could be that the cluster needs to be able to access a container registry to provision containers – this makes sense to solve with a managed identity belonging to the cluster since that clearly comes before you have the app instances running. However, if an application running in the cluster needs access to a SQL server that is more likely to be specific to the application than cluster-wide. (I’m not accounting for shared database server setups here.)
The concept is explained on the official GitHub page for Azure Workload Identity:
https://azure.github.io/azure-workload-identity/docs/concepts.html
And in case you noticed there’s a quick start there I drew inspiration (and some files) from that, but those instructions are geared more towards you working manually from Linux or Mac. I made the necessary adjustments for it to work in a CI/CD pipeline in an automated fashion instead. If you’re trying to follow the instructions you might find them being slightly unclear in some areas and I would have to agree there can be a hurdle to get everything right at first try. The docs gets stuff done, but is not at a GA level quality yet. (Since the feature is in a preview this is to be expected, and I would rather have the team working on the code as long as I’m able to get the basics working.)
If you followed along when we looked at EasyAuth you might be thinking this is along the same lines. The lower level details are probably different, but you can understand it as something similar on a high level – “something” outside the application code performs some magic that does something for you so there is less need for the identity specific secrets to be part of the code.
As always – it’s better to illustrate with sample code. We employ the same base level as previous posts – we store Bicep code for IaC on GitHub and through federated credentials we allow GitHub Actions to reach into Azure and execute scripts.
Check out part 1 if you don’t have the basics configured yet:
https://techcommunity.microsoft.com/t5/azure-developer-community-blog/getting-rid-of-credentials-in-azure-part-1/ba-p/3265205
You’re obviously encouraged to check out part 2 & 3 as well if you haven’t, but this post has no dependencies on those.
All the code can be found on GitHub:
https://github.com/ahelland/Bicep-Landing-Zones/tree/main/credless-in-azure-samples/part-4
What we want to provision here is an Azure Kubernetes Service cluster, install/configure workload identities, and install a sample app that uses a Kubernetes Service Account to authenticate against MS Graph. Wheh, that’s a mouthful :)
It’s sort of an elaborate process so I will walk through the Action step by step and explain along the way.
Create Azure AD AKS Admin Group
We need a group in Azure AD containing the admins that are allowed to manage the cluster. Note that this is for control plane access – not data level access.
- name: Create Azure AD AKS Admin Group
      id: groupcreate
      run: |
        export appName=${{ github.event.inputs.appName }}
        adminGroupId=$(az ad group create --display-name $appName --mail-nickname $appName --query objectId)
        echo "::set-output name=adminGroupId::$adminGroupId"
We don’t actually add members to the group; you can do that separately if you like; we just need a group present. As the owner of the sub I’m working with this is not a roadblock as I can still access the cluster resource.
Deploy Azure Kubernetes Service and Azure Container Registry
We need an Azure Container Registry and a cluster plus the network to attach it to, and this is deployed with Bicep:
 - name: Deploy AKS and ACR
      uses: azure/cli@v1
      with:
        inlineScript: |
          az deployment sub create --location norwayeast
            --name ${{ github.run_number }}
            --template-file ./credless-in-azure-samples/part-4/main.bicep
            --parameters ./credless-in-azure-samples/part-4/azuredeploy.${{ github.event.inputs.environment }}.parameters.json env=${{ github.event.inputs.environment }} adminGroupId=${{ steps.groupcreate.outputs.adminGroupId }}
We’re not creating a cluster with a lot of complex configurations, hardened to the nines and things – the main thing is enabling the workload identity feature:
//Used for workload identity
oidcIssuerProfile: {
  enabled: true
}
Assign AKS RBAC role to the GitHub Action user
The GitHub Action needs to be able to configure things in the cluster, not just create it, and needs data plane admin access to do so. This is done by assigning the “Azure Kubernetes Service RBAC Cluster Admin” role.
- name: Assign AKS RBAC role to the GitHub Action user
      run: |
        aksId=$(az aks show -g rg-${{ github.event.inputs.environment }}-aks -n ${{ github.event.inputs.environment }}-aks --query id -o tsv)
        az role assignment create --role "Azure Kubernetes Service RBAC Cluster Admin" --assignee ${{ secrets.AZURE_CLIENT_ID }} --scope $aksId
When you’ve reached this step you should also go into the Azure Portal to give yourself the same permission. Even if you are the subscription admin you will not be able to look at running containers, services, etc. and without that you are not able to retrieve the IP address of the sample app. It takes a couple of minutes for the role assignment to kick in so you might as well do it now while GitHub is still working on the rest. (If you happen to look at the logs live at least; no harm done if you wait for the process to complete and then do this.)

Get OIDCUrl
The tokens issued by Kubernetes are “regular” JWTs and one of the main things is having Azure AD trust the issuer (aka your cluster). We enabled an OIDC metadata endpoint with Bicep, and since we need the url for our later steps we retrieve the url. Note that it requires the aks-preview extension to work; if you don’t have this installed you will not get a value in return when querying Azure and appear as you didn’t configure this.
 - name: Get OIDCUrl
      id: oidc
      run: |
        az extension add --name aks-preview
        az extension update --name aks-preview
        oidcUrl=$(az aks show --resource-group rg-${{ github.event.inputs.environment }}-aks --name ${{ github.event.inputs.environment }}-aks --query "oidcIssuerProfile.issuerUrl" -o tsv)
        echo "::set-output name=oidcUrl::$oidcUrl"
Get AKS Credentials
Perhaps not so surprising, but we need the credentials for the cluster to perform any actions at all.
 - name: Get AKS Creds
      run: |
        az aks get-credentials --resource-group rg-${{ github.event.inputs.environment }}-aks --name ${{ github.event.inputs.environment }}-aks
The problem with the credentials we have retrieved are that they are intended for interative use. By default you will see in the live logs that there is a code you need to use to authenticate separately outside the Action, and as you probably understand that’s sort of tricky doing in an automated fashion so we need to perform some extra steps to make it work in a pipeline.
I needed some help in figuring out the exact details of this so the next three steps are courtesy of Weinong Wang:
Get kubelogin
There’s actually a tool for manipulating the kubeconfig file:
https://github.com/Azure/kubelogin
We install it with Brew in this step.
- name: Get kubelogin
      run: |
        brew install Azure/kubelogin/kubelogin
Convert kubeconfig for non-interactive use
There are several options when it comes to the output format you want/need, and we specify workloadidentity. (Check the kubelogin repo for more details.)
- name: Convert kubeconfig for non-interactive use
      run: kubelogin convert-kubeconfig -l workloadidentity
Retrieve id-token and store it
With a more appropriate kubeconfig we can set ourselves up with a token that will allow GitHub to not only talk to Azure in general, but our AKS cluster specifically:
 - name: Retrieve id-token and store
      run: |
        IDTOKEN=$(curl -sSL -H "Authorization: bearer ${ACTIONS_ID_TOKEN_REQUEST_TOKEN}" -H "Accept: application/json; api-version=2.0" -H "Content-Type: application/json" "${ACTIONS_ID_TOKEN_REQUEST_URL}&audience=api://AzureADTokenExchange" | jq -r '.value')
        echo $IDTOKEN > ${RUNNER_TEMP}/.token
        jwtd() {
            if [[ -x $(command -v jq) ]]; then
                jq -R 'split(".") | .[0],.[1] | @base64d | fromjson' <<< "${1}"
                echo "Signature: $(echo "${1}" | awk -F'.' '{print $3}')"
            fi
        }
        jwtd $IDTOKEN
        echo "::set-output name=idToken::${IDTOKEN}"
Install Mutating Admission Webhook
Kubernetes can do automagic things when you submit yaml files, and since we neither want to (nor are we easily capable of) preprovisioning the token in our application specification we need to have a component handling the injection of the necessary variables into the running containers. This is handled by a mutating admission webhook – further explained here:
https://kubernetes.io/docs/reference/access-authn-authz/extensible-admission-controllers/
 - name: Install Mutating Admission Webhook
      env:
        AZURE_AUTHORITY_HOST: https://login.microsoftonline.com/
        AZURE_CLIENT_ID: ${{ secrets.AZURE_CLIENT_ID }}
        AZURE_TENANT_ID: ${{ secrets.AZURE_TENANT_ID }}
      run: |
        export AZURE_FEDERATED_TOKEN_FILE=${RUNNER_TEMP}/.token
        sed -i 's|${AZURE_TENANT_ID}|${{ secrets.AZURE_TENANT_ID }}|g' ./credless-in-azure-samples/part-4/azure-wi-webhook.yaml
        kubectl apply -f ./credless-in-azure-samples/part-4/azure-wi-webhook.yaml
Create Service Principal for Workload Identity
We need a separate service principal in Azure AD for our workload identity so we provision that accordingly:
- name: Create Service Principal for Workload Identity
      id: k8sSp
      run: |
        appId=$(az ad sp create-for-rbac --name sp-${{ github.event.inputs.appName }} --query appId -o tsv)
        export APPLICATION_CLIENT_ID=$appId
        export APPLICATION_OBJECT_ID=$(az ad app show --id $appId --query objectId -o tsv)
        export SERVICE_ACCOUNT_ISSUER=${{ steps.oidc.outputs.oidcUrl }}
        echo "::set-output name=APPLICATION_OBJECT_ID::$APPLICATION_OBJECT_ID"
        echo "::set-output name=APPLICATION_CLIENT_ID::$APPLICATION_CLIENT_ID"
Install Service Account
Using the attributes of the service principal we just created we provision a service account in our cluster:
- name: Install Service Account
      env:
        AZURE_AUTHORITY_HOST: https://login.microsoftonline.com/
        AZURE_CLIENT_ID: ${{ secrets.AZURE_CLIENT_ID }}
        AZURE_TENANT_ID: ${{ secrets.AZURE_TENANT_ID }}
      run: |
        export AZURE_FEDERATED_TOKEN_FILE=${RUNNER_TEMP}/.token
        sed -i 's|${SERVICE_ACCOUNT_NAMESPACE}|azure-workload-identity-system|g; s|${SERVICE_ACCOUNT_NAME}|workload-identity-sa|g; s|${APPLICATION_CLIENT_ID}|${{ steps.k8sSp.outputs.APPLICATION_CLIENT_ID }}|g' ./credless-in-azure-samples/part-4/service-account.yaml
        kubectl apply -f ./credless-in-azure-samples/part-4/service-account.yaml
Establish Federated Credential
Once we have the service principal in Azure AD and the service account in Kubernetes we create a federation between the two:
- name: Establish Federated Credential
      continue-on-error: true
      run: |
        sed -i 's|${SERVICE_ACCOUNT_NAMESPACE}|azure-workload-identity-system|g; s|${SERVICE_ACCOUNT_NAME}|workload-identity-sa|g; s|${SERVICE_ACCOUNT_ISSUER}|${{ steps.oidc.outputs.oidcUrl }}|g' ./credless-in-azure-samples/part-4/federated-credential.json
        az rest --method POST --uri "https://graph.microsoft.com/beta/applications/${{ steps.k8sSp.outputs.APPLICATION_OBJECT_ID }}/federatedIdentityCredentials" --body @./credless-in-azure-samples/part-4/federated-credential.json
The step is set to continue on error. This is because after the initial run-through the API will throw an error since the credential has already been created. I didn’t bother with making this more robust with conditionals.
If you delete the cluster you should also either delete the federated credential or the service principal itself (named sp-credless-aks) or you might run into other issues.
Retrieve name of Container Registry
We want our AKS cluster to pull from our own registry, and that requires us to know the name of the registry. (Since the name needs to be globally unique we have a random element in the name and we need to query Azure to figure out what the resource is actually called.)
 # We are making the assumption you have only one registry in the ACR resource group
    - name: Retrieve name of Container Registry
      id: getACRName
      uses: azure/powershell@v1
      with:
        inlineScript: |
          $acrName=(az acr list -g rg-${{ github.event.inputs.environment }}-aks-acr -o tsv --query [0].name)
          echo "::set-output name=acrName::$acrName"
        azPSVersion: "latest"
Integrate ACR and AKS
Instead of supplying credentials in the deployment yaml files we set up ACR to trust our AKS cluster. This is technically done behind the scenes by creating managed identities and assigning a role, so we could embed it as part of our Bicep, but for our sample it’s more flexible doing it with a simple Azure cli command.
- name: Integrate ACR and AKS
      run: |
        az aks update -n ${{ github.event.inputs.environment }}-aks -g 'rg-${{ github.event.inputs.environment }}-aks' --attach-acr ${{ steps.getACRName.outputs.acrName }}
Build and push backend container to ACR
This is where things get more exotic if you are used to using a client id and secret to acquire a token from Azure AD in your code.
Actually, let’s rewind things one step, to explain what we want to do. We said that we wanted an application calling into the MS Graph deployed as part of this Action. Mainly as a proof things are working more than doing anything useful. For the purposes of this demo we do this API call as a backend task and create a separate C# solution for that. (You can run through the API project wizard in Visual Studio to get something similar to the code here.)
We perform some MSAL trickery using our federated identity to acquire a new token:
// <directives>
using Azure.Core;
using Microsoft.Identity.Client;
// <directives>

public class MyClientAssertionCredential : TokenCredential
{
    private readonly IConfidentialClientApplication _confidentialClientApp;

    public MyClientAssertionCredential()
    {
        // <authentication>
        // Azure AD Workload Identity webhook will inject the following env vars
        // 	AZURE_CLIENT_ID with the clientID set in the service account annotation
        // 	AZURE_TENANT_ID with the tenantID set in the service account annotation. If not defined, then
        // 		the tenantID provided via azure-wi-webhook-config for the webhook will be used.
        // 	AZURE_FEDERATED_TOKEN_FILE is the service account token path
        var clientID = Environment.GetEnvironmentVariable("AZURE_CLIENT_ID");
        var tokenPath = Environment.GetEnvironmentVariable("AZURE_FEDERATED_TOKEN_FILE");
        var tenantID = Environment.GetEnvironmentVariable("AZURE_TENANT_ID");

        _confidentialClientApp = ConfidentialClientApplicationBuilder.Create(clientID)
                .WithClientAssertion(ReadJWTFromFS(tokenPath))
                .WithTenantId(tenantID).Build();
    }

    public override AccessToken GetToken(TokenRequestContext requestContext, CancellationToken cancellationToken)
    {
        return GetTokenAsync(requestContext, cancellationToken).GetAwaiter().GetResult();
    }

    public override async ValueTask<AccessToken> GetTokenAsync(TokenRequestContext requestContext, CancellationToken cancellationToken)
    {
        AuthenticationResult result = null;
        try
        {
            result = await _confidentialClientApp
                        .AcquireTokenForClient(requestContext.Scopes)
                        .ExecuteAsync();
        }
        catch (MsalUiRequiredException ex)
        {
            // The application doesn't have sufficient permissions.
            // - Did you declare enough app permissions during app creation?
            // - Did the tenant admin grant permissions to the application?
        }
        catch (MsalServiceException ex) when (ex.Message.Contains("AADSTS70011"))
        {
            // Invalid scope. The scope has to be in the form "https://resourceurl/.default"
            // Mitigation: Change the scope to be as expected.
        }
        return new AccessToken(result.AccessToken, result.ExpiresOn);
    }

    public string ReadJWTFromFS(string tokenPath)
    {
        string text = System.IO.File.ReadAllText(tokenPath);
        return text;
    }
}
This is invoked when the frontend calls into the API, and we subsequently call into the MS Graph to acquire the organization name of the tenant:
using Microsoft.AspNetCore.Mvc;
using Microsoft.Graph;

namespace workload_identity_backend.Controllers
{
    [Route("api/[controller]")]
    [ApiController]
    public class GraphController : ControllerBase
    {
        [HttpGet]
        public ActionResult<IEnumerable<string>> Get()
        {
            GraphServiceClient GraphClient = new GraphServiceClient(new MyClientAssertionCredential());
            var graphOrg = GraphClient.Organization.Request().GetAsync().Result;
            var orgName = graphOrg[0].DisplayName;
            return new string[] { orgName };
        }
    }
}
This is based on a sample from the workload identity team:
https://github.com/Azure/azure-workload-identity/tree/main/examples/msal-net/akvdotnet
The code for the app is stored in the same repo as the rest of our setup, so what we do is have the Action also package up things into a Docker image and push to our container registry at the same time – no external dependencies here.
 - name: Build and push backend container to ACR
      run: |
        cd ./credless-in-azure-samples/part-4/workload-identity-app/workload-identity-backend
        az acr build --registry ${{ steps.getACRName.outputs.acrName }} --image workload-identity-backend:${{ github.run_number }} .
Build and push frontend container to ACR
The sample app is clearly not very advanced, so you could ask why we have a frontend and not just a single web app that does it all. There’s always the benefit of verifying that the Kubernetes network is up to scratch of course, but on a feature level in AKS there are things that we have not configured – we’re not doing SSL, which in turn means we’re not able to do login for users, and we haven’t set up DNS either ending up accessing the app over plain http with a public IP address. So, while it’s not a security mechanism per se it’s cleaner to do the auth pieces on the backend where it’s less accessible. (Not that I recommend this to be used as-is outside PoC use anyways.)
@page "/"
@using Microsoft.Extensions.Configuration;
@using System.Net.Http;
@inject IConfiguration configuration;

<PageTitle>Workload Identity - Frontend</PageTitle>

<h1>Workload Identity Graph Lookup</h1>

<p>
    It looks like your tenant organization name is @orgName. <br />
    And if the above line doesn't look right; well then there's a bug in the setup somewhere.
</p>

@code {
    protected string orgName = string.Empty;

    protected override Task OnInitializedAsync()
    {
        using (var client = new HttpClient())
        {
            var apiAddress = configuration.GetSection("API")["api_address"];
            string requestUrl = apiAddress;
            HttpRequestMessage request = new HttpRequestMessage(HttpMethod.Get, requestUrl);
            HttpResponseMessage response = client.SendAsync(request).Result;
            var responseString = response.Content.ReadAsStringAsync().Result;
            orgName = responseString;
        }
        return base.OnInitializedAsync();
    }

}
So, we package up and upload the frontend image the same way as the backend.
    - name: Build and push frontend container to ACR
      run: |
        cd ./credless-in-azure-samples/part-4/workload-identity-app/workload-identity-frontend
        az acr build --registry ${{ steps.getACRName.outputs.acrName }} --image workload-identity-frontend:${{ github.run_number }} .
Add Permissions
The federated identity is tied to the service principal we created, and using the Graph still requires having permission to do so. Since we perform this as a server side app we need an application permission (as opposed to a delegated permission when accessing things as a user) and I’ve chosen User.Read.All for this. The thing is that this requires admin consent to actually work and Azure doesn’t like one non-interactive user granting access for another non-interactive user so running the script like this will not work out of the box.
    - name: Add Permissions (MS Graph User.Read.All)
      # Note that the grant/consent step will not work unless extra permissions are given to the GitHub Action Service Principal,
      # but it will appear to go through and not present an error for the pipeline execution.
      run: |
        az ad app permission add --id ${{ steps.k8sSp.outputs.APPLICATION_CLIENT_ID }} --api 00000003-0000-0000-c000-000000000000 --api-permissions df021288-bdef-4463-88db-98f22de89214=Role
        az ad app permission grant --id ${{ steps.k8sSp.outputs.APPLICATION_CLIENT_ID }} --api 00000003-0000-0000-c000-000000000000
There’s two main workarounds for this – throw the GitHub Action user into something like the Global Admin role (the permission to read the Graph is not on the subscription level, but on the AAD tenant), or manually login to the portal and click the “OK” button :) (I chose option #2.)

The Action step will still go through without errors even it the permission isn’t actually granted.
Deploy workload-identity-app
If everything checked out so far we’re at the step where the sample app is deployed. Just replace the necessary variable replacements and off you go.
- name: Deploy workload-identity-app
      env:
        AZURE_AUTHORITY_HOST: https://login.microsoftonline.com/
        AZURE_CLIENT_ID: ${{ secrets.AZURE_CLIENT_ID }}
        AZURE_TENANT_ID: ${{ secrets.AZURE_TENANT_ID }}
      run: |
        export AZURE_FEDERATED_TOKEN_FILE=${RUNNER_TEMP}/.token
        sed -i 's|${FRONTEND_IMAGE}|${{ steps.getACRName.outputs.acrName }}.azurecr.io/workload-identity-frontend:${{ github.run_number }}|g; s|${BACKEND_IMAGE}|${{ steps.getACRName.outputs.acrName }}.azurecr.io/workload-identity-backend:${{ github.run_number }}|g' ./credless-in-azure-samples/part-4/workload-identity-app/workload-identity-app.yaml
        kubectl apply -f ./credless-in-azure-samples/part-4/workload-identity-app/workload-identity-app.yaml
You can use your cli locally and get credentials for connecting to the cluster, but if you just want to browse the app it’s probably quicker to go to the Azure Portal and have a look in the Services and Ingresses blade:

Since we had the manual step with granting permissions you might get lucky and see a response immediately, or it might take a little while before it ends up looking like this:

I don’t know about you, but I think this is a pretty neat party trick :)
Closing remarks
Clearly you would want to separate the provisioning of the cluster and packaging & deploying an app if you want to take things further, but either way it shows how useful workload identities can be.
You might also interject that I have tons of things I’m not doing here (that I should be doing) like making it work with a service mesh, or do deployments with Flux, etc. I’d love to do something like that, but that’s not a task for today :)
We have just created one workload identity and we haven’t really done anything to prevent different apps from re-using the same identity. This could lead to very bad things depending on which permissions you grant to the service principal, so do make sure you have a handle on this before going live.
Are we done yet? With this post – yes. With the series – no :) This was mostly infra details with some magic in the background, but we’ll need to work more on the user-facing pieces.


Recent Comments