May 2022 – Microsoft 365 US Public Sector Roadmap Newsletter
This article is contributed. See the original author and article here.
Release News |
Exchange Online and Outlook
We will be retiring Data Loss Prevention experience from the classic Exchange Admin Center
SharePoint / OneDrive for Business
The web player for audio & video files that are stored in ODSP is updated with new features
Teams
Microsoft will soon retire Teams PowerShell Module versions below 4.x.x
Users will be able to discover Teams apps in the store and request approval from admins – GCC
Announcing data purge capabilities for Microsoft Teams content
Users will be able to discover Teams apps in the store and request approval from admins – GCC
Compliance
Announcing Communication Compliance integration with Power Automate
Updates to retention auto-labeling policy scoping coming soon
New machine learning classifier for customer complaints coming soon to public preview
Microsoft 365
M365 Apps Admin Center: Office Cloud Policy Service new look
Understand the layout of an Excel workbook using the navigation pane
Adding support for rich text and images in the Microsoft Planner task notes field
Project for the web and Roadmap available for GCC environment
Retirement of the license service for Office 2010 subscription
Common Area Phone licenses now include Exchange Online Plan 2, AAD P1 and Microsoft Intune
References and Information Resources |
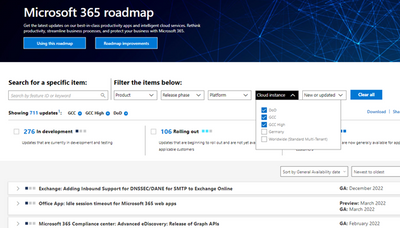
Microsoft 365 Public Roadmap
This link is filtered to show GCC, GCC High and DOD specific items. For more general information uncheck these boxes under “Cloud Instance”.
New to filtering the roadmap for GCC specific changes? Try this:
Stay on top of Office 365 changes
Here are a few ways that you can stay on top of the Office 365 updates in your organization.
Microsoft Tech Community for Public Sector
Your community for discussion surrounding the public sector, local and state governments.
Microsoft 365 for US Government Service Descriptions
- Office 365 Platform (GCC, GCCH, DoD)
- Office 365 U.S. Government GCC High endpoints
- Office 365 U.S. Government DoD endpoints
- Compliance (GCC, GCCH, DoD)
- Enterprise Mobility & Security (GCC, GCCH, DoD)
- Microsoft Defender for Endpoint (GCC, GCCH)
- Microsoft Cloud App Security (GCCH)
- Microsoft Defender for Identity Security (GCCH)
- Azure Information Protection Premium
- Exchange Online (GCC, GCCH, DoD)
- SharePoint (GCC, GCCH, DoD)
- OneDrive (GCC, GCCH, DoD)
- Teams (GCC, GCCH, DoD)
- Office ProPlus (GCC, GCCH, DoD)
- PowerApps (GCC, GCCH, DoD)
- Power Automate US Government (GCC, GCCH, DoD)
- Power BI (GCC, GCCH)
- Planner (GCC, GCCH, DoD)
- Outlook Mobile (GCC, GCCH, DoD)
- Viva Insights (GCC)
- Dynamics 365 US Government
Be a Learn-it-All |
Public Sector Center of Expertise
We bring together thought leadership and research relating to digital transformation and innovation in the public sector. We highlight the stories of public servants around the globe, while fostering a community of decision makers. Join us as we discover and share the learnings and achievements of public sector communities.
Microsoft Teams for Gov YouTube Video Series
The hub for teamwork in Office 365 GCC, GCC High, & DoD
Microsoft Teams for US Government Adoption Guide

Message Center Posts and Updates for Microsoft Teams in GCC |
Looking for what’s on the map for Microsoft Teams and only Teams in GCC?
Go right to the GCC Teams Feature Communications Guide
Message Center Highlights |
SharePoint Online
MC361749 — Section Templates now available in SharePoint Pages
Microsoft 365 Roadmap ID 88838
Section Templates curated for beautiful image and text combinations can now be added in the plus menu.
When this will happen:
Targeted Release (select users and entire org): We will begin rolling this out in late April and expect to complete rollout early May.
Standard: We will begin rolling this out in mid-May and expect to complete rollout late May.
How this will affect your organization:
Authors of SharePoint Pages and News will be able to access section templates from the plus menu in a new tab next to the sections tab.
Section templates can be utilized when authoring SharePoint pages. Users will be able to choose and add templates at the section level instead of just at the page level. Although users will still have access to blank sections, we have implemented six templates to make section design easier.

These templates include fixed aspect ratios on the image webpart to automatically keep images within a template looking consistent with one another. However, this can be overridden when editing an image.

Once elements are added to the canvas, they can be added and deleted just like manually added section elements, but now users have a sleek and inspirational starting point.

What you need to do to prepare:
You do not need to do anything to prepare for this update but might want to notify your users about this change and update your training and documentation as appropriate.
MC355214 — SharePoint: Updates to channel site layouts and parent site settings
Microsoft 365 Roadmap ID 88963
Two updates are coming for the SharePoint sites that get created for every team and private channel in Microsoft Teams. The first update is to simplify the layout for all private channel sites to make them more useful and easier to navigate between the parent site and the associated team. The second update is to adjust the way site theme and navigation is inherited when the Teams-connected sites are added to a hub site.
When will this happen:
Targeted release (select users and entire org): will begin rolling out in mid-April and be complete by late April
Standard: will begin rolling out in early May and be complete by late May
How this will affect your organization:
The first update improves the layout for channel (private and shared) sites. The new page layout features the News, Documents, Quick links, and Activity web parts. The Quick links webpart displays links to additional guidance for popular tasks that can improve the value of your site.

The second update improves the relationship between Teams-connected sites and hub sites. This update streamlines the process of associating Teams-connected sites with hub sites.
With this update:
· Hub site associations get managed at the parent site level for the entire team.
· When a Teams-connected site is associated with a hub, the parent site and all channel sites will inherit the hub’s theme and navigation.
· Any private channel sites that are currently associated to a hub will have this connection removed.
What you need to do to prepare:
You do not need to do anything to prepare for these updates. However, if you currently have private channel sites associated with hub sites, you will need to plan to associate the parent team site with the hub site once this update reaches your tenant.
Learn more:
· Overview of Teams and SharePoint integration
MC350768 — SharePoint: Create from the SharePoint app bar
Microsoft 365 Roadmap ID 82160
Apologies for the delayed release of this new feature. Resources in the SharePoint app bar are expanding to include the ability to create sites, files, and lists as an action.
Key points:
· Timing:
o Targeted Release (select users and entire org): will begin rolling out in mid-April and will complete by late April
o Standard: will begin rolling out in early May and will complete by mid-May.
· Action: Action: review and assess
· Roll-out: tenant level
How this will affect your organization:
This new feature will allow users to create sites, files, and lists from within the SharePoint app bar. Users will be able to select the Create command (the plus sign) on the app bar and then select an option from SharePoint sites, Microsoft Lists, or Office files (Word, PowerPoint, Excel, and OneNote). As users create each of the different assets included in the panel, they will launch the create experience for each format.
· Note: The new create command cannot be disabled or customized. However, if you have previously disabled self-service site creation, the option to create a site will not appear on the create panel
· Site creation will launch the SharePoint site creation panel in the site you are in; if you are in a hub, the site will be associated with this hub when created
· List creation will open in a new tab and take you to the create experience in Microsoft Lists
· Office files will create the document in your OneDrive site until you save to a different location
What you need to do to prepare:
You do not need to do anything to prepare. The SharePoint app bar cannot be customized. If you have not already enabled and customized global navigation in the SharePoint app bar, it’s highly recommended that you do so to take advantage of the best navigational experience for end users.
Learn more:
· Use the new SharePoint app bar and set up global navigation
MC341151 — (Updated) Large Folder Delete on OneDrive and SharePoint Document Libraries on Web
Microsoft 365 Roadmap ID 88979
Updated April 14, 2022: We have updated the rollout timeline below. Thank you for your patience.
Currently large folders (>10k items) cannot be deleted from OneDrive and SharePoint Document Libraries on web. With this new feature we will allow users to delete them. The process of deleting a large folder will be the same as deleting any small folder on the web today.
When this will happen:
We will begin rolling out in mid-March and expect the rollout to be completed by late April (previously early April).
Note: Some users may see this feature before other users within your organization.
How this will affect your organization:
Users will now be able to delete large folders (>10k items) OneDrive and SharePoint Document Libraries on web. If a user tries to delete a shared folder that another user has already started deleting, they will see an error message, “This item is already being deleted.” Deleted folders will still be available in the site Recycle Bin.
What you need to do to prepare:
No action is required.
MC337328 — (Updated) New Microsoft 365 Lists entry point in the SharePoint app bar
Microsoft 365 Roadmap ID: 85641
Updated April 01, 2022: We have updated the rollout timeline below. Thank you for your patience.
Resources in the SharePoint app bar will be expanding to include an entry point to Microsoft 365 Lists.
· Microsoft 365 Lists content is personalized to the individual user
Note: The new Microsoft 365 Lists entry point cannot be disabled or customized.
Key points:
· Timing:
o GCC-High/DoD: will begin rolling out in mid-March and is expected to be complete in mid-April (previously late March).
· Roll-out: tenant level
· Action: Action: review and assess
How this will affect your organization:
This new feature will allow users to be able to easily access and view Microsoft 365 Lists from the SharePoint app bar that have been followed and viewed often. In the Lists panel, users will be able to select the label to navigate to the Microsoft 365 Lists app. Additionally, users will be able to select the breadcrumb where they’ll navigate to the SharePoint site where the List is located.
· Lists that belong to an individual person and have not been shared with others will not be accessible.
What you need to do to prepare:
You do not need to do anything to prepare. Microsoft 365 Lists cannot be disabled or customized. If you have not already enabled and customized global navigation in the SharePoint app bar, it’s highly recommended that you do to take advantage of the best navigational experience for end users.
Learn more:
· Use the new SharePoint app bar and set up global navigation
· Microsoft Lists help & learning
MC336858 — OneDrive and SharePoint: Access your Teams standard and private channel files
Microsoft 365 Roadmap ID 88911
Updated April 05, 2022: We have updated the content below with additional details.
With this new feature, users that navigate to a site in SharePoint or OneDrive will be able to access the files stored in the Teams standard and private channels associated with that site. Users will see an “In channels” section when you navigate to the default document library of a Teams-connected site. This functionality will be available in OneDrive & SharePoint web, including experiences like the Move/Copy Picker.
When this will happen:
Targeted release (select users and entire org): will begin rolling out in mid-April (previously late March) and expect to complete rollout late April (previously early April).
Standard: will begin rolling out in late April (previously early April) and expect to complete rollout mid-May (previously late April).
How this will affect your organization:
When a user navigates to the document library of a SharePoint site associated with a team, the “In channels” section will be visible and collapsed by default. The “In channels” section will include all standard and private channels within the Team, and private channels will be distinguished with a specific icon. When shared channels become available, they will also appear in this section. The “In channels” section will only appear when a user navigates to the default document library of a SharePoint site that’s connected to a Team. The “In channels” section will not be visible if the SharePoint site is not connected to Teams.
· The impact of this work is that all Teams channels will be discoverable within a single SharePoint site, as opposed to navigating to the separate SharePoint site associated with each private or shared channel. This aligns with how end users currently work with channels in Teams.
· There will be no change to private channel disclosure as part of this change. For example, a user will only see the private channels that they explicitly have access to—regardless of whether they access them from OneDrive, SharePoint or Teams.
What you need to do to prepare:
This change will only impact SharePoint sites that are connected with a Team, and the “In channels” section will only be visible in the document library where Teams channels content is stored.
You should be aware that there will be no duplication of entries between the “In channels” and “In site library” lists. This means that, if a folder is associated with both a Teams channel and the document library, it will only appear in the “In channels” list.
· This was based on customer feedback that duplication of entries between the list was confusing and made the “In site library” list unnecessarily long. The impact of this decision is that, if an end user expects to find a folder within the document library, they will now need to look under the “In channels” section.
You might want to notify your end users, update your user training and prepare your help desk as part of this change.
MC295021 — (Updated) New Microsoft 365 Lists entry point in the SharePoint app bar
Microsoft 365 Roadmap ID 85641
Updated April 01, 2022: We have updated the rollout timeline below. Thank you for your patience.
Resources in the SharePoint app bar will be expanding to include an entry point to Microsoft 365 Lists.
· Microsoft 365 Lists content is personalized to the individual user
Note: The new Microsoft 365 Lists entry point cannot be disabled or customized.
Key points:
· Timing:
o Targeted release: will begin rolling out in early January (previously late November) and is expected to be complete in mid-January (previously early December).
o Standard: will begin rolling out in mid-March (previously late January) and is expected to be complete in mid-April (previously late March).
· Roll-out: tenant level
· Action: Action: review and assess
How this will affect your organization:
This new feature will allow users to be able to easily access and view Microsoft 365 Lists from the SharePoint app bar that have been followed and viewed often. In the Lists panel, users will be able to select the label to navigate to the Microsoft 365 Lists app. Additionally, users will be able to select the breadcrumb where they’ll navigate to the SharePoint site where the List is located.
· Lists that belong to an individual person and have not been shared with others will not be accessible.
What you need to do to prepare:
You do not need to do anything to prepare. M365 Lists cannot be disabled or customized. If you have not already enabled and customized global navigation in the SharePoint app bar, it’s highly recommended that you do to take advantage of the best navigational experience for end users.
Learn more:
· Use the new SharePoint app bar and set up global navigation
· Microsoft Lists help & learning
MC291100 — (Updated) Private drafts for SharePoint pages and news
Microsoft 365 Roadmap ID 85629
Updated April 21, 2022: Based on learnings from our early rings, we have made the decision to make additional changes before we proceed with the rollout. We will deliver a new Message center post once we re-start the rollout. Thank you for your patience.
This new feature will provide users the ability to create private drafts for pages and news posts. A private draft will be visible to only the page author, the people the author chooses to share it with, and site admins. Users will be able to create and edit content that’s not ready for others to see except the people with whom users want to collaborate.
When this will happen:
We will communicate via Message center when we are ready to proceed.
How this will affect your organization:
Authors of SharePoint pages and news will be able to create private drafts. When a private draft is created, only the creator and site admins can see the page (including from within the Pages library). The creator can then share the private draft with other people to allow them to access and edit the page. They will also have access to the assets associated with the page which are stored in the site’s assets library.
Like all pages and news posts, only one person at a time can edit the draft. When the draft is published, its permissions will be reset and everyone in your organization who has access to the site will be able to view it.
What you need to do to prepare:
You might want to notify your users about this new capability and update your training and documentation as appropriate.
Learn more:
· Create a private SharePoint page or news post
OneDrive for Business
MC362284 — OneDrive sync app will automatically configure accounts
Microsoft 365 Roadmap ID 93242
This release will enable the OneDrive sync app to sign into an account even quicker. Users will experience an improved single sign-on experience by automatically being able to see their OneDrive files within their file browser upon sign in or OneDrive app update.
· On Windows, users who are signed into the device with an Azure Active Directory (AAD) account will see their OneDrive folder start syncing without entering their account credentials.
· On macOS, users who are signed into another Microsoft app (i.e., Office, Teams, Edge, etc.) will see their OneDrive folder start syncing without entering their account credentials.
When this will happen:
We will begin rolling out in mid-June and expect to complete by late July.
How this will affect your organization:
If OneDrive is running in the background, it will periodically try to sign in with an existing AAD credential that is made available to Microsoft applications. This new capability will replace our existing Windows policy of SilentAccountConfig and is brand new for macOS. If you previously had SilentAccountConfig enabled, then you will see no difference in behavior. If you have never enabled this policy, then as long as OneDrive is configured to run in the background, you will have a more streamlined experience onboarding to OneDrive.
What you need to do to prepare:
Ensure that your OneDrive is set up to run in the background. On macOS you can confirm this by setting the “OpenAtLogin” plist. OneDrive already runs in the background on Windows.
If you would like to disable this, then there is a new policy and plist item in build 22.065 called “DisableAutoConfig”. If you set this to 1, it will disable this new automatic account configuration.
MC357317 — (Updated) OneDrive iOS: New information architecture
Microsoft 365 Roadmap ID 85571
Updated April 21, 2022: We have updated the rollout timeline below. Thank you for your patience.
This feature has started rolling out and we ask you to pardon that we did not provide adequate advance notice as is our customer commitment to you. This release adds a new bottom sheet menu to OneDrive for iOS to make options like share, annotations, delete, and bookmark easier to find.
When this will happen:
Standard (select users and entire org): We began rolling this out in early March and expect to complete rollout in mid-May (previously mid-April).
How this will affect your organization:
To use the new bottom sheet menu:
1. Open any file of your choice in OneDrive for iOS.
2. Tap the horizontal bar or drag the bottom menu upwards to expand the new menu.
The menu will show relevant actions for the specific type of file you’ve opened.

To help you navigate, we’ve compiled a list of available actions:

What you need to do to prepare:
You might want to notify your users about this new capability and update your training and documentation as appropriate.
MC299920 — (Updated) OneDrive: Sync client support for Apple Silicon (Preview)
Microsoft 365 Roadmap ID 82035
Updated April 12, 2022: We have updated the rollout timeline below. Thank you for your patience.
A preview of OneDrive sync that runs natively on Apple silicon is coming to devices in the Current Channel (Preview).
· Following the preview release to Current Channel (Preview), it will release GA.
If you are not interested in the preview of OneDrive sync that runs natively on Apple silicon, you can safely disregard this message.
When this will happen:
· Current Channel (Preview): We will begin rolling this out in early December and expect to complete rollout mid-December. – Complete
· Standard: We will begin rolling this out in mid-February (previously late January) and expect to complete by late April (previously late March).
o There will be no preview release
How this will affect your organization:
All functionality is the same as it is in the 32-bit and 64-bit installations.
What you need to do to prepare:
To enable the preview, users will need to have joined the Current Channel (Preview) and enabled the preview in OneDrive Settings > About. Users can also opt out in OneDrive Settings > About.
You might want to notify users that the ARM install is available as a preview, update your user training, and prepare your help desk.
Power Platforms
MC362053 — Update firewall configurations for Power Automate flow IP addresses by May 15, 2022
New IP addresses have been added for Azure Logic Apps for availability zone support to provide increased resiliency and availability for your Power Automate flows. This will affect some Power Automate flows as calls made from a flow may go directly through the Azure Logic App service. If you have firewall configurations that allow communication with Logic Apps IP addresses, you will need to update them with new addresses for Logic Apps and Connectors.
You can view this article to learn more about availability zones.
How does this affect me?
You are receiving this email because one or more of your flows could be affected by a change.
Beginning on May 15, these new IP addresses may also be used for new and existing flows, and you will be required to update your firewall configurations for them.
What actions do I need to take?
To ensure that your flows continue to work as expected, update your firewall configurations to include the IP addresses for both Logic Apps and Connectors as soon as possible.
If you don’t have this type of firewall configuration, you will not be affected by this change and do not need to take any action.
If you have questions, please see IP address configuration or you may contact Microsoft Support.
MC357303 — Announcing the General Availability of Power Platform’s latest Data Loss Prevention (DLP) capabilities
Power Platform has invested heavily in extending its Data Loss Prevention (DLP) offering, and we are pleased to announce the general availability of two advanced capabilities, DLP connector action controls and DLP for custom connectors, that will provide administrators with a level of control that is unmatched in the industry.
What can I accomplish with these capabilities?
DLP connector action control enables admins to easily allow/block specific connector actions for each connector. For example, you could block the Delete row (V2) action for the SQL Server connector.
DLP for custom connectors enables admins to apply well known DLP constructs – like connector classification (business, non-business, blocked) – to a newer breed of connectors named custom connectors.
Important!
DLP connector endpoint filtering remains in Public Preview and we’ve postponed the general availability originally announced for March 31st, 2022. We will notify you when a new date has been scheduled and you can learn more about the feature here.
Where can I learn more?
We are confident that this new set of advanced DLP capabilities will help your organization strike a balance between productivity and protection. These features are now available for all customers in all supported regions. Want to learn more about using advanced DLP controls in your organization? Here are some resources to help you get started:
· Read the online documentation on DLP connector action control and DLP for custom connectors.
· Understand what best practices to follow when establishing a DLP strategy.
· Complete the Microsoft Learn course about Planning and Managing your Power Platform environments.
· Learn more about Data Loss Prevention policies and Power Platform governance.
Microsoft Teams
MC364774 — Policy operations details in enhanced activity log
Microsoft 365 Roadmap ID 90712
The enhanced Activity log will help admins by providing enough clarity on various policy operations such as batch policy assignment of more than 20 users, group policy assignment, and group policy unassignment. Admins can now easily track such policy operations in activity log by looking at detailed information to get more clarity and understanding.
When this will happen:
This feature will begin rolling out in early May and will be fully completed by mid-June.
How this will affect your organization:
When you execute group policy assignment operation via Microsoft Teams admin center or PowerShell, you can view the status in activity log with more enhanced details. The activity log now will display details around policy operation such as activity name, group name, policy type, policy name, submitted by, submitted time, completion time, impacted users, and overall status. The activity log can be easily accessed through Microsoft Teams admin center.
Policy propagation to users has also been enhanced and now will take up to 24 hours to take effect on the number of impacted users. Please note, this is the maximum time taken by the system to complete a policy operation.

What you need to do to prepare:
Review the activity log to understand how you can make use of new details that are now available for a policy operation. If you are planning to execute assign policy to a group via Microsoft Teams admin center or PowerShell, then make sure to go to the activity log to track the operation. These details are added to help you understand when the policy changes take effect on the users.
MC364307 — Show As now available in Teams Meetings
Microsoft 365 Roadmap ID 93145
Microsoft Teams users will soon be able to set individual “Show As” statuses to meetings. Currently the default “Show As” value for all the meetings an organizer creates is “Busy”.
When this will happen:
We expect to begin rolling this out in late April and expect the rollout to be completed by late June.
How this will affect your organization:
As an organizer, while creating the meeting in the action bar you can choose to set Show As status of the meeting, when the participants RSVP, this status will automatically reflect for the meeting for them. You can also create private meetings and appointments for one-self and with participants using Show As.
As a participant, you can choose to set your individual status of the meeting through Show As independent of status set by RSVP. The updated status will reflect on your calendar.
Note: No impact for admin users.


What you need to do to prepare:
No action required but you may want to update your documentation accordingly.
MC363211 — Download During-Meeting Attendance Report CSV in GCCH
During a meeting, organizers can now download an Attendance Report (CSV files) from the People’s pane in the meeting window.
We apologize for not communicating about this feature release prior to rolling it out.
When this will happen:
This feature is available now.
How this will affect your organization:
This feature allows meeting organizers to download the attendance information during the meeting.
What you need to do to prepare:
Determine if you would like to enable the Teams attendance report and you may consider updating your training and documentation as appropriate.
· Microsoft Teams meeting attendance report
· View and download meeting attendance reports in Teams
MC362756 — Anonymous user support for Live Captions in Microsoft Teams
Microsoft 365 Roadmap ID 93049
Participants who join Microsoft Teams meetings as Anonymous users will now be able to turn on and view Live Captions, CART captions and captions in other spoken language in Teams Meetings on desktop.
When this will happen:
This is available now. We apologize for not communicating this change prior to it becoming available.
How this will affect your organization:
From within a meeting, Users can enable Live Captions by going to More > Turn on live captions.
What you need to do to prepare:
You might want to notify your users about this new capability and update your training and documentation as appropriate.
MC361748 — Announcement – Teams user and device usage report and Graph API data source change, and Teams team usage release – GCCH & DoD
Microsoft 365 Roadmap ID 85546
We are making an improvement to the underlying data source that powers that Teams User usage report and Teams Device usage report in the Microsoft 365 Admin Center. We are also synchronizing this data source change to the similar reports that show up in Teams Admin Center.
Additionally, we are releasing new feature – Teams team usage report in GCC-High and DoD.
When this will happen:
We expect this rollout to begin in late April and expect the rollout to be fully completed by early May.
Note: During this rollout timeframe the reports across the two admin centers are not going to match. Once the rollout is completed that issue should be resolved.
How this will affect your organization:
You can continue to rely on the data available in the Microsoft 365 Admin Center. We will update this announcement when the data source for the reports in the Teams Admin Center starts to match that of Microsoft 365 Admin Center. This change is part of our ongoing commitment to offer reliable and accurate reporting for product usage.
You will see new report – Teams team usage report
What you need to do to prepare:
No action is required. You may want to update your documentation accordingly.
MC359519 — Attendance dashboard available in GCC
Microsoft 365 Roadmap ID 87061
This reporting dashboard will appear as a tab in the meeting detail providing:
· Attendance information for Teams regular meetings
· Registration information for Webinar prior to the meeting
· Joined registration and attendance data after the meeting
When this will happen:
We will begin rollout in mid-April and be complete by early May.
How this will affect your organization:
Once available, this will allow meeting organizer to view the registration/attendance information in the dashboard without having to download the reports.
Feature will be rolling out default ON, IT admins can disable the attendance dashboard, turn off the AllowEngagementReport policy in the Teams admin center, go to Meetings > Meeting policies, and set the policy to Disabled. Or in PowerShell: Set-CsTeamsMeetingPolicy -Identity YOUR_USER_GROUP -AllowEngagementReport “Disabled”

What you need to do to prepare:
Determine if you would like to enable the Teams attendance report and you may consider updating your training and documentation as appropriate.
MC359518 — New Lobby Setting: Only Invited Users join directly for GCC
Microsoft 365 Roadmap ID 86069
We are updating the “Who can bypass lobby” setting to provide more control for meeting organizers.
When this will happen:
We will begin rolling out in mid-April and expect to complete by late April
How this will affect your organization:
We’re adding, “People I invite” as an option to the “Who can bypass lobby?” setting.
Only the participants invited by the organizer in the meeting invite will be able to join the meeting directly. Everyone else will be sent to the lobby.
What you need to do to prepare:
You may consider updating your training and documentation as appropriate.
MC358529 — Microsoft Teams: Roaming bandwidth control for GCC-H and DoD
Microsoft 365 Roadmap ID 89064
Roaming bandwidth control is a new capability that allows admins to set dynamic bandwidth policies which are based upon the geographic location of users’ Teams clients. This allows admins to set more limited bandwidth controls for when users travel to remote or bandwidth constrained locations, and then relax limitations when they travel to a location with higher bandwidth capacity. Initially two settings from the Teams Meeting Policy will be included – AllowIPVideo, andMediaBitRateKb.
When this will happen:
We will begin rolling out in late April and expect to be completed by mid-May.
How this will affect your organization:
The network roaming policy is not enabled by default, admin will need to configure the policy via PowerShell or Teams admin center to implement it.
What you need to do to prepare:
Review your network roaming policy needs and configure as appropriate for your organization.
MC354488 — Microsoft Teams: Microsoft Teams Rooms on Windows store application 4.12 update
The below message is for organizations using Microsoft Teams Rooms for Windows. If you are not using Teams Rooms for Windows, you can disregard this message.
Teams Rooms on Windows is releasing Teams room Windows store application version 4.12 that includes improvements to existing functionality and additional controls for the device administrators to control application and device behavior:
1. IT admins can enroll a Teams rooms device to receive public preview features through XML setting. Once enrolled, the device will start to receive beta features. All features that go to beta testing are announced at Microsoft Teams Public Preview – Microsoft Tech Community.
2. IT admin can set Teams room display resolution and scaling remotely through XML settings
3. IT admin can disable Microsoft noise suppression through XML setting
4. IT admin can override download folder clean up on the device through registry key setting
5. Enabling users to join Teams meeting hosted on another cloud (i.e., GCCH customer can join Teams meetings hosted on commercial cloud and vice versa)
6. Teams rooms now blocks launching edge browser from URLs in PowerPoint Live as an added security measure for Teams rooms with touch displays
7. Meet now experience is improved to add instructions for users to invite users to the room
8. Support for Windows 10 21H2 feature release
Most of these changes are either improvements to the existing experiences on the device or enable IT admins to have greater control over different aspects of device/user experience.
When will this happen:
This update will begin to rollout in early April and is expected to be completed by late April.
How this will affect your organization:
Once you enroll a Teams room device to receive public preview features, it will show an indicator at home screen and enable users to send feedback directly to Microsoft in a similar way to Teams desktop client.

To send feedback to Microsoft, use More menu and select “Send feedback to Microsoft” then enter your feedback. Based on customer feedback, the feature in public preview will be improved.

We recommend enrolling 5-10 devices to public preview/ beta. Information about what features are available in public preview will be made available at: Microsoft Teams Public Preview – Microsoft Tech Community
Setting display resolution and scaling:
To set room display setting, IT admin can now set this setting through XML by setting EnableResolutionAndScalingSetting to true and specifying display resolution for main and extended displays. You can view the documentation specifics here.
Joining cross-cloud Teams meetings:
Teams rooms can now join Teams meeting hosted on another cloud anonymously using web client embedded in Teams rooms client similar to direct guest join for third party meetings.
Users are presented a message to set expectations on experience as it is not as rich as meetings hosted on the same cloud due to interoperability between clouds and data/ network isolation.

Users can join with limited (single screen) experience and bring the experience to console for call controls and other meeting interaction as allowed by the meeting organizer.

The application updates are delivered through Windows store and application is automatically installed.
Note: This is rolling out on Microsoft Teams Rooms on Windows only.
What you need to do to prepare:
You might want to notify your users about this updated experience and update your training and documentation as appropriate.
MC354160 — Teams admin center: Update to call management settings
A new update to Teams admin center will extend the ability of an Admin to configure the call management capabilities for end-users. The existing call management capabilities of call delegation and group call pickup are being extended to also include the ability to manage an end-user’s call forwarding and simultaneous ringing settings as well.
When this will happen:
The enhancement to Teams admin center is scheduled to begin rolling out to tenants in early April and is expected to be completed by early May.
How this will affect your organization:
With this update, the user experience of Teams admin center has been updated in order to accommodate the additional capabilities in the user detail page. Admins can view this by clicking on “Manage Users”, selecting a user who is assigned a phone system license, and clicking the “Voice” tab in the user detail page. While configuration for call delegation and group call pickup is still present, the group call pickup membership list is now accessed by choosing “Group call pickup” as a destination and clicking “Manage call group”.

What you need to do to prepare:
This change will happen automatically and no preparation is required by Admins.
MC349739 — (Updated) Voice-enabled-channels for government clouds: GCCH and DoD
Microsoft 365 Roadmap ID 80117
Updated April 26, 2022: We have updated the rollout timeline below. Thank you for your patience.
Voice enabled channels allow administrators to connect a call queue to a channel in Teams. Users can collaborate and share information in the channel, just as they can in any other Teams channel. Additionally, members of that channel can also receive calls that are placed to the call queue that’s linked to the channel. Now, we are bringing this capability to government clouds including GCC-H and DoD.
When this will happen:
We will begin rolling out in early July (previously April) and expect to complete by late July (previously early May)
How this affects your organization:
Connecting a call queue to a Teams channel allows the Team owner to manage members of the call queue by adding users to, or removing users from, the team.
What you can do to prepare:
Review the Additional Information and consider updating your training and documentation as appropriate.
MC349738 — (Updated) Dynamic caller ID in Voice-enabled channels for government clouds: GCCH, DOD
Microsoft 365 Roadmap ID 89290
Updated April 26, 2022: We have updated the rollout timeline below. Thank you for your patience.
Last year we enabled the capability where agents can use Dynamic Caller ID to call on behalf of a Call Queue from within Voice Enabled Channels. We are now bringing this capability to government clouds including GCCH and DOD.
When this will happen:
We will begin rolling out in early July (previously April) and expect to complete by late July (previously early May).
How this affects your organization:
You can assign outbound caller ID numbers for the agents by specifying one or more resource accounts with a phone number. Agents can select which outbound caller ID number to use with each outbound call they make.
What you can do to prepare:
Review the Additional Information and consider updating your training and documentation as appropriate.
MC346913 — (Updated) Adding a restore option to the Manage Tags Tab
Microsoft 365 Roadmap ID 88318
Updated April 14, 2022: We have updated the rollout timeline below. Thank you for your patience.
In the near future, we will be adding a restore option on the Manage Tags tab (Manage Team > Manage Tags). This update will make it so that when tags are deleted, they will be kept in a deleted section in the Tags tab and can be restored for up to 30 days from the date of deletion.
Note: This is similar to the lifecycle management for Teams Channels.
When this will happen:
Standard: We will begin rolling this out in mid-May (previously early April) and expect to complete rollout early June.
Government: We will begin rolling this out in mid-June (previously late April) and expect to complete rollout early July (previously late June).
How this will affect your organization:
If the tag setting at the manage team level for “Tags are managed by” is set so to “Team owners and members,” then all team members will be able to see and restore deleted tags.
If the tag setting at the manage team level for “Tags are managed by” is set so to “Team owners,” then only team owners will be able to see and restore deleted tags.
What you need to do to prepare:
You might want to notify your users (especially your Team Owners) about this change and update your training and documentation as appropriate.
MC343099 — (Updated) Microsoft Teams: webinars and add registrations to Teams meetings in GCC
Microsoft 365 Roadmap ID 91562
Updated April 14, 2022: We have updated the rollout timeline below. Thank you for your patience.
This is a follow up to MC268725. We apologize for not communicating this rollout ahead of starting. We apologize for any inconvenience.
We are excited to announce the forthcoming availability of Teams webinar capabilities.
Associated features that apply to webinars and meetings, include:
· Registration page creation with email confirmation for registrants.
· Reporting for registration and attendance.
Key points:
· Timing: begin early March and expect to complete in late April (previously early April)
· Control type: user control / admin control / admin UI
· Action: review and assess
How this will affect your organization:
When scheduling a meeting, your users will see the Webinar option on the Calendar drop down menu in Teams (desktop/web).
Additionally, users will be able to add registrations for meetings and webinars for people in your organization and outside of your organization.
The registration feature will be on by default For everyone. In order to view who attended the webinars, we recommended setting the “AllowEngagementReport” policy to true.
Note: We will honor any existing meeting policies enabled within your organization:
· If allow scheduling private meetings is turned off, then users will not be able to schedule webinars.
· When anonymous join is disabled for the tenant, users can schedule a public webinar but it will fail on join.
· SharePoint lists are required in order to set up webinars. To set this up, learn more here: Control settings for Microsoft Lists
What you need to do to prepare:
By default, all users within your tenant will be able to schedule webinars unless current policy configuration prohibits it.
Should you wish to restrict who can host a webinar that requires registration for everyone, change the WhoCanRegister policy accessed in the Teams admin center.
· You can disable this policy tenant-wide
· You can enable this policy for specific users
You can manage the registration feature in the Teams admin center or with PowerShell commands. There are three options for admin management.
· Turn off registration for the entire tenant (set AllowMeetingRegistration to False)
· Turn off registration for external attendees (set AllowMeetingRegistration to TRUE and WhoCanRegister to EveryoneInCompany)
· Give select users the ability to create a registration page that supports external attendees. All other users would be able create a registration page for people inside the tenant. (Leverage the New-CsTeamsMeetingPolicy cmdlet to create a new meeting policy that includes AllowMeetingRegistration to TRUE and WhoCanRegister to Everyone and then assign that to your specific users)
These policies are managed via PowerShell.
· Edit an existing Teams meeting policy by using the Set-CsTeamsMeetingPolicy cmdlet.
· Create a new Teams meeting policy by using the New-CsTeamsMeetingPolicy cmdlet and assign it to users.
You might want to notify your users about this new capability and update your training and documentation as appropriate.
MC337332 — (Updated) Export feature in Teams Admin Center
Microsoft 365 Roadmap ID 85704
Updated April 19, 2022: We have updated the rollout timeline below. Thank you for your patience.
Teams admin center is adding support for downloading the data from the list pages like teams list page, members list page, channels list page and users list page. The downloaded data will be in the form of a CSV file. Admins can click on the “Export” icon placed on the table headers in these pages to generate the data and download the CSV from the downloads section in the header of the Teams admin center.
When this will happen:
We will begin rolling this out in early March and expect to complete the rollout by mid-June (previously mid-March).
How this will affect your organization:
Admins will now see a downloads icon in the header.
The downloads section will display the list of all entries that were generated in the last 24 hours. This section also is personalized for each admin in an organization but they cannot see exported files from other admins in their organization.
This new feature will enable admins to apply filters on these list pages and then export the filtered list of items instead of exporting the entire list.
What you need to do to prepare:
You might want to notify your Teams administrators about this new capability and update your training and documentation as appropriate.
MC318662 — (Updated) Communication Access Real-Time Translation Captions in Microsoft Teams for GCC-H and DoD
Microsoft 365 Roadmap ID 83614
Updated April 15, 2022: We have updated the rollout timeline below. Thank you for your patience.
This coming new feature will enable users to view real-time captions coming from a Communication Access Real-Time Translation (CART) provider within the Microsoft Teams meeting window. Meeting organizers and participants will be able to ask their CART captioning providers to stream captions to Microsoft Teams.
When this will happen:
GCC-High: will begin rolling out in mid-May (previously mid-April) and expect to complete rollout late May (previously late April).
DoD: will begin rolling out in late May and expect to complete rollout late June.
How this will affect your organization:
Tenant admins should ensure the policy for CART captions is enabled in order for their users to be able to schedule meetings with CART captions.
What you need to do to prepare:
You might want to notify your users about this new capability and update your training and documentation as appropriate.
MC317766 — (Updated) Live Captions in all available languages and CART Captions on Teams Meetings on Web
Microsoft 365 Roadmap ID 84906, 84001
Updated April 01, 2022: We have updated the rollout timeline below. Thank you for your patience.
Live Captions in all available languages will now be available on Teams Meetings on web browsers. CART Captioning support will also be available on web browsers. Chrome/Edge/Safari on Win/Mac/Linux platforms will be supported.
When this will happen:
· Live captions for web: We expect the rollout to begin in mid-June (previously late March) and expect the rollout to be completed by early July (previously mid-April).
· CART captions for web: We expect the rollout to begin in early June (previously early April) and expect the rollout to be completed by mid-June (previously mid-April).
How this will affect your organization:
Users will now have all live captions and CART caption options that are available on the desktop version of the app available when they join via web browser.
What you need to do to prepare:
IT Admins should update documentation for their organization as necessary.
MC305426 — (Updated) Changes to Microsoft Teams apps’ native permissions in the browser
Microsoft 365 Roadmap ID 83656
Updated April 26, 2022: We have updated the rollout timeline below. Thank you for your patience.
In order to better secure Microsoft Teams third-party applications that request native device permissions – such as camera, microphone or location access – we will be requiring users to manually opt-in for these permissions per app in the Microsoft Teams web browser experience. We are already doing this on the Teams desktop and mobile clients.
Previously, Microsoft Teams app permissions were handled by the browser when requesting camera, microphone or location access. With this change, users will need to navigate to the app’s permissions dialog to grant access to these permissions for their Microsoft Teams third-party application in the web browser.
First-party Microsoft Teams applications in Education will be unaffected by this change: Assignments, OneNote, EDU Class Notes, EDU PLC Notes, and EDU Staff Notes.
When this will happen:
· We expect standard rollout to begin in early February and expect the rollout to be completed by mid-March (previously late February). – Complete
· We expect GCC, GCC-H and DoD rollouts to begin in late March (previously early March) and expect those rollouts to be complete by mid-May (previously late April)
How this will affect your organization:
Users who use Microsoft Teams third-party applications in the browser will not be able to continue using native device permissions – such as camera, microphone, or location access – until the user has granted the application permission to do so through the Teams app permission dialog. A one-time educational coachmark bubble will be provided to educate users about the change.
What you need to do to prepare:
Consider bringing awareness to your users about this change if your tenant relies on third-party applications that might request camera, microphone or location permissions.
Compliance
MC365115 — Microsoft Purview Records Management – Apply a new retention label at end of retention period (preview)
Microsoft 365 Roadmap ID 88827
We are introducing a new option for the action that can be taken on an item at the end of its retention period. This feature will enable you to manage the lifecycle of an item by specifying different retention settings for each phase of an item’s lifecycle.
This feature introduces a new action in the retention label creation wizard named “Change the label”. Choosing this option for a label will automatically apply a new label, and label settings when the item reaches the end of its retention period.
When this will happen:
Rollout to public preview will begin in early May and is expected to be complete by late May.
How this will affect your organization:
For many organizations, the lifecycle of a file or email is not comprised of a single phase. Instead, multiple stages require different restrictions and retention settings. To enable automatic management of each phase of an item’s lifecycle, we’re introducing the ability to link multiple retention labels together. This capability provides the ability to configure multi-stage retention.
If you’d like to automatically apply another label when a retention period is completed for an item, create a new retention label. In the Retention settings step, under the ‘At the end of the retention period’ section, select the “Change the label” action. You’ll then be asked to choose an existing retention label to apply at the end of the retention period.
It is also possible to use this feature for more than two sequential phases of retention. For example, let’s say Label A has the action ‘Change the label’ at the end of its retention period, and Label B is selected as the next label. Label B can also use the action ‘Change the label’ and select Label C as the next label. Note that at the time of creating and configuring Label A, Label B must already exist to appear under the action ‘Change the label’. Likewise, at the time of creating Label B, Label C must already exist to be used under the action ‘Change the label’.
What you need to do to prepare:
No action is needed to enable this change. However, you may want to communicate this change to your administrators or team responsible for Records Management at your organization.
Access the Records Management solution in the Microsoft Purview compliance portal.
To learn more about supported scenarios and cases, please visit our documentation: Configure retention settings to automatically retain or delete content
MC361277 — Announcing Microsoft Purview: Your home for Microsoft 365 compliance solutions
Microsoft 365 compliance solutions will be consolidated under the Microsoft Purview brand name. This change will bring together Microsoft 365 compliance solutions and Azure Purview into a single portfolio and will align the naming of various solutions for consistency with other offerings.
When this will happen:
The new naming will go into effect on April 19th.
How this will affect your organization:
Microsoft Purview will deliver comprehensive solutions to help govern, protect, and manage your data estate.
Starting today, April 19, 2022, you will see Microsoft Purview naming within the compliance center experience (now called Microsoft Purview compliance portal) and related solutions. Here’s an overview of naming updates in effect now:
Former name | New name |
Azure Purview | Microsoft Purview |
Azure Purview portal | Microsoft Purview governance portal |
Microsoft 365 compliance | Microsoft Purview |
Microsoft 365 compliance center | Microsoft Purview compliance portal |
Advanced Audit in Microsoft 365 | Microsoft Purview Audit (Premium) |
Basic Audit in Microsoft 365 | Microsoft Purview Audit (Standard) |
Microsoft 365 Communication Compliance | Microsoft Purview Communication Compliance |
Microsoft Compliance Manager | Microsoft Purview Compliance Manager |
Microsoft Information Governance | Microsoft Purview Data Lifecycle Management |
Office 365 Data Loss Prevention | Microsoft Purview Data Loss Prevention |
Advanced eDiscovery in Microsoft 365 | Microsoft Purview eDiscovery (Premium) |
Core eDiscovery in Microsoft 365 | Microsoft Purview eDiscovery (Standard) |
Microsoft Information Protection | Microsoft Purview Information Protection |
Microsoft 365 Insider Risk Management | Microsoft Purview Insider Risk Management |
Records Management in Microsoft 365 | Microsoft Purview Records Management |
Product SKU names (including Microsoft 365 E5/A5/G5 Compliance and the compliance component SKUs: Information Protection & Governance, Insider Risk Management, Discover & Respond) will not change at this time.
What you need to do to prepare:
No action is required for you to see this change, and no URLs are changing at this time. However, you may wish to update your documentation to reference the new naming. Note: Additional updates will continue to be made to product documentation and change communications as we roll out this naming change broadly.
View the updated Microsoft Purview compliance portal experience here:
· Microsoft Purview compliance portal for Worldwide and GCC cloud environments
· Microsoft Purview compliance portal for GCC-H cloud environments
· Microsoft Purview compliance portal for DoD cloud environments
Additional resources
· Read the Microsoft Purview blog announcement
· Learn more on our new webpage
MC358957 — Communication Compliance: Announcing GA of additional classifier language support
The Communication Compliance solution in the Microsoft 365 compliance center will soon support additional languages for built-in classifiers.
Microsoft 365 Roadmap ID 88995.
When this will happen:
Rollout will begin in early May and is expected to be complete by late May.
How this will affect your organization:
To expand the ability to detect policy violations in communications beyond English, French, Spanish, German, Portuguese, Italian, Japanese, and Chinese, Communication Compliance built-in classifiers (threat, harassment, and profanity) now support these additional four languages:
· Arabic
· Chinese Traditional
· Dutch
· Korean
What you need to do to prepare:
Communication Compliance helps organizations detect explicit code of conduct and regulatory compliance violations, such as harassing or threatening language, sharing of adult content, and inappropriate sharing of sensitive information. Built with privacy by design, usernames are pseudonymized by default, role-based access controls are built in, investigators are explicitly opted in by an admin, and audit logs are in place to help ensure user-level privacy.
Access the Communication Compliance solution in the Microsoft 365 compliance center:
· Microsoft 365 compliance center for Worldwide and GCC cloud environments
· Microsoft 365 compliance center for GCC-H cloud environments
· Microsoft 365 compliance center for DoD cloud environments
Learn more:
· Learn about Communication Compliance
MC355211 — Microsoft Information Protection: Updates to Sensitive Information Types (SITs) definitions (U.S. gov clouds)
In our continued efforts to improve the accuracy of out-of-the-box sensitive information types (SITs), we will be updating the definition of five existing SITs for better accuracy and to stay updated with the latest definition published by relevant authorities.
When this will happen:
Rollout to U.S. gov clouds will begin in mid-May and is expected to be complete by late May.
How this will affect your organization:
The following SITs definitions are being updated as follows:
SIT name | Changes |
Slovakia passport number | The new definition will look for:
|
U.S. driver’s license number |
|
Hong Kong identity card (HKID) number |
|
Singapore national registration identity card (NRIC) number |
|
Drug Enforcement Agency (DEA) number |
|
What you need to do to prepare:
No action is needed. Your existing policies (including DLP policies) need not be changed.
Learn more:
· Sensitive information type entity definitions
MC352631 — Microsoft 365 compliance center: Compliance Manager – Alerts and notifications for score changes
Microsoft 365 Roadmap ID 88965
We’re rolling out a new capability to enable monitoring and alerting related to Compliance Manager activities in the Microsoft 365 compliance center.
When this will happen:
Rollout will begin in late April and is expected to be complete by late May.
How this will affect your organization:
This feature will allow admins to set monitoring policies on top of Compliance Manager activities such as score change, improvement action assignment, and evidence upload. A successful policy match will also generate an alert which will allow admins to further investigate.
Once this feature is rolled out, admins will see a default Compliance Manager score change activity detection policy in their portal which will generate periodic alerts regarding compliance score change activity. Admins can opt to turn this policy off and track score changes manually.
What you need to do to prepare:
No action is needed to prepare.
Visit the Compliance Manager to view and disable default policies:
· Microsoft 365 compliance center for GCC cloud environments
· Microsoft 365 compliance center for GCC-H cloud environments
· Microsoft 365 compliance center for DoD cloud environments
Learn more:
· Learn more about Compliance Manager
· Default compliance score change policy
MC343438 — (Updated) Information Governance – Records Management: General Availability of Multi-stage disposition review
Microsoft 365 Roadmap ID 82110
Updated April 21, 2022: We have updated the rollout timeline below. Thank you for your patience.
Multi-stage disposition review in the Microsoft 365 Records Management solution will enable you to create a tiered content disposition experience with up to five stages of review. Multiple reviewers can be added per stage, and reviewers will only see items assigned to them along with contextual information about the file.
When this will happen:
Rollout will begin in early May (previously early April) and is expected to be complete by early June (previously late May).
How this will affect your organization:
With this new feature:
1. Records Management admins will be able to create retention labels with multiple review and approval stages at the end of the retention period. Admins will be able to designate up to five serial stages and assign multiple reviewers to each stage. Reviewers can be individual users or mail-enabled security groups.
2. Disposition reviewers will be able to view and act on files currently assigned to them for review. Reviewers can approve file disposal, extend retention, relabel content, or add additional reviewers to assist.
3. Records Management admins will be able to view all labels and items pending disposition. Additionally, admins will have the option to customize the notification and reminder email messages sent to disposition reviewers by appending content to the default message.
4. Records Management admins and other users with access to unified audit log will be able to view the disposition activities a disposition reviewer took when an item reached the end of its configured retention period.
What you need to do to prepare:
To begin using this feature, navigate to the File plan tab in the Records Management solution within the Microsoft 365 compliance center. From the File plan, you will be able to create a new retention label, and in the retention settings step, after selecting Trigger a disposition review, you’ll be able to set one or multiple retention stages. You’ll also be able to edit an existing retention label that uses disposition review to add additional stages.
· Microsoft 365 compliance center for GCC
· Microsoft 365 compliance center for GCC-H
· Microsoft 365 compliance center for DoD
Note: To view all labels and items pending disposition, Records Management admins will need to visit the new Records Management settings and add themselves to a mail-enabled security group created for this purpose.
Disposition reviewers should be assigned the Disposition Management role to ensure they do not have access to other parts of the Records Management solution and can only approve items assigned to them.
Learn more:
· Records Management: Disposition of content
MC337623 — (Updated) Extend Compliance Manager capabilities beyond Microsoft 365 assets (US gov clouds)
Microsoft 365 Roadmap ID 88969
Updated April 19, 2022: We have updated the rollout timeline below. Thank you for your patience.
We apologize for not sending an earlier update regarding our delayed rollout. We delayed the feature release to ensure the best possible experience for our users, and it is now ready. Microsoft Compliance Manager is a feature in the Microsoft 365 compliance center that helps you manage your organization’s compliance requirements with greater ease and convenience.
As announced in June 2021 (MC261351), we are releasing pre-configured assessment templates to extend Compliance Manager capabilities beyond Microsoft 365 assets. Rollout of this feature will soon begin for US gov cloud environments.
When this will happen:
Rollout will begin in early March and is expected to be complete by early May (previously mid-April).
How this will affect your organization:
This release enables Compliance Manager’s comprehensive set of pre-built assessment templates to support any product or service that your organizations uses, helping your organization comprehensively manage its compliance with a broad set of national, regional, and industry-specific regulations and standards.
If your organization has already purchased or is planning to purchase a template, or is using templates included with your license level, this functionality will be available alongside the Microsoft 365-specific compliance guidance present in the included or premium templates for no additional charge.
· Included templates: Are available for use as part of your organization’s licensing agreement. Note that included templates vary by license level or cloud environment.
· Premium templates: Premium templates must be purchased in order to create assessments from them.
Note: Premium assessments are available for purchase for all license levels via the Compliance Manager Premium Assessment Add-On SKU via the Microsoft 365 admin center.
What you need to do to prepare:
Get started by visiting the Microsoft 365 compliance center here:
· Microsoft 365 compliance center for GCC cloud tenants
· Microsoft 365 compliance center for GCC-High cloud tenants
· Microsoft 365 compliance center for DoD cloud tenants
Learn more about Compliance Manager by reviewing the following documentation:
· Get started with Compliance Manager
· Working with assessment templates in Compliance Manager
MC296437 — (Updated) Announcing continuous compliance assessments in the Microsoft 365 compliance center
Microsoft 365 Roadmap ID 72222
Updated April 19, 2022: We have updated the rollout timeline below. Thank you for your patience.
We’re enhancing Compliance Manager’s automated testing and evidence generation functionality and enabling additional improvement actions and solutions for automated testing.
When this will happen:
Rollout will begin in late February (previously early February) and is expected to be complete by early May (previously mid-April).
How this will affect your organization:
With this update, we’re adding testing automation to a subset (40+) of Compliance Manager actions; if these actions are relevant to a tenant’s compliance assessments, a continually–updated test status will now be displayed depending on whether the tenant has successfully completed the action. We’re also enhancing the automated testing experience such that for these actions, admins will see additional test result information, including testing logic and test evidence, if applicable.
We’re also improving the automation settings experience where you can determine whether you want a specific action to be tested manually or automatically, including adding a new section in the action drill-down where you can view or specify the action source. To access, go to Compliance Manager > Settings.
Access Compliance Manager by visiting the appropriate link for your cloud environment:
· Microsoft 365 compliance center for WW and GCC
· Microsoft 365 compliance center for GCC-H
· Microsoft 365 compliance center for DoD
What you need to do to prepare:
Testing automation can be enabled or disabled at any time within Compliance Manager settings.
· If you have previously opted to disable automation, there will be no change.
· If you have previously opted to enable automation, these actions will be automated at rollout. Note: If you have chosen to enable automation, but have already entered data in the manual testing space for an action, we will keep the action set to manually tested to avoid overwriting customer data. If you opt to automate any such action, all previous implementation notes and documentation will be retained, however manually entered testing status and date(s) will be overwritten by the new automated test.
Learn more:
· Microsoft Compliance Manager.
Exchange Online
MC363212 — Sensitivity Label as a condition support for PDF on Exchange Online
We will be extending the ability to use sensitivity labels as a condition in Data Loss Protection (DLP) rules (for Exchange Online (EXO) location) to PDF attachments in Exchange emails. This feature will allow you to protect labelled PDF files through DLP policies using the condition “content contains sensitivity label” in the DLP rule.
When will this happen:
We will begin rolling this out in early June and expect to complete rollout by early July.
How this will affect your organization:
Emails with attachments containing PDF files with sensitivity labels will start getting detected by DLP.


What you need to do to prepare:
If you currently have DLP policies that are used for detecting sensitivity labels, after this update, you can expect to see that the DLP policy rules will match on the PDF files as well. In case you have any restrictions or exceptions, please make sure to make the necessary changes to support the PDF as best fits your organization.
Learn more:
· Learn about sensitivity labels
MC342072 — (Updated) Safe Links Global Settings Migrated to Custom Policies
Updated April 14, 2022: Customers that have “Use Safe Links in Office 365 Apps” turned on, will need to create a custom policy in order to maintain safe links protections in Office 365 Apps. This change was planned to be deployed in conjunction with the completion of the Built-In Protection. However, the two changes will reach customers at differing times. Beginning mid-April tenants will see the policy setting Use Safe Links in Office 365 Apps in both the Global Settings menu and Custom Policy. As a reminder in the future tenants will not be able to manage this setting in the Global Settings menu.
Only the policy setting “Use Safe Links in Office 365 Apps” configured in the Global Setting menu will be enforced at this time. Another update will be sent prior to removing the policy setting from the Global Setting menu.”
To create a more consistent user experience across all policies in Microsoft Defender for Office portal the following Safe Links policy attributes will be migrated from the Global Settings flyout to the custom policy settings.
Note: Use Safe Links in Office 365 Apps
· Do Not Track when users click protected links in Office 365 Apps
· Do not let users click through the Original URL in Office 365 Apps
When this will happen:
We will begin rolling this out in early May and expect to complete rollout late June.
How this will affect your organization:
For already existing user scoped properties (Track Clicks and Allow Click Through), this change will not override user scoped settings with current tenant wide settings. This means these values will not change for any existing custom policies.
For customers that have “Use Safe Links in Office 365 Apps” turned on, after the migration this tenant level setting will be enabled by default as part of built-in protection for all users, groups, or domains not named as part of a custom policy. Customers can manage the properties “EnableSafeLinksforOffice”, “Track Clicks”, and “Allow Click Through” in custom policies going forward.
What you need to do to prepare:
You might want to notify your users about this change and update your training and documentation as appropriate.
Learn more:
· Preset security policies in EOP and Microsoft Defender for Office 365
· Safe Links in Microsoft Defender for Office 365
MC318994 — (Updated) Microsoft Defender for Office 365: Updates to URL Protection Report
Microsoft 365 Roadmap ID 88880
Updated April 21, 2022: We have updated the rollout timeline below. Thank you for your patience.
We are enhancing the URL protection report by including new click actions to the reporting.
When will this happen:
· We will begin rolling this out to standard release customers by the end of March 2022 and we expect to be complete by late April (previously early April).
· We will begin rolling this out to government customers in early May (previously mid-April) and we expect to be complete by mid-May (previously late April).
How this will affect your organization:
1. URL protection report Action view:
· Previous we only had four kinds of User click action that existed in the URL protection report which were namely:
o “Allowed” – Clicks allowed by system
o “Blocked” – Clicks blocked by system
o “Blocked and clicked through” – Blocked clicks where a user clicks through to the blocked URL.
o “Clicked through during scan” – Clicks that where the user clicks through the pending scan page to the URL.
· We will be introducing four new actions that will help Admins have better insights to the new actions that exist within their organization tenant. These new actions are:
o “Admin allowed” – Clicks allowed by the admin as part of the safe links policy
o “Admin block” – Clicks that are blocked by the admin as part of the safe links policy
o “Pending scan” – Clicks on URLs that are pending a scan verdict
o “Admin blocked and click through” – Admin has blocked the link but the user clicked through
2. URL protection report application view
· Previously in the application view of the URL protection we had the following categories:
o Email client
o PowerPoint
o Word
o Excel
o OneNote
o Visio
o Teams and Others.
· With these new updates, we will be merging the PowerPoint, Word, Excel, OneNote, and Visio categories into one consolidated view and call it “Office”
What you need to do to prepare:
To prepare for these changes please updates your reporting documents and Cmdlets (Get-SafeLinksAggregateReport and Get-SafeLinksDetailReport ).
MC316157 — (Updated) Exchange Transport Rule Report moving to the new EAC from the Security and Compliance Center
Updated April 22, 2022: We have updated the timing for GCC-High to reflect that we won’t proceeding with this change at this time. We will communicate to GCC-High organizations via Message center when we are ready to proceed.
We will be retiring the Exchange Transport Rule (ETR) report from the Security and Compliance Center (SCC).
· The report will no longer be available in the security reporting dashboard, beginning early March 2022.
Instead, we recommend the utilization of the replacement for this report, found in the new (MC252053 – July, 2021) modern Exchange Admin Center (EAC), which is where we will continue to invest our development resources.
Note: The report will no longer be available in the respective enviroments below starting the end of March 2022 in the security reporting dashboard. The replacement for this report, in the new modern Exchange Admin Center (EAC), is rolling out to WW regions beginning in early January and expect to complete by early February, along with the other mail flow reports and features.
Key points:
· Timing: Retirement:
o WW: Early March
o GCC: mid-April
o GCC-High: postponed
· Action: We recommend you go to the new modern EAC to use the enhanced version of the Exchange Transport Rules report where we will continue to invest our development resources.
How this will affect your organization:
You will not be able to use the Exchange Transport Rule report in the SCC after your respective environment’s report deprecation date. Our recommendation is that you start transitioning to the new and enhanced report in EAC when it becomes available in your environment.
What you need to do to prepare:
Instead of using the SCC dashboard for these features, begin using the modern EAC now.
Learn more:
· Exchange transport rule report in the new Exchange admin center in Exchange Online
MC289686 — (Updated) Change to mailbox forwarding behavior coming to Exchange Online
Updated April 21, 2022: Based on learnings from our early rings, we have made the decision to make additional changes before we proceed with the rollout. We will communicate via Message center when we are ready to proceed.
We’re making some changes to which forwarded messages are rewritten with SRS.
Starting in early November, we will be further consolidating our rewriting for messages that are automatically forwarded outside of Exchange Online. Not all forwarded messages are rewritten using SRS today. Messages forwarded with SMTP or mailbox forwarding have their P1 Mail From address replaced with the forwarding mailbox address today. This will be changing and SRS rewriting will be used instead.
· The change will be rolled out slowly and it may take several months to reach your organization.
How this will affect your organization:
Note: This is a behavior change that may result in some disruptions.
· All messages that are forwarded externally from Exchange Online to the internet will be subject to new SRS rewriting. This risk of any impact to those messages should be low. You can find out more about SRS behavior from the link provided.
· Customers with on-premises servers will see messages relayed to those servers no longer being rewritten. This should be fine for deliveries to mailboxes hosted on-premises. However if customers route mail out to the internet via their on-premises servers instead of Exchange Online, there is a risk. Forwarded messages will go out without being rewritten and could result in them being rejected by the recipients’ servers. To avoid this, a new setting has been added to on-premises connectors to enable SRS rewriting for those messages.
What you need to do to prepare:
Before this change takes effect, customers who route traffic to the internet from their on-premises environment should enable the new parameter SenderRewritingEnabled on their outbound on-premises mail flow connector to avoid any disruptions.
Please click Additional Information to learn more.
Security
MC365114 — Configuration Change: Tenants using Management API notifications service must update endpoints to support TLS 1.2
Azure Information Protection has now retired the use of Transport Layer Security (TLS) 1.0 and 1.1 and begun enforcing TLS 1.2 for all components and as part of a long-term shift to refuse legacy protocol and cipher suite connections, the Office 365 Management Activity API notifications service now utilizes only the transport layer security (TLS) 1.2 protocol. The move to TLS 1.2 is to ensure that our service is secure by default and in alignment with the rest of Microsoft 365 services as previously communicated (MC126199 in Dec 2017, MC128929 in Feb 2018, MC186827 in July 2019, MC218794 in July 2020, MC240160 in February 2021, MC292797 in October 2021, and MC335273 in February 2022).
Note: If your organization has already taken steps to migrate from TLS 1.0 and 1.1, you can safely disregard this message.
When will this happen:
As of April 22, 2022, the Office 365 Management Activity API notifications service stopped supporting TLS 1.0/1.1 traffic.
How this will affect your organization:
If you have configured Audit notifications via the Management API notifications service and your endpoints currently support lower than TLS 1.2, you will no longer be receiving notifications to retrieve new Audit data.
What you need to do to prepare:
To continue to receive Audit notifications via the Management API notifications service, please ensure that endpoints are updated to support TLS 1.2.
Review documentation for additional context on this change and steps to prepare for and migrate to TLS 1.2:
· Office 365 Management Activity API reference
· Preparing for TLS 1.2 in Microsoft Azure
MC364310 — Update Microsoft Defender for Endpoint and MDM policy to newest version.
We want to let you know that running very old versions of Microsoft Defender for Endpoint (MDE) can result in an invalid agent state and loss of protection. Mobile device management (MDM) previously configured to deploy very old MDE version may expose your organization to the risk of the invalid agent state and protection loss.
If you do not have macOS and Linux devices in your environments, you can disregard this message.
What you need to do to prepare:
Review the following recommendations to assess potential impact on your current configuration or end user education.
· Check your Mac devices to ensure that (MAU) is enabled, and devices are getting updated
· When onboarding a new device, download the MDE package from the Microsoft 365 portal and avoid using previously downloaded packages
· Check your MDM policies regularly to ensure you are pushing the updated version MDE from the Microsoft 365 portal.
· Due to series of recent breaking changes, ensure you never push a version older than:
o Linux 101.62.74
o Mac 101.61.69
· Ensure that your MDM is configured to ignore the app version if MDE is already installed on the devices.
· On your macOS devices, configure Microsoft Auto Update (MAU) to deliver updates automatically
Learn more:
For all new changes across versions of MDE (Mac), please review Microsoft Defender for Endpoint on Mac.
Linux: To update to the latest Microsoft Defender for Endpoint version listed in What’s new in Microsoft Defender for Endpoint on Linux:
· Use the update command based on your distributions package manager.
o See, Deploy updates for Microsoft Defender for Endpoint on Linux for details.
macOS: To update to the latest Microsoft Defender for Endpoint version listed in What’s new in Microsoft Defender for Endpoint on Mac:
· Enable Microsoft Auto Update.
o See, Deploy updates for Microsoft Defender for Endpoint on macOS for details.
Note: To download and apply the package, visit the onboarding section of the security center portal for your respective Operating Software.
For additional information on what’s new and how to install, please review Onboard non-Windows devices.
MC362283 — Updates to the Zero-hour auto purge (ZAP) alerts
Microsoft 365 Roadmap ID 93206
We will be updating the current zero-hour auto purge (ZAP) alerts and introduce a new ZAP alert that will notify you if a message has not been removed by ZAP.
Updates to the ZAP alerts will include:
· Scoping the success ZAP alerts for only ZAP related scenarios. You will no longer be alerted as part of the ZAP alert for Dynamic Delivery scenarios.
· A new failure ZAP alert is being introduced. You will receive an alert when a message was not successfully removed from the mailbox. Manual action will be required to remediate the message. The alert will be correlated and linked to both Automated Investigation and Response (AIR) and Incidents. The alert will be on by default and can be configured in alert policies.
When this will happen:
We expect these updates to roll out in late May and expect to be complete by late June.
How this will affect your organization:
Due to these new changes, you can expect a change in the volume of the successful ZAP alerts. The new ZAP failure alert will be on by default and can be configured in the alert policy settings. You can review both default alerts in the portal. However, if you’re exporting these alerts into external systems, you will need to include the new alert generated by the new policy.
What can you do to prepare:
Review the following resources below to learn more:
· Microsoft 365 alert policies
· Zero-hour auto purge in Microsoft Defender for Office 365
MC358531 — Data Management Report
We will be retiring the Data management report beginning mid-May. Instead, we recommend the utilization of Data at-rest Scan progress, which is where we will continue to invest our development resources.
If your organization is not using this Data Management Report feature, you can safely disregard this message.
How this will affect your organization:
Users will no longer be able to view report lists of all the files stored in your cloud apps, by app, when this change is implemented.
What you need to do to prepare:
You might want to update your training and documentation as appropriate.
Please click Additional Information to learn more.
MC358528 — Update on who can manage sensitive attributes of user objects
Today, there are several user attributes that are considered sensitive, and we will be simplifying this model.
· Some rely on Global Admins (GA) to be able to manage them for all users (admins and non-admins).
· Others don’t have a Global Admins dependency but the set of admin roles that can manage them and for whom is not consistent.
When this will happen:
We will begin rolling this out in early June and expect to complete rollout late June.
How this will affect your organization:
User Admins, Authentication Admins and Privileged Authentication Admins will be able to manage all sensitive attributes for non-admin users and select admin users based on the same model we have for password reset here.
The full list of sensitive attributes and tasks is:
· accountEnabled
· altSecId
· auth methods
· deviceKey
· mobile
· onPremisesImmutableId
· otherMail
· passwordProfile
· telephoneNumber
· userPrincipalName
· delete
· restore
· invalidateAllRefreshTokens.
What you need to do to prepare:
We will align the behavior of managing user attributes with that mentioned above. So, some older roles that were also allowed to manage user attributes (for ex – Directory Writer) will no longer work. Please work with your Privileged Role Admin or Global Admin if new role assignments are needed to avoid any impact on your business operations.
MC352619 — Microsoft 365 Defender is now available to GCC, GCC High and DoD customers
Microsoft 365 Defender is now available in GCC, GCC High and DoD and provides XDR capabilities across Microsoft Defender for Endpoint, Microsoft Defender for Office 365, Microsoft Defender for Identity and Microsoft Defender for Cloud Apps.
When this will happen:
Now available.
How will this affect your organization:
Microsoft 365 Defender helps determine the full scope and impact of a threat by stitching together the threat signal received from each of these products. Microsoft 365 Defender can help identify initial threat entry, the scope of the issue, and how it’s currently impacting the organization. It also can take automatic action to prevent or stop the attack and self-heal affected mailboxes, endpoints, and user identities.
Microsoft 365 Defender for US government customers is built in the Azure US Government environment and uses the same underlying technologies as Microsoft 365 Defender in Azure Commercial. This offering is available to GCC, GCC High, and DoD customers and is based on the same prevention, detection, investigation, and remediation as the commercial version. However, there are some differences in the availability of capabilities for this offering.
The release of Microsoft 365 Defender corresponds with the Microsoft Security Center portal URL redirection to the new unified experience as follows:
· GCC: https://security.microsoft.com
· GCC High: https://security.microsoft.us
· DoD: https://security.apps.mil
What you need to do to prepare:
Check out these resources to learn more about Microsoft 365 Defender:
· Microsoft 365 Defender | Microsoft Docs
· Frequently asked questions when turning on Microsoft 365 Defender | Microsoft Docs
· Learn more about licensing requirements and feature parity with commercial version at Microsoft 365 Defender for US Government customers.
MC343059 — (Updated) Change in Activity Log experience for activities older than 30 days
Updated April 26, 2022: We have updated this post to ensure visibility. The content below has not changed.
Microsoft Defender for Cloud Apps is making some changes to the Activity Log experience to align with Microsoft 365 Defender for upcoming unified investigation and hunting experiences. Activity log queries will apply to activities logged in the last 30 days.
Note: All activities will continue to be retained for 180 days.
When will this happen:
On April 1, 2022, Activity Log existing filters will query all activities logged in the last 30 days.
How this will affect your organization:
To query older activities, you should navigate to Activity Log and click on “Investigate 6 months back” on the top right-hand corner of the screen. From there you will define the filters as normally done with Activity Log.
The following filters will be supported:
· Username
· Activity type
· IP address
· Application
· Location
· Activity ID
The supported operators are equal, not equal. Other filters and operators will not be available when defining a query for activities older than 30 days.
In addition to the changes in the Activity Log there will be a change in the Activities API – which will return only activities from the past 30 days.
What you need to do to prepare:
For additional information, refer to the product documentation (documentation will be updated on April 1 upon rollout).
MC341683 — (Updated) Upcoming changes to Office 365 Management API events for Microsoft Defender for Office 365
Updated April 07, 2022: We have updated the rollout timeline below. Thank you for your patience.
In alignment with the permanent redirection of the Office 365 Security & Compliance Center (SCC), and as previously mentioned (MC320940 – Feb 2022), we will be updating the deeplinks for Microsoft Defender for Office 365 events in Office 365 management API and the Unified Audit logs.
When this will happen:
We will begin rolling this out in late April (previously early April) and expect to complete rollout mid-June (previously late May).
How this will affect your organization:
As part of this change, deeplinks pointing to Office 365 Security & Compliance Center portal (protection.office.com) will start pointing to Microsoft 365 Defender portal (security.microsoft.com).
Note: There will be no change to any existing data attributes, recordtype or data audit structure. The only change that will happen is that the deeplink will start pointing to entities in security portal as compared to the Office 365 Security & Compliance Center portal.
This change will impact events with the following Recordtypes:
· 28 – ThreatIntelligence
· 40 – SecurityComplianceAlerts (Microsoft Defender for Office Plan 2 and above)
· 47 – ThreatIntelligenceAtpContent
· 64 – AirInvestigation
Example: The field EventDeepLink for Records with Recordtype 28 (ThreatIntelligence) would start pointing to security.microsoft.com, instead of protection.office.com. Once this change is implemented, the deeplinks which were earlier pointing to the Office 365 Security and Compliance portal (protection.office.com), will start pointing to the Microsoft 365 Defender portal (security.microsoft.com). There is no other change to the API itself, as well as the different data attributes that are published today.
What you need to do to prepare:
You should evaluate your use of the event deeplinks and make sure that you update your playbooks and workflows to work within the Microsoft 365 Defender portal. If you are still working fully or partially out of the Office 365 Security & Compliance center, we recommend that you plan your transition, to avoid interrupted experiences.
Learn more:
· Microsoft Defender for Office 365 and Threat Investigation and Response schema
Microsoft 365
MC362280 — Microsoft Stream: Add or Edit captions and transcript for a video in SharePoint or OneDrive for GCC and GCC High
Microsoft 365 Roadmap ID 88890
As previously mentioned in (MC312492 – Jan 2022), this new feature will allow users to upload, download, and delete captions in the Web VTT file format for a video in SharePoint or OneDrive. This will enable them to edit transcript files generated by Teams live transcript or Stream by downloading the file, editing in a text or VTT editor, and re-uploading it. The VTT file will be displayed as captions inside the video player and as a transcript in the transcript pane next to the video.
When this will happen:
We will begin rolling out and early June 2022 expect to complete by late June 2022.
How this will affect your organization:
A user who does not have a transcript but has edit permissions on a video will be able to navigate to Media Settings in the player and use the Transcript and captions setting to upload captions. Users will also be able to download and delete the caption file.

Any viewer will be able to enable captions during playback via the Closed Captions button and will be able to see transcript in transcript pane.

What you need to do to prepare:
You might want to notify your users about this new capability and update your training and documentation as appropriate.
MC358959 — Reminder: IE11 desktop application retires in 2 months on June 15, 2022 – Set up IE mode today (non-LTSC, non-Server)
As previously announced, the future of Internet Explorer on Windows is in Microsoft Edge. Internet Explorer mode (IE mode) provides legacy browser support within Microsoft Edge. Because of this, the IE11 desktop application will be retired on June 15, 2022, on certain versions of Windows 10. This means that the IE11 desktop application will no longer be supported and afterwards will redirect to Microsoft Edge if a user tries to access it.
With 2 months left before retirement, we highly recommend you begin testing your sites in IE mode, followed by disabling the IE11 application completely via policy, to ensure readiness.
Note: The IE11 desktop application is not available on Windows 11. To continue using legacy IE-based sites and apps on Windows 11, IE mode in Microsoft Edge must be configured before deploying Windows 11.
Internet Explorer 11 desktop application
· Timing: The IE11 desktop application will be retired on June 15, 2022.
o Windows 10 LTSC and Server not affected. For a full list of what is in scope for retirement, see the FAQ.
o IE11 is not available on Windows 11.
· Action:
o To continue using a supported browser, transition to the Microsoft Edge.
o To continue using legacy IE-based sites and apps in Windows 10 and Windows 11, you will need to configure those sites and apps to open in Microsoft Edge using Internet Explorer mode.
§ You can use IE driver for automatic, end-to-end site testing in IE mode.
§ Use policy to disable the IE11 application and ensure you’re prepared for retirement.
How this will affect your organization:
If your organization has legacy sites and apps with IE dependencies, you will need to set up IE mode so that users can access them through Microsoft Edge. If you do not set up IE mode before IE11 is retired and disabled, users will lose access to those legacy sites, and you could experience business disruption.
As first seen with the Windows 10 January 2022 C “Preview” release, IE11 now has an in-product banner notifying users of the upcoming retirement. This only shows on Windows versions affected by IE11 retirement. To configure, use the “Hide Internet Explorer 11 Application Retirement Notification” group policy found in the Local Group Policy Editor under Administrative TemplatesWindows ComponentsInternet Explorer.
Note: After June 15, 2022, the IE11 desktop application will be removed from in-scope versions of Windows 10 via Windows update. We do not recommend avoiding Windows updates to keep IE11 as Window updates contain critical operating system security patches.
What you need to do to prepare:
To prepare, we recommend setting up Microsoft Edge in your organization. If your organization needs legacy browser support, you should set up IE mode in Microsoft Edge as soon as possible because this is a multi-step process.
· View the Microsoft browser usage report in the Microsoft 365 Admin center to help size IE usage in your organization. Appropriate permissions required.
· Use the Getting Started guide to set up IE mode in Microsoft Edge in your organization.
o Start setting up IE mode by performing Site Discovery (typically 3-4 weeks). This is also available in the Configure IE mode guided set up experience.
o Learn more by watching the on-demand webinar.
o Use IE Driver to automate end-to-end IE mode testing.
o Disable IE11 to test IE mode in your environment.
· FastTrack can help with deployment and configuration at no additional charge for customers with 150 or more seats of Windows 10.
· For cost-free help with web app and site compatibility, especially if you have legacy site concerns after configuring IE mode, learn more about the App Assure program.
Additional Information
· Read our FAQ to help answer your questions and use the troubleshooting guide during setup.
· Visit the Internet Explorer mode website.
· Watch videos from our IE retirement YouTube playlist to learn more.
· Learn more about hosting your IE mode site list in an authenticated cloud endpoint in the M365 admin center.
· Read our announcement blog and browse our blog series for more information.
We always value feedback and questions from our customers. Please feel free to submit either feedback or questions via Message Center.
MC357842 — Office 2013 end of support: Reduce your exposure to security risks by moving to a newer version of Office
After five years of Mainstream Support, and five years of Extended Support, Office 2013 will reach the End of Extended Support on April 11, 2023. Per the Fixed Lifecycle Policy, after this date security updates for Office 2013 will no longer be available. We recommend you upgrade to Microsoft 365 Apps, which includes the Office apps you are familiar with (such as Word, Excel, PowerPoint, and Outlook).
Note: If you don’t have Office 2013 deployed in your environment, you can safely disregard this message.
When this will happen:
Office 2013 will reach the End of Support on April 11, 2023.
How this will affect your organization:
After Office 2013 reaches the end of support, Microsoft won’t provide any new security updates, and the continued use of Office 2013 after April 2023 may increase your organization’s exposure to security risks or impact your ability to meet compliance obligations.
Also, if you connect to Microsoft 365 with an Office 2013 client, you might experience performance or reliability issues. Since October 2020, Office 2013 is not a supported client to connect to Microsoft 365 services. These are the client versions of Office that are currently supported for connecting to Microsoft 365 (and Office 365) services (learn more:(
· Microsoft 365 Apps
· Office LTSC 2021
· Office 2019
· Office 2016
What you need to do to prepare:
Please start upgrading to Microsoft 365 Apps, which is designed to receive regular updates, and will help you stay current by getting security updates and our latest features.
Alternatively, if your organization requires a static, unchanging product, consider moving to Office LTSC 2021. When evaluating your options, keep in mind the end of support dates for Office clients connecting to Microsoft 365 services (learn more).
Here are some resources to help you plan your upgrade:
· For an overview of how to move from Office 2013 to Microsoft 365 Apps, see Office 2013 upgrade guidance.
· For help from Microsoft resources to move to Microsoft 365 Apps and cloud-based services, see Microsoft FastTrack.
Thanks for being a Microsoft customer!
MC354159 — Microsoft Lists Calendar: Unscheduled Pane
Microsoft 365 Roadmap ID 93223
The new feature, Microsoft Lists Calendar: Unscheduled Pane, will allow users to review all the items not yet appearing in the Calendar view due to missing dates. These items will appear on the Unscheduled tab within the events pane to the right of the Calendar view.
When this will happen:
We will begin rolling this out in mid-April and expect to complete the rollout by late April.
How this will affect your organization:
You will now see a new “Unscheduled” tab within the events pane to the right of the Calendar view. The items with missing start and/or end dates and those with start date later than the end date would appear on this pane. You may select the items to open the edit form and make appropriate edits to schedule these items.

What you need to do to prepare:
No action is required to enable this feature. But you may consider notifying users about this new capability and update your training and documentation as appropriate.
MC353488 — (Updated) Viva Topics for US Government Cloud
Microsoft 365 Roadmap ID 72185
Updated April 14, 2022: We have updated this message, so it shows for all organizations as intended. The body of the message has not changed. Thank you for your patience.
Microsoft Viva Topics uses artificial intelligence (AI) to empower people with knowledge and expertise in Microsoft Teams and the Microsoft 365 apps they use every day and to connect, manage, and protect content across systems and teams. We’re pleased to announce that Viva Topics will be available for purchase, as an add-on in GCC.
When this will happen:
The licenses for GCC will begin rolling out in early April and expect to complete by early May.
How this will affect your organization:
Microsoft Viva applies AI to empower people with knowledge and expertise in the apps they use every day. Viva Topics automatically organizes content and expertise across your systems and teams into related topics like projects, products, processes, and customers.
Topic pages and topic centers, created and updated by AI, enable experts to cultivate and share knowledge with wiki-like simplicity. In addition, topic cards deliver knowledge just-in-time across SharePoint, Office and Search. Outlook and Microsoft Teams, coming soon.
Microsoft Viva Topics is built on the content and platform services of Microsoft Teams and the Microsoft Graph.
What you need to do to prepare:
Review the product announcement and work with your Microsoft account team for planning, purchasing and rollout.
Learn more: Introducing Microsoft Viva Topics
MC353485 — Microsoft Stream: View and edit video/audio file information
Microsoft 365 Roadmap ID 93224 and 93225
We will be updating the web player for audio & video files that are stored in OneDrive and SharePoint (including when those files are embedded in Teams, Yammer, and SharePoint web parts) with two new features called About and Custom Thumbnail.
When this will happen:
Targeted Release (select users and entire org): will begin rolling out in mid-April and expect to complete rollout late April.
Standard: will begin rolling out in mid-May and expect to complete rollout mid-June.
Government: will begin rolling out in early July and expect to complete rollout late July.
How this will affect your organization:
About will enable users, with edit permissions, to add and edit a title/description on their video or audio file. Viewers will be able to see this information along with non-editable fields like upload date, owner name, filename, and area path.

Custom thumbnail, located in Video Settings, will allow users with edit permissions to change the default thumbnail by uploading an image or selecting a frame from the video. This custom thumbnail will be used throughout Microsoft 365.

What you need to do to prepare:
You might want to notify your users about this change and update your training and documentation as appropriate.
MC344411 — (Updated) Microsoft To Do iOS and Android apps releasing for GCC users
Microsoft 365 Roadmap ID 85590
Updated April 14, 2022: We have updated the rollout timeline below. Thank you for your patience.
The Microsoft To Do iOS and Android apps will soon be available for GCC customers.
Key points:
· Timing: We will begin rolling this out in late May (previously late April) and expect to complete rollout by late June (previously late May).
· Roll-out: tenant level
· Control type: admin control
· Action: review and assess
How this will affect your organization:
Microsoft To Do is a personal task management app that empowers users to track and focus on the things they need to get done. Your users with Exchange Online accounts will now be able to manage tasks through the To Do iOS app and To Do Android App.
Users with assigned licenses will be able to use the To Do iOS and Android apps.
· Learn how to assign Microsoft To Do license
What you need to do to prepare:
Depending on the SKU(s) you own, prepare to see one or more of the following new service plans – To-Do (Plan1), To-Do (Plan 2), To-Do (Plan 3), To-Do (Firstline).
You might want to notify your users about this new capability and update your training and documentation as appropriate.
MC341149 — (Updated) Microsoft 365 Admin center: General Availability of the Office cloud policy service for government cloud
Microsoft 365 Roadmap ID 88944
Updated April 05, 2022: We have updated the rollout timeline below. Thank you for your patience.
The Office cloud policy service lets you enforce policy settings for Microsoft 365 Apps for enterprise on a user’s device. Once configured, these policies are automatically enforced as users sign in and use Microsoft 365 apps.
When this will happen:
We expect to begin will rolling out starting in mid-May (previously mid-April) and expect to complete by late June (previously late May).
The initial release will support policies for Microsoft 365 Apps for enterprise on Windows and future updates will bring support for additional applications and platforms.
How this will affect your organization:
Admins will now be able to use this service for deploying policies to Microsoft 365 Apps for Enterprise on user devices.
What you need to do to prepare:
Please familiarize yourself with the Office cloud policy service and get the most out of the service once available.
MC340783 — (Updated) Organization Fonts on PowerPoint for the web
Microsoft 365 Roadmap ID 88538
Updated April 05, 2022: We have updated the rollout timeline below. Thank you for your patience.
Support for organization fonts on PowerPoint for the web will allow tenants with an E3 or E5 license to upload their custom fonts via SharePoint. These fonts will show in the font picker dropdown and will render properly on PowerPoint for the web when editing and presenting.
When this will happen:
We expect this rollout to begin in late April (previously late March) and be completed by early May (previously early April).
How this will affect your organization:
Tenant admins will have the ability to upload their font files as an organization asset library via SharePoint. These fonts will show in the font picker dropdown and will render properly on PowerPoint for the web when editing and presenting. Custom organization fonts will populate in 24 hours.
What you need to do to prepare:
If your fonts are licensed, make sure your font license covers this use case. Contact your licenser proactively to ensure that you are not violating existing use terms.
MC335614 — (Updated) Microsoft 365 admin center: Creating more granular email notifications for Service issues
Microsoft 365 Roadmap ID 91627
Updated April 01, 2022: We have updated the rollout timeline below. Thank you for your patience.
We are adding the ability to subscribe to separate email notifications for the different types of service issues that show up on the Service Health dashboard. Currently admins can enroll in email notifications for incidents and advisories, we are adding additional granularity for admins to subscribe to Microsoft service issues and issues occurring within your organization that require admin action.
When this will happen:
This feature will start rolling out in late February and we expect the rollout to be completed by late April (previously late March).
How this will affect your organization:
Admins will now have greater granularity of the email notifications they receive based on the type of issue within in the Service Health Dashboard. If your tenant is eligible, you will now see the following options to include these issue types for email notifications:
· Incidents
· Advisories
· Issues in your environment that require action (New)
· Issues with priority accounts (New)
If you are currently subscribed to receive either Incidents or Advisories you will automatically be subscribed to the two new options automatically as to not disrupt any notifications you currently receive.
What you need to do to prepare:
No specific action required. You can learn more about these types of issues here: Exchange Online monitoring for Microsoft 365.
MC329435 — (Updated) Message Center Email Notification Changes
Updated April 14, 2022: We have updated the rollout timeline below. Thank you for your patience.
Beginning in late April (previously early April), admins within your tenant will no longer receive the Message center weekly digest and major update email notifications by default. Any existing admins who have customized their Message center email preferences will continue to receive these emails, based on their customized preferences, and this update will have no impact. This change will also not affect the opt-in state for email notification of Data Privacy related messages.
New admins, specifically those with the roles of Global Admin, Message Center Reader or Message Center Privacy Reader, will be subscribed to a 4-week trial period for the Message center weekly digest and can choose to stay subscribed once the trial has concluded by using the Message center preferences menu.
We are making this change based on customer feedback, where the overall consensus was to allow admins to opt in to receive these emails.
When this will happen:
This change is expected to roll out in late April (previously early April).
How this will affect your organization:
Any admins who have not customized their preferences or taken action to stay subscribed to Message center email notifications will need to do so by April 1st, 2022, if they would like to continue to receive these notifications.
What you need to do to prepare:
Admins who would like to stay subscribed to the Message Center weekly digest and major update email notifications will need to visit the Message Center Preferences menu, confirm the email address to subscribe and save their preferences.
Another way to get to the Message Center Preferences — where you can customize Message Center view and emails — is by clicking on the Preferences button located above the filter menu. If you don’t see the Preferences button, please ensure that all messages in the list are unselected.”
MC318316 — (Updated) OAuth interface for Office 365 Reporting web service
Updated April 05, 2022: We have updated the rollout timeline below and provided additional details for clarity. Thank you for your patience.
Currently, users accessing Reporting Web service use “Basic Authentication” and must provide their credentials. With this feature update, Microsoft will improve the security of your tenant by replacing “Basic Authentication” access in favor of the recommended OAuth user interface which is where we will continue to invest our development resources.
Key points:
· Timing: Rollout will begin in early May (previously mid-March) and is expected to be complete by late May (previously late March).
How this will affect your organization:
No immediate action required. Users could start migrating their programmatic access to Office 365 Reporting Web Service from “Basic Authentication” to “OAuth”.
What you need to do to prepare:
You might want to notify your users about this change and update your training and documentation as appropriate.
Learn more:
MC295027 — (Updated) Rich text and images in Planner task notes
Microsoft 365 Roadmap ID 85688
Updated April 14, 2022: We have updated the rollout timeline below. Thank you for your patience.
We are adding support for rich text (bold, italics, underline, etc.) and images in the Planner task notes field.
NOTE: We will update this post once we have Microsoft Graph documentation for the new rich text task notes field available.
When this will happen:
We expect to begin rolling out the new rich text task notes field in early September (previously late March) and we expect to complete the rollout by late September (previously mid-April).
How this will affect your organization:
To support this capability, we are introducing a new rich text enabled task notes field in the Planner Microsoft Graph API. This will result in two task notes fields in our API – the new “rich text task notes field” and the existing “plain text task notes field.” When this feature launches, Planner for the Web and for Teams (Tasks app) will support rich text in task notes. Other Planner experiences in iOS, Android, SharePoint, and Power Automate will only support plain text task notes, but we plan to update these apps to support rich text at a later date.
When this feature update is deployed, all existing task notes content will be preserved in the new rich text enabled task notes field, so users will be able to continue viewing and editing notes without interruption.
We will maintain compatibility between the rich text task notes field and plain text task notes field by ensuring both fields’ contents stay in sync.
If a user edits the rich text task notes field, all content is synced to the plain text task notes field automatically. Any rich content is converted to plain text and synced to the plain text task notes field.
If a user edits the plain text task notes field via the Microsoft Graph API or via a client which only supports the plain text field, the contents in the plain text task notes field is synced to the rich text task notes field without modification. Therefore edits to the plain text task notes field will result in the removal of any pre-existing rich text, text formatting, or images in the rich text notes field.
If a user chooses to insert images in the rich text task notes field, a preview of the image will appear in the task notes field. End users should not see any interruption in their Planner experiences. They can continue using task notes as they do today but gain the ability to insert rich text and view image previews in task notes if desired (for Planner experiences which support it).
What you need to do to prepare:
If your organization has custom applications interacting with our Microsoft Graph Planner API, make sure to update the apps to support the rich text task notes field as soon as it is available to take advantage of the new notes capabilities. We will maintain support for the existing plain text task notes field in our Microsoft Graph Planner API for at least 36 months.
If your organization has applications or workflows which parse the task notes to trigger logic based off contents in the notes field, we recommend users continue to input only plain text in task notes and not apply text formatting or insert images into task notes. Such apps should also be updated to avoid parsing task notes or applying logic to contents in the task notes as these are not recommended uses of the task notes field in our API.
Microsoft 365 IP and URL Endpoint Updates |
Documentation – Office 365 IP Address and URL web service


![Distributed Denial of Service [SC-5]: Use Case Example](https://www.drware.com/wp-content/uploads/2022/05/large-31 "TJBanasik_2-1652718025030.png")


Recent Comments