by Contributed | May 25, 2022 | Technology
This article is contributed. See the original author and article here.
What is Azure Static Web Apps or SWA (Static Web Apps)
Azure Static Web Apps is a service that’s perfect for your full stack as well as static files projects. Yes, you heard that correctly. Regardless if you are dealing with:
- A static resume site
- SPA application
- Static site generator like Gatsby etc
Azure Static Web Apps is there for you and enables you to deploy your files to Azure.
how does that work?
When you create an Azure resource, it connects your GitHub repo to Azure via workflow file in yaml. This ensures that all your future work can be pushed to Azure with nothing but Git and GitHub.
https://azure.microsoft.com/en-us/services/app-service/static/
Sounds like it’s worth trying? If, so have a look at these resources
What is Azure Static Web Apps CLI?
It’s a CLI you run from your console. With it, you can do a lot of things like the below:
- Work on your JAMstack app locally
- Built-in framework detection
- Serverless support
- Authentication & Authorization
- Login to Azure
- Deploy & Ship from the CLI
- New documentation site
Check it out, how it can accelerate your workflow building SWA apps :)
https://github.com/Azure/static-web-apps-cli
by Contributed | May 24, 2022 | Technology
This article is contributed. See the original author and article here.
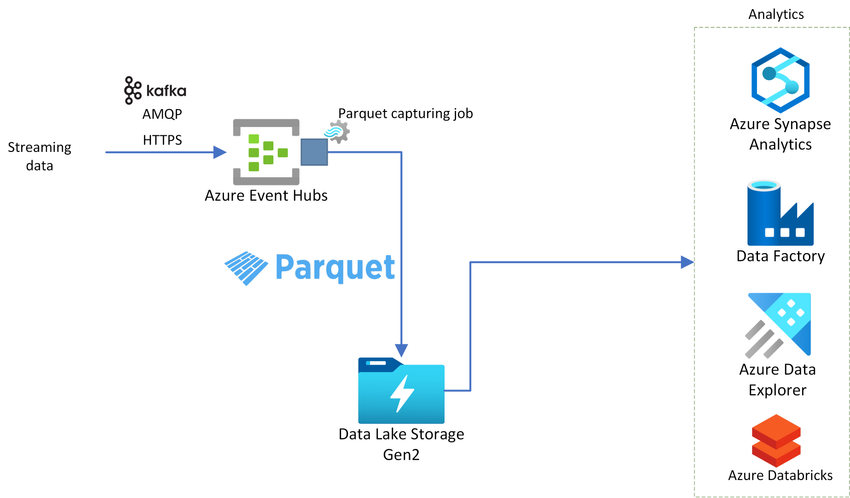
Azure Event Hubs enables you to stream millions of events per second from any source using Kafka, AMQP or HTTPS protocols. Using Event Hubs capture feature, you can load real-time streaming data to data lakes, warehouses, and other storage services, so that they can be processed or analyzed by analytics services.
Today we are excited to announce the preview of Apache Parquet capturing support in Azure Event Hubs.
Why Apache Parquet for big data analytics?
Apache Parquet is column-oriented storage format that is designed for efficient data storage and retrieval. It’s open source and is not tied to any processing framework, data model or programming language. Parquet is ideal for storing any kind of big data and is built to support efficient compression and encoding schemes.
Capture streaming data in Parquet format using Event Hubs
Using Azure Event Hubs, no code editor for event processing, you can automatically capture streaming data in an Azure Data Lake Storage Gen2 account in Parquet format. The no code editor allows you to easily develop an Azure Stream Analytics job without writing a single line of code.
Once data is captured, any analytics service of your choice can process or analyze Parquet data.
Get Started Today
by Contributed | May 23, 2022 | Technology
This article is contributed. See the original author and article here.
Data loss prevention is a major concern with all customers who would like to have granular control over their data and how it gets exported from their databases on Azure.
The steps below guide on how Outbound Firewall Rules can be leveraged to improve the security posture and ensure data gets exported only to approved Azure Storage accounts. All other Azure Storage accounts are treated as unapproved unless explicitly whitelisted.
The steps below use Azure APIs and Powershell cmdlets to implement the lockdown and enable OFRs.
Pre-requisites:
1. Valid Service Principal based Azure Active Directory (AAD) token for authentication of requests.
2. Latest version of Azure Powershell cmdlets
To enable Restrict Outbound Network Access and add/create OFRs using APIs
1. Check the current OFR configuration of the SQL Server using a GET request on
https://management.azure.com/subscriptions/{{subId}}/resourceGroups/{{sqlRg}}/providers/Microsoft.Sql/servers/{{sqlServer}}?api-version=2021-02-01-preview
where
{{subId}} = Subscription ID
{{sqlRg}} = Resource Group hosting the SQL server
{{sqlServer}} = name of the SQL server
It should show that the restrictOutboundNetworkAccess is disabled.
2. Create two storage accounts on Azure Storage. Example:
– auditallowstorage
– auditdenystorage
3. Export database to both storage accounts. The export should be successful for both accounts.
4. Issue a PUT request to Enable RestrictOutboundNetworkAccess on the SQL server using SQL API
https://management.azure.com/subscriptions/{{subId}}/resourceGroups/{{sqlRg}}/providers/Microsoft.Sql/servers/{{sqlServer}}?api-version=2021-02-01-preview
with JSON body as
{ "properties" :
       {"restrictOutboundNetworkAccess": "Enabled"},
              "location": "<sql_server_region>"
}
where
{{subId}} = Subscription ID
{{sqlRg}} = Resource Group hosting the SQL server
{{sqlServer}} = name of the SQL server
<server_region> = region where the SQL server is hosted
5. Verify that the restrictOutboundNetworkAccess property is now set to Enabled by issuing a GET request on
https://management.azure.com/subscriptions/{{subId}}/resourceGroups/{{sqlRg}}/providers/Microsoft.Sql/servers/{{sqlServer}}/outboundfirewallrules?api-version=2021-02-01-preview
where
{{subId}} = Subscription ID
{{sqlRg}} = Resource Group hosting the SQL server
{{sqlServer}} = name of the SQL server
It should show that the provisioned state is “ready” for restrictOutboundNetworkAccess
6. Ensure that there is no existing Outbound Firewall Rule in place using this Powershell command:
Get-AzSqlServerOutboundFirewallRule -ServerName <sql_server_name> -ResourceGroupName <resource_group_name>
where
<resource_group_name> = Resource Group hosting the SQL server
<sql_server_name> = name of the SQL server
7. Export database again to both of the storage accounts (auditallowstorage and auditdenystorage). This should fail.
8. Create OFR only for storage account auditallowstorage using this PUT request:
https://management.azure.com/subscriptions/{{subId}}/resourceGroups/{{sqlRg}}/providers/Microsoft.Sql/servers/{{sqlServer}}/outboundfirewallrules/{{saName}}.blob.core.windows.net?api-version=2021-02-01-preview
where
{{subId}} = Subscription ID
{{sqlRg}} = Resource Group hosting the SQL server
{{sqlServer}} = name of the SQL server
{{saName}} = Storage Account name for which OFR is created. In this case, its auditallowstorage
9. Verify that OFR was successfully created for storage account using this Powershell command:
Get-AzSqlServerOutboundFirewallRule -ServerName <sql_server_name> -ResourceGroupName <resource_group_name>
where
<resource_group_name> = Resource Group hosting the SQL server
<sql_server_name> = name of the SQL server
It should show the list of the allowed FQDN (Fully Qualified Domain Name). In this case, its auditallowstorage.
10. Export database to storage account auditallowstorage. This should be successful.
11. Export database to storage account auditdenystorage should still fail.
To disable Restrict Outbound Network Access and remove OFRs
1. Remove all Outbound Firewall Rules:
Remove-AzSqlServerOutboundFirewallRule -ServerName <sql_server_name> -ResourceGroupName <resource_group_name> -AllowedFQDN <sa_name>.blob.core.windows.net
where
<resource_group_name> = Resource Group hosting the SQL server
<sql_server_name> = name of the SQL server
<sa_name> = Storage Account Name
2. Issue a PUT request to disable RestrictOutboundNetworkAccess on the SQL server using SQL API
https://management.azure.com/subscriptions/{{subId}}/resourceGroups/{{sqlRg}}/providers/Microsoft.Sql/servers/{{sqlServer}}?api-version=2021-02-01-preview
with JSON body as
{ "properties" :
       {"restrictOutboundNetworkAccess": "Disabled"},
              "location": "<sql_server_region>"
}
where
{{subId}} = Subscription ID
{{sqlRg}} = Resource Group hosting the SQL server
{{sqlServer}} = name of the SQL server
<server_region> = region where the SQL server is hosted
3. Verify that the restrictOutboundNetworkAccess property is disabled on the SQL server by issuing the following GET request on
https://management.azure.com/subscriptions/{{subId}}/resourceGroups/{{sqlRg}}/providers/Microsoft.Sql/servers/{{sqlServer}}?api-version=2021-02-01-preview
where
{{subId}} = Subscription ID
{{sqlRg}} = Resource Group hosting the SQL server
{{sqlServer}} = name of the SQL server
To enable Restrict Outbound Network Access and add/create OFRs using Powershell
1. Execute the following command to enable restrictOutboundNetworkAccess property on the SQL server:
Set-AzSqlServer -ServerName <server_name> -ResourceGroupName <resource_group> -RestrictOutboundNetworkAccess "Enabled"
where
<server_name> = name of the SQL server
<resource_group> = name of the resource group
2. Check the current list of Outbound Firewall Rules on the SQL server:
Get-AzSqlServerOutboundFirewallRule -ServerName <server_name> -ResourceGroupName <resource_group>
where
<server_name> = name of the SQL server
<resource_group> = name of the resource group
3. Export database again to both of the storage accounts (auditallowstorage and auditdenystorage). This should fail.
4. Add a new Outbound Firewall Rule on the server using the command:
New-AzSqlServerOutboundFirewallRule -ServerName <server_name> -ResourceGroupName <resource_group> -AllowedFQDN <sa_name>.blob.core.windows.net
where
<resource_group> = Resource Group hosting the SQL server
<server_name> = name of the SQL server
<sa_name> = Storage Account Name
5. List the OFRs on the server using the following command:
Get-AzSqlServerOutboundFirewallRule -ServerName <server_name> -ResourceGroupName <resource_group>
6. Export database to storage account auditallowstorage. This should be successful
7. Export database to storage auditdenystorage should still fail.
Hope this was useful folks! Feel free to get in touch :)


Recent Comments