This article is contributed. See the original author and article here.
There’s a known issue with the noncompliance messaging details that appear in Company Portal for Windows 10/11 devices. When a device is identified as noncompliant due to having a Windows build outside the ranges an admin specifies in the Intune compliance policy, a remediation message is displayed in the Company Portal indicating the operating system (OS) needs updating along with a valid range of OS versions. However, when multiple OS ranges are specified in the policy by configuring the Valid operating systembuilds compliance setting, the message in the Company Portal will only display the first OS build range rather than all acceptable ranges.
The compliance policy is being enforced correctly despite the missing ranges in the remediation messaging. To make the device compliant, update the device OS build to a version within the specified acceptable range in the compliance policy.
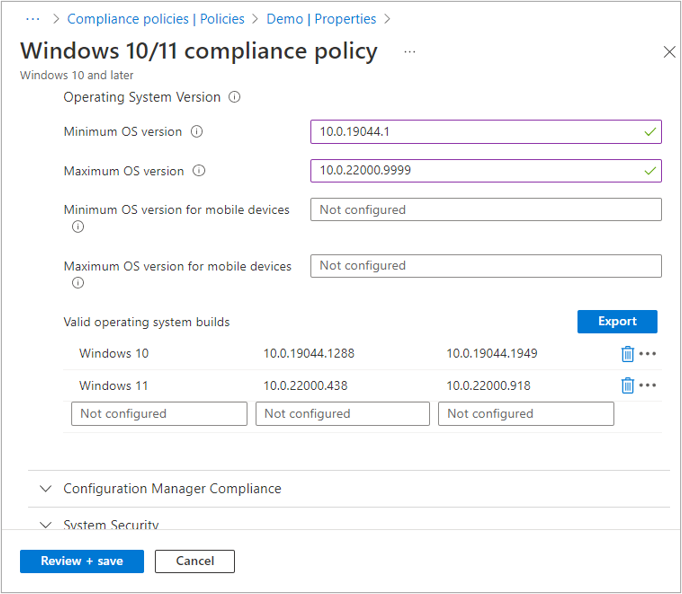
Here’s an example of the scenario, the compliance policy below has two ranges within the Valid operating system builds setting 10.0.19044.1288 – 10.0.19044.1949 and 10.0.22000.438 – 10.0.22000.918.
Screenshot of a new Windows 10/11 compliance policy with a few settings configured from this blog post.
If a device’s OS falls outside of those ranges, they’ll correctly receive a remediation message in the Company Portal, but the message will only display the first range: 10.0.19044.1288 – 10.0.19044.1949.
Screenshot of a managed Windows 11 PC and its current compliance settings under the Intune Company Portal.
If you have any questions or comments for the Intune team, reply to this post or reach out to @IntuneSuppTeam on Twitter.
This article is contributed. See the original author and article here.
By Hugo Affaticati, Technical Program Manager
Introduction
Azure is pleased to share results from our MLPerf Inference v2.1 submission. For this submission, we benchmarked our NC A100 v4-series, NDm A100 v4-series, and NVads A10 v5-series. They are powered by the latest NVIDIA A100 PCIe Tensor Core GPUs, NVIDIA A100 SXM Tensor Core GPUs and NVIDIA A10 Tensor Core GPUs respectively. These offerings are our flagship virtual machine (VM) types for AI inference and training and enable our customers to address their inferencing needs, ranging from 1/6 of a GPU to eight GPUs. These series are all available making AI inference accessible to all. We are excited to see what new breakthroughs our customers will make using these VMs.
In this document, we share outstanding AI benchmark results MLPerf Inference v2.1 and the best practices and configuration details you need to be able to replicate them. And as a result, not only do we show that Azure is committed to providing our customers with the latest GPU offerings, but that are also in line with on-premises performance and available on-demand in the cloud, and scales to adapt to all sizes of AI workloads and needs.
MLPerfTM from MLCommons®
MLCommons® is an open engineering consortium of AI leaders from academia, research labs, and industry where the mission is to “build fair and useful benchmarks” that provide unbiased evaluations of training and inference performance for hardware, software, and services—all conducted under prescribed conditions. MLPerf™ Inference benchmarks consist of real-world compute-intensive AI workloads to best simulate customer’s needs. MLPerf™ tests are transparent and objective, so technology decision makers can rely on the results to make informed buying decisions.
Highlights of Performance Results
The highlights of results obtained with MLPerf Inference v2.1 benchmarks exercise are shown below.
NC A100 v4-series achieved 54.2K+ samples/s for RNN-T offline scenario
NDm A100 v4-series achieved 26+ samples/s for 3D U-Net offline scenario
NVads A10 v5-series achieved 24.7K+ queries/s for ResNet50 server scenario
Once your machine is deployed and configured, create a folder for the scripts and get the scripts from MLPerf Inference v2.1 repository.
cd /mnt/resource_nvme
git clone https://github.com/mlcommons/inference_results_v2.1.git
cd inference_results_v2.1/closed/Azure
Create folders for the data and get the ResNet50 data:
export MLPERF_SCRATCH_PATH=/mnt/resource_nvme/scratch
mkdir -p $MLPERF_SCRATCH_PATH
mkdir $MLPERF_SCRATCH_PATH/data $MLPERF_SCRATCH_PATH/models $MLPERF_SCRATCH_PATH/preprocessed_data
cd $MLPERF_SCRATCH_PATH/data && mkdir imagenet && cd imagenet
In this imagenet folder download ImageNet Data available online and go back to the script.
cd /mnt/resource_nvme/inference_results_v2.1/closed/Azure
Get the rest of the datasets from inside the container:
make prebuild
make download_data BENCHMARKS=”resnet50 bert rnnt 3d-unet”
make download_model BENCHMARKS=”resnet50 bert rnnt 3d-unet”
make preprocess_data BENCHMARKS=”resnet50 bert rnnt 3d-unet”
make build
Run the benchmark
Finally, run the benchmark with the make run command, an example is given below. The value is only correct if the result is “VALID”, modify the value in the config files if the result is “INVALID”.
make run RUN_ARGS=”–benchmarks=bert –scenarios=offline –config_ver=default,high_accuracy,triton,high_accuracy_triton”
This article is contributed. See the original author and article here.
It’s been a while since our last MEC, and a lot has changed since then.
The MEC Technical Airlift is a free, digital event for IT professionals who work with Exchange Online and/or Exchange Server day-to-day, and ISVs and developers who make solutions that integrate with Exchange.
MEC will be THE place for the Exchange community to come together to explore new innovations and information. It features a variety of learning opportunities, deep technical breakout sessions, and time with members of our passionate engineering teams. You’ll also hear from some of the best-known names in Exchange around the world and get engaged in the community.
First and foremost, MEC is about fostering the Exchange community. MEC is the best place to engage directly with the engineering teams that build Exchange Online and Exchange Server and your peers in the community.
Security is of paramount importance to all organizations, and a big goal for MEC is to help customers secure their Exchange environment. The accelerated rate of digital transformation we have seen these past years presents both challenges and opportunities. Now more than ever it is critical to keep your infrastructure secure, including your Exchange infrastructure and data.
At MEC, we want to help all of you modernize your infrastructure. Whether you run Exchange in the cloud, on-premises, or both, we want to help you move forward successfully and at the same time get your feedback and input on how we can improve our products and services. Join us for two jam-packed days of all things Exchange.
This article is contributed. See the original author and article here.
Join us for new insights on the employee experience
Faced with a shifting economic landscape and increasingly tight labor market, today’s leaders are looking for new ways to balance organizational success with the wellbeing of their teams.
Join Satya Nadella and Jared Spataro, plus Ryan Roslansky of LinkedIn, at this digital event to get urgent insights into creating meaningful digital employee experiences, bridging the gap between leaders and their people, and empowering people to be their best.
Empowering Your Workforce in Economic Uncertainty Thursday, September 22, 2022 9:00 AM–9:45 AM Eastern Time
This article is contributed. See the original author and article here.
Now more than ever organizations need a single, integrated experience that makes working together easier and more engaging for their employees whether they are all in the same room, remote, or—for many of us—a mix of both. Because of this, Microsoft is happy to announce changes to our Microsoft Teams Rooms licensing model.


Recent Comments