by Contributed | Oct 17, 2024 | Technology
This article is contributed. See the original author and article here.
In the realm of software development, code signing certificates play a pivotal role in ensuring the authenticity and integrity of code. For individual developers, obtaining these certificates involves a rigorous identity validation process. This blog explores the challenges individual developers face and how Trusted Signing can streamline the code signing process, with a focus on how its individual validation process contributes to this efficiency.
Challenges faced by Individual Developers in Code Signing
Individual developers often face unique challenges when it comes to code signing. Here are some key issues:
- Identity Validation process: This includes challenges such as obtaining the necessary documentation, undergoing lengthy verification processes, and dealing with differing requirements from various CAs.
- Private Key Theft or Misuse: Private keys are crucial for the code signing process and must be protected at all times. If these keys are stolen, attackers can use the compromised certificates to sign malware, distributing harmful software under a verified publisher name. It is expensive for individual developers to invest in the infrastructure and operations required to manage and store the keys.
- Complexity and Cost: The process of obtaining and managing code signing certificates can be complex and expensive, especially for individual developers and small teams. This complexity can lead to incomplete signing or not signing at all.
- Integration with DevOps: Code signing needs to be integrated with DevOps processes, tool chains, and automation workflows. Ensuring that access to private keys is easy, seamless, and secure is a significant challenge.
- Code Integrity and Security: While code signing ensures the integrity of software, it does not guarantee that the signed code is free from vulnerabilities. Hackers can exploit unregulated access to code signing systems to get malicious code signed and distributed.
What is the Trusted Signing service?
Trusted Signing is a comprehensive code signing service supported by a Microsoft-managed certification authority. The identity validation process is designed to be robust. Certificates are issued from Microsoft-managed CAs and are subsequently protected and serviced by providing seamless integration with leading developer toolsets. This eliminates the need for individual developers to invest in additional infrastructure and operations.
The Importance of Identity Validation
Identity validation is crucial for securing code signing certificates. It ensures that the individual requesting the certificate is indeed who they claim to be, thereby preventing malicious actors from distributing harmful code under the guise of legitimate software. This process builds trust among users and stakeholders, as they can be confident that the signed code is authentic and has not been tampered with.
Process for Identity Validation with Trusted Signing
Trusted Signing utilizes Microsoft Entra Verified ID (VID) for identity validation of individual developers. This process ensures that developers receive a VID, which is accessible through the Authenticator app, offering enhanced security, a streamlined process, and seamless integration with Microsoft Entra.
The verification process involves the following steps:
- Submission of Government-Issued Photo ID: The first requirement is to provide a legible copy of a currently valid government-issued photo ID. This document must include the same name and address as on the certificate order.
- Biometric/selfie check: Along with the photo ID, applicants need to submit a selfie. This step ensures that the person in the ID matches the individual applying for the certificate.
- Additional Verification Steps: If the address is missing on the government issued ID card, then additional documents will be required to verify the address of the applicant.
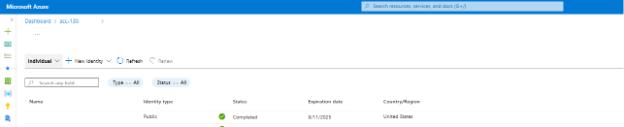
This is how a successfully procured VID would appear in Azure portal.
Best Practices for a Smooth Validation Process
To ensure a smooth and successful identity validation process, individual developers should adhere to the following best practices:
- Accurate Documentation: Ensure that all submitted documents are accurate and up-to-date and follow the guidelines.
- Stay Informed: Keep abreast of any changes in the validation requirements or processes of the CA you are working with.

Costs of using Trusted Signing service
Trusted Signing offers two pricing tiers starting at $9.99/month and you can pick the tiers based on your usage. Both tiers are designed to provide optimal cost efficiency and cater to various signing needs. You can find the pricing details here. The costs for identity validation, certificate lifecycle management, storing the keys securely, and signing are all included in a single SKU, ensuring accessibility and predictable expenses.
Conclusion
Identity validation is a critical step for individual developers seeking code signing certificates. By understanding the process, preparing in advance, and following best practices, developers can successfully navigate the validation process and secure their code signing certificates with Trusted Signing. This not only enhances the security of their software but also builds trust with users and stakeholders.

by Contributed | Oct 17, 2024 | Business, Microsoft 365, Technology
This article is contributed. See the original author and article here.
As a small or medium-sized business (SMB) leader, you’ve likely heard a lot about generative AI and how it’s transforming businesses of all sizes. To better understand how AI is helping businesses grow and compete, Microsoft commissioned Forrester Consulting to study the potential return on investment (ROI) of Microsoft 365 Copilot for SMBs.
The post Microsoft 365 Copilot drove up to 353% ROI for small and medium businesses—new study appeared first on Microsoft 365 Blog.
Brought to you by Dr. Ware, Microsoft Office 365 Silver Partner, Charleston SC.
by Contributed | Oct 16, 2024 | Business, Microsoft 365, Technology
This article is contributed. See the original author and article here.
We’re honored to announce that Microsoft has, once again, been recognized as a Leader in the 2024 Gartner® Magic Quadrant™ for Unified Communications as a Service (UCaaS), Worldwide. This is the sixth year we’ve received this recognition and we’re thrilled to be positioned highest in both the ability to execute and furthest on completeness of vision axes.
The post Microsoft named a Leader in the 2024 Gartner® Magic Quadrant™ for Unified Communications as a Service for the sixth year in a row appeared first on Microsoft 365 Blog.
Brought to you by Dr. Ware, Microsoft Office 365 Silver Partner, Charleston SC.
by Contributed | Oct 16, 2024 | Technology
This article is contributed. See the original author and article here.
We’re excited to introduce the cross-location shifts feature in Microsoft Shifts app, designed to enhance flexibility and efficiency for both frontline managers and workers. Currently in public preview, this feature empowers businesses to better manage staffing across multiple locations while giving employees more control over their schedules.
For Frontline Managers
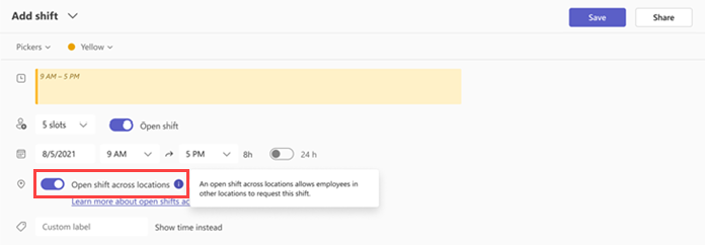
With cross-location shifts, managers can offer open shifts across various teams and locations, helping to balance workforce needs, fill last-minute gaps, and improve customer satisfaction. By turning on the cross-location feature in Shifts settings, managers can post open shifts that employees from other locations can request, ensuring their store or site is always fully staffed.
Managers will be notified when employees from other locations request shifts and can easily approve or decline requests. Once approved, workers from other locations will appear in your schedule as external employees, making it seamless to track staff across locations.
For Frontline Workers
The cross-location feature provides more flexibility for employees, allowing them to pick up open shifts at different locations that suit their schedules. Workers can view open shifts at other sites and submit a request to pick up the shift. Once approved by the manager at that location, the shift will appear in their schedule.

Getting Started
For IT Admins: To enable cross-location open shifts in your organization, follow the steps outlined here: Set up open shifts across locations in Shifts for your frontline – Microsoft 365 for frontline workers | Microsoft Learn
For Managers and Workers: Learn more about using this feature here: Use open shifts across locations in Shifts – Microsoft Support
What’s coming next:
- Manager of employees can opt in for approval when they are working at other locations in addition to approval of the target store manager
- Manager of employee can view the location name in the team schedule when they are working at other locations
This powerful new feature helps businesses optimize staffing, enhance worker flexibility, and improve overall operational efficiency. Stay tuned as we refine this feature during its public preview phase, and we encourage you to share your feedback!
Please take a moment to share your feedback/questions on this feature via this brief survey (https://aka.ms/CrossLocationShifts) and include your email for any further queries. We’re eager to connect with you!

by Contributed | Oct 15, 2024 | Technology
This article is contributed. See the original author and article here.
Introduction
In today’s data-driven world, the ability to act upon data as soon as its generated is crucial for businesses to make informed decisions quickly. Organizations seek to harness the power of up-to-the-minute data to drive their operations, marketing strategies, and customer interactions.
This becomes challenging in the world of real-time data where it is not always possible to do all the transformations while the data is being streamed. Therefore, you must come up with a flow that does not impact the data stream and is also quick.
This is where Microsoft Fabric comes into play. Fabric offers a comprehensive suite of services including Data Engineering, Data Factory, Data Science, Real-Time Intelligence, Data Warehouse, and Databases. But today, we are going to focus on Real-Time Intelligence.
Use-Cases
This set up can be used in scenarios where data transformation is needed to be used in downstream processing/analytical workload. As example of this would be to enable OneLake availability in KQL table and use that data to be accessed by other Fabric engines like Notebooks, Lakehouse etc. for training ML models/analytics.
Another example let’s say you have a timestamp column in your streaming data and you would like to change its format based on your standard. You can use the update policy to transform the timestamp data format and store it.
Overview
Fabric Real-Time Intelligence supports KQL database as its datastore which is designed to handle real-time data streams efficiently. After ingestion, you can use Kusto Query Language (KQL) to query the data in the database.
KQL Table is a Fabric item which is part of the KQL Database. Both these entities are housed within an Eventhouse. An Eventhouse is a workspace of databases, which might be shared across a certain project. It allows you to manage multiple databases at once, sharing capacity and resources to optimize performance and cost. Eventhouses provide unified monitoring and management across all databases and per database.
Figure 1: Hierarchy of Fabric items in an Eventhouse
Update policies are automated processes activated when new data is added to a table. They automatically transform the incoming data with a query and save the result in a destination table, removing the need for manual orchestration. A single table can have multiple update policies for various transformations, saving data to different tables simultaneously. These target tables can have distinct schemas, retention policies, and other configurations from the source table.
Scope
In this blog, we have a scenario where we will be doing data enrichment on the data that lands in the KQL table. In this case, we will be dropping the columns we don’t need but you can also do other transformations supported in KQL on the data.
Here we have a real-time stream pushing data to a KQL table. Once loaded into the source table, we will use an update policy which will drop columns not needed and push the data of interest to the destination table from the source table.

Prerequisites
Creating sample data stream
- In the Real-Time Intelligence experience, create a new event stream.
- Under source, add new source and select sample data.

- Continue configuring the stream. I am using the Bicycles sample data stream in this blog.
- Select Direct ingestion as the Data Ingestion Mode for destination.
- Select your workspace and KQL database you have created as a prerequisite to this exercise for the destination.
- You should be seeing a pop-up to configure the database details and continue to configure the table where you need to land the data from the stream.
Configuring KQL Table with Update Policy
- Open the Eventhouse page in Fabric. There you should now be able to preview the data that is being ingested from the sample data stream.
Create a new destination table. I used the following KQL to create the new table (destination):
.create table RTITableNew (
    BikepointID: string,Street: string, Neighbourhood: string, No_Bikes: int, No_Empty_Docks: int )
- Under the Database tab, click on new and select Table Update Policy.

You can edit the existing policy format or paste the one below that I used:
NOTE: RTITable is source and RTITableNew is the destination table.
.alter table RTITable policy update ```[
{
"IsEnabled": true,
"Source": "RTITable",
"Query": "RTITable | project BikepointID=BikepointID, Street=Street, Neighbourhood=Neighbourhood, No_Bikes=No_Bikes, No_Empty_Docks=No_Empty_Docks ",
"IsTransactional": true,
"PropagateIngestionProperties": false,
"ManagedIdentity": null
}
]```
The above policy drops the Longitude and Latitude columns and stores the rest of the columns in the destination table. You can do more transformations as per your requirements, but the workflow remains the same.
- After running the above command, your destination table will start populating with the new data as soon as the source table gets data. To review the policy on the destination table, you can run the following command:
.show table policy update
Conclusion
To summarize, we took a real-time data stream, stored the data in a KQL database and then performed data enrichment on the data and stored in a destination table. This flow caters the scenarios where you want to perform processing on the data once its ingested from the stream.
Further Reading and Resources
Common scenarios for using table update policies – Kusto | Microsoft Learn
Create a table update policy in Real-Time Intelligence – Microsoft Fabric | Microsoft Learn

Recent Comments