by Contributed | Nov 21, 2022 | Technology
This article is contributed. See the original author and article here.
We are excited to be partnering with SWOOP Analytics to host our 2022 Yammer and Viva Engage Festival on December 7th! This event is for our customers to learn from each another and hear how to build culture and community in your own organizations. If you are launching and not sure where to begin or are curious to hear what’s on the roadmap for Viva Engage, there are sessions for you!
Agenda and Speakers
This virtual event will span across European, Americas, and Asia Pacific time zones. Look at the agenda to see an idea of the types of stories and sessions that will be available and add them to your calendar! Feel free to attend sessions outside of your timezone.
All sessions will be recorded to be able to watch on demand following the event.
Customers from around the world are ready to share with you their experiences from all different types of industries and stages of adoption. Our speakers will share advice, tactics and best practices that you’ll be able to take and use at your organization. You’ll also hear directly from Microsoft and learn more about the future of Microsoft Viva. Take a closer look at all the presenters here.

Nominate your colleagues for the Community Champion Award
The Yammer Community Champion Award is an opportunity to recognize passionate community managers around the world who are committed to employee engagement, knowledge sharing, and collaboration in their Yammer networks and communities.
As part of the Yammer Community Festival, we will announce regional winners of the Yammer Community Champion Award.
Can you think of anyone who deserves this title? Tell us who you think should win this award!
Register today!
Secure your virtual seat and register now! We’re running the event as an interactive Microsoft Teams meeting with Q&A enabled. Bring your questions and ideas as we want to make the chat component active, with many voices heard. Speakers are there to prompt conversations in chat and be prepared to unmute!
FAQs
How much does this cost?
This event is free so invite your whole team!
Who should attend?
With the variety of backgrounds from our speakers and other attendees, most roles will be able to find a similar role from one our customers that supports the work you do, if you are in marketing, communications, sales, product development or IT. Join us!
Can I attend a session outside of my time zone?
Yes! Feel free to attend any session that fits your schedule, regardless of your location.
Will sessions be recorded?
Yes, sessions will be recorded and made available after the event.
How many people can I nominate for the Community Champion Award?
We do not have a set limit for the number of nominations by organization or person. Feel free to nominate all the Community Champions you know!
How many winners will there be and how will they know that they have won?
There will be one winner per regional session and winners will be contacted in advance of session that they have been ‘shortlisted’ as a top contender for the Yammer Community Champion Award. This is to ensure the winners are present to virtually accept their award.
What do the Community Champion Award members win?
There will be custom merchandise sent to each award winner.
by Contributed | Nov 20, 2022 | Technology
This article is contributed. See the original author and article here.
Azure compute benchmark is now aligned with CIS
Security benchmarks help organizations strengthen their security posture and meet various cloud security compliance requirements. The Microsoft cloud security benchmark announced at Ignite 2022 provides clear and concrete guidance to securely configure cloud resources.
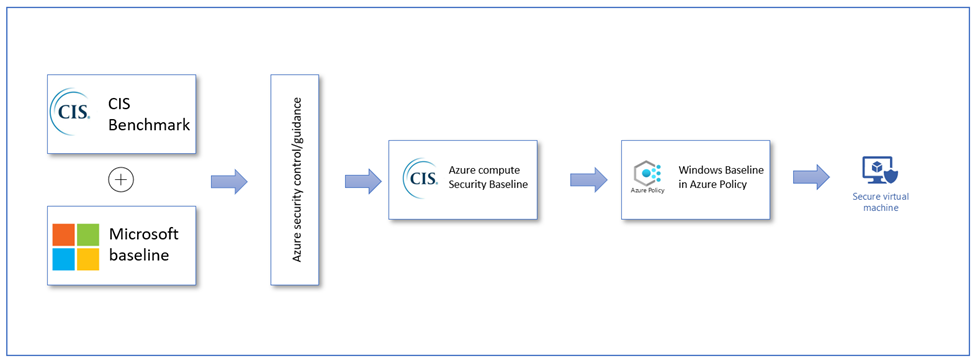
Today, we are excited to announce a new Azure compute benchmark for Azure virtual machines. This newly released benchmark has the CIS recommended security configurations aligned with the Azure environment. this new benchmark takes into consideration the cloud-specific security controls and removes non-applicable controls that have no significant risk impact in cloud environment.
‘CIS Azure Compute Microsoft Windows Server 2019 Benchmark v1.0.0’ can be downloaded from CIS benchmark for Cloud compute. You will be able to seamlessly monitor the secure configuration settings of the new CIS benchmark in Microsoft Defender for Cloud as well as via the built-In Windows baseline Azure policy in the Azure policy Portal.
Figure 1: Azure Security and CIS benchmark team collaboration
Benchmark usage scenarios
Using Microsoft Defender for Cloud:
You will be able to monitor the security baseline settings for Windows Server in the Microsoft Defender for Cloud portal by going to the ‘Remediate Security Configurations’ in ‘Recommendations’ section and selecting ‘Vulnerabilities in security configuration on your Windows machines should be remediated (powered by Guest Configuration)’

Figure 2: Microsoft Defender for Cloud Portal
You will be able see the status of each baseline rule, view baseline failures through ‘Expected’ and ‘Actual’ values, understand the risk and impact of each misconfiguration, and view additional steps to remediate them.

Figure 3: Windows Baseline Recommendation
Using as a ‘BuiltIn’ Policy in Azure Policy Portal:
Alternatively, you can also leverage the Windows Baseline available as a built-in policy to monitor the security configurations setting of your Windows servers. You can assign the “Windows machines should meet requirements of the Azure compute security baseline” and monitor the compliance results in the Azure Policy portal.

Figure 4: Azure Policy Portal
What Next?
- Achieving CIS benchmark certification for the Azure compute baseline: We will be working with the CIS benchmark team to certify the benchmark monitoring implementation to ensure it meets the CIS requirements.
- Publishing a Linux baseline for Ubuntu distributions that is specific to Azure compute: Similar to Windows Server Benchmark, we will be working with CIS benchmark team to develop the Linux baseline for Ubuntu distributions specific to Azure.
We want to thank the CIS benchmark team, contributors from the CIS community and multiple teams within Microsoft for their help with publishing the benchmark!
If you would like to participate in improving the benchmark or provide feedback, please send us an email. We would love to hear your success stories and feedback on how to make it better!
Additional References:

by Contributed | Nov 19, 2022 | Technology
This article is contributed. See the original author and article here.
Hello to our illustrious and awesome readers!
Brandon Wilson here today with a short post just to give our readers a heads up on an excellent learning opportunity that we thought it might be helpful for many of you.
Since there is already content out there, I won’t be going into depth on this, other than to say it will cost you a couple of hours, for a couple of days, and we anticipate the time will be well spent! Go forth and learn (and then pass the knowledge around)! The below content summary will take you to the page to see upcoming workshop dates/times, as well as provide you with the registration link.
So, without further ado, let’s introduce this CTO! style:
Title: Upcoming Microsoft Workshops: How to successfully migrate away from AD FS to Azure AD
Source: Community Events List
Author: Melissa Cox
Publication Date: November 2, 2022
Content excerpt:
Join us to learn how to successfully migrate from AD FS to Azure AD to benefit from improved security and better user experience for your organization. During this in-depth workshop, we want to share why other customers have moved to Azure AD, and what to keep in mind to successfully migrate from AD FS.

Thanks for reading, and I hope this helps you out…we’ll see you on Azure (AD)!
by Contributed | Nov 18, 2022 | Technology
This article is contributed. See the original author and article here.
The Azure Well-Architected Framework (WAF) helps ensure that Azure workloads are reliable, stable, and secure while meeting SLAs for performance and cost. The WAF tenets are:
Applying the Azure WAF to your Azure Data Factory (ADF) workloads is critical and should be considered during initial architecture design and resource deployment. If you haven’t already, check out this companion blog on Azure Data Factory Patterns and Features for the Azure Well-Architected Framework. But how do you ensure that your ADF environment still meets WAF as workloads grow and evolve?
In this blog post, we’ll focus on monitoring Azure Data Factory to help align to the Azure Well-Architected Framework for data workloads.
Alerts and monitoring over Azure Data Factory
All Azure resources offer the capability to build dashboards over costs, but don’t necessarily give you the detail needed or have the alerting capabilities when an issue arises. You can view pipeline activity within the Data Factory itself, but this does not allow you to create aggregated reports over activities and pipelines over time.
Create alerts over ADF metrics, leverage Azure Monitor and Log Analytics for detailed and/or summarized information about your Data Factory activities and/or create your own notification framework within Data Factory, helping your Data Factories to continue to be optimized for cost, performance and reliability.
Using metrics and alerts in Data Factory
Metrics are essentially performance counters, always returning a number, and are leveraged when you configure alerts.
Configure alerts for failures
Configure ADF metrics and alerts to send notifications when triggers, pipelines, activities or SSIS packages fail. In the example below, an alert will be issued whenever the activity name “cdCopyTextToSQL” fails:

Configure Pipeline Elapsed Time metric
In the ADF Pipeline Settings, the Elapsed time metrics on Pipeline Settings allows you to set a duration metric for the pipeline:

Then create an Alert Rule for Elapsed Time Pipeline Run metrics:

If the pipeline runtime exceeds the duration defined in the Elapsed time metric Pipeline Settings, an alert will be issued.
Set Alerts on Self-Hosted Integration Runtimes
Self-Hosted Integration Runtimes (SHIRs) are used to move and transform data that resides in an on-premises network or VNet. Set alerts to ensure resources are not overutilized or queuing data movement requests:

The following metrics are available:
- Integration runtime available memory (IntegrationRuntimeAvailableMemory) – be notified when there are any dips in available memory
- Integration runtime available node count (IntegrationRuntimeAvailableNodeNumber) – be notified when nodes in a SHIR cluster are not available or not being fully utilized
- Integration runtime CPU Utilization (IntegrationRuntimeCpuPercentage) – be notified when there are spikes in CPU or when CPU is being maxed out
- Integration runtime queue duration (IntegrationRuntimeAverageTaskPickupDelay) – be notified when the average activity queue duration exceeds a limit
- Integration runtime queue length (IntegrationRuntimeQueueLength) – be notified when there are long waits between activities
You can also configure event log capture on the VM(s) that hosts your SHIR.
Set alerts on Azure Subscription Limits
ADF has resources limits per Azure subscription. If you expect a Data Factory will have a large number of pipelines, datasets, triggers, linked services, private endpoints and other entities, set alerts on the count of Total entities to be notified when Data Factories start approaching the limit (Default Limit is 5000). For example:

You can also set an alert or query on Total factory size (GB unit) to ensure the Data Factory will not exceed the data factory size limit (2 GB default).
Leveraging alerts in ADF allows you to be immediately notified when pipelines are failing or when resources are reaching their limits, supporting WAF tents of Cost Optimization, Reliability, Operational Excellence, and Performance Efficiency.
Use Azure Monitor with Log Analytics over Data Factory
Azure Monitor provides verbose information about your ADF triggers, pipelines, and activities for further analysis.
Add diagnostic settings
Add diagnostic settings to your Data Factory, enabling Azure Monitor to provide detailed information such as activity duration, trends, and failure information.
Send this data to Log Analytics to query in with the Kusto Query Language(KQL), build Azure workbooks from KQL queries, or export to Power BI for further transformation and analysis.

(In my Data Factories, I do not use SSIS therefore I do not have them configured.)
Explore logs with KQL
In the Azure Portal for the Data Factory where you configured the diagnostic settings, go to Monitoring -> Logs to query the corresponding Log Analytics tables containing the run information about my Data Factory:

Detailed Failure Information
Run queries to get detailed information or aggregated information around failures, as in the example below:
ADFActivityRun
| where Status == 'Failed'
| project ActivityName, TimeGenerated, Error, Input, Output

Extrapolate costs for orchestration
Costs in Azure Data Factory are based upon Usage. Costs are based upon the number of activities run or triggered, the type of Integration Runtime (IR) used, the number of cores used in an IR, and the type of activity. Get the latest pricing details here
Calculations for Orchestration activities are simple: sum up the number of failed or successful activities (ADFActivityRun) plus the number of triggers executed (ADFTriggerRun) plus the number of debug runs (ADFSandboxPipelineRun). The table below summarizes the cost per 1000 runs (as of 11/14/2022):
Activity Type
|
Azure IR
|
VNet Managed IR
|
Self-Hosted IR
|
Orchestration
|
$1/1000 Runs
|
$1/1000 Runs
|
$1.50/1000 Runs
|
Here’s a sample query to the number of activity runs, where you can apply the cost per IR:
ADFActivityRun
| where Status != "Queued" and Status != "InProgress"
| where EffectiveIntegrationRuntime != ""
| summarize count() by EffectiveIntegrationRuntime

Costs are also accrued based upon the type of activity, the activity run duration, and the Integration Runtime used. This data is available in the ADFActivityRun table. Below are the cost details for pipeline activities by IR (for West US 2, as of 11/14/2022):
Activity Type
|
Azure IR
|
VNet Managed IR
|
Self-Hosted IR
|
Data movement activities
|
$0.25/DIU-hour
|
$0.25/DIU-hour
|
$0.10/hour
|
Pipeline activities
|
$0.005/hour
|
$1/hour
|
$0.002/hour
|
External pipeline activities
|
$0.00025/hour
|
$1/hour
|
$0.0001/hour
|
The example query below derives the elements highlighted above that contribute to the Activity cost:
ADFActivityRun
| where Status != "Queued" and Status != "InProgress"
| project ActivityJson = parse_json(Output)
| project billing = parse_json(ActivityJson.billingReference.billableDuration[0]), ActivityType = parse_json(ActivityJson.billingReference.activityType)
| where ActivityType =="PipelineActivity"
| evaluate bag_unpack(billing)
| project duration, meterType, unit

Dataflow activity costs are based upon whether the cluster is General Purpose or Memory optimized as well as the data flow run duration (Cost as of 11/14/2022 for West US 2):
General Purpose
|
Memory Optimized
|
$0.274 per vCore-hour
|
$0.343 per vCore-hour
|
Here’s an example query to get elements for Dataflow costs:
ADFActivityRun
| where Status != "Queued" and Status != "InProgress" and ActivityType =="ExecuteDataFlow"
| project ActivityJson = parse_json(Output), InputJSon = parse_json(Input)
| project billing = parse_json(ActivityJson.billingReference.billableDuration[0]), compute = parse_json(InputJSon.compute)
| evaluate bag_unpack(billing)
| evaluate bag_unpack(compute)

Costs on Data Factory operations are also incurred, but these are generally insignificant (costs as of 11/14/2022, US West 2):
Read/Write
|
Monitoring
|
$0.50 per 50,000 modified/referenced entities
|
$0.25 per 50,000 run records retrieved
|
For more examples on Data Factory pricing, see Understanding Azure Data Factory pricing through examples.
You can also export all the table data from Log Analytics to Power BI and build our own reports:

Build your own monitoring framework
Some organizations prefer to build their own monitoring platform, extracting pipeline input, output, or error information to SQL or their data platform of choice. You can also send email notifications when an activity fails.

Monitoring your data factories, whether it is with the built-in features of Azure Metrics, Azure Monitor and Log Analytics or through your own auditing framework, helps ensure your workloads continue to be optimized for cost, performance and reliability to meet the tenets of the WAF. New features are continually added to Azure Data Factory and new ideas evolve as well. Please post your comments and feedback with other features or patterns that have helped you monitor your data factories!
by Contributed | Nov 17, 2022 | Technology
This article is contributed. See the original author and article here.
We are excited to announce the public preview support for Cosmos DB endpoint from IoT Hub in November 2022. You can now stream your data directly from IoT Hub to Cosmos DB.
Many IoT solutions require extensive downstream data analysis and pushing data into hyperscale databases. For example, IoT implementations in manufacturing and intelligent transport systems require hyperscale databases with extremely high throughput to process the continuous stream of data. Traditional SQL based relational databases cannot scale optimally and also become expensive once data scale increases. Cosmos DB is best suited for such cases where the data needs to be analyzed while it is being written!
Until today, there was no direct way to get IoT device data to Cosmos DB. You had to either setup a custom application or use other tools like Azure Functions or Azure Stream Analytics to collect the streaming data and then write to Cosmos DB. This was not only an additional overhead, but also increased the overall cost of the solution. You don’t need to do this any longer – with the new release, you can:
- Configure a Cosmos DB account as a custom endpoint within the IoT Hub
- Use Synthetic Partition Keys to auto-generate partition keys based on your business logic
- Create routing rules to send data directly to the defined Cosmos DB endpoint
How to configure a Cosmos DB endpoint?
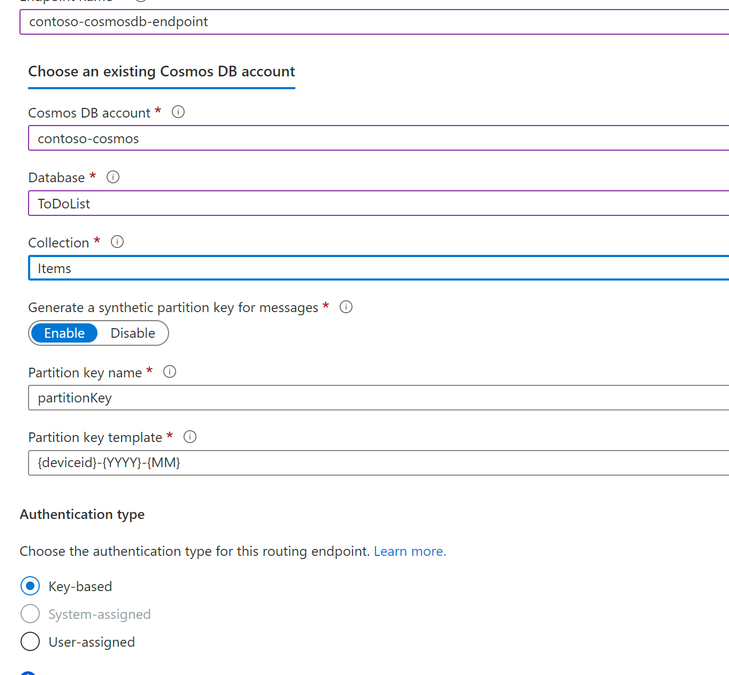
Setting up a Cosmos DB endpoint is pretty straightforward. In the Azure portal, open the IoT Hub blade that you have setup and navigate to the Hub settings. Select “Message Routing” on the left pane and click on “Custom endpoints” and choose “Cosmos DB” from the dropdown list. Once you select Cosmos DB as your preferred endpoint, the below screen appears – configure the endpoint and click on Create to complete the process.
 Figure 1: Creating a Cosmos DB custom endpoint
Once you have setup the Cosmos DB endpoint, you can use it to setup routes, create routing rules and use all the other functionalities available in message routing within IoT Hub.
When should I use Synthetic Partition Keys?
IoT Hub supports writing to Cosmos DB in JSON (if specified in the message content-type) or as Base64 encoded binary. You can also enable Synthetic Partition Keys to create logical partitions of your data automatically based on your business logic and data growth rate.
As Cosmos DB is a hyperscale datastore, all data/documents written to it must contain a field that represents a logical partition. The partition key property name is defined at the Container level and cannot be changed once it has been set. Each logical partition has a maximum size of 20GB. To effectively support high-scale scenarios, you can enable Synthetic Partition Keys for the Cosmos DB endpoint and configure them based on your estimated data volume. For example, in manufacturing scenarios, your logical partition might be expected to approach its max limit of 20 GB within a month. In that case, you can define a Synthetic Partition Key which is a combination of the device id and the month. This key will be automatically added to the partition key field for each new Cosmos DB record, ensuring logical partitions are created each month for each device.
What next?
Setting up of Cosmos DB endpoint from the Azure portal is available for public preview in November 2022. You can learn more about the functionality from our documentation. We are working towards adding support for setup via CLI and general availability of Cosmos DB custom endpoints – this is coming soon! You can also reach out to us via various support tools if you have any questions or require technical support.
We are looking forward to your feedback!

Recent Comments