
by Contributed | Mar 3, 2023 | Technology
This article is contributed. See the original author and article here.
PgBadger is one of the most comprehensive Postgres troubleshooting tools available. It allows users to have insight into a wide variety of events happening in the database including:
- (Vacuums tab) Autovacuum actions – how many ANALYZE and VACUUM actions were triggered by autovacuum daemon including number of tuples and pages removed per table.
- (Temp Files tab) Distribution of temporary files and their sizes, queries that generated temporary files.
- (Locks tab) type of locks in the system, most frequent waiting queries, queries that waited the most; unfortunately, there is no information provided which query is holding the lock, only the queries that are locked are shown.
- (Top tab) Slow query log
- (Events tab) all the errors, fatals, warnings etc. aggregated.
- And many more
You can see a sample pgBadger report here.
You can generate a pgBadger report from Azure Database for PostgreSQL Flexible Server in multiple ways:
- Using Diagnostic Settings and redirecting logs to a storage account; mount storage account onto VM with BlobFuse.
- Using Diagnostic Settings and redirecting logs to a storage account; download the logs from storage account to the VM.
- Using Diagnostic Settings and redirecting logs to Log Analytics workspace.
- Using plain Server Logs*
*Coming soon!
In this article we will describe the first solution – Using Diagnostic Settings and redirecting logs to a storage account. At the end of exercise we will have storage account filled with the logs from Postgres Flexible Server and a operational VM with direct access to the logs stored in the storage account like shown below in the picture:
generate pgBadger report from Azure Database for PostgreSQL Flexible Server
To be able to generate the report you need to configure the following items:
- Adjust Postgres Server configuration
- Create storage account (or use existing one)
- Create Linux VM (or use existing one)
- Configure Diagnostic Settings in Postgres Flexible Server and redirect logs to the storage account.
- Mount storage account onto VM using BlobFuse
- Install pgBadger on the VM
- Ready to generate reports!
Step 1 Adjust Postgres Server configuration
Navigate to the Server Parameters blade in the portal and modify the following parameters:
log_line_prefix = ‘%t %p %l-1 db-%d,user-%u,app-%a,client-%h ‘  #Please mind the space at the end!
log_lock_waits = on
log_temp_files = 0
log_autovacuum_min_duration = 0
log_min_duration_statement=0 # 0 is recommended only for test purposes, for production usage please consider much higher value, like 60000 (1 minute) to avoid excessive usage of resources
 Adjust Postgres Server configuration
After the change hit the “Save”:
 Save changed Postgres parameters
Step 2 Create storage account (or use existing one)
Please keep in mind that the storage account needs to be created in the same region as Azure Database for PostgreSQL Flexible Server. Please find the instruction here.
Step 3 Create Linux VM (or use existing one)
In this blog post we will use Ubuntu 20.04 as an example, but nothing stops you from using rpm-based system, the only difference will be in a way that BlobFuse and pgBadger is installed.
Step 4 Configure Diagnostic Settings in Postgres Flexible Server and redirect logs to the storage account.
Navigate to Diagnostic settings page in the Azure Portal, Azure Database for PostgreSQL Flexible Server instance and add a new diagnostic setting with storage account as a destination:


Hit save button.
Step 5 Mount storage account onto VM using BlobFuse
In this section you will mount storage account to your VM using BlobFuse. This way you will see the logs on the storage account as standard files in your VM. First let’s download and install necessary packages. Commands for Ubuntu 20.04 are as follows (feel free to simply copy and paste the following commands):
wget https://packages.microsoft.com/config/ubuntu/20.04/packages-microsoft-prod.deb
sudo dpkg -i packages-microsoft-prod.deb
sudo apt-get update -y
For other distributions please follow the official documentation.
Use a ramdisk for the temporary path (Optional Step)
The following example creates a ramdisk of 16 GB and a directory for BlobFuse. Choose the size based on your needs. This ramdisk allows BlobFuse to open files up to 16 GB in size.
sudo mkdir /mnt/ramdisk

sudo mount -t tmpfs -o size=16g tmpfs /mnt/ramdisk

sudo mkdir /mnt/ramdisk/blobfusetmp

sudo chown  /mnt/ramdisk/blobfusetmp
Authorize access to your storage account
You can authorize access to your storage account by using the account access key, a shared access signature, a managed identity, or a service principal. Authorization information can be provided on the command line, in a config file, or in environment variables. For details, see Valid authentication setups in the BlobFuse readme.
For example, suppose you are authorizing with the account access keys and storing them in a config file. The config file should have the following format:
accountName myaccount

accountKey storageaccesskey

containerName insights-logs-postgresqllogs
Please prepare the following file in editor of your choice. Values for the accountName and accountKey you will find in the Azure Portal and the container name is the same as in the example above. The accountName is the name of your storage account, and not the full URL.
Please navigate to your storage account in the portal and then choose Access keys page:


Copy accountName and accountKey and paste it to the file. Copy the content of your file and paste it to the fuse_connection.cfg file in your home directory, then mount your storage account container onto the directory in your VM:
vi fuse_connection.cfg

chmod 600 fuse_connection.cfg

mkdir ~/mycontainer

sudo blobfuse ~/mycontainer –tmp-path=/mnt/resource/blobfusetmp  –config-file=/home//fuse_connection.cfg -o attr_timeout=240 -o entry_timeout=240 -o negative_timeout=120
sudo -i

cd /home//mycontainer/

ls # check if you see container mounted

# Please use tab key for directory autocompletion; do not copy and paste!

cd resourceId=/SUBSCRIPTIONS/<your subscription id>/RESOURCEGROUPS/PG-WORKSHOP/PROVIDERS/MICROSOFT.DBFORPOSTGRESQL/FLEXIBLESERVERS/PSQLFLEXIKHLYQLERJGTM/y=2022/m=06/d=16/h=09/m=00/

head PT1H.json # to check if file is not empty
At this point you should be able to see some logs being generated.
Step 6 Install pgBadger on the VM
Now we need to install pgBadger tool on the VM. For Ubuntu please simply use the command below:
sudo apt-get install -y pgbadger
For other distributions please follow the official documentation.
Step 7 Ready to generate reports!
Choose the file you want to generate pgBadger from and go to the directory where the chosen PT1H.json file is stored, for instance, to generate a report from 2022-05-23, 9 o’clock you need to go to the following directory:
cd /home/pgadmin/mycontainer/resourceId=/SUBSCRIPTIONS/***/RESOURCEGROUPS/PG-WORKSHOP/PROVIDERS/MICROSOFT.DBFORPOSTGRESQL/FLEXIBLESERVERS/PSQLFLEXIKHLYQLERJGTM/y=2022/m=05/d=23/h=09/m=00
Since PT1H.json file is a json file and the Postgres log lines are stored in the message and statement values of the json we need to extract the logs first. The most convenient tool for the job is jq which you can install using the following command on Ubuntu:
sudo apt-get install jq -y
Once jq is installed we need to extract Postgres log from json file and save it in another file (PTH1.log in this example):
jq -r ‘.properties | .message + .statement’ PT1H.json > PT1H.log
Finally we are ready to generate pgBadger report:
pgbadger –prefix=’%t %p %l-1 db-%d,user-%u,app-%a,client-%h ‘ PT1H.log -o pgbadgerReport.html
Now you can download your report either from Azure Portal – your storage account or by using scp command:

Happy Troubleshooting!
by Contributed | Mar 2, 2023 | Technology
This article is contributed. See the original author and article here.
Expect your apps to work on Windows 11. If you still need extra reassurance, test only your most critical apps with Test Base for Microsoft 365. This efficient and cost-effective testing service is available today to all IT pros, along with developers and independent software vendors.
We hope you’re already experiencing the safer, smoother, and more collaborative work environment with the new Windows 11 features. We’re also here to help you ensure business continuity by maintaining high application compatibility rates and supporting you in testing the mission-critical applications that you manage. Many of you have traditional (read legacy) testing systems that are provisioned in on-premises lab infrastructure. This setup has a myriad of challenges: limited capacity, manual setup and configuration, cost associated with third-party software, etc. That’s why we created Test Base for Microsoft 365. It’s a cloud-based testing solution that allows IT pros and developers to test your applications against pre-release and in-market versions of Windows and Office in a Microsoft-managed environment. Scale your testing, use data-driven insights, and ensure fewer deployment issues and helpdesk escalations with targeted testing of critical apps.
Let’s take a closer look at how you can leverage Test Base to optimize your testing with:
- Proactive issue discovery with insights
- Automated testing against a large matrix
- Worry-free interoperability assurance
- Support throughout the entire validation lifecycle
Proactive issue discovery with insights
If you’re on a mission to be more proactive with issue detection, give Test Base a try. Do you wish to have more time to test your apps before the monthly Windows updates go out? We know reactive issue detection is stressful after your end users have already been impacted. So why not leverage prebuilt test scripts in our smooth onboarding experience! With that, let Test Base perform the install, launch, close, and uninstall actions on your apps 30 times for extra assurance. Get helpful reports and know that your apps won’t have any foundational issues on the new version of Windows.
Use prebuilt or personalized scripts to test updates
Here’s how you can use the prebuilt test scripts and get actionable insights:
- Access the Test Base portal.
- Select New Package from the left-hand side menu.
- Click on the Edit Package tab and select a pre-generated test script from the left-hand side pane.
- Follow the step-by-step onboarding experience from there!
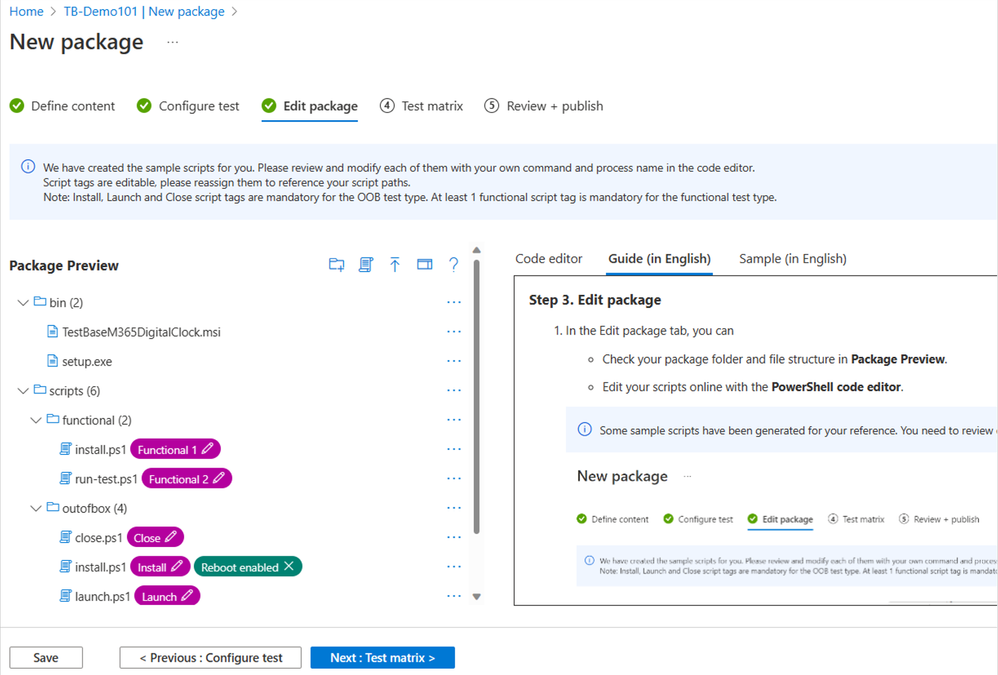
The following image shows the Package Preview step of the onboarding experience, illustrating a custom script to test the installation of an application. You can also choose to write your own functional tests to validate the specific functionality of your applications.
 Pre-generated template scripts available on the New Package page inside Test Base
After you configure your test matrix on the following screen, we automatically test your applications against Windows updates. You’ll also get an execution report and summary of any failures. Use this report to see data on your applications’ reliability, memory, and CPU utilization across all your configured tests. At the end, see Event Trace Logs (ETLs) and a video recording of the test execution to easily debug any issues that you find.
 Script execution report in the test results summary in Test Base
Compare CPU usage for feature updates
As part of the test results, view CPU utilization insights for your applications during Windows feature updates. Within the same onboarding experience in Test Base > New Package > Create New Package Online > Test Matrix tab, you can view a side-by-side analysis between your configured run and a baseline run. Select any of the familiar OSs as the baseline, and it will appear below your test graph. In the following example, the tested December monthly security build (2022.12 B) shows up on the top, while the baseline November monthly security build (2022.11 B) is listed on the bottom. The results are summarized above both charts with a regression status and details.
 Side-by-side CPU utilization analysis of a test run against the baseline inside Test Base
How do we determine that? We check for a statistically significant difference in CPU usage for processes between the baseline and target run. A run is regressed if one or more relevant processes experiences a statistically significant increase at one of our observed percentiles. Use these insights for faster regression detection and to ensure enough lead time to fix any issues you might find. Learn more about the CPU regression analysis in our official documentation.
Automated testing against a large matrix
Can you identify with managing scores of devices that run multiple different versions of Windows? Then you might worry about eventually facing an unexpected compatibility issue between Windows and another Microsoft first-party app update. Test Base is integrated with the Windows build system, so we can help you test your apps against builds as soon as they are available and before they are released to Windows devices. Use our comprehensive OS coverage and automated testing to detect potential issues as early as possible, improve your SLA, and reduce labor costs.
- Select New Package from the left-hand side menu.
- Within the onboarding guide, click on the Test Matrix page.
- Select the OS update type from among security update, feature update, or both.
- Use the drop-down menu to select all applicable OS versions (either in-market or pre-release) that you want to test.
- Optional: Select Inside Channel if you want to include tests on the latest available features.
- Choose your OS baseline for insight.
Note: To choose a baseline OS, evaluate which OS version your organization is currently using. This will offer you more regression insights. You can also leave it empty if you prefer to focus on new feature testing.
|
 The Test Base testing matrix of in-market and pre-release security and feature updates
That’s how you can easily automate testing against in-market and pre-release Windows security and feature updates. Start today with these considerations:
- To become a Full Access customer and start testing on pre-release updates, see Request to change access level.
- To always get the latest features available, select a Windows Insider channel to run your tests on.
- In case you still don’t find the OS you want to use as a baseline, let us know!
Worry-free interoperability assurance
We know your users have multiple applications running on their devices at the same time: mail app, browser, collaboration tools, etc. Sometimes, updates affect the interaction between applications and the OS, which could then affect the application’s performance.
Do you find yourself wishing for better predictability of regressions from Microsoft product updates or more lead time to fix occasional resulting issues? Use our interoperability tests with detailed reliability signals just for that. Find them within the same Test Base onboarding experience:
- Select the New Package flow.
- Navigate to the Configure test tab.
- Toggle the Pre-install Microsoft apps to turn it on under Test type.
 The pre-install Microsoft apps is toggled on in the New package configuration in Test Base
For interoperability assurance, you’d want to look for any signals of regressions after running the test. From the test summary, select the run you want to examine closer, and navigate to the Reliability tab. Here’s what a successful test would look like, comparing the number of crashes between the target test run and the baseline.
 Detailed reliability signals for feature update test results in Test Base
With Test Base, you can conduct pre-release testing against monthly Microsoft 365 and Office 365 updates for extra confidence that you are covered across a broad range of Microsoft product updates. Leverage the automation in Test Base to schedule monthly tests whenever the monthly updates become available! For that, learn how to pick security testing options in the Set test matrix step in our official documentation.
Support throughout the entire validation lifecycle
The best part about Test Base is that you can use it throughout the entire Windows and Microsoft 365 apps validation lifecycle, supported by people and tools you trust. Use our support not only for the annual Windows updates, but also for the monthly security updates.
- If you’re a developer, take advantage of integrations with familiar development tools like Azure DevOps and GitHub to test as you develop. That way, you can catch regressions before they are introduced to end users. Check out our documentation on how you can integrate Test Base into your Continuous Integration/Continuous Delivery pipeline.
- Whether you’re an app developer or an IT pro, work with an App Assure engineer to get support with remediating any issues you find.
The table below outlines some of the key benefits that Test Base provides across the end-to-end validation lifecycle: from testing environment, to testing tools and software, and, finally, to testing services.
Testing environment
|
Testing tools & software
|
Testing services
|
- Elastic cloud capacity
- Access to pre-release Windows and Microsoft 365 Apps builds
|
- Low-code, no-code automation
- CPU/memory insights
- Automated Failure analysis
|
- Automated setup and configuration
- Actionable notifications
- Joint remediation with App Assure
|
Get started today
Sign up for a free trial of Test Base to try out these features and optimize your testing process! To get started, simply sign up for an account via Azure or visit our website for more information.
Interested in learning more? Watch this contextualized walk-through of the Test Base service: How to build app confidence with Test Base. You can also leverage our series of how-to videos.
Check out more information and best practices on how to integrate Test Base into your Continuous Integration/Continuous Delivery pipeline in our GitHub documentation. We’ve also put together some sample packages that you can use to test out the onboarding process:
Finally, join our Test Base for Microsoft 365 Tech Community or GitHub Discussions Community to share your experiences and connect with other users.
Continue the conversation. Find best practices. Bookmark the Windows Tech Community and follow us @MSWindowsITPro on Twitter. Looking for support? Visit Windows on Microsoft Q&A.
by Contributed | Mar 1, 2023 | Technology
This article is contributed. See the original author and article here.
In this guest blog post, Omri Eytan, CTO of odix, discusses how businesses relying on Microsoft 365 can protect themselves from file-based attacks with Filewall, available via Microsoft Azure Marketplace.
Many theses were written about the latest pandemic impact on our working habits, preferences, and how companies had to adopt new processes to keep business alive.
We see numerous reports describing the work-from-home trend becoming the new reality of hybrid working environment. This had a huge impact on IT departments, which had to enable a secured yet transparent working environment for all employees, wherever they work. A McAfee Report showed a 50 percent increase in cloud use across enterprises in all industries during COVID while the number of threat actors targeting cloud collaboration services increased 630 percent for the same period!
Furthermore, the reports highlighted the increase in number of threats mainly targeted collaboration services such as Microsoft 365.
Microsoft 365 security approaches: attack channel vs. attack vector protection
To begin with, businesses must take responsibility for their cloud SaaS deployments when it comes to security, data backup, and privacy. Microsoft 365 business applications (Exchange Online, OneDrive, SharePoint, and Teams) are no different.
Security solutions offering protection for Microsoft 365 users can be divided into two main methodologies:
- Protecting attack channel: dedicated security solutions designed to protect users from various attack vectors within a specific channel such as email. The email channel has many third-party solutions working to protect users against various attack vectors such as phishing, spam, and malicious attachments.
- Protecting attack vector: advanced security solutions aiming to protect users from a specific attack vector across multiple channels such as email, OneDrive, and SharePoint.
These approaches remind us of an old debate when purchasing IT products: Should the company compromise a bit on innovation and quality and purchase a one-stop-shop type of solution, or is it better to choose multiple best-of-breed solutions and be equipped with the best technology available?
Security solutions for Microsoft 365 are no different.
Protecting Microsoft 365 users against file-based attacks
This article focuses on one of the top attack vectors hackers use: the file-based attack vector. Research shows the top file types used to embed malware in channels like email are commonly used, like Word, Excel, and PDF. Hackers use these file types because people tend to click and open them naturally. When malicious code is embedded well (e.g., in nested files), the file bypasses common anti-malware solutions such as anti-virus and sandbox methods that scan files for threats and block the files if malware was detected.
Deep file analysis (DFA) technology, introduced by odix, was designed to handle all commonly used files and offers a detectionless approach. With DFA, all malware, including zero-day exploits, is prevented and the user gets a safe copy of the original file.
What are DFA and CDR?
DFA or CDR (content disarm and reconstruction) describes the process of creating a safe copy of an original file by including only the safe elements from the original file. CDR focuses on verifying the validity of the file structure on the binary level and disarms both known and unknown threats. The detectionless approach ensures all files that complete the sanitization process successfully are malware-free copies and can be used safely.
odix, an Israel-based cybersecurity company driving innovation in content disarm and reconstruction technology, developed the FileWall solution to complement and strengthen existing Microsoft security systems. FileWall, available in Microsoft AppSource and Azure Marketplace, helps business users easily strengthen Microsoft 365 security within a few clicks.
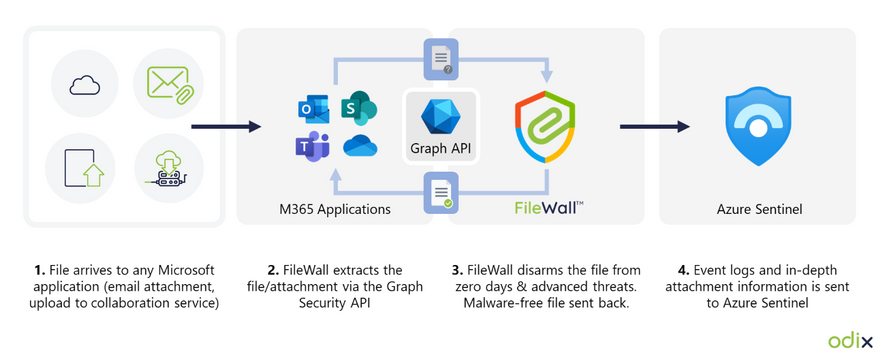
How FileWall works with Microsoft security technology
FileWall integrates with the Microsoft Graph security API and Microsoft Azure Sentinel, bringing malware protection capabilities with an essential added layer of deep file analysis technology containing CDR proprietary algorithms.
FileWall blocks malicious elements embedded in files across Microsoft 365 applications including Exchange Online, SharePoint, OneDrive, and Teams. The unique DFA process is also extremely effective in complex file scenarios such as nested files and password-protected attachments where traditional sandbox methods could miss or result in lengthy delays and disruption of business processes.
Empowering Microsoft 365 security: granular filtering per channel
FileWall includes a modern admin console so the Microsoft 365 administrator can set security policies and gain overall control of all files and attachments across Exchange Online, SharePoint, OneDrive, and Teams. The FileWall file type filter lets the admin define which file types are permitted in the organization and which should be blocked. This minimizes the attack surface the organization is exposing via email and collaboration services by eliminating the threat vectors available in certain file types.

The type filter has three main controls:
- On/off: enabling or disabling the filter functionality on all file types
- Work mode: the ability to create preset lists of permitted and non-permitted file types for specific users within the organization
- Default settings: suggested default policy by FileWall which includes 204 file types categorized as dangerous, including executable files (*.exe), windows batch files (*.bat), windows links (*.lnk), and others
How FileWall complements Defender’s safe attachments
As a native security solution within the Microsoft 365 deployment, FileWall doesn’t harm productivity. Consequently, all FileWall’s settings have been configured to complement Microsoft 365 Defender. Combining the two products provides high levels of security with multi antivirus, sandbox, and CDR capabilities. While the sandbox can manage executables and active content, FileWall handles all commonly used files such as Microsoft Office, PDF, and images. As most organizational traffic consists of non-executable documents, this method can reduce sandbox load by 90 percent to 95 percent, lowering total costs and improving the average latency.
FileWall enhances the existing Microsoft type filter and allows additional granular controls over the types of files that are allowed to enter the organization while enforcing these restrictions on nested and embedded files as well.

Call for Certified Microsoft CSPs who wish to increase revenues
FileWall for Microsoft 365 is available for direct purchase through Microsoft AppSource, Azure Marketplace, or via the FileWall-certified partner program for Microsoft CSPs.
Microsoft CSPs can bundle FileWall via Microsoft Partner Center for their customers. odix offers generous margins to Microsoft CSPs who joined the FileWall partner program.
FileWall-certified partners are eligible for a free NFR license according to odix terms of use.

by Contributed | Mar 1, 2023 | Business, Microsoft 365, Technology
This article is contributed. See the original author and article here.
Today marks a significant shift in endpoint management and security. We are launching the Microsoft Intune Suite, which unifies mission-critical advanced endpoint management and security solutions into one simple bundle.
The post The Microsoft Intune Suite fuels cyber safety and IT efficiency appeared first on Microsoft 365 Blog.
Brought to you by Dr. Ware, Microsoft Office 365 Silver Partner, Charleston SC.

by Contributed | Feb 28, 2023 | Technology
This article is contributed. See the original author and article here.
Join Microsoft at GTC, a global technology conference running March 20 – 23, 2023, to learn how organizations of any size can power AI innovation with purpose-built cloud infrastructure from Microsoft.
Microsoft’s Azure AI supercomputing infrastructure is uniquely designed for AI workloads and helps build and train some of the industry’s most advanced AI solutions. From data preparation to model and infrastructure performance management, Azure’s comprehensive portfolio of powerful and massively scalable GPU-accelerated virtual machines (VMs) and seamless integration with services like Azure Batch and open-source solutions helps streamline management and automation of large AI models and infrastructure.
Attend GTC to discover how Azure AI infrastructure optimized for AI performance can deliver speed and scale in the cloud and help you reduce the complexity of building, training, and bringing AI models into production. Register today! GTC Developer Conference is a free online event.
Microsoft sessions at NVIDIA GTC
Add the below Microsoft sessions at GTC to your conference schedule to learn about the latest Azure AI infrastructure and dive deep into a variety of use cases and technologies.
Featured sessions
Accelerate AI Innovation with Unmatched Cloud Scale and Performance
Thursday, Mar 23 | 7:00 AM – 7:50 AM MST
Nidhi Chappell, General Manager, Azure HPC, AI, SAP and Confidential Computing
Kathleen Mitford, Corporate Vice President, Azure Marketing, Microsoft
Manuvir Das, Head of Enterprise Computing, NVIDIA
Azure’s purpose-built AI infrastructure is enabling leading organizations in AI to build a new era of innovative applications and services. The convergence of cloud flexibility and economics, with advances in cloud performance, is paving the way to accelerate AI initiatives across simulations, science, and industry. Whether you need to scale to 80,000 cores for MPI workloads, or you’re looking for AI supercomputing capabilities, Azure can support your needs. Learn more about Azures AI platform, our latest updates, and hear about customer experiences.
Azure’s Purpose-Built AI Infrastructure Using the Latest NVIDIA GPU Accelerators
On-demand
Matt Vegas, Principal Product Manager, Microsoft
Microsoft offers some of the most powerful and massively scalable Virtual Machines, optimized for AI workloads. Join us for an in-depth look at the latest updates for Azure’s ND series based on NVIDIA GPUs, engineered to deliver a combination of high-performance, interconnected GPUs, working in parallel, that can help you reduce complexity, minimize operational bottlenecks operations, and can deliver reliability at scale.
Talks and panel sessions
Session ID
|
Session Title
|
Speakers
|
Primary Topic
|
S51226
|
Accelerating Large Language Models via Low-Bit Quantization
|
Young Jin Kim, Principal Researcher, Microsoft
Rawn Henry, Senior AI Developer Technology Engineer, NVIDIA
|
Deep Learning – Inference
|
S51204
|
Transforming Clouds to Cloud-Native Supercomputing: Best Practices with Microsoft Azure
|
Jithin Jose, Principal Software Engineer, Microsoft Azure
Gilad Shainer, SVP Networking, NVIDIA
|
HPC – Supercomputing
|
S51756
|
Accelerating AI in Federal Cloud Environments
|
Bill Chappel, Vice President of Mission Systems in Strategic Missions and Technology, Microsoft
Steven H. Walker, Chief Technology Officer, Lockheed Martin
Matthew Benigni, Chief Data Officer, Army Futures Command
Christi DeCuir, Director, Cloud Go-to-Market, NVIDIA
|
Data Center / Cloud – Business Strategy
|
S51703
|
Accelerating Disentangled Attention Mechanism in Language Models
|
Pengcheng He, Principal Researcher, Microsoft
Haohang Huang, Senior AI Engineer, NVIDIA
|
Conversational AI / NLP
|
S51422
|
SwinTransformer and its Training Acceleration
|
Han Hu, Principal Research Manager, Microsoft Research Asia
Li Tao, Tech Software Engineer, NVIDIA
|
Deep Learning – Training+
|
S51260
|
Multimodal Deep Learning for Protein Engineering
|
Kevin Yang, Senior Researcher, Microsoft Research New England
|
Healthcare – Drug Discovery
|
S51945
|
Improving Dense Text Retrieval Accuracy with Approximate Nearest Neighbor Search
|
Menghao Li, Software Engineer, Microsoft
Akira Naruse, Senior Developer Technology Engineer, NVIDIA
|
Data Science
|
S51709
|
Hopper Confidential Computing: How it Works under the Hood
|
Antoine Delignat-Lavaud, Principal Researcher Microsoft Research, Microsoft
Phil Rogers, VP of System Software, NVIDIA
|
Data Center / Cloud Infrastructure – Technical
|
S51447
|
Data-Driven Approaches to Language Diversity
|
Kalika Bali, Principal Researcher, Microsoft Research India
Caroline Gottlieb, Product Manager, Data Strategy, NVIDIA
Damian Blasi, Harvard Data Science Fellow, Department of Human Evolutionary Biology, Harvard University
Bonaventure Dossou, Ph.D. Student, McGill University and Mila Quebec AI Institute
EM Lewis-Jong, Common Voice – Product Lead, Mozilla Foundation
|
Conversational AI / NLP
|
S51756a
|
Accelerating AI in Federal Cloud Environments, with Q&A from EMEA Region
|
Bill Chappel, Vice President of Mission Systems in Strategic Missions and Technology, Microsoft
Steven H. Walker, Chief Technology Officer, Lockheed Martin
Larry Brown, SA Manager, NVIDIA
Christi DeCuir, Director, Cloud Go-to-Market, NVIDIA
|
Data Center / Cloud – Business Strategy
|
S51589
|
Accelerating Wind Energy Forecasts with AceCast
|
Amirreza Rastegari, Senior Program Manager, Azure Specialized Compute, Microsoft
Gene Pache, TempoQuest
|
HPC – Climate / Weather / Ocean Modeling
|
S51278
|
Next-Generation AI for Improving Building Security and Safety
|
Adina Trufinescu, Senior Program Manager, Azure Specialized Compute, Microsoft
|
Computer Vision – AI Video Analytics
|
Deep Learning Institute Workshops and Labs

We are proud to host NVIDIA’s Deep Learning Institute (DLI) training at NVIDIA GTC. Attend full-day, hands-on, instructor-led workshops or two-hour free training labs to get up to speed on the latest technology and breakthroughs. Hosted on Microsoft Azure, these sessions enable and empower you to leverage NVIDIA GPUs on the Azure platform to solve the world’s most interesting and relevant problems.
Register for a Deep Learning Institute workshop or lab today!
Learn more about Azure AI infrastructure
Whether your project is big or small, local or global, Microsoft Azure is empowering companies worldwide to push the boundaries of AI innovation. Learn how you can make AI your reality.
Azure AI Infrastructure
Azure AI Platform
Accelerating AI and HPC in the Cloud
AI-first Infrastructure and Toolchain at Any Scale
The case for AI in the Azure Cloud
AI Infrastructure for Smart Manufacturing
AI Infrastructure for Smart Retail

Recent Comments