This article is contributed. See the original author and article here.
What is ML.NET
Machine learning (ML) is everywhere. We use ML empowered applications every day: when choosing the next TV series to watch based on Netflix recommendations for example, or when asking Alexa to play our favorite song. Soon every application on every platform will incorporate some ML capabilities, empowering the application itself and making it smarter.
This is the key reason why ML has been added into the .NET ecosystem a few years back, by creating an open-source framework (ML.NET) which enables developers to train, build and ship custom ML models for a wide range of scenarios (sentiment analysis, forecasting, recommendations and more). Since then, the framework has evolved a lot, incorporating new features, with the preview release of the latest version (ML.NET 3.0) being announced a few weeks ago.
Now, you could argue that there’s tons of ML frameworks over there, so what’s the difference between ML.NET and the most common frameworks for data scientists (like scikit-learn, pytorch or tidyverse)?
- ML.NET is not designed for data scientists only: people with different levels of ML understanding can empower their .NET solutions with some kind of AI. And this is immediately clear when thinking about the languages used for ML models development in this framework (C# and F#) which are the standard languages for .NET ecosystem, but not the languages traditionally used for data science and modeling – Python and R.
- Another characteristic of this framework, which makes explicit the mission of democratizing the art of ML, is the availability of a graphical user interface as a Visual Studio component (called Model Builder) to build and deploy ML models in a few clicks.
- Also, key objective of this framework is to make ML consumable, by providing tools to automatize not only the model training process but also some of the classical MLOps tasks, like model maintenance (retraining) and integration of the model in a client application.
Model builder
We mentioned that one of the key differentiators of this framework is Visual Studio Model Builder feature. And it is also the best place to start for ML beginners that wish to train a custom model on their scenario and data, and then consume it in their application.
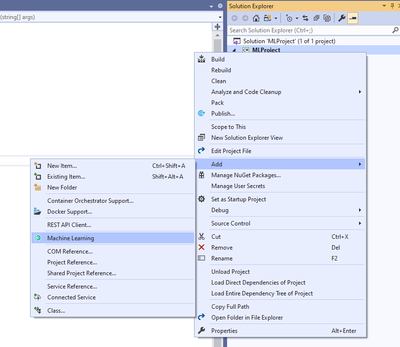
After installing the Model Builder component, you can open its user interface (UI) from Visual Studio by right clicking on the project item of your solution in Solution Explorer and then selecting “Add -> Machine Learning”.
At this point, Model Builder provides you with a step-by-step procedure to import data, train and evaluate custom ML models for the scenario that best suits your application’s needs.

You can choose between different kinds of scenarios, including:
- Classical ML use cases – like classification or regression: Model Builder uses Automated ML to train multiple models from your data in parallel and then pick the best one according to pre-defined evaluation metrics.
- Deep learning use cases – like image or text classification: Model Builder uses your data to fine tune pre-trained deep learning models (e.g. NAS-BERT or Inception).
In any case, once training is completed, Model Builder generates the code that you can use to re-train the model (for example to tune hyperparameters or update the dataset) and consume it in your app.
ML.NET API & AutoML
The ML.NET API enables you to integrate machine learning into your new or existing .NET applications by installing the Microsoft.ML NuGet package. This option might be for you if you’re familiar with ML and looking for ways to best leverage ML in your application, with the familiarity of the .NET platform in C# or F#.

ML.NET is supported on:
- .NET
- .NET Core 2.0 and above
- .NET Framework 4.6.1 and above.
You can also automate the process of applying machine learning, known as AutoML through the API. The typical ML workflow includes the iterative steps of preprocessing, training, and evaluation, repeating these steps until it reaches the desired results. With each iteration optimization techniques applied during the training and evaluation phases select the best algorithm and hyperparameters. If you’re a beginner to ML but want to use AutoML in your application, you can use the defaults provided in the API and let AutoML handle the rest. The API also enables experienced users to extend the defaults and customize the model. The AutoML API can be found within the Microsoft.ML.AutoML package on NuGet.
Model deployment
When your model is complete, there are various options for deploying it to the cloud with Azure. We’ll walk through how you can deploy your model to the cloud as a web API in Azure App Service, Azure Container Apps or Azure Functions.
Consuming a trained model begins with saving and exporting it. An exported model can be used with any .NET application or Azure Function through the ML.NET API in C# or F#. To use it, you’ll first add the exported model to the project, then use the API to import and load the model and finally add input data to make predictions. Refer to the documentation on options and tutorials on how to export and load your models with either the ML.NET Model Builder or ML.NET API.
In an ASP.NET application, whether it’s a web app like Razor Pages or an API, you’d use a controller class to access your trained model to use any input from a HTTP request or return predictions in a response, in addition to other controller tasks. To deploy your ASP.NET application to Azure, first build it locally in Visual Studio, then deploy it to App Service or Azure Container App through Visual Studio’s Azure development workload.
With Azure Functions you can run small pieces of code in a serverless environment in the cloud via triggers, which will run the functions code and define how it’s invoked. This is a cost-effective option for consuming a model across various applications. One option for integrating a model into a function is through an HTTP trigger, which invokes the function via an HTTP request, where your trained model can use input data from an HTTP request and send predictions in a response. With the Azure development workload in Visual Studio, you can create and test a local function with your trained model, and finally deploy your function to Azure.
How to get started?
ML.NET enables all .NET developers any level of data science experience can build ML models with the tools and platform they know. With a variety of scenarios to choose from, you load data to build a model with the Model Builder in Visual Studio or the ML.Net API. You can build ML pipelines that automate iterative steps within the workflow, creating the best version of your model. ML powered projects can be deployed to various platforms, including the cloud where a deployed ML.NET model can consume new data and return results, enabling end users to leverage ML within your application.
| ML knowledge level | Recommended tool | Useful resources |
| Beginner | Model Builder
(low code) |
|
| Intermediate/advanced | ML.NET AutoML APIs
(full code) |
|
Brought to you by Dr. Ware, Microsoft Office 365 Silver Partner, Charleston SC.

Recent Comments