by Contributed | Jul 8, 2023 | Technology
This article is contributed. See the original author and article here.
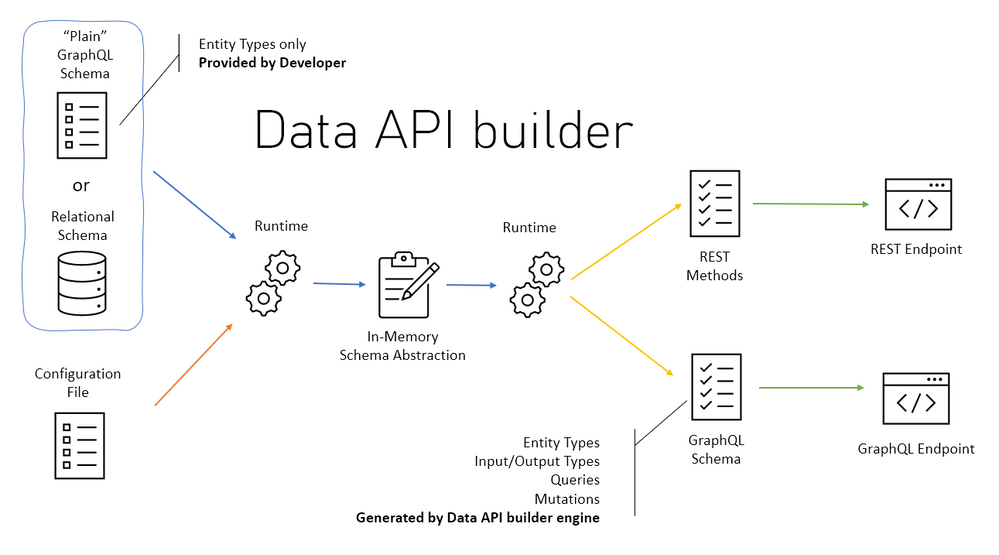
Getting started with Data API builder for Azure SQL Database or SQL Server
What is Data API builder?
Data API builder for Azure Databases provides modern REST and GraphQL endpoints to your Azure Databases. Database objects can be safely exposed via REST or GraphQL endpoints with Data API builder, allowing your data to be accessed using modern approaches on any platform, language, or device. Granular security is ensured by an integrated and configurable policy engine; integration with Azure SQL,
SQL Server, PostgreSQL, MySQL, and Cosmos DB provides developers with unprecedented productivity.
Data API Builder Features
- REST operations like CRUD ( POST, GET, PUT, PATCH, DELETE) , filtering, sorting and pagination.
- GraphQL operations like queries and mutation, queries and mutations.
- Support authentication via OAuth2/JWT.
- Role-based authorization using received claims.
- Allow collections, tables, views and stored procedures to be accessed via REST and GraphQL.
- Full integration with Static Web Apps via Database Connection feature when running in Azure.
- Easy development via dedicated CLI.
- Open Source, you can always contribute
Our Focus.
In this blog, I’m going to walk you through a simple process to get started with Data API Builder with Microsoft SQL Database deployed on Azure. This can also be done using Azure Cosmos Db, Azure Database for PostgreSQL and Azure MySQL Database.
Prerequisites.
- Basic understanding of Rest CRUD operations like POST and GET
- Basic understanding of a relational database like Microsoft SQL or MYSQL
- Willingness to follow along and learn as the above two prerequisites are not a must.
Requirements to get started.
Please click the below links to download .Net 6 and Vs Code editor, you can search Live Preview and Thunder client in the Vs code Extension Tab and install them.
Procedure
- Provision and deploy Microsoft SQL on Azure
- Create a Data API builder.
- Test our API with Thunder client & Insomnia
- Link our Azure SQL DB via Data API Builder to our simple HTML Page to view our Data.

Provision and deploy Microsoft SQL on Azure


- Click create to start provisioning your service.

- Select your subscription, create a resource group, enter a database name and select elastic pool no for this is just a demo project.

- Create your SQL server and select a location.

- For authentication I have selected both SQL and Azure Active directory, but SQL alone is enough for authenticating this project. Add sever admin and password and keep the safe because we will need them later.

- After creating the SQL server, select locally – redundant backup for demo purposes.

- For these options, let’s go with the defaults.

- For these options, let’s go with the defaults.

- Create tags to identify your services on your resource group and create Review + create

- Click go to resources after deployment is complete

- On the overview you will see all the essential details of our SQL Database and SQL Server.

- Click on the Query editor and sign in with either SQL Server auth or Azure Active Directory

- You can view your database name below

- Click new query and add this code below to create two tables (Brand & Category) then click run to execute these queries.

- Add this insert statements to insert data in our database.

- click run to execute and check the message below ‘query succeeded’.

- refresh to view the newly created tables.

- You can easily view tables available in our database

- Run the below SQL Statement to confirm data inside our table.


- On the connection string copy ADO.NET(SQL authentication) we will use it late.(NB: do not expose your connection string with password, I will do so for demo purposes)

Create a Data API builder.
- Back to our windows open windows PowerShell and type dotnet, if the below message doesn’t appear. Install .NET 6.0

- Run the below command to install Data API Builder locally.

- Confirm installation was successful by running the below command.

Test our API with Thunder client & Insomnia
- Open any folder you want to work on with VS Code then open your terminal. Run dab init –database-type “mssql” –connection-string “enter-your-connection-string-we-copied-in-the-above-steps”. Its good practice to use .env file on your root folder and call it on our connection string ie dab init –database-type “mssql” –connection-string “@env(‘my-connection-string’)”

- The command generates a config file called dab-config.json looking like this:

- Data-source will directly enable us to specify the database we are using and connection-string.The runtime will specify that our Data API will be consumed by both Rest endpoint is made available at the path `/api/` and GraphQL endpoint is available at `/graphql`. Under host we specify the mode of our data API either production or development, cors enables us to set origins example if yourdormain.com is your client app which will be sending request to your API you should add it under origins. Under authentication you can specify how you want to be authenticated.

- Add the below code for the brand category entities. This entities maps directly to your tables on Azure SQL database, wo do this by specifying the source. Permissions lets use specify the actions, “*” means all operations Create Edit Read Delete are enabled. With role you can assign people roles to do this actions above, anonymous will let anyone do all the actions.

- To start run the code below.


- launch your Thunder client VS code extension( if on windows use CTRL + SHIFT + R). create a new request, select GET and https://localhost:5001/api/category. Click send and you should get a response from our deployed Azure SQL database.


- The GET verb also supports several query parameters (also case sensitive) that allow you to manipulate and refine the requested data:
- $orderby: return items in the specified order
- $first: the top n items to return
- $filter: expression to filter the returned items
- $select: list of field names to be returned

- The query parameters select will Only select CategoryID field after you click send.

- The query parameters `filter` and `eq` will return CategoryName equal to Category x after you click send.

- Data API offers validations, example you can’t just send categoryName as the only field because our table requires both categoryName and categoryID. An error will be returned.

- REST Endpoint POST: create a new category after you add the json object below with that data and click send.

- REST Endpoint POST: create a new category after you add the json object below with that data and click send.

- REST Endpoint PUT: will update a category after you add the json object below with that data and click send.

- Whenever you need to access a single item, you can get the item you want through a GET request by specifying its primary key example CategoryID

- To delete a record by specifying its primary key example CategoryID and set the HTPP request to delete, and click send.

- GraphQL endpoint is available at `/graphql`, set the HTPP request to post and provide the schema below and click send. For this example we need REST client like Postman or Insomnia to query. I have used Insomnia.

- This is how we filter using the filter method.

- This is how we orderBy descending or ascending.

Link our Azure SQL DB via Data API Builder to our simple HTML Page to view our Data.
For this demo am using a simple html page with jQuery and bootstrap. is helping me to make the HTTP request to our API server using fetch, get the response and append it to our html page dynamically.
- Step one – add this code in index.html. and right click on the code to open with live server. Copy the URL displayed after the html page loads.

- Step two – Paste the URL below on the dab-config.json on origins. Save your code. On your terminal `CTRL + C` to terminate the Data API server and start it again using `dab start`.

- There you go it, successfully connected your static web app with Data API builder for Azure Databases engine.

Read more:

by Contributed | Jul 7, 2023 | Technology
This article is contributed. See the original author and article here.
Para te ajudar a obter novos conhecimentos, teremos a Maratona #AISkills, uma imersão gratuita e online, destinada para pessoas que querem aprender a usar a IA na prática, abordando temas como Ética na IA, Prompt Engineering, GitHub Copilot, Análise de Dados, Machine Learning, Azure OpenAI e muito mais.
18 de Julho, 12:30h
Palestrante:
Danielle Monteiro
|
Princípios do Microsoft Responsible AI na prática
IA responsável é a aplicação de princípios éticos e sociais na criação, desenvolvimento e uso de tecnologias de Inteligência Artificial (IA). Estes princípios ajudam a garantir que os sistemas de IA sejam usados de forma responsável e segura, ao mesmo tempo em que ajudam a proteger os direitos humanos.
|
19 de Julho, 12:30h
Palestrante:
Henrique Eduardo Souza
|
Ganhe produtividade com Prompt Engineering
Prompt engineering é a prática de fornecer instruções específicas a um modelo de IA para produzir os resultados desejados. Do Chat GPT ao GitHub Copilot, você aprenderá a escrever prompts eficientes para gerar textos e até mesmo, linhas de código. |
01 de Agosto, 12:30h
Palestrante:
Cynthia Zanoni
|
Como criar um jogo de pedra, papel e tesoura com o GitHub Copilot
O GitHub Copilot está transformando a produtividade e a jornada de aprendizado de pessoas desenvolvedoras. Nesta palestra, vamos explorar o Codespaces e o GitHub Copilot para criar um jogo de pedra, papel e tesoura! |
03 de Agosto, 12:30h
Palestrante:
Livia Regina Bijelli Ferreira
|
Microsoft Fabric: análise de dados para a era da IA
O mundo de hoje está inundado de dados — sempre em fluxo dos dispositivos que usamos, dos aplicativos que construímos e das interações que temos. O Microsoft Fabric é uma plataforma de análise unificada de ponta a ponta que reúne todos os dados e ferramentas de análise de que as organizações precisam. O Fabric integra tecnologias como Azure Data Factory, Azure Synapse Analytics e Power BI em um único produto unificado, capacitando dados e profissionais de negócios a liberar o potencial de seus dados e estabelecer as bases para a era da IA. |
15 de Agosto, 12:30h
Palestrante:
Pablo Lopes
|
Criando um assistente com o Azure OpenAI Service
Crie um assistente natural com o Azure OpenAI, faça notas, pegue os pontos mais importantes e feedback sobre as ideias como especialista.
|
16 de Agosto, 19h
Palestrante:
Beatriz Matsui
|
Introdução a MLOps: Conceitos e Prática
O machine learning está no núcleo da inteligência artificial, e muitos aplicativos e serviços modernos dependem de modelos de machine learning preditivos. Nesta sessão vamos falar sobre conceitos de MLOps (Machine Learning Operations) e como trabalhar com tais práticas usando ferramentas de DevOps e aprendizado de máquina da Microsoft. |

O Cloud Skills Challenge é uma plataforma integrada com o Microsoft Learn, portal global de cursos gratuitos da Microsoft, disponível 24 horas por dia, 7 dias por semana. Além de assistir as aulas gratuitas da Maratona #AISkills, você pode participar do nosso grupo de estudos de Inteligência Artificial, basta realizar a sua inscrição no Cloud Skills Challenge.
Depois de concluir um desafio, você receberá um selo do Microsoft Learn AI Skills Challenge e um certificado de conclusão. Na Maratona #AISKills, temos 4 trilhas de desafio de estudos. Você pode escolher uma ou mais trilhas!
Desafio de Machine Learning
O aprendizado de máquina está no centro da inteligência artificial, e muitos serviços modernos dependem de modelos preditivos de aprendizado de máquina. Saiba como usar o Aprendizado de Máquina do Azure para criar e publicar modelos sem escrever código. Você também explorará as várias ferramentas de desenvolvedor que pode usar para interagir com o espaço de trabalho.
Desafio dos Serviços Cognitivos
Os Serviços Cognitivos do Azure são blocos de construção da funcionalidade de IA que podem ser integrados em aplicativos. Você aprenderá a provisionar, proteger e implantar serviços cognitivos. Usando essa ferramenta, você pode criar soluções inteligentes que extraem significado semântico do texto e oferecem suporte a cenários comuns de visão computacional.
Desafio de operações de aprendizado de máquina (MLOps)
As operações de aprendizado de máquina (MLOps) aplicam princípios de DevOps a projetos de aprendizado de máquina. Você aprenderá a implementar conceitos chave, como controle de origem, automação e CI/CD para criar uma solução MLOps de ponta a ponta enquanto usa Python para treinar, salvar e usar um modelo de aprendizado de máquina.
Desafio do Construtor de IA
Este desafio apresenta o AI Builder, ensina como criar modelos e explica como você pode usá-los no Power Apps e no Power Automate. Você aprenderá a criar tópicos, entidades personalizadas e variáveis para capturar, extrair e armazenar informações em um bot.
Os desafios começam dia de 17 de Julho e se quiser antecipar sua inscrição, acesse a página do Cloud Skills Challenge.
 BÔNUS
BÔNUS
Benefícios gratuitos para estudantes
Tutoriais do GitHub para iniciantes em programação
Quero trazer um destaque para estes recursos, pois todos os tutoriais foram traduzidos para Português com a ajuda de nossa comunidade Microsoft Learn Student Amabassadors. Então, acesse os tutoriais e não esqueça de deixar uma estrelinha!
Cursos no Microsoft Learn com certificado
by Contributed | Jul 6, 2023 | Technology
This article is contributed. See the original author and article here.
Microsoft Purview Data owner policies is a cloud-based service that helps you provision access to data sources and datasets securely and at scale. Data owner policies expose a REST API through which you can grant any Azure AD identity (user, group or service principal) to have Read or Modify access to a dataset or data resource. The scope for the access can range from fine-grained (e.g., Table or File) to broad (e.g., entire Azure Resource Group or Subscription). This API provides a consistent interface that abstracts the complexity of permissions for each type of data source.
More about Microsoft Purview Data policy app and the Data owner policies at these links:
If you would like to test drive the API, sign-up here to join the private preview.
by Contributed | Jul 5, 2023 | Technology
This article is contributed. See the original author and article here.
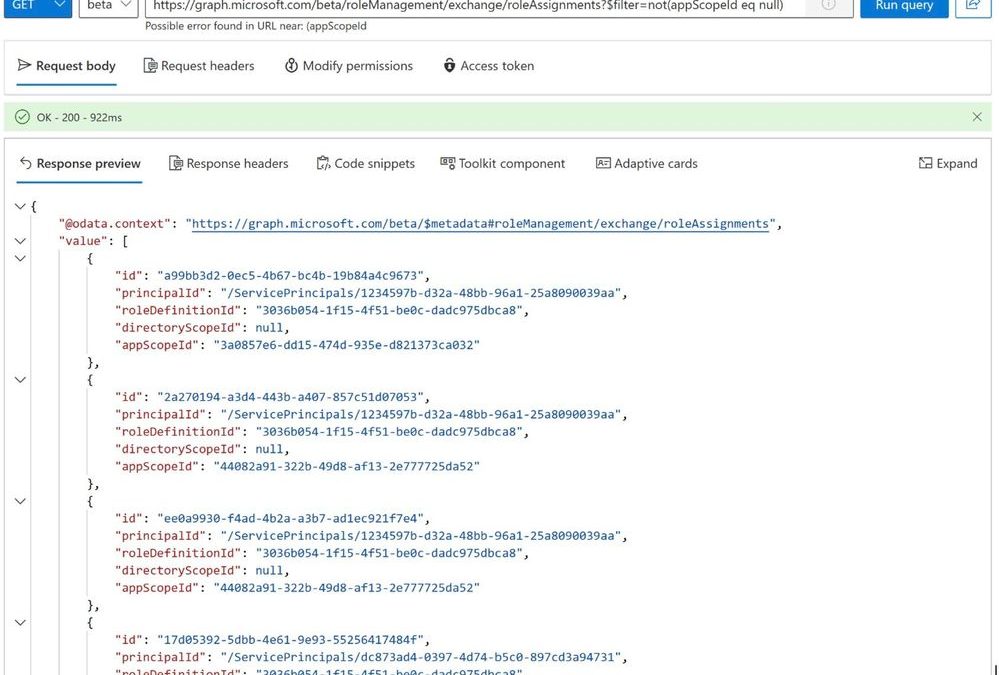
Today, we’re excited to announce the public preview of Exchange Online Role Based Access Control (RBAC) management in Microsoft Graph. The preview is designed for admins who want a consistent management interface, and for developers who want to programmatically control RBAC.
The public preview supports create, read, update, and delete APIs in Microsoft Graph which conform to a Microsoft-wide RBAC schema. Exchange Online RBAC role assignments, role definitions, and management scopes are supported through this new API.
With this preview, Exchange Online joins other RBAC systems in the Microsoft Graph Beta API, namely, Cloud PC, Intune, and Azure AD directory roles and entitlement management.
How Unified RBAC for Exchange Online works
Admins assigned the appropriate RBAC role in Exchange Online can access Unified RBAC using the Microsoft Graph beta endpoint or by using Microsoft Graph PowerShell. RBAC data remains stored in Exchange Online and can be configured using Exchange Online PowerShell.
In addition to Exchange RBAC permissions, you will also need one of these permissions:
- RoleManagement.Read.All
- RoleManagement.ReadWrite.All
- RoleManagement.Read.Exchange
- RoleManagement.ReadWrite.Exchange
Actions and entities supported in this preview:
Entity
|
Endpoint
|
Allowed API Actions
|
Read
|
Create
|
Update
|
Delete
|
Roles
|
graph.microsoft.com /beta/roleManagement/exchange/roleDefinitions
|
✓
|
X
|
X
|
✓
|
Assignments
|
graph.microsoft.com /beta/roleManagement/exchange/roleAssignments
|
✓
|
✓
|
✓
|
✓
|
Scopes
|
graph.microsoft.com /beta/roleManagement/exchange/customAppScopes
|
✓
|
✓
|
✓
|
✓
|
Role Groups
|
Not supported
|
X
|
X
|
X
|
X
|
Transitive Role Assignment
|
Not supported
|
X
|
X
|
X
|
X
|
Reading the list of role assignments assigned with a management scope:

Reading the list of Management Scopes:

List roles using Microsoft Graph PowerShell:

Try the Public Preview Today
Unified RBAC is available to all tenants today as a part of the public preview. See Use the Microsoft Graph SDKs with the beta API and roleManagement resource type for more information.
We’d love your feedback on the preview. You can leave a comment here or share it with us at exourbacpreview@microsoft.com.
FAQs
Does this API support app-only access?
Not yet. This will be added to the preview later.
Exchange Online Team

by Contributed | Jul 4, 2023 | Technology
This article is contributed. See the original author and article here.
People sometimes wish to review and change their form or quiz responses after submission, even days later. We’re happy to share that you can now review and edit responses when needed.
- First, save your response
To save your response, ensure that the form creator has selected “Allow respondents to save their responses” option in the Forms settings.
Forms setting – save response
Once the setting is enabled, and you submit a form, you will have the option to save your response from the thank you page.
 “Save my response” in Thank you page
The response will be saved in “Filled forms” in Microsoft Forms.
 Filled forms
- If enabled, you can then edit your response
The form’s creator must select “Allow respondents to edit their responses” in the form’s setting.
 Forms setting – edit response
If enabled, you will have the option to “Save my response to edit” on the thank you page.
 “Save my response to edit” in Thank you page
As long as the form is open, you have the flexibility to revisit the form at any time to edit your answers. However, edits cannot be made once a form has been closed or deleted.
 Edit response
FAQ
Where is the data saved?
As with all forms, the response data will be stored in the form creator’s repository only. Respondents can only view their own and cannot make any changes unless the form creator allows them to edit their response. If the form or the response is removed, the respondent will no longer have access to the response.
What’s the limitation of the feature?
Updating a response do not trigger a Power Automate flow. This capability will be enabled soon.
We hope you find these new features helpful! We will continue working on enabling more options with Microsoft Forms. Let us know if you have questions or if there’s anything else we can help you with!

Recent Comments