by Scott Muniz | Aug 16, 2020 | Azure, Microsoft, Technology, Uncategorized
This article is contributed. See the original author and article here.
This blog post shows you how to use Helm chart to run a WordPress application on Azure Kubernetes services(AKS) and Azure Database for MySQL. We will be using Bitnami WordPress helm chart which is the easiest way to get started with this applications on Kubernetes in Azure.
Prerequisites
To complete this process, you need:
Create a Resource group
Create a resource group in the East US Azure region for your Kubernetes cluster and your Azure Database for MySQL resources by running the following command:
az group create --name myresourcegroup --location eastus
Create an Azure Kubernetes Service (AKS) cluster
Create an AKS cluster; the below command creates an AKS cluster named myaks in the East US Azure region.
az aks create -g myresourcegroup -n myaks --location eastus --generate-ssh-keys
Connect to your AKS cluster
To connect to the Kubernetes cluster from your local computer, use the Kubernetes command-line client, known as kubectl. If you use the Azure Cloud Shell, kubectl is already installed. You can also install kubectl locally using the command az aks install-cli.
Note: Make sure you set the PATH environment variables to include path to kubectl on your local environment.
To configure kubectl to connect to your Kubernetes cluster, use the az aks get-credentials command.
az aks get-credentials --resource-group myresourcegroup --name myaks
Create a MySQL database with Azure Database for MySQL
Create a MySQL server with MySQL version 8.0 in your resource group and provide a server admin login and a strong password.
az mysql server create --resource-group myresourcegroup --name mydemoserver --location eastus --admin-user myadmin --admin-password <server_admin_password> --sku-name GP_Gen5_2 --version 8.0 --tags 'AppProfile=WordPress'
Now we create the database by running the following command:
az mysql db create --resource-group myresourcegroup --server-name mydemoserver --name wpdatabase
To allow your AKS cluster to connect to the MySQL server, you will need to create a firewall rule to allow all Azure-internal IP addresses to access your Server. If your AKS cluster and MySQL server are created securely in a virtual network , then you can skip this this step. For simplicity, we are not using virtual networks in this example.
az mysql server firewall-rule create --resource-group myresourcegroup --server-name mydemoserver –-name allowazure --start-ip-address 0.0.0.0 --end-ip-address 0.0.0.0
Create a firewall rule to connect to your server from your local environment. You can find your IP address using https://whatismyipaddress.com/ if you don’t know how to find the IP address.
az mysql server firewall-rule create --resource-group myresourcegroup --server-name mydemoserver –-name allowmyIP --start-ip-address <YOUR IP ADDRESS> --end-ip-address <YOUR IP ADDRESS>
Installing WordPress
For this tutorial, we are using an existing Helm Chart for WordPress built by Bitnami. This Bitnami helm chart uses local MariaDB as the database and we need to override these values to use the app with Azure Database for MySQL. You can override the values you want to modify with a custom values.yaml file.
Create a new directory for your project settings in your local environment.
mkdir myblog
cd myblog
Next, create a file named values.yaml using any text editor of your choice. This file will be used to set up a few parameters that will define how WordPress connects to the database and some additional WordPress settings like sitename and your site administrator’s information.
Copy the values.yaml file below. Please update the database information with your MySQL database and blog Information below. Do not forget to disable MariaDB as shown in the final section.
values.yaml
## Blog Info
wordpressUsername: wpadmin
wordpressPassword: password
wordpressEmail: sunny@example.com
wordpressFirstName: Sunny
wordpressLastName:
wordpressBlogName: Sunny’s Blog!

## Database Settings
externalDatabase:
  host: mydemoserver.mysql.database.azure.com
  user: myadmin
  password: your-server-admin-password
  database: wpdatabase

## Disabling MariaDB
mariadb:
  enabled: false
Now let’s execute helm to install WordPress. The following command tells helm to add the Bitnami Helm Chart repository so you can access all of their helm charts.
helm repo add bitnami https://charts.bitnami.com/bitnami
Once we have access to the Bitnami repository, use helm to install the WordPress chart under the name myblog, using values.yaml as configuration file:
helm install --name myblog -f values.yaml stable/wordpress
The output looks like this
NAME: myblog
LAST DEPLOYED: Sun Jul 19 22:57:24 2020
NAMESPACE: default
STATUS: deployed
REVISION: 1
TEST SUITE: None
NOTES:
** Please be patient while the chart is being deployed **
To access your WordPress site from outside the cluster follow the steps below:
Get the WordPress URL by running these commands:
NOTE: It may take a few minutes for the LoadBalancer IP to be available.
Watch the status with: 'kubectl get svc --namespace default -w myblog-wordpress'
export SERVICE_IP=$(kubectl get svc --namespace default myblog-wordpress --template "{{ range (index .status.loadBalancer.ingress 0) }}{{.}}{{ end }}")
echo "WordPress URL: http://$SERVICE_IP/"
echo "WordPress Admin URL: http://$SERVICE_IP/admin"
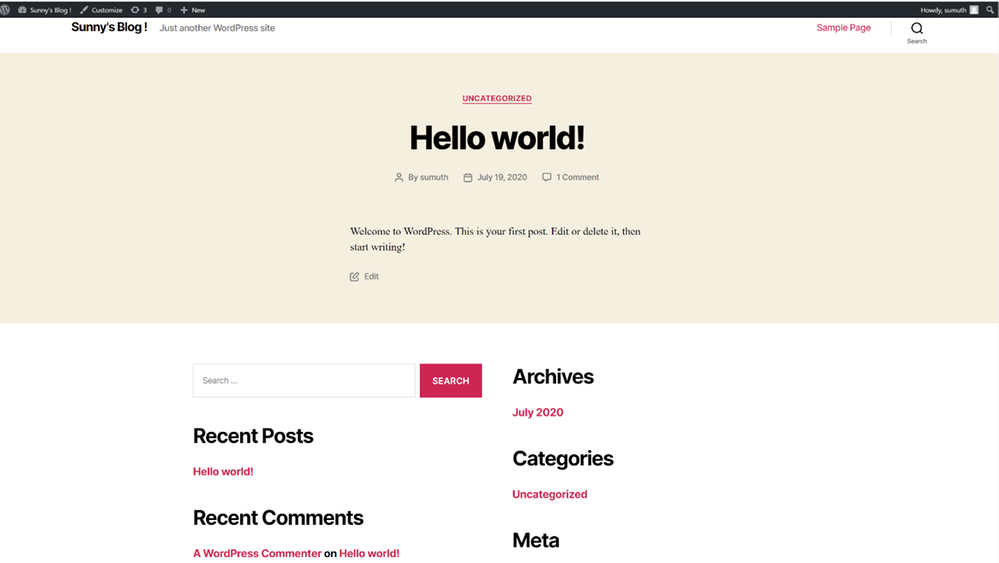
Open a browser and access WordPress using the obtained URL.
Login with the following credentials below to see your blog:
echo Username: wpadmin
echo Password: $(kubectl get secret --namespace default myblog-wordpress -o jsonpath="{.data.wordpress-password}" | base64 --decode)
Note: If you have a custom Helm chart for your WordPress app , you can use it in place of bitnami/wordpress.
After the installation is complete, a service named myblog-wordpress is created within your Kubernetes cluster. This may take a few minutes before the container is ready and the External-IP information is available. To check the status of this service and retrieve its external IP address, run:
kubectl get services
The output should show you the External IP
NAME                   TYPE           CLUSTER-IP     EXTERNAL-IP        PORT(S)       AGE
kubernetes             ClusterIP      10.0.0.1            <none>              443/TCP            19m
myblog-wordpress   LoadBalancer   <IPAddress> <IPAddress>  <ports>  110s
Make a note of the external IP for your app from the above output. Now you can browse your WordPress app on the browser using that external IP address.
The first time your browse the app it can take a while and may timeout as it is completing the WordPress installation. The deployment can take a few minutes to refresh again after 5 mins to see the site up and running

This was your first WordPress app deployment on Azure using AKS and Azure Database for MySQL. Happy Helming with Azure Kubernetes Services and Azure Database for MySQL !
Feedback
We are constantly looking at ways to improve our service and prioritize highly requested items. If you have any feedback, you can use UserVoice .
Questions
If our documentation fails to provide clarity, we encourage customers to contact us with questions.
Support
For support with an existing Azure Database for MySQL server, use the Azure portal to open a support request with us.
by Scott Muniz | Aug 14, 2020 | Azure, Microsoft, Technology, Uncategorized
This article is contributed. See the original author and article here.

New Learn Modules for Azure and Window Server IT Pros is just the beginning to this weeks content wrap up from the Advocate team!
Content Round Up
Mod 11:Deploy Azure File Sync (Video)
Orin Thomas
Short video for MS Learn course – Module 11: Implement a hybrid File Server Infrastructure – Deploy Azure File Sync
Mod 20:Manage Azure VM Backups (Video)
Orin Thomas
Short video for MS Learn course – Module 20: Implement hybrid backup and recovery with Windows Server IaaS – Manage Azure VM backups with Azure Backup service.
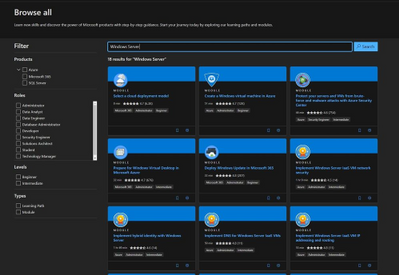
New Microsoft Learn Modules for Azure and Windows Server IT Pros
Thomas Maurer
In the last couple of days, we published a couple of new Microsoft Learn modules around Azure, Hybrid Cloud, and Windows Server for IT Pros. These modules help you to learn how you can leverage Microsoft Azure in a hybrid cloud environment to manage Windows Server.
Migrate VMs from AWS to Azure with Azure Migrate
Sarah Lean
Blog and video around using Azure Migrate to migrate from AWS to Azure
How to use Terraform to Create Azure DevOps Projects
Anthony Bartolo
With the recent release by HashiCorp and Microsoft of the Azure DevOps Provider 0.0.1 for Terraform we look at how to use these new features to create repeatable standardized projects into Azure DevOps by MVP Chris Jeffery
Blog/ Setting-up Codespaces for .NET Core App Development
Justin Yoo
This post shows how to set up a common development environment for Visual Studio Codespaces to build .NET Core applications.
Video: Migrate your AWS VMs to Azure with Azure Migrate
Sarah Lean
A video showcasing how Azure Migrate can be used to migrate virtual machines from AWS across to Azure.
Connect Azure Cloud Shell to Virtual Network vNet
Thomas Maurer
As you know, Azure Cloud Shell is a great management tool to manage your Azure resources. Azure Cloud Shell is an interactive, authenticated, browser-accessible shell for managing Azure resources. It provides the flexibility of choosing the shell experience that best suits the way you work, either Bash or PowerShell. You can learn more about Azure Cloud Shell
here. If you wanted to manage Azure resources such as Azure virtual machines (VMs), you needed to connect to a public IP address of a virtual machine, which really didn’t work in all scenarios. With the
latest update, you can now connect Azure Cloud Shell to an Azure virtual network (vNet). With the new method, you can now deploy the Azure Cloud Shell container within your virtual network (vNet), which now allows you to use PowerShell remoting, SSH, or other command-line tools such as kubctl using private IP addresses.
GraphQL on Azure: Part 3 – Azure Functions
Aaron Powell
Blog/ Turning Raspberry PI into Remote Controller
Justin Yoo
This post shows how to enable LIRC module on a Raspberry PI so that it turns into a remote controller for all home appliances.
Jay Gordon
AzureFunBytes – A Twitch show on how to use all the fundamentals that are Microsoft Azure. This time we look at the options for containers on Azure.
Web API Authentication with Microsoft.Identity.Web
Matt Soucoup
Learn how to authenticate to an ASP.NET Core Web API protected by Azure AD with the Microsoft.Identity.Web library.
Azure Architecture Best Practices Virtual Event
Thomas Maurer
I am happy to let you know about another
free online event where I am presenting together with Microsoft Cloud Solution Architect, Dominik Zemp, about Azure Architecture Best Practices. This free virtual event will be on August 18 from 9:30am-12:00pm (CEST). In this session, you will learn about proven guidance that’s designed to help you, architect, create and implement the business and technology strategies necessary for your organization to succeed in the cloud. It provides best practices, documentation, and tools that cloud architects, IT professionals, and business decision-makers need to successfully achieve their short- and long-term objectives. We will be focusing on topics like the
Cloud Adoption Framework and the new
Enterprise-Scale landing zone architecture.
Use Debezium pgoutput plugin with Azure PostgreSQL
Abhishek Gupta
This blog will provide a quick walk through of how to use the PostgreSQL pgoutput plugin with Debezium on Azure
“Get Inspired By These BitCamp Final Projects by High School Students!” Dev.to post
Chloe Condon
The Students I have been working with in Bit Project are presenting their final projects this week. This blogpost will highlight these 7 projects and link to their open source projects/MSLearn modules. The event is live here on 8/13 (and I will be updating the blog post with the recorded video of presentations after 8/13)!
Twitch stream: adding accessibility tooling and linting to a React-based game
Em Lazer-Walker
I took the Azure-based social space / event platform I’m building for the Roguelike Celebration conference and added in a few different accessibility linting tools, including integrating them with GitHub and GitHub Actions. I talked through the value (and limitations!) of automated accessibility tooling, and went through my app live and fixed accessibility issues based on the feedback.
Azure Functions with WSL2 and Visual Studio Code
Alvaro Videla Godoy
Explains how to solve a couple of problems we might find while getting started with Azure Functions with WSL2 and Visual Studio Code on Windows 10
by Scott Muniz | Aug 14, 2020 | Azure, Microsoft, Technology, Uncategorized
This article is contributed. See the original author and article here.
I made this as a quick lab based on the public documentation to help address this doubt about restoring a deleted database on Azure.
This is a common customer doubt.
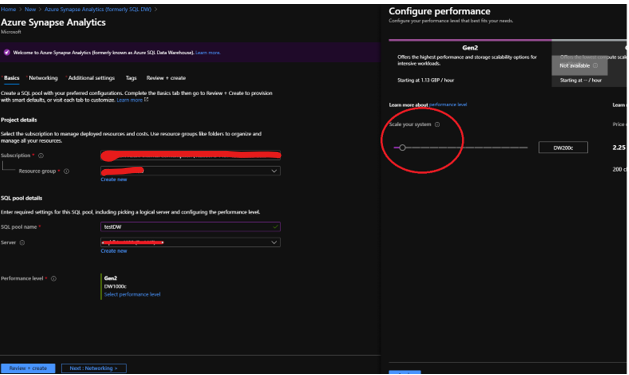
- Create a new DW database and change the performance level to the minimum, this is just a lab as you can check on fig. 1.

Fig 1 Create database
- Connect on SQL Server Management Studio and check the last backup by running the following:
select * from sys.pdw_loader_backup_runs

Fig. 2 No backups
It is completely empty as there is no backup for this database, yet. So, let’s force a backup to be done by creating a restore point.
- Define a new restore point on the Azure Portal by clicking on… New Restore Point Fig 3.

Fig 3 Restore Point
- Connect on SQL Server Management Studio again and check the lastest backups by running again pdw_loader_backup_run as you can confirm on fig 4:

Fig 4 One backup
By the docs:
A data warehouse restore is a new data warehouse that is created from a restore point of an existing or deleted data warehouse. Restoring your data warehouse is an essential part of any business continuity and disaster recovery strategy because it re-creates your data after accidental corruption or deletion.
Doc: https://docs.microsoft.com/en-us/azure/synapse-analytics/sql-data-warehouse/backup-and-restore
SQL DW will create 42 restore points and the user can additionally create more 42 restore points. Basically this is a restore to a point in time.
- Let’s add one more restore point.
- Create a table like the script below and then add a new restore point. You should get the results as shown in Fig 5.
create table test1 ( i int)

Fig 5 New restore point.
- Drop the database from Azure Portal as fig 6.

Fig 6 Drop the database
Public doc: https://docs.microsoft.com/en-us/azure/synapse-analytics/sql-data-warehouse/sql-data-warehouse-restore-deleted-dw
- Open PowerShell.
- Connect to your Azure account and list all the subscriptions associated with your account.
- Select the subscription that contains the deleted SQL pool to be restored.
- Get the specific deleted data warehouse.
Add the details and run on power shell:
$SubscriptionName="<YourSubscriptionName>"
$ResourceGroupName="<YourResourceGroupName>"
$ServerName="<YourServerNameWithoutURLSuffixSeeNote>"  # Without database.windows.net
#$TargetResourceGroupName="<YourTargetResourceGroupName>" # uncomment to restore to a different server.
#$TargetServerName="<YourtargetServerNameWithoutURLSuffixSeeNote>"
$DatabaseName="<YourDatabaseName>"
$NewDatabaseName="<YourDatabaseName>"

Connect-AzAccount
Get-AzSubscription
Select-AzSubscription -SubscriptionName $SubscriptionName

# Get the deleted database to restore
$DeletedDatabase = Get-AzSqlDeletedDatabaseBackup -ResourceGroupName $ResourceGroupName -ServerName $ServerName -DatabaseName $DatabaseName

# Restore deleted database
$RestoredDatabase = Restore-AzSqlDatabase –FromDeletedDatabaseBackup –DeletionDate $DeletedDatabase.DeletionDate -ResourceGroupName $DeletedDatabase.ResourceGroupName -ServerName $DeletedDatabase.ServerName -TargetDatabaseName $NewDatabaseName –ResourceId $DeletedDatabase.ResourceID

# Use the following command to restore deleted data warehouse to a different server
#$RestoredDatabase = Restore-AzSqlDatabase –FromDeletedDatabaseBackup –DeletionDate $DeletedDatabase.DeletionDate -ResourceGroupName $TargetResourceGroupName -ServerName $TargetServerName -TargetDatabaseName $NewDatabaseName –ResourceId $DeletedDatabase.ResourceID

# Verify the status of restored database
$RestoredDatabase.status
Simple like that! You can also use the portal for it, look at the public documentation for more details.
- If you run again sys.pdw_loader_backup_runs after the restore you will see the restore points as the user drop database and the latest backups:

Fig 7 Restore points
Note: A dropped DW database is cleaned-up 8 days after the drop and cannot be restored
That is it!
Liliam
UK Engineer.

by Scott Muniz | Aug 14, 2020 | Azure, Microsoft, Technology, Uncategorized
This article is contributed. See the original author and article here.

CSS live reloading on Blazor
Jun-ichi Sakamoto is a Japanese MVP for Developer Technologies. The 10-time MVP title holder specializes in C#, ASP.NET, Blazor, Azure Web Apps, TypeScript. Jun-ichi’s publication of NuGet packages – like Entity Framework Core, helper, testing tools, Blazor components, and more – have been downloaded more than 18 million times. For more on Jun-ichi, check out his Twitter @jsakamoto

Helping the busy BDM or manager: create ToDo tasks automatically when you are mentioned in a team channel
Vesku Nopanen is a Principal Consultant in Office 365 and Modern Work and passionate about Microsoft Teams. He helps and coaches customers to find benefits and value when adopting new tools, methods, ways or working and practices into daily work-life equation. He focuses especially on Microsoft Teams and how it can change organizations’ work. He lives in Turku, Finland. Follow him on Twitter: @Vesanopanen

6 useful Xamarin Forms Snippets
Damien Doumer is a software developer and Microsoft MVP in development technologies, who from Cameroon and currently based in France. He plays most often with ASP.Net Core and Xamarin, and builds mobile apps and back-ends. He often blogs, and he likes sharing content on his blog at https://doumer.me. Though he’s had to deal with other programming languages and several frameworks, he prefers developing in C# with the .Net framework. Damien’s credo is “Learn, Build, Share and Innovate”. Follow him on Twitter @Damien_Doumer.

#Microsoft Windows Admin Center and Azure Backup Management #WAC #Azure
James van den Berg has been working in ICT with Microsoft Technology since 1987. He works for the largest educational institution in the Netherlands as an ICT Specialist, managing datacenters for students. He’s proud to have been a Cloud and Datacenter Management since 2011, and a Microsoft Azure Advisor for the community since February this year. In July 2013, James started his own ICT consultancy firm called HybridCloud4You, which is all about transforming datacenters with Microsoft Hybrid Cloud, Azure, AzureStack, Containers, and Analytics like Microsoft OMS Hybrid IT Management. Follow him on Twitter @JamesvandenBerg and on his blog here.

Step by Step Azure NAT Gateway – Static Outbound Public IP address
Robert Smit is a EMEA Cloud Solution Architect at Insight.de and is a current Microsoft MVP Cloud and Datacenter as of 2009. Robert has over 20 years experience in IT with experience in the educational, health-care and finance industries. Robert’s past IT experience in the trenches of IT gives him the knowledge and insight that allows him to communicate effectively with IT professionals. Follow him on Twitter at @clusterMVP

by Scott Muniz | Aug 14, 2020 | Azure, Microsoft, Technology, Uncategorized
This article is contributed. See the original author and article here.
The Super User feature of the Azure Rights Management service from Azure Information Protection ensures that authorized people and services can always read and inspect the data that Azure Rights Management protects for your organization. You can learn more about the super user feature and how to enable and manage it here.
One of the concerns we have heard from our customers regarding the super user management was that to be able to add a super user, one needs to be assigned the Global Administrator role and that the super user assignment is permanent until manually removed. All this adds complexity to the roles management workflow and raises security, compliance and governance questions especially at large companies with distributed IT organizations.
Azure Active Directory (Azure AD) Privileged Identity Management (PIM) is a service that enables you to manage, control, and monitor access to important resources in your organization. These resources include resources in Azure AD, Azure, and other Microsoft Online Services like Office 365 or Microsoft Intune. You can learn more about Azure PIM here.
One of the most expected PIM features had been ability to manage membership of privileged AAD groups. Finally, you can now assign eligibility for membership or ownership of privileged access groups. You can learn more about this new capability here.
Note: As of this writing (August 2020) this feature is in preview, so it is subject to change.
So, how can this new feature help us with the problem outlined above? Let’s find out.
Enable the AIP Super User feature
If you have not enabled the Super User feature yet, you need to connect to the AIP service as a Global Administrator and run the following command: Enable-AipServiceSuperUserFeature
 Figure 1: Enabling the AIP Super User feature
Note: Please take a moment to review our security best practices for the Super User feature.
Create an Azure AD group
Before you go ahead and create a new group, you need to consider:
- AIP only works with identities which have an email address (proxyAddress attribute in Azure AD)
- As of this writing (August 2020) only new Microsoft 365 and Security groups can be created with “isAssignableToRole” property, you can’t set or change it for existing groups.
- This new switch is only visible to Privileged Role Administrators and Global Administrators because these are only two roles that can set the switch.
This leaves us with the only option – a new Microsoft 365 group.
 Figure 2: Creating a new Microsoft 365 group in the Azure Portal
If you prefer PowerShell, you can use it too:
 Figure 3: Creating a new Microsoft 365 group using PowerShell
 Figure 4: Reviewing properties of the new Microsoft 365 group using PowerShell
Enable PIM support for the new group
Our next step is to enable privileged access management for the group we have just created:
 Figure 5: Accessing Privileged access configuration from the group management
 Figure 6: Enabling Privileged Access for the new group
Add eligible members to the group
Now we can add assignments and decide who should be active or eligible members of our new group.
 Figure 7: Adding assignments
 Figure 8: Reviewing a list of the eligible members
Set the new group to use as the super user group for AIP
The Set-AipServiceSuperUserGroup cmdlet specifies a group to use as the super user group for Azure Information Protection. Members of this group are then super users, which means they become an owner for all content that is protected by your organization. These super users can decrypt this protected content and remove protection from it, even if an expiration date has been set and expired. Typically, this level of access is required for legal eDiscovery and by auditing teams.
You can specify any group that has an email address, but be aware that for performance reasons, group membership is cached. For information about group requirements, see Preparing users and groups for Azure Information Protection.
 Figure 9: Adding the new PIM-managed group as the super user group
Using the super user feature
Now that we have everything set up, let’s see what the end user (JIT administrator) experience is going to be.
First, for the sake of testing we are going to make sure that the test user can’t open a protected document he does not normally have access to.
 Figure 10: Error indicating that the user does not have access to the protected document
It’s time to elevate our access using Azure PIM:
 Figure 11: List of the PIM-managed privileged access groups
 Figure 12: List of privileged groups the user is eligible for
 Figure 13: Privileged group activation dialog
 Figure 14: Verifying that the user has the privileged group activated
After that the user is able to access the protected document and remove or change protection settings if needed.
 Figure 15: Accessing a protected document as a super user
If required by your company’s policy, you can secure this elevation process even further by enforcing MFA and approval
 Figure 16: Customizing role activation options
For more information about role-assignable groups in Azure AD, see Use cloud groups to manage role assignments in Azure Active Directory.
Please also take a moment to review current limitations and known issues here.

Recent Comments