by Scott Muniz | Aug 21, 2020 | Azure, Microsoft, Technology, Uncategorized
This article is contributed. See the original author and article here.
It is practical to enable access to the developer portal for users from multiple Azure Active Directories. The following instructions show you how to manage the external groups of multiple tenants.
Prerequisites
NoteThis feature is available in the Premium, Standard and Developer tiers of API Management.
Instructions
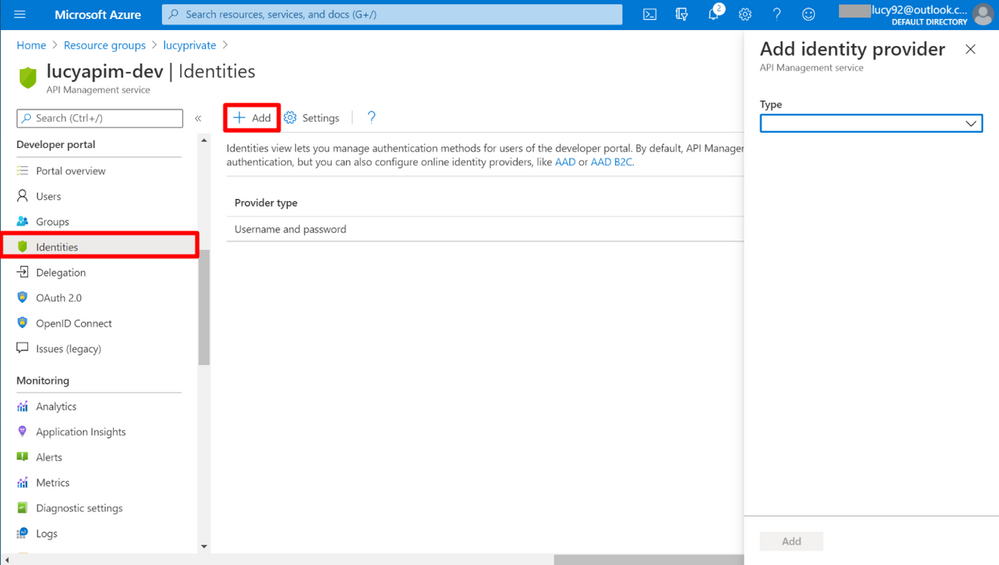
1. Go to the APIM instance. Select Identities on the portal. Click the button + Add on the top, then you will see the Add identity provider pane appears on the right.

2. Select Azure Active Directory on the pane. The Request URL (legacy) is used for the Developer Portal (legacy), while the Request URL is used for the Developer Portal. In this article, we will use the Developer Portal as a sample.

3. Open a new Tab on the browser. Select the service App registrations.

4. Click the button + New Registration.
5. Give the new registration a meaningful name. Set Supported account types to Accounts in any organizational directory (Any Azure AD directory – Multitenant). Set Redirect URI to the value you got from step 2. Choose Register.
6. On the App registrations portal, copy the Application (client) ID and the Directory (tenant) ID.
7. Go back to the API Management portal. Paste Application (client) ID into Client Id and paste Directory (tenant) ID into Signin tenant.
8. Go to the App registration portal. Select Certificates & secrets. Select the button + New client secret. To add a new client secret, give it a meaningful name and select the button Add.
9. Copy the secret value immediately, because when you leave the page, you can never see the secret again.
10. Go back to the APIM portal. Paste the secret into Client secret and select Add.
11. Select Group on the right pane. Then you will see that a new button + Add Azure AD group displays on the portal now.
12. Then go to the App registration portal. Select Authentication. Choose ID token. Click the button Save.
13. Select API permission on the right pane. Click the button + Add a permission.
14. Select Azure Active Directory Graph under the Supported legacy APIs.
15. Select Application permissions. Choose the permission Directory.Read.All. Then Click the button Add permission.
16. Click the button Grant admin consent for Default Directory to eliminate the warning Not granted for Default Directory.
17. Go back to the API Management Portal. Select Group on the right pane. Click the button + Add Azure AD group.
18. Select your default tenant in the drop-list of Tenant. Then choose the AD group you want to add. Until now, we have completed all the steps to authorize developer accounts by Azure AD in the default tenant. Next, we need to learn how to add the AD group from the external tenants.
19. Go to Identities. Select the provider type Azure Active Directory we just created. Change the Signin tenant to the external tenant Id. Add the external tenant Id into Allowed tenants as well. Then click the button Update.
20. Before adding the external AD group into the APIM, we must get the admin consent for the external tenant. There are two ways to grant admin consent for the external directory.
- Ask the admin of the external directory sign in the developer portal with Azure Active Directory. During signing in, the window Permissions requests will pop up. Select the button Accept, then the permission will be approved.

- Ask the admin of the external directory open the service Enterprise application on Azure Portal. Select the app with the same name of the app registration you created earlier. Click the button Grant admin consent for Default Directory.

Please note when adding the external tenant as the allowed tenant in step 19, a new enterprise application with the same name of the app registration should be created into the external tenant. The two methods are equivalent and able to grant the admin consent for the external tenant by the AD admin.
21. Go back to the tenant containing the APIM service. On the APIM portal, select Group in the right pane. Select + Add Azure AD group. Now we can add the AD group from the external tenant.
by Scott Muniz | Aug 21, 2020 | Azure, Microsoft, Technology, Uncategorized
This article is contributed. See the original author and article here.
Quite a bit of Azure news to cover this week. Items covered include Microsoft 365 apps to retire support for Internet Explorer 11, Azure IoT Central updates including a command line-interface (CLI) IoT extension update and a Mobile app gateway sample, Assigning groups to Azure AD roles is now in public preview and Video Analytics is now available as a new Azure IoT Central App Template.
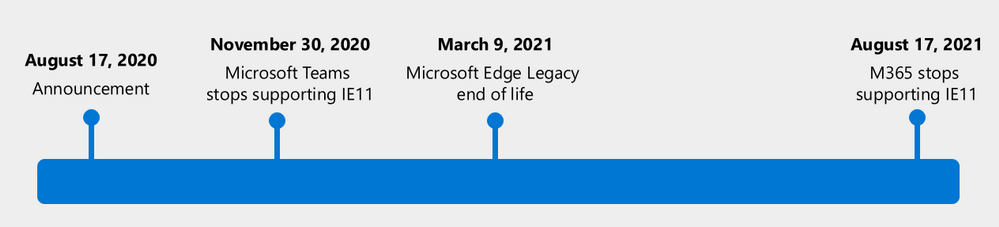
Microsoft 365 apps to retire support for Internet Explorer 11 and Windows 10 sunsets Microsoft Edge Legacy

The Microsoft Teams web app will no longer support IE 11 as of November 30, 2020 and the remaining Microsoft 365 apps and services will no longer support IE 11 as of August 17, 2021. After the above dates, customers will have a degraded experience or will be unable to connect to Microsoft 365 apps and services on IE 11. For degraded experiences, new Microsoft 365 features will not be available or certain features may cease to work when accessing the app or service via IE 11.
After March 9, 2021, the Microsoft Edge Legacy desktop app within Windows 10 will not receive new security updates. The new Microsoft Edge and Internet Explorer mode uses the Trident MSHTML engine from Internet Explorer 11 (IE11) for legacy sites and can be specifically configure via policy.
Azure IoT Central UI new and updated features
A plethora of new Azure IoT Central features updates this week including:
- Azure command line-interface (CLI) IoT extension update
- Enables the ability to troubleshoot and diagnose common issues when connecting a device to IoT Central. For example, you can use the Azure CLI to compare and validate the device property payload against the device model and run a device command and view the response.
- Mobile app gateway sample
-
Most medical wearable devices are Bluetooth Low Energy devices that need a gateway to send data to IoT Central. This phone app acts as that gateway and can be used by a patient who has no access to, or knowledge of, IoT Central. You can customize the IoT Central Continuous Patient Monitoring sample mobile app for other use cases and industries.
- Device builder documentation improvements
-
A new article for device developers describes message payloads. It describes the JSON that devices send and receive for telemetry, properties, and commands defined in a device template. The article includes snippets from the device capability model and provides examples that show how the device should interact with the application.
- User management support with the IoT Central APIs
-
You can now use the IoT Central APIs to manage your application users. This makes it easier to add, remove, and modify users and roles programmatically. You can add and manage service principal (SPNs) as part of your application to make it easier to deploy IoT Central in your existing release pipeline.
Assigning groups to Azure AD roles is now in public preview
Currently available for Azure AD groups and Azure AD built-in roles, and Microsoft will be extending this in the future to on-premises groups as well as Azure AD custom roles. You’ll need to create an Azure AD group and enable it to have roles assigned which can be done by anyone who is either a Privileged Role Administrator or a Global Administrator. To use this feature, you’ll need to create an Azure AD group and enable it to have roles assigned. This can be done by anyone who is either a Privileged Role Administrator or a Global Administrator. After that, any of the Azure AD built-in roles, such as Teams Administrator or SharePoint Administrator, can have groups assigned to them.
New Azure IoT Central Video Analytics App Template now available

The new IoT Central video analytics template simplifies the setup of an Azure IoT Edge device to act as the gateway between cameras and Azure cloud services. The template installs the IoT Edge modules such as an IoT Central Gateway, Live Video Analytics on IoT Edge, OpenVINO Model server, and an ONVIF module on the Edge device. These modules help the IoT Central application configure and manage the devices, ingest the live video streams from the cameras, and easily apply AI models such as vehicle or person detection. Simultaneously in the cloud, Azure Media Services and Azure Storage record and stream relevant portions of the live video feed.
MS Learn Module of the Week

Develop IoT solutions with Azure IoT Central
Interested in rapidly building enterprise-grade IoT applications on a secure, reliable, and scalable infrastructure? This path is the place to start to learn how to build IoT solutions with Azure IoT Central. IoT Central is an IoT application platform that reduces the burden and cost of developing, managing, and maintaining enterprise-grade IoT solutions.
Let us know in the comments below if there are any news items you would like to see covered in next week show. Az Update streams live every Friday so be sure to catch the next episode and join us in the live chat.
by Scott Muniz | Aug 21, 2020 | Azure, Microsoft, Technology, Uncategorized
This article is contributed. See the original author and article here.
How many times have you wanted to remediate a non-compliant object using Azure Policy but found you can’t because the policy language or type of object can’t be manipulated in that way. Or maybe you’ve had to write a policy with an audit effect instead of being able to create a deployment to remediate the issue. Deployment Scripts are currently in preview and allow you to execute PowerShell or CLI scripts using Azure Container Instances as part of an Azure Resource Manager template. To put it simply – now you can run a script as part of a template deployment.
So my thought was if I can deploy a template using an Azure Policy DeployIfNotExists effect – why can’t I deploy a Deployment Script object which then runs the code to remediate my non-compliant Azure resource?
Well as it turns out you can! And this allows several interesting use cases which are not possible with the default policy language such as: –
- Deleting orphaned objects.
- Changing the license type to Hybrid Benefit for existing Azure machines.
- Detailed tag application – running a script to build a tag value based on many other resources or conditions.
- Performing data plane operations on objects like Azure Key Vault and Azure Storage.
The rest of this post takes you through how I set this functionality up to ensure that all Windows virtual machines are running with Azure Hybrid Benefit enabled.
Azure Policy
I won’t go into the details of creating the basic Azure Policy rules however you want to ensure that the effect for your policy is DeployIfNotExists. In my case I started of with a very simple rule which will help filter out resources I’m not interested in – so as part of the rule I’m looking for resource types which are virtual machines, and that have Microsoft Windows Server as the publisher.
{
    "if": {
        "allOf": [
            {
                "field": "type",
                "equals": "Microsoft.Compute/virtualMachines"
            },
            {
                "field": "Microsoft.Compute/virtualMachines/storageProfile.imageReference.publisher",
                "equals": "MicrosoftWindowsServer"
            }
        ]
    }
}
For the policy effect I specify DeployIfNotExists and then retrieve the same object and apply some more checks to it. This time as part of the existence condition I’m going to check the license type field to check if it is correct.
"existenceCondition": {
    "allOf": [
        {
            "field": "Microsoft.Compute/virtualMachines/licenseType",
            "exists": true
        },
        {
            "field": "Microsoft.Compute/virtualMachines/licenseType",
            "equals": "Windows_Server"
        },
        {
            "field": "Microsoft.Compute/virtualMachines/licenseType",
            "notEquals": "[parameters('StorageAccountId')]"
        }
    ]
}
In the JSON above there is a check for the StorageAccountId parameter which has nothing to do with the object we’re running the policy against – but I need to include it as I’ve used it as a parameter for my policy. It will always return true, so it’s not really included as part of the evaluation and by itself won’t trigger the deployment. (If you try to add a policy without consuming all the parameters in the policy rules you will get an error).
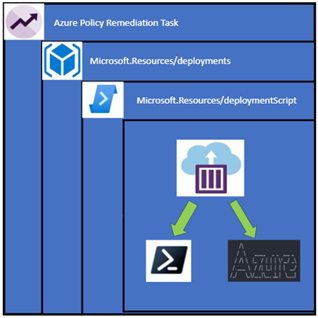
The rest of a DeployIfNotExists policy contains the object I want to deploy, and it does get a bit complicated. If I was to just deploy the deployment script object it would deploy in the same resource group as my resource to be remediated which isn’t a desirable outcome as it would leave a mess of orphaned objects. The deployment script also requires a storage account to work and I don’t want my subscription littered with random storage accounts. To get around this I create a subscription level deployment – which deploys a deployment resource, which contains a nested deployment to deploy the deployment script. Confused? Here it is in a diagram and you can follow the previous links or look at the policy itself.

The best part is we don’t have to manage the Azure Container Instance as the deployment script object does that for you.
What I do have to worry about is the script that runs – it uses a user assigned managed identity which must have permission manage the resources, in this case I need to give it Reader and Virtual Machine Contributor rights on the subscription so it can change that license type and update the virtual machine.
The PowerShell script which runs is so simple: –
Param($ResourceGroupName, $VMName)
$vm = Get-AzVM -ResourceGroupName $ResourceGroupName -Name $VMName
$vm.LicenseType = "Windows_Server"
Update-AzVM -VM $vm -ResourceGroupName $ResourceGroupName
The container instance comes with the Az modules already or if you prefer to use the Azure CLI you can specify that in the deployment script object in the template. The script can be either be provided inline or link to an external URL. If you are linking externally and don’t want it to be in a public location, you might have to provide a SAS URL. I also specify arguments to provide to the script in a concatenated string format, the documentation on the deployment script provides some more information on these arguments but you can incorporate parameters from the policy which means the inputs can come from the non-compliant objects. As well you can choose to use an existing storage account, or you can let the deployment script create one for you.
"forceUpdateTag": "[utcNow()]",
"azPowerShellVersion": "4.1",
"storageAccountSettings": {
    "storageAccountName": "[parameters('StorageAccountName')]",
    "storageAccountKey": "[listKeys(resourceId('Microsoft.Storage/storageAccounts', parameters('StorageAccountName')), '2019-06-01').keys[0].value]"
},
"arguments": "[concat('-ResourceGroupName ',parameters('VMResourceGroup'),' -VMName ',parameters('VMName'))]",
"retentionInterval": "P1D",
"cleanupPreference": "OnSuccess",
"primaryScriptUri": "https://raw.githubusercontent.com/anwather/My-Scripts/master/license.ps1"
I’ve linked the policy rule here for you to review, be careful to observe the flow of the parameters as they are provided in the policy assignment and then are passed down through each deployment object as a value. The ‘StorageAccountName’ parameter is a good example of this.
Deploying the Solution
Scripts and policies are located in my GitHub repository – you can clone or download them.
The steps to deploy the required resources and policy are as below: –
- Ensure that you have the latest version of the Az PowerShell modules available.
- Connect to Azure using Connect-AzAccount
- Modify the deploy.ps1 script and change the values where indicated.
$resourceGroupName = "ACI" # <- Replace with your value
$location = "australiaeast" # <- This must be a location that can host Azure Container Instances
$storageAccountName = "deploymentscript474694" # <- Unique storage account name
$userManagedIdentity = "scriptRunner" # <- Change this if you don’t like the name
4. Run the deploy.ps1 script. The output should be like below.

The script will create a resource group, storage account and deploy the policy definition.
Create a Policy Assignment
In the Azure portal Policy section, we can now create the assignment and deploy the policy. Click on “Assign Policy”.

Select the scope you want to assign the policy to and ensure that the correct policy definition is selected.

Click next and fill in the parameters – the values for this are output by the deployment script.

Click next – you can leave the options as is for this screen and simply click Review and Create. On the final screen just click create.
The policy will be assigned, and a new managed identity will also be created which allows us to remediate any non-compliant resources.

Testing It Out
To test the policy and remediation task I have built a new Windows Server making sure that I haven’t selected to use Azure Hybrid Benefit.

Once the policy evaluation cycle is complete (use Start-AzPolicyComplianceScan to trigger) I can see that my new resource is now showing as non-compliant.

I can go in now and create a remediation task for this machine by clicking on Create Remediation Task. The task will launch and begin the deployment of my Deployment Script object.

I can check the resource group I specified (ACI) that the deployment script objects are created in and will be able to see the object in there.

Selecting this resource will show the details about the container instance that was launched (it’s been deleted already since the container has run) and the logs. You can also see that during the script deployment it has been able to bring the parameters I specified in the template into the script.

And finally, we can check the virtual machine itself, and I find that the Azure Hybrid Benefit has been applied successfully.

When I look at the resource now in the Azure Policy blade it is now showing the resource as compliant.

So there you have it, what started as a theory for remediating objects has been proven to work nicely and now I have the task of looking over all my other policies and seeing what I can remediate using this method.
Known Issues:
- In the example given – Azure Spot instances can’t be remediated using this process
- My testing cases are small and in no way should reflect your own testing.
- This is hosted on GitHub – if there are issues or you make changes please submit a PR for review.
Disclaimer:
The sample scripts are not supported under any Microsoft standard support program or service. The sample scripts are provided AS IS without warranty of any kind. Microsoft further disclaims all implied warranties including, without limitation, any implied warranties of merchantability or of fitness for a particular purpose. The entire risk arising out of the use or performance of the sample scripts and documentation remains with you. In no event shall Microsoft, its authors, or anyone else involved in the creation, production, or delivery of the scripts be liable for any damages whatsoever (including, without limitation, damages for loss of business profits, business interruption, loss of business information, or other pecuniary loss) arising out of the use of or inability to use the sample scripts or documentation, even if Microsoft has been advised of the possibility of such damages.

Recent Comments