This article is contributed. See the original author and article here.
It is practical to enable access to the developer portal for users from multiple Azure Active Directories. The following instructions show you how to manage the external groups of multiple tenants.
Prerequisites
- Complete the following quickstart: Create an Azure API Management instance.
- Import and publish an Azure API Management instance. For more information, see Import and publish.
- Highly recommend to read the article Authorize developer accounts by using Azure Active Directory in Azure API Management – Single Tenant
NoteThis feature is available in the Premium, Standard and Developer tiers of API Management.
Instructions
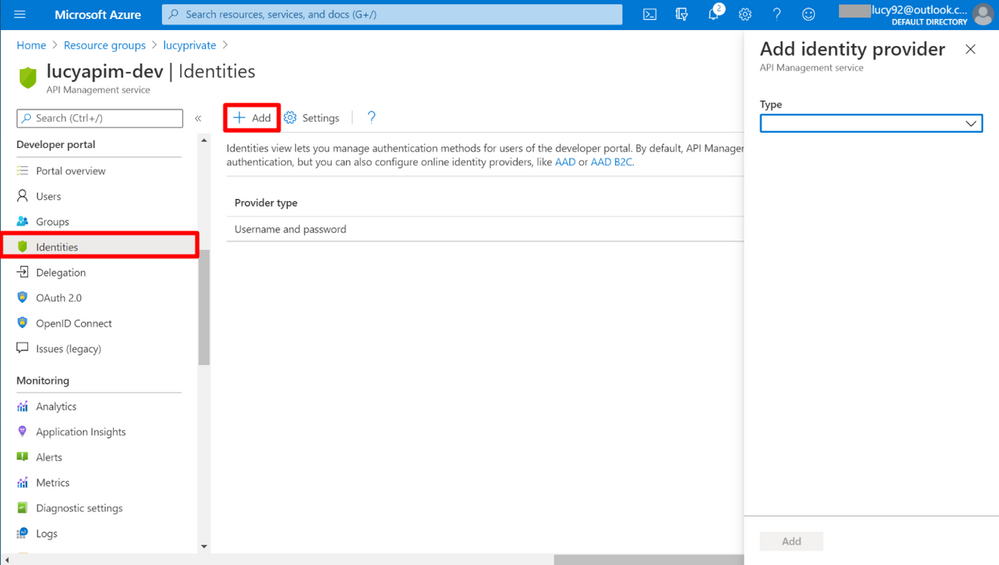
1. Go to the APIM instance. Select Identities on the portal. Click the button + Add on the top, then you will see the Add identity provider pane appears on the right.

2. Select Azure Active Directory on the pane. The Request URL (legacy) is used for the Developer Portal (legacy), while the Request URL is used for the Developer Portal. In this article, we will use the Developer Portal as a sample.

3. Open a new Tab on the browser. Select the service App registrations.

4. Click the button + New Registration.
5. Give the new registration a meaningful name. Set Supported account types to Accounts in any organizational directory (Any Azure AD directory – Multitenant). Set Redirect URI to the value you got from step 2. Choose Register.

6. On the App registrations portal, copy the Application (client) ID and the Directory (tenant) ID.

7. Go back to the API Management portal. Paste Application (client) ID into Client Id and paste Directory (tenant) ID into Signin tenant.

8. Go to the App registration portal. Select Certificates & secrets. Select the button + New client secret. To add a new client secret, give it a meaningful name and select the button Add.

9. Copy the secret value immediately, because when you leave the page, you can never see the secret again.

10. Go back to the APIM portal. Paste the secret into Client secret and select Add.

11. Select Group on the right pane. Then you will see that a new button + Add Azure AD group displays on the portal now.
12. Then go to the App registration portal. Select Authentication. Choose ID token. Click the button Save.

13. Select API permission on the right pane. Click the button + Add a permission.

14. Select Azure Active Directory Graph under the Supported legacy APIs.

15. Select Application permissions. Choose the permission Directory.Read.All. Then Click the button Add permission.

16. Click the button Grant admin consent for Default Directory to eliminate the warning Not granted for Default Directory.

17. Go back to the API Management Portal. Select Group on the right pane. Click the button + Add Azure AD group.

18. Select your default tenant in the drop-list of Tenant. Then choose the AD group you want to add. Until now, we have completed all the steps to authorize developer accounts by Azure AD in the default tenant. Next, we need to learn how to add the AD group from the external tenants.

19. Go to Identities. Select the provider type Azure Active Directory we just created. Change the Signin tenant to the external tenant Id. Add the external tenant Id into Allowed tenants as well. Then click the button Update.

20. Before adding the external AD group into the APIM, we must get the admin consent for the external tenant. There are two ways to grant admin consent for the external directory.
- Ask the admin of the external directory sign in the developer portal with Azure Active Directory. During signing in, the window Permissions requests will pop up. Select the button Accept, then the permission will be approved.
- Ask the admin of the external directory open the service Enterprise application on Azure Portal. Select the app with the same name of the app registration you created earlier. Click the button Grant admin consent for Default Directory.


Please note when adding the external tenant as the allowed tenant in step 19, a new enterprise application with the same name of the app registration should be created into the external tenant. The two methods are equivalent and able to grant the admin consent for the external tenant by the AD admin.
21. Go back to the tenant containing the APIM service. On the APIM portal, select Group in the right pane. Select + Add Azure AD group. Now we can add the AD group from the external tenant.

Brought to you by Dr. Ware, Microsoft Office 365 Silver Partner, Charleston SC.

Recent Comments