This article is contributed. See the original author and article here.
Overview
As more businesses convert OT systems to digital IT infrastructures, security operations center (SOC) teams and chief information security officers (CISOs) are increasingly responsible for handling threats from OT networks.
Defender for IoT’s built-in integration with Sentinel helps bridge the gap between IT & OT security challenge. Sentinel enables SOC teams to reduce the time taken to manage and resolve OT incidents efficiently by providing out-of-the-box capabilities to analyze OT security alerts, investigate multistage IT/OT attacks, utilize Azure Log Analytics for threat hunting, utilize threat intelligence, and automate incident response using SOAR playbooks.
Customer engagements have taught us that sometimes customers prefer to maintain their existing SIEM, alongside Microsoft Sentinel, or as a standalone SIEM.
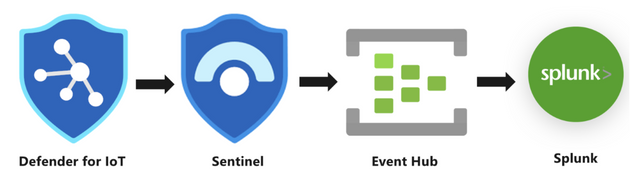
In this blog, we’ll introduce a solution that sends Microsoft Defender for IoT alerts to an Event Hub that can be consumed by a 3rd party SIEMs. You can use this solution with Splunk, QRadar, or any other SIEM that supports Event Hub ingestion.
Preparation and use
In this blog, we’ll use Splunk as our example.
The following describe the necessary preparation steps:
- Connect your alerts from Defender for IoT to Microsoft Sentinel
- Register an application in Azure AD
- Create an Azure Event Hub Namespace
- Prepare Azure Sentinel to forward Incidents to Event Hub
- Configure Splunk to consume Azure Sentinel Incidents from Azure Event Hub
1. Connect your alerts from Defender for IoT to Microsoft Sentinel
The first step is to enable the Defender for IoT data connector so that all Defender for IoT alerts are streamed into Microsoft Sentinel (a free process).
In Microsoft Sentinel, under Configuration, select Data Connectors and then locate Microsoft Defender for IoT data connector. Open the connector page, select the subscription whose alerts you want to stream into Microsoft Sentinel, and then select Connect.
For more information, see Connect your data from Defender for IoT to Microsoft Sentinel
2. Register an application in Azure AD
You’ll need Azure AD to be defined as a service principal for Splunk Add-on for Microsoft Cloud Services.
- To register an app in Azure AD, open the Azure Portal and navigate to Azure Active Directory > App Registrations > New Registration. Fill the Name and click Register.
- Click Certificates & secrets to create a secret for the Service Principle. Click New client secret and note its value.
- To grant the required permissions to read data from the app, click API permissions > Add a permission and select Microsoft Graph > Application permissions > SecurityEvents.ReadWrite.All.
Ensure that the granted permission is approved by admin.
- For the next step of setting up Splunk Add-on for Microsoft Cloud Services, note the following settings:
- The Azure AD Display Name
- The Azure AD Application ID
- The Azure AD Application Secret
- The Tenant ID


3. Create an Azure Event Hub Namespace
- In the Azure Portal, navigate to Event Hubs > New to create a new Azure Event Hub Namespace. Define a Name, select the Pricing Tier and Throughput Units and click Review + Create.
- Once the Azure Event Hub Namespace is created click Go to resource and click + Event Hubs to create an Azure Event Hub within the Azure Event Hub Namespace.
- Define a Name for the Azure Event Hub, configure the Partition Count, Message Retention and click Review + Create.
- Navigate to Access control (IAM) and Click + Add > Add role assignment to add the Azure AD Service Principle created before and delegate as Azure Event Hubs Data Receiver and click Save.
- For the configuration of Splunk Add-on for Microsoft Cloud Services app, make a note of following settings:
- The Azure Event Hub Namespace Host Name
- The Azure Event Hub Name


4. Prepare Azure Sentinel to forward Incidents to Event Hub
To forward Microsoft Sentinel incidents or alerts to Azure Event Hub, you’ll need to define your Microsoft Sentinel workspace with a data export rule.
- In the Azure Portal, navigate to Log Analytics > select the workspace name related to Microsoft Sentinel > Data Export > New export rule.
- Name the rule, configure the Source as SecurityIncident and the Destination as Event Type utilizing the Event Hub Namespace and Event Hub Name configured previously. Click on Create.


5. Configure Splunk to consume Microsoft Sentinel Incidents from Azure Event Hub
For Microsoft Defender for IoT alerts to be ingested into Azure Event Hub, install the Splunk Add-on for Microsoft Cloud Services app.
- For the installation, open the Splunk portal and navigate to Apps > Find More Apps. For the dashboard find the Splunk Add-on for Microsoft Cloud Services app and Install.
- To add the Azure AD Service Principal, open the Splunk app and navigate to Azure App Account > Add. Use the details you’d noted earlier:
Define a Name for the Azure App Account
Add the Client ID, Client Secret, Tenant ID
Choose Azure Public Cloud as Account Class Type
Click Update to save and close the configuration.
Now navigate to Inputs within the Splunk Add-on for Microsoft Cloud Services app and select Azure Event Hub in Create New Input selection.
Define a Name for the Azure Event Hub as Input, select the Azure App Account created before, define the Event Hub Namespace (FQDN), Event Hub Name, let the other settings as default and click Update to save and close the configuration.


Once the ingestion is processed, you can query the data by using sourcetype=”mscs:azure:eventhub” in search field.
Disclaimer: The use of EventHub and Log Analytics export rule may incur an additional charge. For more information, see Event Hubs pricing and Log Data Export pricing

Brought to you by Dr. Ware, Microsoft Office 365 Silver Partner, Charleston SC.

Recent Comments