This article is contributed. See the original author and article here.
Overview
This document covers the step by step procedure to set up and configure SAP on Oracle ASM (Oracle Linux 8.2 /Oracle 19c) on Azure . As this setup involves a large number of steps, it is very easy to miss or misconfigure ,that may result in errors/issues ,which could be very cumbersome to resolve. Hence these steps are covered here in detail. Since we are talking about the Oracle ASM install, scope of this document is restricted to SAP DB instance install.
High Level Process Flow :
- Create VMs
- Patch OS and pre-install
- Create disks
- Setup ASM
- DB Install with SWPM
- Oracle software installation
- SBP Oracle DB instance
- SBP Oracle Grid
- Confirm patching successful + run Oracle Enterprise Manager
Deploy Linux VMs
via Azure portal
- Create a Resource Group
- Create a Virtual network
- Use the Virtual Network create above
- Create Virtual Machine 1 for App server . Virtual Machine 2 for ASCS server, Virtual Machine 3 for DB server .Use at least Oracle Linux 8.0 image from azure marketplace image gallery. In this example Oracle Linux 8.2 image is used.
via Azure CLI
1. Login to Azure
az login
- Create a resource group
az group create –name oraasmtestrg –location <location>
3. Create a virtual machinesaz group create
App server
az vm create –resource-group oraasmtestrg –name oraapp1 –image Oracle:Oracle-Linux:ol8_2-gen2:8.2.01 –size Standard_E4s_v3 –admin-username sapadmin –admin-password <password> –location southeastasia –vnet-name oraasmtestvnet –subnet default
ASCS:
az vm create –resource-group oraasmtestrg –name oraascs1 –image Oracle:Oracle-Linux:ol8_2-gen2:8.2.01 –size Standard_E4s_v3 –admin-username sapadmin –admin-password <password> –location southeastasia –vnet-name oraasmtestvnet –subnet default
Database server:
az vm create –resource-group oraasmtestrg –name oradb7 –image Oracle:Oracle-Linux:ol8_2-gen2:8.2.01 –size Standard_E8s_v3 –admin-username sapadmin –admin-password <password> –data-disk-sizes-gb 512 512 512 512 –location southeastasia –os-disk-size-gb 128 –vnet-name oraasmtestvnet –subnet default
Jump server
az vm create –resource-group oradgsap-rg –name oradgjmp-vm –image win2016datacenter–size Standard_E2s_v3 –admin-username sapadmin –admin-password <password> –location < location> –vnet-name oraasmtestvnet –subnet default
It is a good practice to disable the public Ip Addresses of SAP VMs. You can access these VMs from Jump box via private Ip Addresses
OS configuration and pre-install
Resize OS disk
The default provisioned size of OS disk on Linux Vm on azure is 30GB which is not sufficient for the Oracle install. As the OS selected is Oracle Linux 8.2 which has GPT partition in OS disk, follow the steps here https://docs.microsoft.com/en-us/azure/virtual-machines/linux/resize-os-disk-gpt-partition to resize the OS Disk with GPT partition
Install ASM libraries
Refer Oracle ASMLib Downloads for Oracle Linux 8 For more information about installing Oracle ASM libraries.
- Login as root for install
sudo su –
- Update the OS
sudo yum update
- Download and install the Oracle Preinstallation RPM:
# yum -y install oracle-database-preinstall-19c
# rm oracle-database-preinstall-19c-1.0-1.el7.x86_64.rpm
- Install Oracle ASM libraries
yum list | grep oracleasm
- Verify that Oracle ASM is installed:
rpm -qa |grep oracleasm
- This should result in following output
oracleasm-support-2.1.12-1.el8.x86_64
oracleasmlib-2.0.17-1.el8.x86_64
- Verify users and groups were created correctly:
id oracle
- This should result in following output similar to the following:
id=54321(oracle) gid=54321(oinstall) groups=54321(oinstall),54334(asmdba),54322(dba),54323(oper),54324(backupdba),54325(dgdba),54326(kmdba),54330(racdba),54331(sapinst),54332(asmoper),54333(asmadmin)
Setup Oracle ASM
- Create a folder for user oracle and change the owner:
mkdir /oracle
chown oracle:oinstall /oracle
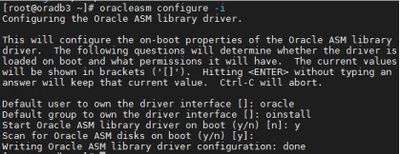
- Setting up the Oracle ASM library driver involves defining the default user (oracle) and default group (oinstall) as well as configuring the drive to start on boot (choose y) and to scan for disks on boot (choose y). You need to answer the prompts from the following command:
# oracleasm configure -i
- The output of this command should look similar to the following, with prompts to be answered:
- View the disk configuration:
cat /proc/partitions
- Enter the following command to load the oracleasm kernel module
# oracleasm init
- Verify the Oracle ASM status:
oracleasm status
- Format disk /dev/sda, /dev/sdb, /dev/sdc, /dev/sdd by running the following commands
fdisk /dev/sda
fdisk /dev/sdb
fdisk /dev/sdc
fdisk /dev/sdd
- Answer the prompts from the above fdisk commands with:
n for new partition
p for primary partition
1 to select the first partition
press enter for the default first cylinder
press enter for the default last cylinder
press w to write the changes to the partition table
- Create Oracle ASM disks:
oracleasm createdisk DATA_DISK_01 /dev/sda1
oracleasm createdisk DATA_DISK_02 /dev/sdb1
oracleasm createdisk ARCH_DISK_01 /dev/sdc1
oracleasm createdisk RECO_DISK_01 /dev/sdd1
- List Oracle ASM disks:
oracleasm listdisks
- Change the passwords for the root and oracle users:
passwd oracle
passwd root
- Change the directory permissions:
chmod -R 775 /oracle
chown grid:oinstall /oracle
chown oracle:oinstall /dev/sda1
chown oracle:oinstall /dev/sdb1
chown oracle:oinstall /dev/sdc1
chown oracle:oinstall /dev/sdd1
chmod 600 /dev/sda1
chmod 600 /dev/sdb1
chmod 600 /dev/sdc1
chmod 600 /dev/sdf1
DB Instance Install(SWPM)
Before we begin the DB instance install , mount the sapmnt (NFS share) directory which must have been created during the ASCS instance setup.
- Install NFS libraries
sudo yum -y install nfs-utils
- Create sapmnt directory and mount remote NFS file system
mkdir /sapmnt
mount <<ip of NFS server>>:/sapmnt /sapmnt - Every host running the SAP installer requires the presence of the C shell command language interpreter as documented a. here. Verify the existence of the /bin/csh script file. When not existing install using following command:
yum install csh - Verify that the /bin/csh script file exists using the following command:
ls -al /bin/csh - Start the SAP SWPM installer and select the appropriate options:
Software Provisioning Manager 1.0 SP 29 –> SAP NetWeaver 7.5 –> Oracle à Application Server ABAP–> Distributed System –> Database Instance - Specify the profile directory

Specify the DBSID and select the ‘Single Instance on Oracle ASM

- You may see this error – “Supported Linux distributions for SAP Products…” .This can be safely ignored
- Select 19 as Oracle server and client versions.


- Select ‘Remove database and recreate’


- Enter ORACLE_HOME and ORACLE_SID for GRID and select “Oracle Grid Software not installed”

- Select the Number of parallel jobs based on the CPU cores. The default number is 3

- SWPM stops for the installation of Oracle software

Oracle Grid Install
- Download the following from SAP portal as documented in SAP Note 509314
- Oracle Grid installer for Oracle 19
- Oracle 19 Software (64-bit)
- Latest Oracle Patches 19.0.0.0
An empty folder /oracle/stage/19 is created by SWPM installer. We downloaded the grid and oracle rdbms installer into this folder
- Run the grid installer setup .Login as oracle and unzip the grid installer:
cd /oracle/stage/19/grid_home
unzip -q linuxx64_12201_grid_home.zip - Run the grid installer setup .This would launch Oracle Grid Infrastructure Setup Wizard
./gridSetup.shCurrently we have a known issue with Oracle 8.2 install.The Oracle Installer fails with error INS-08101: - Currently we have a known issue with Oracle 8.2 install.The Oracle Installer fails with error INS-08101:

The work around to resolve this is:
⦁ Set the OS parameter in your terminal to a previous version and re-start the Oracle Universal Installer.
export CV_ASSUME_DISTID=OEL7.8
- Enter the Disk group name for DATA, select the disk path of Data disks and set the discovery path (e.g. ‘dev/oracleasm/disks/):
- Specify the password for ASM user accounts (SYS and SNMP)


- Select name of operating system group,which you want to use for system authentication to Oracle ASM

- Select the path for Oracle base

- Select Oracle inventory directory path

- If you choose to run the configuration scripts automatically , specify the ‘root’ user credentials

- Verify the settings and click Next to finish


We have just configured/created data group named ‘DATA’ .. To configure other disk groups (ARCH and RECO) , we use ASM Configuration Assistant tool.
- To start ASMCA, enter asmca at a command prompt inside the Oracle Grid Infrastructure home.
cd $ORACLE_HOME/bin
./asmca


Oracle DB Installation:


SAP Bundle Patches
Download following SBP patches(19.8) for Oracle RDBMS and GRID, and follow the instructions from respective readme files :
Oracle Database SAP Bundle Patch
- Following files were downloaded to the database host for Oracle DB SAP Bundle Patch:
SAP19P_2008-70004508.ZIP (this SBP)
GIRU19P_2008-70004508.ZIP (DBRU 19.8.0.0.200714)
OPATCH19P_2008-70004508.ZIP (OPatch 12.2.0.1.21)

- Follow the instructions in ‘readme’ file (README19P_2008-70004508.HTM ) and install the SAP Bundle Patch. Main command to install this Patch is:
env ORACLE_HOME=$IHRDBMS $IHRDBMS/MOPatch/mopatch.sh -v -s SAP19P_2008- 70004508.ZIP
Oracle Database SAP Bundle Patch for Grid Infrastructure
Downloaded the following files for SAP Bundle Patch for Grid Infrastructure:
SGR19P_2008-70004550.ZIP (this SBP)
GIRU19P_2008-70004550.ZIP (GIRU 19.8.0.0.200714)
OPATCH19P_2008-70004550.ZIP (OPatch 12.2.0.1.21)

Follow the instructions in the ‘readme’ file(README19P_2008-70004550.HTM) and Install the patches of the SAP Bundle Patch into the grid home. Main command to install this Patch is:
env ORACLE_HOME=$OHGRID $OHGRID/MOPatch/mopatch.sh -v -s SGR19P_2008-70004550.ZIP
Continue/complete the DB Instance install (SWPM)
- SWPM was stopped/paused for the installation of Oracle software . Now that Oracle software(RDBMS, Grid ) and SAP Bundle Patches are installed, we can click ‘Next’ to continue with the installation.

- This completes the Installation of Oracle DB instance with ASM.

- You may verify by running the ASM instance .

- You can verify the setup by running the Oracle Enterprise manager
https://mydbhost.example.com:5500/em/
for example:
https://oradb.internal.cloudapp.net:5500/em/
When prompted for your username and password, log in as a user with DBA privilege (such as SYS or SYSTEM)
References (SAP Notes and relevant documents/papers)
| Note number | Title |
| 1928533 | SAP Applications on Azure: Supported products and Azure VM types |
| 2015553 | SAP on Microsoft Azure: Support prerequisites |
| 1999351 | Troubleshooting enhanced Azure monitoring for SAP |
| 2178632 | Key monitoring metrics for SAP on Microsoft Azure |
| 2191498 | SAP on Linux with Azure: Enhanced monitoring |
| 2039619 | SAP applications on Microsoft Azure using the Oracle database: Supported products and versions |
| 2243692 | Linux on Microsoft Azure (IaaS) VM: SAP license issues |
| 1550133 | Using Oracle Automatic Storage Management (ASM) with SAP NetWeaver based Products |
| 1597355 | Swap-space recommendation for Linux |
| 1554661 | Configuration of environment for ‘oracle’ user |
| 2799920 | Patches for 19c: Database |
| 2660017 | Oracle Database Software Installation on Unix |
| 1915323 | OS User Concept for SAP NetWeaver for 12c and higher |
- SAP Community WIKI:
- (https://wiki.scn.sap.com/wiki/display/HOME/SAPonLinuxNotes) has all required SAP Notes for Linux.
- https://wiki.scn.sap.com/wiki/pages/viewpage.action?pageId=448467009 describes how to use Oracle Automatic Storage Management (ASM) with your SAP system.
- Azure Virtual Machines planning and implementation for SAP on Linux
- Azure Virtual Machines deployment for SAP on Linux
- Azure Virtual Machines DBMS deployment for SAP on Linux
Brought to you by Dr. Ware, Microsoft Office 365 Silver Partner, Charleston SC.

Recent Comments