This article is contributed. See the original author and article here.
Introduction
During the migration journey from SQL Server to Azure SQL Database or Managed Instance, the customers I meet often wondering how to deal with the Integrated Authentication, their applications, especially the legacy ones.
The following tutorial will help you to create a small sandbox based on an Azure SQL Database, an Azure Active Directory synchronized with an OnPremise Active Directory.
This tutorial is, of course, for testing/learning purpose only and is not intended to be used in production or any other environment.
Note that we’ll mainly use the Azure portal, but all of the following actions can be done using Powershell.
Subscriptions
In this example, we’ll use a MSDN subscription, providing an Azure Active Directory Free license. If using a different subscription, ensure that you’ll have sufficient administration rights at the Azure Active Directory level.
If you don’t have a subscription, you can create a free account here
Provisioning Resources
We’ll start by creating the resources required for this sandbox:
1 Windows Server Virtual Machine, playing the role of a Domain Controller
1 Windows Server Virtual Machine, playing the role of an application host
1 Azure SQL Database
To start log on : https://portal.azure.com
Domain Controller
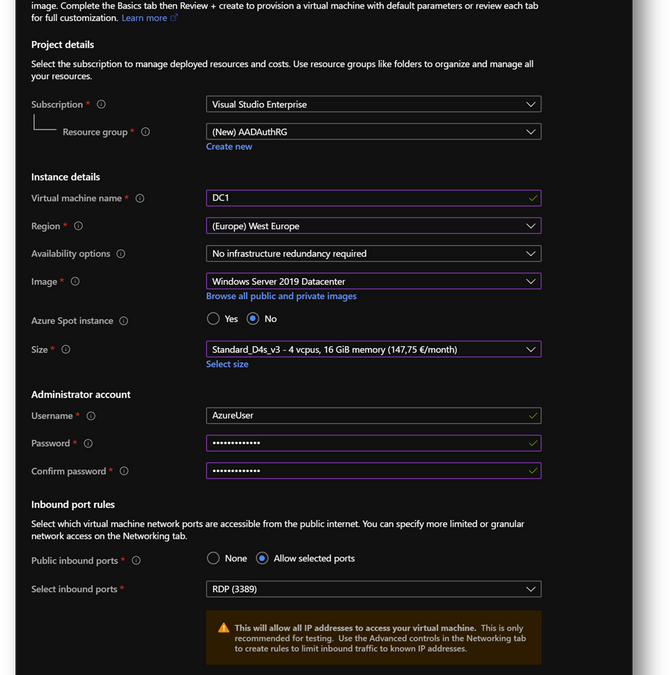
- Create a new virtual machine DC1. Then move to the [Networking] pane. (link)

- No modification required on the [Networking] pane.

- Click on [Review and Create] and then click on [Create]

|
Summary |
|
|
Resource Group |
AADAuthRG |
|
Virtual Machine Name |
DC1 |
|
Virtual Machine Size |
Standard D4s v3 |
|
Vnet Name |
AADAuthRG-vnet |
|
Subnet |
10.0.0.0/24 |
|
Private IP address* |
10.0.0.4 |
|
Local Administrator |
AzureUser |
|
Local Administrator Password |
Strong Password required |
*The private IP should be the same. If not, keep yours in mind as it will be required at a later stage.
NB: To find the private IP address of DC1, select your virtual machine and go the [Overview] blade.

Application Host
- Create a new virtual machine Client1 in the same resource group AADAuthRG

- On the [Networking] pane, use the already created virtual network AADAuthRG-vnet

- Click on [Review and Create] and then click on [Create]
|
Summary |
|
|
Resource Group |
AADAuthRG |
|
Virtual Machine Name |
Client1 |
|
Virtual Machine Size |
Standard E2s v3 |
|
Vnet Name |
AADAuthRG-vnet |
|
Subnet |
10.0.0.0/24 |
|
Private IP address* |
10.0.0.5 |
|
Local Administrator |
AzureUser |
|
Local Administrator Password |
Strong Password required |
*The private IP may be different. Keep yours in mind as it will be required at a later stage.
- Once Client1 created, select it, go to the [Networking] pane and click on the [Network Interface]
- Click on the [DNS servers] blade, select [Custom] and add the DC1 private IP address. [Save].


- Restart Client1 or connect and execute “ipconfig /renew” in a Command Prompt
Azure SQL Database
We will use an Azure SQL Database (link) but you can use an Azure SQL Managed Instance (link) instead. The provisioning duration will be longer.
- Create a new Azure SQL Database AdventureWorksLT in the same resource group AADAuthRG

- You’ll be asked to create a new server

- On the [Networking] pane
- Select [Public Endpoint]
- Set [Allow Azure services and resources to access this server] to ON
- Set [Add current client IP address] to ON, if you want to access the server from your current computer

- On the [Additional settings] pane, set [Use existing data] to [Sample Data]

- Click [Review and create] and then [Create]
|
Summary |
|
|
Resource Group |
AADAuthRG |
|
Azure SQL Database server name |
sqlaadauthsrv |
|
Azure SQL Database name |
Standard E2s v3 |
|
Service tier |
DTU-based – Basic |
|
Connectivity Method |
Public Endpoint |
|
Allow Azure services and resources to access this server |
On |
|
Add current client IP address |
On |
|
Azure SQL Database server Administrator |
AzureUser |
|
Azure SQL Database server Administrator Password |
Strong Password required |
Azure Active Directory administrator
- In your Azure Active Directory, click on the [Users] blade

- Click on [New User] and name it

- In the [Roles] menu, select [Global administrator]

- Once done, open an InPrivate session in Edge and log into https://portal.azure.com in order to update the password

Configuration
Configure the Domain Controller
To start, we need to install the Active Directory Domain Services feature. Connect to the DC1 Virtual Machine, start a Windows Powershell session and execute the following command:
Install-WindowsFeature -Name AD-Domain-Services -IncludeManagementTools
You should have a Success exit code.
Once done, DC1 must be promoted to domain controller. To do so, start ServerManager

- Click on the flag and then click on [Promote this server to a domain controller]
- Add a new forest. As the domain needs to be verified to be used with Azure Active Directory, we will use the domain already provided within AAD.
- You can also use a custom domain, but this way, we won’t have to create a new TXT or MX record at the domain registrar.


- On the Azure portal, go to [Azure Active Directory] blade, then [Overview]. You’ll find the Primary domain name. Copy it.

- Paste the primary domain name as the [Root domain name]

- Set a strong password and click [Next] until you reach the [Prerequisites Check]

- Click on [Install]
- You can also use this Powershell script

Import-Module ADDSDeployment

Install-ADDSForest `
-CreateDnsDelegation:$false `
-DatabasePath "C:windowsNTDS" `
-DomainMode "WinThreshold" `
-DomainName "***outlook.onmicrosoft.com" `
-DomainNetbiosName "***OUTLOOK" `
-ForestMode "WinThreshold" `
-InstallDns:$true `
-LogPath "C:windowsNTDS" `
-NoRebootOnCompletion:$false `
-SysvolPath "C:windowsSYSVOL" `
-Force:$true
DC1 will restart and you’ll be disconnected. Wait a minute and reconnect.
- [Windows + R] and type “dsa.msc”

- We will now create a domain administrator. Click right on the [Users] folder in your domain and select New User

- Create a user adadmin
- Add this account to the [Domain Admins] group
- We will need at a later stage a synchronizaiton account. We’ll create adsyncuser now
- We will also create a new Security Group containing the applicative account(s).
- Click right on [Users] and select New –> Group and name it MyUsers


- Then create a new user appuser, this account will be used next on the Client1 server.
- Add appuser to the MyUser group


Configure the Applicative host
- Connect to the Client1 virtual machine
- Go to the Control Panel –> System and Security –> System. Click on [Change Settings], then [Change]

- Select [Domain] and enter your domain name

- Use the previously created credentials.

- You’ll be prompt to restart. Click on [Restart later]
- Still in Control Panel –> System and Security –> System, Click on [Remote Settings]

- Click on [Select Users]

- Add the [Domain Users] group

- Install SSMS on Client1
Install ADConnect
- Download ADConnect and install it on DC1. It will start automatically. (More details)
- Installing Azure AD Connect on a Domain Controller is not recommended due to security practices and more restrictive settings that can prevent Azure AD Connect from installing correctly. (Link)
- Check [I Agree to the license terms and privacy policy] and click on [Next]

- Click on [Customize], then [Install]


- Select [Password Hash Synchronization]
- Check [Enable single sign-on] and click on [Next]
- Connect with your Azure Active Directory global administrator aadadmin.
- Click on [Add directory] to connect your directory
- Select [Use existing AD account], use the adsyncuser account and click on [OK]
- Click on [Next]
- Check [Continue without matching all UPN suffixes to verified domain] and click on [Next]
- Select [Sync select domains and OUs] and check [Users] only. Click on [Next]
- Click on [Next]


- Select [Synchronize selected] and enter MyUsers. Click [Resolve], then [Next]

- Click on [Next]

- Click on [Next]. If prompted for Forest Credentials, use adadmin

- Verify [Start the synchronization process when configuration completes] is checked and click on [Install]
- Click on [Exit]
- On the Azure portal, you should now see your appuser in your Azure Active Directory


- Check Seamless Single Sign-on is enable on your forest. To do it, click on the [Azure AD Connect] blade in your Azure Active Directory

- If Seamless Single Sign-on is disable, enable it using the following procedure.
Add a GPO
To enable Seamless Single Sign-on, we’ll use a GPO to modify some settings
- On DC1, [Windows + R] and type “gpmc.msc”
- Click right on your domain and select [Create a GPO in this domain, and Link it here…]
- Name it Seamless SSO
- Edit the Seamless SSO GPO
- Go to “User ConfigurationPoliciesAdministrative TemplatesWindows Componentslnternet Explorerlnternet Control PanelSecurity Page” and open “Site to Zone Assignment List”


- Select [Enabled] and click on [Show]
- Enter the following records and click on [OK]


| Value name | Value |
| https://autologon.microsoftazuread-sso.com | 1 |
| https://aadg.windows.net.nsatc.net | 1 |
- Then go to “User TemplatesWindows Componentslnternet Explorerlnternet Control PanelSecurity Pagelntranet Zone” and open “Allow updates to status bar via script”
- Select [Enabled] and click on [OK]

- Connect to Client1, launch a Command Prompt and type “gpudate /force”

Configure Azure SQL Database
We’ll now configure the Azure AD authentication with Azure SQL. (link)
- On the Azure portal, go to your Azure SQL Database server sqlaadauthsrv and click on [Active Directory admin] blade.

- Click on [Set admin] and select aadadmin. Then click on [Save]

Note: For this sanbox, I use aadadmin account, which is an AAD Global Administrator, to reduce the number of tasks. However, an account with less privileges should be used for a production environment or any other environment.
- Now, open SSMS and connect to your Azure SQL Database with your aadadmin user using “Azure Active Directory – Password” authentication method.
Only connections established with Active Directory accounts can create other Active Directory users

- Open a new query on AdventureWorksLT and create a database user for appuser
CREATE USER [appuser@***outlook.onmicrosoft.com] FROM EXTERNAL PROVIDER
EXEC sp_addrolemember 'db_datareader', 'appuser@***outlook.onmicrosoft.com';
- Now, connect to Client1 using <Domain>appuser account.
- You should now be able to connect your Azure SQL Database with the “Azure Active Directory – Integrated” authentication method.
- Click on [Options], [Connection Properties] and fill the [Connect to database] field with the database Name AdventureWorksLT.
- Finally click on [Connect]


Hope this helps.
Ryad B
Customer Engineer – Data & AI
Brought to you by Dr. Ware, Microsoft Office 365 Silver Partner, Charleston SC.

Recent Comments