This article is contributed. See the original author and article here.
As a Windows developer, a very common requirement you might be asked to implement is to track information about the installation process. For example, let’s say that you have started a special campaign to advertise your application and you want to understand how many people are installing it because they have clicked one of the promotional banners. Or, in an enterprise environment, you may want to know which is the department of the employee who is installing the application, so that you can apply a different configuration. A very common solution for this requirement is to leverage a web installation and to use query string parameters, appended to the installation URI, which must be collected by the Windows application the first time it’s launched. For example, your installation URL can be something like http://www.foo.com/setup?source=campaign. Then your application, when it’s launched for the first time, must able to retrieve the value of the query string parameter called source and use it as it’s needed (for example, by sending this information to an analytic platform like App Center).
As you might know if you follow this blog, MSIX is the most modern technology to deploy Windows application and, through a feature called App Installer, you can support web installations with automatic updates. As such, is there a way to pass activation parameters to the application from the installer URL with MSIX and App Installer? The answer is yes!
Let’s see how we can do that.
Adding protocol support
The way MSIX supports this feature is by leveraging protocol support. Your app must register a custom protocol, which will be used to launch the application after it has been installed from your website using App Installer. Then, your application will retrieve all the information about the activation through the startup arguments, like in a regular protocol activation scenario. For example, let’s say you register a protocol called contoso-expenses:. This means that, when someone invokes a URL like contoso-expenses:?source=campaign, your application will receive as activation arguments the value source=campaign. This is exactly what App Installer is going to do the first time it launches your MSIX packaged app after the installation has been completed.
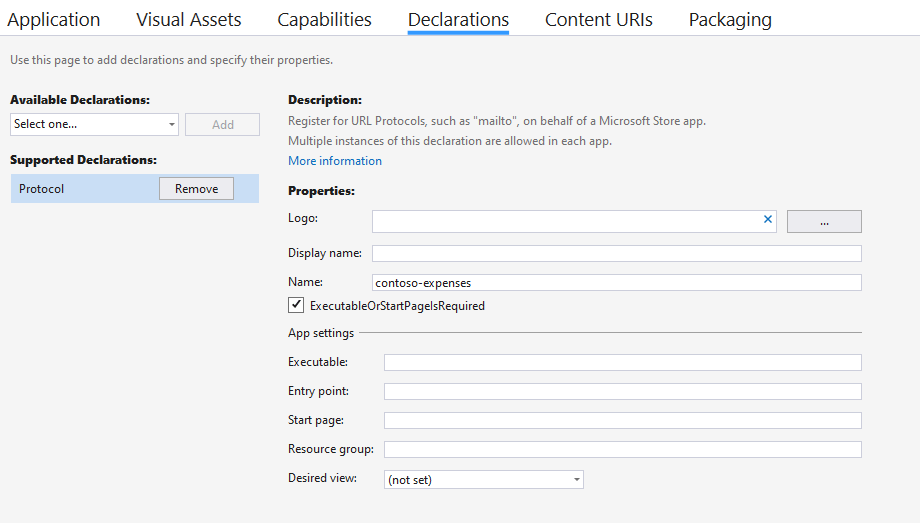
Adding protocol support in a MSIX packaged application is quite easy, thanks to the application manifest. In my scenario, I have a WPF application built with .NET Core, which is packaged as MSIX using the Windows Application Packaging Project. As such, all I have to do is to double click on the Package.appxmanifest file in the Windows Application Packaging Project and move to the Declarations section. In the Available declarations dropdown menu choose Protocol and fill the Name field with the name of the custom protocol you want to register (in my scenario, it’s contoso-expenses:(

Listening for activation arguments
The next step is to make our application aware of activation arguments. The way you implement this support changes based on the development framework you have chosen. In this sample we’re going to see how to do it in a WPF application. Activation arguments can be retrieved in the App.xaml.cs file, by overriding the OnStartup() method, which is invoked every time the application starts:
public partial class App : Application
{
    protected override void OnStartup(StartupEventArgs e)
    {
        string path = $"{Environment.GetFolderPath(Environment.SpecialFolder.Desktop)}//AppInstaller.txt";

        if (e.Args.Length > 0)
        {
            System.IO.File.WriteAllText(path, e.Args[0]);
        }
        else
        {
            System.IO.File.WriteAllText(path, "No arguments available");
        }
    }
}
The OnStartup() method gets, as input parameter, an object of type StartupEventArgs, which includes any activation parameter that has been passed to the application. They are stored inside an array called Args. In case of protocol activation, there will be only one item in the array with the full URL that has been used to activate the application. The previous sample code simply writes this information, for logging purposes, in a text file stored on the desktop of the current user.
Test the custom protocol implementation
Before putting all together for App Installer, we have a way to quickly test if the implementation we have done works as expected. Since the App Installer implementation of this feature is based on the standard approach for managing custom protocols, we can test this scenario right away, without needing to package everything together and upload it on our website. We just need to invoke our custom protocol from any Windows shell.
As first step, right click on the Windows Application Packaging Project and choose Deploy, in order to install the application on the system and register the custom protocol. Now open the Run panel in Windows 10 (or just press Start+R on your keyboard) and type a URI which uses your custom protocol. For example, in my scenario I can use something like:
contoso-expenses:?source=campaign
If you have implemented everything correctly, your application will start. The OnStartup() event will have been triggered as well, so if I check my desktop I will find a file called AppInstaller.txt with the following content:
contoso-expenses:?source=campaign
As you can see, everything is working as expected. The application has launched and, in the activation arguments, I’ve been able to get the full URL that it has been used to invoke the custom protocol.
If you encounter issues during the OnStartup() event, the Windows Application Packaging Project gives you an option to easily test this scenario. Right click on it, move to the Debug section and enable the option Do not launch, but debug my code when it starts.

Now you can press F5 to launch the debugger, but the application won’t be actively launched. The debugger will be on hold, waiting for the application to be activated. Thanks to this feature, you can easily test different activation paths. In our scenario, you can just add a breakpoint inside the OnStartup() method and then, from the Run panel, invoke the custom URL. The application will start and the debugger will wake up, triggering the breakpoint and giving you the option to debug your code.
Now that we have a working implementation in our application, let’s see how we can configure App Installer to leverage it.
Setting up App Installer
When it comes to the App Installer configuration, you don’t have to do anything special to support this scenario. The App Installer file you’re using today to deploy your MSIX application works fine. However, you will have to customize the URL that is used to trigger the installation. If you’re generating the App Installer file as part of the publishing process in Visual Studio, you will end up with a web page similar to the following one:

The Get the app button will trigger the installation of the MSIX package by leveraging the special ms-appinstaller protocol and it will look like this:
ms-appinstaller:?source=https://contosoexpensescd.z19.web.core.windows.net/ContosoExpenses.Package.appinstaller
The trick here is to add a special parameter to this URI, called activationUri. As such, open the web page with your favorite text editor and change the URL to look like this (or copy it directly in your web browser, if you just want to do a test):
ms-appinstaller:?source=https://contosoexpensescd.z19.web.core.windows.net/ContosoExpenses.Package.appinstaller&activationUri=contoso-expenses:?source=campaign
As you can see, I have added at the end an activationUri parameter with, as value, the same exact custom URL I have tested before, based on the contoso-expenses protocol registered in the application. When you do this, Windows will automatically launch this URL at the end of the MSIX deployment process, instead of simply launching your application.
The installation process won’t look different. When you click on Get the app button with the new custom URL, the user will continue to see the traditional MSIX deployment experience:

The only difference is that, as you can notice, the option Launch when ready is hidden. The application will be forcefully launched at the end of the process with the custom URL we have specified, otherwise we won’t be able to get the activation parameters. Once the deployment is complete, Windows will silently invoke the custom URL we have passed to the activationUri parameter, which in our case is contoso-expenses:?source=campaign. As a consequence, the experience will be like the one we have tested before when we have locally invoked the custom protocol: the application will be launched and, on the desktop, we’ll find a file called AppInstaller.txt with the full URL that has been used for triggering the execution.
Unfortunately, Visual Studio doesn’t have a way to customize the web page that is generated to add this custom App Installer URI. However, in a real scenario, you won’t probably use that page, but you will have the App Installer link embedded in a button or banner of your existing website.
Working with the activation parameters
An easier way to work with the activation parameters is to leverage the HttpUtility class which is included in the System.Web namespace. Thanks to this class, you can manipulate the query string parameters coming from the Uri in an easier way:
protected override void OnStartup(StartupEventArgs e)
{
    string path = $"{Environment.GetFolderPath(Environment.SpecialFolder.Desktop)}//AppInstaller.txt";

    if (e.Args.Length > 0)
    {
        UriBuilder builder = new UriBuilder(e.Args[0]);
        var result = HttpUtility.ParseQueryString(builder.Query);
        var value = result["source"];

        System.IO.File.WriteAllText(path, $"Source: {value}");
    }
    else
    {
        System.IO.File.WriteAllText(path, "No arguments available");
    }
}
As first step, we use the UriBuilder class to create a Uri object out of the activation parameter we have received inside the first position of the e.Args array. This way, we can easily access only to the query string parameters (without the whole contoso-expenses protocol) by using the Query property. By using the ParseQueryString() method and passing the query string we get in return a dictionary, which makes easy to access to all the various parameters. The previous sample shows how easily we can retrieve the value of the source parameter from the query string. Thanks to this approach, we can avoid to use string manipulation to retrieve the same information, which is more error prone.
What about a Universal Windows Platform application?
What if, instead of a .NET application like in this example, I have a UWP app? From a custom protocol registration perspective, the approach is exactly the same. The deployment technology for UWP is MSIX, so also in this case we have a manifest file where we can register our protocol. From a code perspective, instead, UWP offers a dedicated method for custom activation paths, called OnActivated(), which must be declared in the App.xaml.cs file. This is an example implementation:
protected override void OnActivated(IActivatedEventArgs args)
{
    if (args is ProtocolActivatedEventArgs eventArgs)
    {
        UriBuilder builder = new UriBuilder(eventArgs.Uri);
        var result = HttpUtility.ParseQueryString(builder.Query);
        var value = result["source"];
    }
}
As you can see, the code is very similar to the WPF implementation. The only difference is that the OnActivated event can be triggered by multiple patterns and, as such, first we need to make sure that this is indeed a protocol activation, by checking the real type of the IActivataedEventArgs parameter. In case of protocol activation, it will be ProtocolActivatedEventArgs, which gives us access to the to the Uri property we need to retrieve the activation URL.
Wrapping up
This implementation is based on the standard custom protocol support offered by Windows, so it’s very easy to implement. Every development platform support a way to get activation parameters when the application starts, so you just need to write some code to manage the desired scenario.
You can find the full sample used in this blog post on GitHub.
Happy coding!
References
- App Installer: https://docs.microsoft.com/en-us/windows/msix/app-installer/app-installer-root
- Protocol support in MSIX: https://docs.microsoft.com/en-us/windows/apps/desktop/modernize/desktop-to-uwp-extensions#protocol
- Windows Application Packaging Project: https://docs.microsoft.com/en-us/windows/msix/desktop/desktop-to-uwp-packaging-dot-net
- HttpUtility class: https://docs.microsoft.com/en-us/dotnet/api/system.web.httputility?view=netcore-3.1
Brought to you by Dr. Ware, Microsoft Office 365 Silver Partner, Charleston SC.

Recent Comments