This article is contributed. See the original author and article here.
Happy New Year everyone!
With the new year comes a new Azure Sentinel PowerShell module!
Based on the Azure SDK for .NET and part of the Azure (Az) module, we are announcing the public preview release of the SecurityInsights PowerShell module.
Because this is an official supported PowerShell module when we release it, the cmdlets are based on the Generally Available (GA) 2020-01-01 SecurityInsights API. As soon as features hit GA, we will update the SecurityInsights module to reflect that.
How to download and test
Prerequisites: the SecurityInsights module requires at a minimum PowerShell version 5.1 and relies on Az.Accounts for Azure authentication.
You can download the SecurityInsights PowerShell module from the PowerShellGallery and install it by using the PowerShell command Install-Module -Name Az
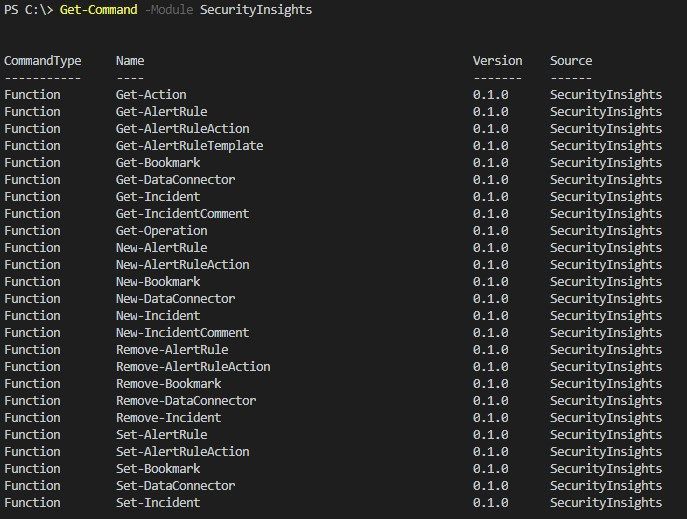
The available cmdlets can be explored by using Get-Command -Module
The SecurityInsights module supports the most common use cases, like interacting with incidents to change status, severity, owner, etc. But also, to add comments and labels to incidents and creating bookmarks.
Although using ARM templates is the preferred way for your CI/CD pipeline, the SecurityInsights module can be very useful for post deployment tasks and is specifically targeted to Security Operations Center (SOC) automation tasks. These tasks can vary from configuring data connectors, creating analytics rules, adding automation actions to analytics rules, etc.
Managing Incidents
Using the SecurityInsights module is straightforward and is parameter driven as most of the PowerShell modules. The common parameters are your Azure Sentinel workspace and resource group name. You can retrieve all your incidents using Get-AzSentinelIncident -ResourceGroupName $resourceGroupName -WorkspaceName $workspaceName or retrieve a specific incident by adding the parameter -IncidentId <yourIncidentId>
Note: the IncidentId is derived from the Name field as depicted below:

Assign an Incident Owner
Most of the cmdlets accept a string as a parameter, but some cmdlets require an input object. For example, to assign an owner to an incident you would first need to create the owner object.
The owner object requires the following mandatory object parameters:
- AssignedTo – the owner full name
- Email – the email address of the owner
- ObjectId – the Azure Active Directory objectId of the owner
- UserPrincipalName – the user principal name of the owner
There are a couple of ways to create an owner object, for example:
$ownerObject = @{"AssignedTo" = "Jeff Leatherman"; "Email" = "JeffL@contoso.com"; "ObjectId" = "f4e959b4-feda-4345-a1e7-16b4af2fc226";"UserPrincipalName" = "JeffL@contoso.com"}
After you have created the owner object, you can then pass it as a parameter to the cmdlet Update-AzSentinelIncident like this:
Update-AzSentinelIncident -ResourceGroupName <yourResourceGroupName> -WorkspaceName <yourWorkspaceName> -IncidentId a4b586c8-97d8-4cc5-9154-b723c62d26d8 -Owner $ownerObject
Closing an incident
In case you need to close an incident, you need to make sure that you are passing the valid closing classifications and classification reasons.
Valid closing incident classifications are:
- Undetermined
- TruePositive
- BenignPositive
- FalsePositive
Valid closing classification reasons are:
- SuspiciousActivity
- SuspiciousButExpected
- IncorrectAlertLogic
- InaccurateData
Example closing an incident:
Update-AzSentinelIncident -ResourceGroupName <yourResourceGroupName> -WorkspaceName <yourWorkspaceName> -IncidentID "a5977bae-2775-44d1-8381-a28f6f061954" -Classification FalsePositive -ClassificationComment "my comment" -ClassificationReason InaccurateData -Status Closed
Configuring data connectors
The cmdlet New-AzSentinelDataConnector supports configuring and enabling Azure Sentinel data connectors. The current supported GA data connectors are:
Name | Description |
Represents AAD (Azure Active Directory Identity Protection) | |
Represents AATP (Azure Advanced Threat Protection) | |
Represents ASC (Azure Security Center) | |
Represents Amazon Web Services CloudTrail | |
Represents MCAS (Microsoft Cloud App Security) | |
Represents MDATP (Microsoft Defender Advanced Threat Protection) | |
Represents Office 365 | |
Represents threat intelligence data |
The following example configures the Office 365 data connector:
New-AzSentinelDataConnector -ResourceGroupName "yourResourceGroupName" -WorkspaceName "yourWorkspaceName" -Office365 -Exchange "Enabled" -SharePoint “Enabled"
Some data connectors require more information, like the Azure Security Center data connector:
New-AzSentinelDataConnector -ResourceGroupName "yourResourceGroupName" -WorkspaceName "yourWorkspaceName" -AzureSecurityCenter -SubscriptionId <yourSubscriptionId> -Alerts Enabled
Exporting and importing analytics rules
The most common asked question that we get is how to export analytics rules and import those in another Azure Sentinel environment. This use case is specifically valid in a Dev-Test scenario where you want to have automation support to import your created analytics rules into production. To export your analytics rules you can leverage the Get-AzSentinelAlertRule cmdlet like in the following example:
$myRules = Get-AzSentinelAlertRule -ResourceGroupName $resourceGroupName -WorkspaceName $workspaceName
$myExportPath = "C:SentinelRulesExport"
$myExtension = ".json"
foreach($rule in $myRules){
    $ruleName = $rule.DisplayName
    $rule = $rule | ConvertTo-Json
    $rule | Out-File "$($myExportPath)$($ruleName)$($myExtension)"
}
This will export your analytics rules into a folder as JSON formatted files.
You can then edit the analytics rules or just import those into another Azure Sentinel environment using the following example:
$myImportPath = "C:SentinelRulesImport"
$myNewRules = Get-ChildItem $myImportPath -Filter *.json
foreach ($myNewRule in $myNewRules) {
    $myRuleObject = Get-Content -Path $myNewRule | ConvertFrom-Json
    New-AzSentinelAlertRule -ResourceGroupName $resourceGroupName -WorkspaceName $workspaceName `
        -Scheduled -DisplayName $myRuleObject.DisplayName -Description $myRuleObject.Description -Query $myRuleObject.Query `
        -QueryFrequency $myRuleObject.QueryFrequency.Ticks -QueryPeriod $myRuleObject.QueryPeriod.Ticks -Severity $myRuleObject.Severity -TriggerThreshold $myRuleObject.TriggerThreshold
Happy automating!
Brought to you by Dr. Ware, Microsoft Office 365 Silver Partner, Charleston SC.

Recent Comments