This article is contributed. See the original author and article here.
Mutual TLS Authentication between Azure Kubernetes Service and API Management
By (alphabetically): Akinlolu Akindele, Dan Balma, Maarten Van De Bospoort, Erin Corson, Nick Drouin, Heba Elayoty, Andrei Ermilov, David Giard, Michael Green, Alfredo Chavez Hernandez, Hao Luo, Maggie Marxen, Siva Mullapudi, Nsikan Udoyen, William Zhang
Introduction
We have two goals in this doc:
- How to set up AKS cluster for mutual TLS (mTLS) authentication between Azure Kubernetes Service (AKS) NGINX ingress controller and a client app such as curl? If you are not using a gateway for your microservices or using a gateway other than Azure API Management (APIM), this portion is what might interests you.
- How to set up APIM for mTLS between AKS and APIM? This covers the case in which APIM is used as the API gateway for REST services hosted in AKS cluster.
This is a sister doc to Use MITREid Connect for OAuth2 Authorization in API Management: one covers securing AKS via mTLS between AKS and APIM while the other covers securing APIM via OAuth2 and OpenID Connect across APIM, Identity Provider and clients.
Our goal is for AKS (as a service) to authenticate APIM (as a client) so that only calls from APIM with a valid client cert with private key can get thru. Therefore what we need is not TLS between APIM and AKS which is for client (APIM in our case) to authenticate server (AKS in our case). What we need is mutual TLS.
As a reference and also for context, this and this documents provide mTLS authentication between APIM and Azure App Service.
The steps:
- HTTPS calls from APIM is intercepted by frontend load balancer of App Service
- App Service frontend load balancer injects an X-ARR-ClientCert request header with the client certificate (base64 string) as the header value, before forwarding the request to application code.
- Application code retrieves the cert string such as headers[“X-ARR-ClientCert”] and converts it to an X.509 cert.
- Application code parses the cert and verifies the attributes and claims as client authentication.
As you can see, the approach for mTLS between APIM and App Service is not as good as we wish:
- The HTTP header X-ARR-ClientCert seems to be Microsoft-specific, instead of any open spec (maybe there is no such spec?) What is the story for AKS? While APIM is Microsoft, AKS is internally Kubernetes.
- The client cert authentication happens inside application code. This defeats the purpose of using APIM as API gateway.
Our goal is to achieve mTLS between APIM and AKS without custom security code in applications in AKS pods. Rather we hope to rely on AKS NGINX ingress controller and ingress resources to perform client cert authentication at infrastructure level.
Prerequisites
kubectl. Minimum version required is v 1.18. To find your kubectl client version:
kubectl version –client
openssl for preparing certificates. Or if you prefer, you can use other tools for creating self-signed certs.
helm . (Windows 10 users can just put the unzipped folder anywhere and add the corresponding PATH variable.)
Prepare DNS
Since our plan is not to use VNET to enclose both AKS and APIM, we need to have a DNS-resolvable domain name. This domain name will be mapped to AKS NGINX ingress controller load balancer static IP. For this we need to first register a domain. As an example, aksingress.com is registered and its subdomain dev.aksingress.com will be used in this document.
Prepare X.509 Certificates
Self-signed certs can be used for dev/test. OpenSSL can be used for creating self-signed certs.
We need the following three certs in certain file formats:
| Name | Purpose | Environment | Private Key Required | Required Formats |
|---|---|---|---|---|
| CA | Certificate Authority | Kubernetes Secrets | No | .crt, .cer |
| Server | Server Certificate | Kubernetes Secrets | Yes | .crt, .key |
| Client | Client Certificate | APIM, test client | Yes | .crt, .key, .pfx |
NOTES:
- Relying on legacy Common Name for cert validation will be deprecated in Kubernetes. It is recommended to use Subject Alternate Names (SANs) instead.
- For TLS, the server cert SAN must match the FQDN of server backend, which, in our case, is the AKS ingress resource host name. This host name will pair with the static IP of AKS NGINX ingress controller we will create later on.
- The private key of CA is NOT installed anywhere: either in Kubernetes secret or API Management.
First let’s create configuration files for both client and server certs:
File: server_dev.cnf
[ req ]

default_bits = 4096

prompt = no

encrypt_key = no

default_md = sha256

distinguished_name = dn

req_extensions = req_ext
[ dn ]

CN = dev.aksingress.com

emailAddress = acp@microsoft.com

O = Microsoft

OU = CSE

L = Redmond

ST = WA

C = US
[ req_ext ]

subjectAltName = @alt_names

[alt_names]

DNS.1   = dev.aksingress.com
File: client_dev.cmf
[ req ]

default_bits = 4096

prompt = no

encrypt_key = no

default_md = sha256

distinguished_name = dn

req_extensions = req_ext
[ dn ]

CN = gateway.com

emailAddress = acp@microsoft.com

O = Microsoft

OU = CSE

L = Redmond

ST = WA

C = US
[ req_ext ]

subjectAltName = @alt_names

[alt_names]

DNS.1   = gateway.com
Below we assume the existence of a subfolder .mTLS under openssl command.
Openssl commands:
# Create CA

openssl req -x509 -sha256 -newkey rsa:4096 -keyout mTLSca.key -out mTLSca.crt -days 3650 -nodes -subj “/CN=My Cert Authority”
# Generate the Server Key, and Certificate and Sign with the CA Certificate

openssl req -out mTLSserver_dev.csr -newkey rsa:4096 -nodes -keyout mTLSserver_dev.key -config mTLSserver_dev.cnf

openssl x509 -req -sha256 -days 3650 -in mTLSserver_dev.csr -CA mTLSca.crt -CAkey mTLSca.key -set_serial 01 -out mTLSserver_dev.crt
# Generate the Client Key, and Certificate and Sign with the CA Certificate

openssl req -out mTLSclient_dev.csr -newkey rsa:4096 -nodes -keyout mTLSclient_dev.key -config mTLSclient_dev.cnf

openssl x509 -req -sha256 -days 3650 -in mTLSclient_dev.csr -CA mTLSca.crt -CAkey mTLSca.key -set_serial 02 -out mTLSclient_dev.crt
# to verify CSR and show SAN

openssl req -text -in mTLSserver_dev.csr -noout -verify

openssl req -text -in mTLSclient_dev.csr -noout -verify
Since APIM expects certs in Microsoft format such as .pfx and .cer, and Kubernetes expects certs in .crt and .key format, we need the following conversion.
# Convert .crt + .key to .pfx

openssl pkcs12 -export -out mTLSca.pfx -inkey mTLSca.key -in mTLSca.crt

openssl pkcs12 -export -out mTLSclient_dev.pfx -inkey mTLSclient_dev.key -in mTLSclient_dev.crt

openssl pkcs12 -export -out mTLSserver_dev.pfx -inkey mTLSserver_dev.key -in mTLSserver_dev.crt
Create AKS Cluster
To leverage the AKS-managed Azure Active Directory integration feature, we can use the following CLI to create an AKS cluster with AKS-managed AAD integration.
# parameters used for creating AKS

tenant_id=”1aaaabcc-73b2-483c-a2c7-b9146631c677″

aks_admin_group_name=”aks-admin-group”

aks_api_group_name=”aks-api-group”

resource_group_name=”rg-aks”

aks_cluster_name=”aks-cluster-04″
echo “display current AAD groups”

az ad group list -o table

# echo “Create a group for AKS cluster admins”

# az ad group create –display-name $aks_admin_group_name –mail-nickname myalias
# echo “Create resource group $resource_group_name”

# az group create –name $resource_group_name –location centralus
echo “get aks-admin-group object ID for $aks_admin_group_name:”

aks_admin_group_object_id=$(az ad group show –group $aks_admin_group_name –query objectId -o tsv)

echo $aks_admin_group_object_id

echo “get aks-api-group object ID for $aks_api_group_name:”

aks_api_group_object_id=$(az ad group show –group $aks_api_group_name –query objectId -o tsv)

echo $aks_api_group_object_id
echo “Create an AAD-managed AKS cluster”

az aks create –resource-group $resource_group_name

            –name $aks_cluster_name

            –node-count 1

            –enable-aad

            –aad-admin-group-object-ids $aks_admin_group_object_id

            –aad-tenant-id $tenant_id

            #–generate-ssh-keys
Creating Kubernetes Secrets
First make sure we are working with the correct AKS cluster context.
echo “Ensure you have the right credential. It will update C:Users[userid].kubeconfig with the new cluster context.”

az aks get-credentials -g rg-aks -n aks-cluster-04
echo “Display the current AKS cluster context”

kubectl config current-context
Assume the ca.crt, server_dev.crt and server_dev.key files are in a sub-folder named mTLS.
# Add server.crt, server.key and ca.crt into Kubernetes secret named ingress-secret

kubectl create secret generic ingress-secret-dev –from-file=tls.crt=”mTLSserver_dev.crt” –from-file=tls.key=”mTLSserver_dev.key” –from-file=ca.crt=”mTLSca.crt”
# Display the secret

kubectl get secret ingress-secret-dev

# List all secrets in the cluster

kubectl get secrets
Creating an NGINX Ingress Controller
An ingress controller is required to work with Kubernetes ingress resources. We will define client authentication and TLS configurations in an ingress resource.
We can put ingress controller either in the default namespace or a custom namespace.
    # Create a Helm repo

    helm repo add ingress-nginx https://kubernetes.github.io/ingress-nginx

    # To see the Helm repo

    helm repo list

    # Use Helm to deploy an NGINX ingress controller

    helm install nginx-ingress ingress-nginx/ingress-nginx

        –namespace default

        –set controller.replicaCount=1

        –set controller.nodeSelector.”beta.kubernetes.io/os”=linux

        –set defaultBackend.nodeSelector.”beta.kubernetes.io/os”=linux
Details can be found in this doc .
Have a Test App and Add its Container to ACR
This is beyond the scope of this document.
Ideally for better test result, the REST API app should have the following:
- At least three methodts: get, post, delete. This would allow us to test RBAC, such as only a specific role can delete while anyone can do get/create. RBAC is out of the scope of this document.
- The get method should return the full request headers as part of the response so that we can see the headers received by the application code. As a request goes through OAuth2 and then mTLS, some additional headers will be added and are available to application code.
Deploy the Container to AKS Pods
Create a YAML file and save it with the name “tinyrest_container.yml.
apiVersion: apps/v1

kind: Deployment

metadata:

name: tinyrest

labels:

    app: tinyrest

spec:

replicas: 1

selector:

    matchLabels:

    app: tinyrest

template:

    metadata:

    labels:

        app: tinyrest

    spec:

    containers:

    – name: tinyrest

        image: myacr.azurecr.io/tinyrest:latest

        ports:

        – containerPort: 3000
Authenticate with Azure Container Registry from Azure Kubernetes Service by running a command like below:
echo “ACR integration with AKS”

az aks update –name aks-cluster-04 –resource-group rg-aks –attach-acr myacr
Deploy the container by running the following kubectl commands:
echo “Deploy container from ACR to AKS”

kubectl apply -f ./aks_bash/tinyrest_container.yml

kubectl get deploy

kubectl get pods
Deploy a Service to Expose the Pods
Create a YAML for service:
apiVersion: v1

kind: Service

metadata:

name: tinyrest-svc

spec:

ports:

– port: 8080

    targetPort: 3000

    protocol: TCP

    name: http

selector:

    app: tinyrest
Deploy the service by running the following kubectl commands:
echo “Deploy AKS service”

kubectl apply -f ./aks_bash/tinyrest_service.yml

kubectl get svc
The second command should show the NGINX ingress controller as a LoadBalancer in addition to the service you just added.
Deploy an Ingress Resource with Security Configurations
Create a YAML file for an ingress resource:
apiVersion: networking.k8s.io/v1beta1

kind: Ingress

metadata:

    annotations:

        nginx.ingress.kubernetes.io/auth-tls-verify-client: “on”

        nginx.ingress.kubernetes.io/auth-tls-secret: “default/ingress-secret-dev”

    name: tinyrest-ingress-dev

    namespace: default

spec:

    rules:

    – host: dev.aksingress.com

        http:

        paths:

        – backend:

            serviceName: tinyrest-svc

            servicePort: 8080

            path: /

    tls:

    – hosts:

        – dev.aksingress.com

        secretName: ingress-secret-dev
In this ingress resource, we have specified the following for mTLS authentication:
- The ingress must verify a client cert (server authenticating client);
- Use the Kubernetes secret (named ingress-secret-dev) as the source for server cert, server key and CA cert.
- The hostname specified (dev.aksingress.com in our example) must match the SAN in server cert.
Deploy the ingress resource with rules via the following kubectl commands:
echo “Deploy ingress resource with rules”

kubectl apply -f ./aks_bash/tinyrest_ingress_rules.yml

kubectl get ingress

kubectl describe ingress tinyrest-ingress-dev
Make sure you see a static external IP address after deploying the ingress service. There might be a short delay after running the deploy command before the static IP shows up.
Add A Record to DNS
Now the static IP of the AKS ingress controller is available. You can map it to the domain (dev.aksingress.com ) in your DNS setup.
Testing AKS Configuration for mTLS Authentication
With client cert authentication and CA cert configured in AKS ingress resource, we can test it using curl client.
If you call the ingress without supplying the client cert or client key, you will get the following error
$ curl https://dev.aksingress.com/resource -k
<html> <head><title>400 No required SSL certificate was sent</title></head> <body>
400 Bad Request
No required SSL certificate was sent
nginx/1.19.2</body> </html>
Mutual TLS authentication between AKS and curl client can be achieved by supplying client cert, client key and CA cert, as shown below.
curl –verbose https://dev.aksingress.com/resource –cert “mTLSclient_dev.crt” –key “mTLSclient_dev.key” –cacert “mTLSca.crt”
If our test application returns the incoming headers, it looks like below:
 “request_header”: {

     “host”: “dev.aksingress.com”,

     “ssl-client-verify”: “SUCCESS”,

     “ssl-client-subject-dn”: “C=US,ST=IL,L=Libertyville,OU=CSE,O=Microsoft,emailAddress=acp@microsoft.com,CN=gateway.com”,

     “ssl-client-issuer-dn”: “CN=My Cert Authority”,

     “x-request-id”: “556a994d6f9949eef44189a18294080e”,

     “x-real-ip”: “10.244.0.1”,

     “x-forwarded-for”: “10.244.0.1”,

     “x-forwarded-proto”: “https”,

     “x-forwarded-host”: “dev.aksingress.com”,

     “x-forwarded-port”: “443”,

     “x-scheme”: “https”,

     “user-agent”: “curl/7.68.0”,

     “accept”: “*/*”

 }
In its response, in addition to the correct response from the AKS pods, the following verbose section indicates client authentication of server cert is successful.
 * Server certificate:

 *  subject: CN=dev.aksingress.com; emailAddress=acp@microsoft.com; O=Microsoft; OU=CSE; L=Libertyville; ST=IL; C=US

 *  start date: Sep 29 13:10:18 2020 GMT

 *  expire date: Sep 27 13:10:18 2030 GMT

 *  common name: dev.aksingress.com (matched)

 *  issuer: CN=My Cert Authority

 *  SSL certificate verify ok.
Configuring mTLS in APIM
Details can be found in How to secure back-end services using client certificate authentication in Azure API Management .
End-to-End Test
To perform end-to-end test, we also need to follow the other document to configure OAuth2.
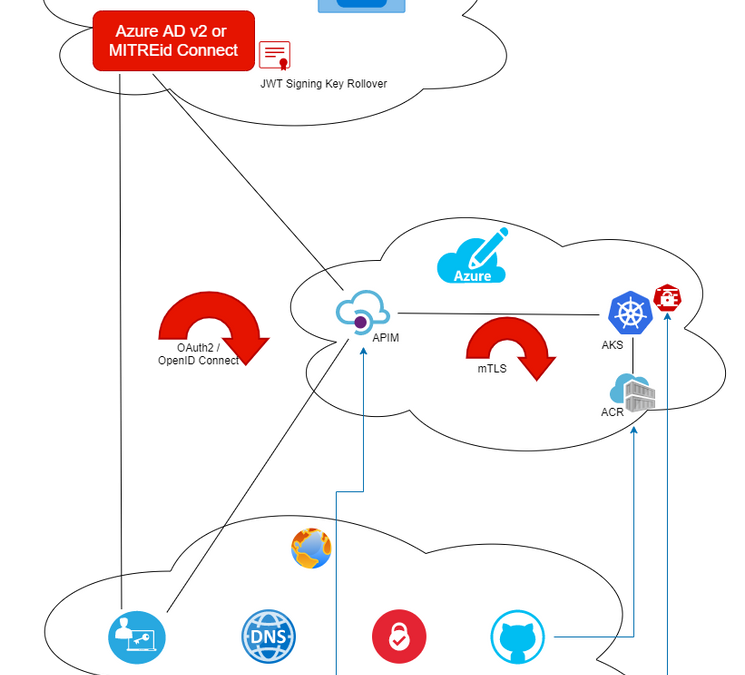
The end-to-end test covers two security loops:
OAuth2, which covers
- client app (either public or private client)
- Identity Provider (any OAuthe2-compliant Identity Provider such as Azure AD or MITREid Connect)
- API gateway (APIM)
mTLS, which covers
- Client (APIM) authenticating server (AKS)
- Server (AKS) authenticating client (APIM)
The end-to-end security can be illustrated by the diagram below.

The OAuth2 Test Tool (http://aka.ms/ott ) can be used for the test.
If your REST API used for test returns the incoming HTTP headers in its response body, the headers in its response should look like below:
“request_header”: {

        “host”: “aksingress.com”,

        “ssl-client-verify”: “SUCCESS”,

        “ssl-client-subject-dn”: “CN=gateway.com”,

        “ssl-client-issuer-dn”: “CN=My Cert Authority”,

        “x-request-id”: “a1e62e86b490b1afc29f5fd3fbfa802c”,

        “x-real-ip”: “10.244.0.1”,

        “x-forwarded-for”: “10.244.0.1”,

        “x-forwarded-proto”: “https”,

        “x-forwarded-host”: “aksingress.com”,

        “x-forwarded-port”: “443”,

        “x-scheme”: “https”,

        “x-original-forwarded-for”: “67.186.69.18”,

        “x-correlation-id”: “23a8237a-d16b-4471-8c19-058717c982cf”,

        “origin”: “https://npmwebapp.azurewebsites.net”,

        “sec-fetch-site”: “cross-site”,

        “sec-fetch-mode”: “cors”,

        “sec-fetch-dest”: “empty”,

        “content-type”: “application/json”,

        “accept”: “*/*”,

        “accept-encoding”: “gzip,deflate,br”,

        “accept-language”: “en-US,en;q=0.9”,

        “authorization”: “Bearer [token]”,

        “referer”: “https://npmwebapp.azurewebsites.net/”,

        “user-agent”: “Mozilla/5.0 (Windows NT 10.0; Win64; x64) AppleWebKit/537.36 (KHTML, like Gecko) Chrome/85.0.4183.121 Safari/537.36”

    }
The first half indicates client (APIM) has successfully authenticated the server (AKS) cert and forwarded the request to the server (aksingress.com ), which performs its own authentication of the client. The second half shows the JWT used for OAuth2 authorization. The sec-fetch-* headers indicate this is a CORS call and preflight is required (client domain: npmwebapp.azurewebsites.net , API gateway domain: [apim-svc-name].azure-api.net). The client cert CN (in our case aksingress.com) is different from APIM FQDN.
Troubleshooting
Log of NGINX Ingress Controller
Reading the log of the NGINX ingress controller is an effective way to troubleshoot. You can retrieve the ingress controller log via the following kubectl commands:
# get the name of NGINX ingress controller

kubectl get pods -n default | grep nginx-ingress

# get the log for the NGINX ingress controller

kubectl logs -n default nginx-ingress-ingress-nginx-controller-7cb87487f5-jg8xw
Below is a sample error entry in such log:
W0923 16:30:28.571719 6 controller.go:1146] Unexpected error validating SSL certificate “default/ingress-secret” for server “aksingress.com”: x509: certificate relies on legacy Common Name field, use SANs or temporarily enable Common Name matching with GODEBUG=x509ignoreCN=0
while a successful request can look like below:
10.244.0.1 – – [23/Sep/2020:22:30:38 +0000] “GET /resource HTTP/2.0” 200 459 “-” “curl/7.68.0” 38 0.002 [default-tinyrest-svc-8080] [] 10.244.0.13:3000 459 0.000

200 69ad615ba1e85defdaba5a0ba57529df
Ingress Resource Setup
Another thing to check is the ingress resource setup:
$ kubectl describe ingress tinyrest-ingress-dev

Name:             tinyrest-ingress-dev

Namespace:        default

Address:          52.154.41.113

Default backend:  default-http-backend:80 (<error: endpoints “default-http-backend” not found>)

TLS:

ingress-secret-dev terminates dev.aksingress.com

Rules:

Host                Path  Backends

—-                —-  ——–

dev.aksingress.com

                    /   tinyrest-svc:8080 (10.244.0.13:3000)

Annotations:          nginx.ingress.kubernetes.io/auth-tls-secret: default/ingress-secret-dev

                    nginx.ingress.kubernetes.io/auth-tls-verify-client: on

Events:               <none>
Notice that since we have configured nginx.ingress.kubernetes.io/auth-tls-verify-client: on, the error endpoints “default-http-backend” not found is expected.
Missing Client Cert for Server Authentication of Client
If error indicates missing client cert, please check the API inbound policy in APIM. In order for APIM to supply client cert to AKS ingress resource for authenticating the client, the inbound processing policy must contain the following node
<authentication-certificate thumbprint=”05F6B958079A4FC88978946FB3DA65B37F0F9E4E” />
Make sure the thumbprint matches with the thumbprint of the client cert you installed on APIM.
Ingress Secret Cannot be Found
Check the YAML file for the ingress resource to make sure the secret name and namespace are correct. You can use kubectl to describe the Kubernetes secret and should see the following three certs/key:
$ kubectl describe secret ingress-secret-dev

Name:         ingress-secret

Namespace:    default

Labels:       <none>

Annotations:  <none>
Type:  Opaque
Data

====

tls.crt:  1675 bytes

tls.key:  3272 bytes

ca.crt:   1809 bytes
Brought to you by Dr. Ware, Microsoft Office 365 Silver Partner, Charleston SC.

Recent Comments