This article is contributed. See the original author and article here.
Introduction
AKS or Azure Kubernetes Service is a fully managed Kubernetes container orchestration service that enables you to deploy, scale, and manage containerized applications easily. However, even with the most robust systems issues can arise that require troubleshooting.
This blog post marks the beginning of a three-part series, that originated from an intensive one-day bootcamp focused on advanced AKS networking triage and troubleshooting scenarios. It offers a practical approach to diagnosing and resolving common AKS networking issues, aiming to equip readers with quick troubleshooting skills for their AKS environment.
Each post walks through a set of scenarios that simulate typical issues. Detailed setup instructions will be provided to build a functional environment. Faults will then be introduced that causes the setup to malfunction. Hints will be provided on how to triage and troubleshoot these issues using common tools such as kubectl, nslookup, and tcpdump. Each scenario concludes with fixes for the issues faced and explanation of the steps taken to resolve the problem.
Prerequisites
Before setting up AKS, ensure that you have an Azure account and subscription, with permissions that allows you to create resource groups and deploy AKS clusters. PowerShell needs to be available as PS scripts will be used. Follow instructions provided in this Github link to set up AKS and run scenarios. It is also recommended that you read up on troubleshooting inbound and outbound networking scenarios that may arise in your AKS environment.
For inbound scenarios, troubleshooting connectivity issues pertains to applications hosted on the AKS cluster. Link describes issues related to firewall rules, network security groups, or load balancers, and provides guidance on verifying network connectivity, checking application logs, and examining network traffic to identify potential bottlenecks.
For outbound access, troubleshooting scenarios are related to traffic leaving the AKS cluster, such as connectivity issues to external resources like databases, APIs, or other services hosted outside of the AKS cluster.
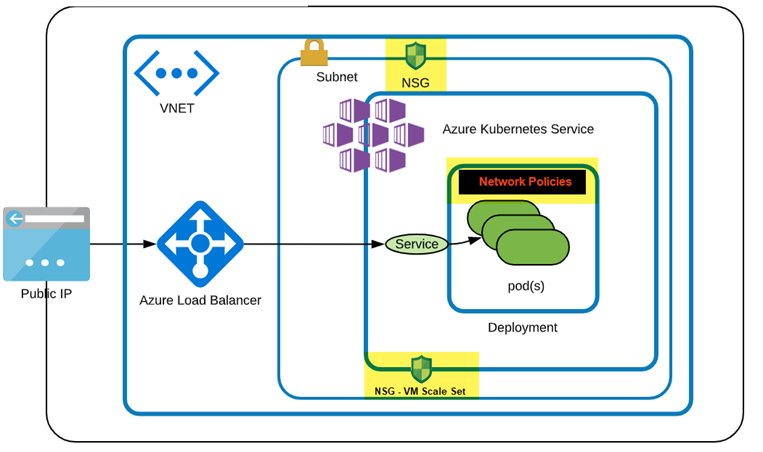
Figure below shows the AKS environment, which uses a custom VNet with its own NSG attached to the custom subnet. The AKS setup uses the custom subnet and will have its own NSG created and attached to the Network Interface of the Nodepool. Any changes to the AKS networking are automatically added to its NSG. However, to apply AKS NSG changes to the custom Subnet NSG, they must be explicitly added.
Scenario 1: Connectivity resolution between pods or services in same cluster
Objective: The goal of this exercise is to troubleshoot and resolve connectivity between pods and services within the same Kubernetes cluster.
Layout: AKS cluster layout with 2 Pods created by their respective deployments and exposed using Cluster IP Service.

Step 1: Set up the environment
- Setup up AKS as outlined in this script.
- Create namespace student and set context to this namespace
kubectl create ns student
kubectl config set-context –current –namespace=student

# Verify current namespace
kubectl config view –minify –output ‘jsonpath={..namespace}’
- Clone solutions Github link and change directory to Lab1 i.e., cd Lab1.
Step 2: Create two deployments and respective services
- Create a deployment nginx-1 with a simple nginx image:
kubectl create deployment nginx-1 –image=nginx
- Expose the deployment as a ClusterIP service:
kubectl expose deployment nginx-1 –name nginx-1-svc –port=80 –target-port=80 –type=ClusterIP
- Repeat the above steps to create nginx-2 deployment and a service:
kubectl create deployment nginx-2 –image=nginx
kubectl expose deployment nginx-2 –name nginx-2-svc –port=80 –target-port=80 –type=ClusterIP
Confirm deployment and service functional. Pods should be running and services listening on Port 80.
kubectl get all
Step 3: Verify that you can access both services from within the cluster by using Cluster IP addresses
# Services returned: nginx-1-svc for pod/nginx-1, nginx-2-svc for pod/nginx-2
kubectl get svc

# Get the values of  and
kubectl get pods

# below should present HTML page from nginx-2
kubectl exec -it  — curl nginx-2-svc:80

# below should present HTML page from nginx-1
kubectl exec -it  — curl nginx-1-svc:80

# check endpoints for the services
kubectl get ep
Step 4: Backup existing deployments
- Backup the deployment associated with nginx-2 deployment:
kubectl get deployment.apps/nginx-2 -o yaml > nginx-2-dep.yaml
- Backup the service associated with nginx-2 service:
kubectl get service/nginx-2-svc -o yaml > nginx-2-svc.yaml
Step 5: Simulate service down
- Delete nginx-2 deployment
kubectl delete -f nginx-2-dep.yaml
- Apply the broken.yaml deployment file found in Lab1 folder
kubectl apply -f broken.yaml
- Confirm all pods are running
kubectl get all
Step 6: Troubleshoot the issue
Below is the inbound flow. Confirm every step from top down.

- Check the health of the nodes in the cluster to see if there is a node issue
kubectl get nodes
- Verify that you can no longer access nginx-2-svc from within the cluster
kubectl exec -it  — curl nginx-2-svc:80
# msg Failed to connect to nginx-2-svc port 80: Connection refused
- Verify that you can access nginx-1-svc from within the cluster
kubectl exec -it  — curl nginx-1-svc:80
# displays HTML page
- Verify that you can access nginx-2 locally. This confirms no issue with the nginx-2 application.
kubectl exec -it  — curl localhost:80
# displays HTML page
- Check the Endpoints using below command and verify that the right Endpoints line up with their Services. There should be at least 1 Pod associated with a service, but none seem to exist for nginx-2 service but nginx-2 service/pod association is fine.
kubectl get ep

- Check label selector used by the Service experiencing issue, using below command:
kubectl describe service
Ensure that it matches the label selector used by its corresponding Deployment using describe command:
kubectl describe deployment
Use ‘k get svc’ and ‘k get deployment’ to get service and deployment names.
Do you notice any discrepancies?
- Using the Service label selector from #3, check that the Pods selected by the Service match the Pods created by the Deployment using the following command
kubectl get pods –selector=
If no results are returned then there must be a label selector mismatch.
From below figure, selector used by deployment returns pods but not the selector used by corresponding service.

- Check service and pod logs and ensure HTTP traffic is seen. Compare nginx-1 pod and service logs with nginx-2. Latter does not show GET requests, suggesting no incoming traffic.
k logs pod/ # no incoming traffic
k logs pod/ # HTTP traffic as seen below
k logs svc/
k logs svc/

Step 7: Restore connectivity
- Check the label selector the Service is associated with and get associated pods:
# Get label
kubectl describe service nginx-2-svc
# When attempting to obtain pods using the service label, results in “no resources found” or “no pods available”.
kubectl describe pods -l app=nginx-2
- Update deployment and apply changes.
kubectl delete -f nginx-2-dep.yaml
In broken.yaml, update labels ‘app: nginx-02’, to ‘app: nginx-2’, as shown below

kubectl apply -f broken.yaml # or apply dep-nginx-2.yaml

k describe pod
k get ep # nginx-2 svc should have pods unlike before
- Verify that you can now access the newly created service from within the cluster:
# Should return HTML page from nginx-2-svc
kubectl exec -it  — curl nginx-2-svc:80

# Confirm above from logs
k logs pod/
Step 8: Using Custom Domain Names
Currently Services in your namespace ‘student’ will resolve using ..svc.cluster.local.
Below command should return web page.
k exec -it — curl nginx-2-svc.student.svc.cluster.local
- Apply broken2.yaml in Lab1 folder and restart CoreDNS
kubectl apply -f broken2.yaml
kubectl delete pods -l=k8s-app=kube-dns -n kube-system

# Monitor to ensure pods are running
kubectl get pods -l=k8s-app=kube-dns -n kube-system
- Validate if DNS resolution works and it should fail wit ‘curl: (6) Could not resolve host:’
k exec -it  — curl nginx-2-svc.student.svc.cluster.local
k exec -it  — curl nginx-2-svc
- Check the DNS configuration files in kube-system which shows the configmap’s, as below.
k get cm -A -n kube-system | grep dns
- Describe each of the ones found above and look for inconsistencies
k describe cm coredns -n kube-system
k describe cm coredns-autoscaler -n kube-system
k describe cm coredns-custom -n kube-system
- Since the custom DNS file holds the breaking changes, either edit coredns-custom and remove data section OR delete the ConfigMap ‘coredns-custom’. Deleting kube-dns pods should re-create deleted ConfigMap ‘coredns-custom’.
kubectl delete cm coredns-custom -n kube-system
kubectl delete pods -l=k8s-app=kube-dns -n kube-system

# Monitor to ensure pods are running
kubectl get pods -l=k8s-app=kube-dns -n kube-system
- Confirm DNS resolution now works as before.
kubectl exec -it — curl nginx-2-svc.student.svc.cluster.local
# Challenge lab: Resolve using FQDN aks.com #
# Run below command to get successful DNS resolution
k exec -it  — curl nginx-2-svc.aks.com

# Solution #
k apply -f working2.yaml
kubectl delete pods -l=k8s-app=kube-dns -n kube-system

# Monitor to ensure pods are running
kubectl get pods -l=k8s-app=kube-dns -n kube-system

# Confirm working using below cmd
k exec -it  — curl nginx-2-svc.aks.com

# Bring back to default
k delete cm coredns-custom -n kube-system
kubectl delete pods -l=k8s-app=kube-dns -n kube-system

# Monitor to ensure pods are running
kubectl get pods -l=k8s-app=kube-dns -n kube-system
Step 9: What was in the broken files
In broken.yaml deployment labels didn’t match up with the service i.e., it should have been nginx-2

In broken2.yaml breaking changes were made that resolved ‘student.svc.cluster.local’ to ‘bad.cluster.local’, which broke DNS resolution.
$kubectl_apply=@”
apiVersion: v1
kind: ConfigMap
metadata:
  name: coredns-custom
  namespace: kube-system
data:
  internal-custom.override: | # any name with .server extension
    rewrite stop {
      name regex (.*).svc.cluster.local {1}.bad.cluster.local.
      answer name (.*).bad.cluster.local {1}.svc.cluster.local.
    }
“@
$kubectl_apply | kubectl apply -f –
Step 10: Cleanup
k delete deployment/nginx-1 deployment/nginx-2 service/nginx-1-svc service/nginx-2-svc
or just delete namespace >  k delete ns student
Scenario 2: DNS and External access failure resolution
Objective: The goal of this exercise is to troubleshoot and resolve Pod DNS lookups and DNS resolution failures.
Layout: Cluster layout as shown below has NSG applied to AKS subnet, with Network Policies in effect.

Step 1: Set up the environment
- Setup up AKS as outlined in this script.
- Create and switch to the newly created namespace
kubectl create ns student
kubectl config set-context –current –namespace=student

# Verify current namespace
kubectl config view –minify –output ‘jsonpath={..namespace}’
- Clone solutions Github link and change directory to Lab2 i.e., cd Lab2.
Step 2: Verify DNS Resolution works within cluster
- Create pod for DNS validation within Pod
kubectl run dns-pod –image=nginx –port=80 –restart=Never
kubectl exec -it dns-pod — bash

# Run these commands at the bash prompt
apt-get update -y
apt-get install dnsutils -y
exit
- Test and confirm DNS resolution resolves to the correct IP address.
kubectl exec -it dns-pod — nslookup kubernetes.default.svc.cluster.local
Step 3: Break DNS resolution
- From Lab2 folder apply broken1.yaml
kubectl apply -f broken1.yaml
- Confirm running below command results in ‘connection timed out; no servers could be reached’
kubectl exec -it dns-pod — nslookup kubernetes.default.svc.cluster.local
Step 4: Troubleshoot DNS Resolution Failures
- Verify DNS resolution works within the AKS cluster
kubectl exec -it dns-pod — nslookup kubernetes.default.svc.cluster.local
# If response ‘connection timed out; no servers could be reached’ then proceed below with troubleshooting
- Validate DNS service which should show port 53 in use
kubectl get svc kube-dns -n kube-system
- Check logs for pods associated with kube-dns
$coredns_pod=$(kubectl get pods -n kube-system -l k8s-app=kube-dns -o=jsonpath='{.items[0].metadata.name}’)
kubectl logs -n kube-system $coredns_pod- If a custom ConfigMap is present, verify that the configuration is correct.
kubectl describe cm coredns-custom -n kube-system
- Check for networkpolicies currently in effect. If DNS related then describe and confirm no blockers. If network policy is a blocker then have that removed.
kubectl get networkpolicy -A
NAMESPACE     NAME              POD-SELECTOR
kube-system   block-dns-ingress  k8s-app=kube-dns
kubectl describe networkpolicy block-dns-ingress -n kube-system
# should show on Ingress path not allowing DNS traffic to UDP 53
- Remove the offending policy
kubectl delete networkpolicy block-dns-ingress -n kube-system
- Verify DNS resolution works within the AKS cluster. Below is another way to create a Pod to execute task as nslookup and delete on completion
kubectl run -it –rm –restart=Never test-dns –image=busybox –command — nslookup kubernetes.default.svc.cluster.local
# If the DNS resolution is working correctly, you should see the correct IP address associated with the domain name
- Check NSG has any DENY rules that might block port 80. If exists, then have that removed
# Below CLI steps can also be performed as a lookup on Azure portal under NSG
Step 5: Create external access via Loadbalancer
- Expose dns-pod with service type Load Balancer.
kubectl expose pod dns-pod –name=dns-svc –port=80 –target-port=80 –type LoadBalancer
- Confirm allocation of External-IP.
kubectl get svc
- Confirm External-IP access works within cluster.
kubectl exec -it dns-pod — curl
- Confirm from browser that External-IP access fails from internet to cluster.
curl
Step 6: Troubleshoot broken external access via Loadbalancer
- Check if AKS NSG applied on the VM Scale Set has an Inbound HTTP Allow rule.
- Check if AKS Custom NSG applied on the Subnet has an ALLOW rule and if none then apply as below.
$custom_aks_nsg = “custom_aks_nsg” # <- verify
$nsg_list=az network nsg list –query “[?contains(name,’$custom_aks_nsg’)].{Name:name, ResourceGroup:resourceGroup}” –output json

# Extract Custom AKS Subnet NSG name, NSG Resource Group
$nsg_name=$(echo $nsg_list | jq -r ‘.[].Name’)

$resource_group=$(echo $nsg_list | jq -r ‘.[].ResourceGroup’)
echo $nsg_list, $nsg_name, $resource_group

$EXTERNAL_IP=””
az network nsg rule create –name AllowHTTPInbound `
–resource-group $resource_group –nsg-name $nsg_name `
–destination-port-range 80 –destination-address-prefix $EXTERNAL_IP `
–source-address-prefixes Internet –protocol tcp `
–priority 100 –access allow
- After ~60s, confirm from browser that External-IP access succeeds from internet to cluster.
curl
Step 7: What was in the broken files
Broken1.yaml is a Network Policy that blocks UDP ingress requests on port 53 to all Pods

Step 8: Cleanup
k delete pod/dns-pod
or
k delete ns student

az network nsg rule delete –name AllowHTTPInbound `
–resource-group $resource_group –nsg-name $nsg_name
Conclusion
This post demonstrates common connectivity and DNS issues that can arise when working with AKS. The first scenario focuses on resolving connectivity problems between pods and services within the Kubernetes cluster. We encountered issues where the assigned labels of a deployment did not match the corresponding pod labels, resulting in non-functional endpoints. Additionally, we identified and rectified issues with CoreDNS configuration and custom domain names. The second scenario addresses troubleshooting DNS and external access failures. We explored how improperly configured network policies can negatively impact DNS traffic flow. In the next article, second of the three-part series, we will delve into troubleshooting scenarios related to endpoint connectivity across virtual networks and tackle port configuration issues involving services and their corresponding pods.
Disclaimer
The sample scripts are not supported by any Microsoft standard support program or service. The sample scripts are provided AS IS without a warranty of any kind. Microsoft further disclaims all implied warranties including, without limitation, any implied warranties of merchantability or of fitness for a particular purpose. The entire risk arising out of the use or performance of the sample scripts and documentation remains with you. In no event shall Microsoft, its authors, or anyone else involved in the creation, production, or delivery of the scripts be liable for any damages whatsoever (including, without limitation, damages for loss of business profits, business interruption, loss of business information, or other pecuniary loss) arising out of the use of or inability to use the sample scripts or documentation, even if Microsoft has been advised of the possibility of such damages.
Brought to you by Dr. Ware, Microsoft Office 365 Silver Partner, Charleston SC.

Recent Comments