This article is contributed. See the original author and article here.
This post was authored by Leo Furlong, a Solutions Architect at Databricks.
Many Azure customers orchestrate their Azure Databricks pipelines using tools like Azure Data Factory (ADF). ADF is a popular service in Azure for ingesting and orchestrating batch data pipelines because of its ease of use, flexibility, scalability, and cost-effectiveness. Many Azure Databricks users leverage ADF, for not only ingesting RAW data into data landing zones in Azure Data Lake Storage Gen2 (ADLS) or Azure Blob Storage, but also for orchestrating the execution of Azure Databricks notebooks that transform data into a curated Delta Lake using the medallion architecture.
In its current form, ADF customers can execute Azure Databricks jobs using the execute Notebook, Python, or Jar activities. Under the covers, these activities create a job in Azure Databricks by submitting to the Runs submit API and checking for status completion using the Runs get API. ADF customers can also execute an existing Azure Databricks job or Delta Live Tables pipeline to take advantage of the latest job features in Azure Databricks. It is extremely easy to execute an Azure Databricks job in ADF using native ADF activities and the Databricks Jobs API. The approach is similar to how you can execute an Azure Databricks Delta Live Tables pipeline from ADF. Additionally, you can have ADF authenticate to Azure Databricks using a personal access token (PAT), Azure Active Directory (Azure AD) token, or Managed Identity, with the last option being the best practice and least complex.
Configuration for Executing Azure Databricks Jobs from ADF
The sections below walkthrough how to build and configure a modular ADF pipeline that can execute any Azure Databricks defined job using out-of-the-box ADF pipeline activities and managed identity authentication. The full sample code can be found in the following Gists (regular and with parameters). You can also program the pipeline yourself using the following steps.
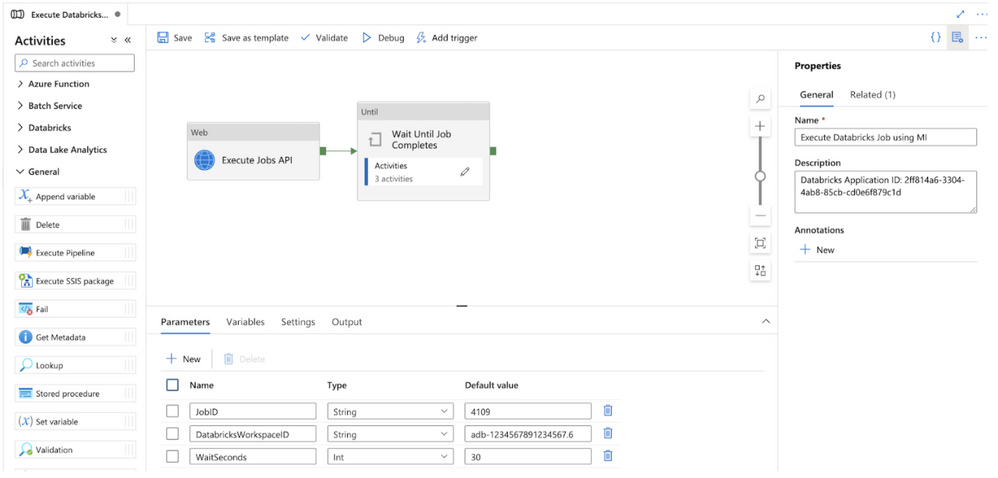
Figure 1 – Modular ADF pipeline for executing Azure Databricks jobs using managed identities (MI)
Step 1 – Create ADF pipeline parameters and variables
The pipeline has 3 required parameters:
- JobID: the ID for the Azure Databricks job found in the Azure Databricks Jobs UI main screen. This parameter is required.
- DatabricksWorkspaceID: the ID for the workspace which can be found in the Azure Databricks workspace URL. This parameter is required.
- WaitSeconds: the number of seconds to wait in between each check for job status.

Figure 2 – ADF pipeline parameters

Figure 3 – Example Azure Databricks Jobs UI
The pipeline also has one variable called JobStatus with a default value as “Running”. This variable will be used to set the Job status while we are running the Azure Databricks job. When the Job Status changes, the ADF pipeline will update the variable.

Figure 4 – ADF pipeline variables
Step 2 – Execute the Azure Databricks Run Now API
The first step in the pipeline is to execute the Azure Databricks job using the Run Now API. This is done using the ADF Web activity and leveraging dynamic expressions. Configure the following values in the web activity:
URL: click “Add dynamic content” and enter the formula @concat(‘https://’,pipeline().parameters.DatabricksWorkspaceID,’.azuredatabricks.net/api/2.1/jobs/run-now’).
Method: POST
Body: click “Add dynamic content” and enter the formula @concat(‘{“job_id”:’,pipeline().parameters.JobID,’}’).
Integration runtime: select the correct integration runtime for your environment. The integration runtime should have network connectivity to the Azure Databricks workspace.
Authentication: select Managed Identity in the drop down menu.
Resource: enter the value 2ff814a6-3304-4ab8-85cb-cd0e6f879c1d. This ID represents the identifier for the Azure Databricks login application in Azure and is consistent for all tenants and customers.

Figure 5 – Web Activity to execute Azure Databricks job

Figure 6 – Dynamically constructed URL

Figure 7 – Dynamically constructed body
Step 3 – ADF Until activity
The second step in the pipeline is an Until activity. The Until activity will be used to check the Azure Databricks job execution status until it completes. All activities inside of the Until activity will execute until the JobStatus pipeline variable is no longer equal to the value “Running”. Configure the following values in the Until activity:
Expression: click “Add dynamic content” and enter the formula @not(equals(variables(‘JobStatus’),’Running’)).
Timeout: optionally, enter a timeout value for the Until activity that is less than the default.

Figure 8 – ADF Until activity
To program activities inside the Until activity, click on the pencil button in the Activities menu. Within the Until activity, 3 activities are used to check the Azure Databricks job status, set the ADF pipeline variable, and wait to recheck the job status if it hasn’t already completed.

Figure 9 – Check Azure Databricks job status flow
Step 4 – Check the Azure Databricks Job status using the Runs get API
The first activity inside the Until activity is to check the Azure Databricks job status using the Runs get API. This is done using the ADF Web activity and leveraging dynamic expressions. The return value from the Runs get API call will not only provide the Job status, but it will also provide the status for the individual tasks in a multi-task job and provide the Run URLs to navigate to the Azure Databricks job run executions in the Azure Databricks workspace UI for viewing status or troubleshooting. Configure the following values in the web activity:
URL: click “Add dynamic content” and enter the formula @concat(‘https://’,pipeline().parameters.DatabricksWorkspaceID,’.azuredatabricks.net/api/2.1/jobs/runs/get?run_id=’,activity(‘Execute Jobs API’).output.run_id). Make sure the activity value in the formula is equal to the name of the first web activity you created in the pipeline.
Method: GET
Integration runtime: select the correct integration runtime for your environment. The integration runtime should have network connectivity to the Azure Databricks workspace.
Authentication: select Managed Identity in the drop down menu.
Resource: enter the value 2ff814a6-3304-4ab8-85cb-cd0e6f879c1d. This ID represents the identifier for the Azure Databricks login application in Azure and is consistent for all tenants and customer.

Figure 10 – Get job run status
Figure 11 – Dynamic job run status expression

Step 5 – Set ADF variable with job run status
The second activity inside the Until activity is a Set variable activity which is used to set the value of the pipeline variable JobStatus to the value returned from the Runs get API call. The expression checks whether the API return value of the life_cycle_state field is “PENDING” or “RUNNING” and sets the variable to “Running”. If the life_cycle_state field is not “PENDING” or “RUNNING”, then the variable is set to the result_state field. Configure the following values in the set variable activity:
Name: in the Name drop down menu, select the JobStatus variable
Value: click “Add dynamic content” and enter the formula. Make sure the activity name in the formula matches the name of your first Until web activity.
@if(
or(
equals(activity(‘Check Job Run API’).output.state.life_cycle_state, ‘PENDING’), equals(activity(‘Check Job Run API’).output.state.life_cycle_state, ‘RUNNING’)
),
‘Running’,
activity(‘Check Job Run API’).output.state.result_state
)

Figure 12 – Set the variable to the Runs get output
Step 6 – Wait to recheck job run status
The third activity inside the Until activity is a Wait activity which is used to wait a configurable number of seconds before checking the Runs get API again to see whether the Azure Databricks job has completed. Configure the following values in the wait activity:
Wait time in seconds: click “Add dynamic content” and enter the formula. @pipeline().parameters.WaitSeconds

Figure 13 – Wait before rechecking job status
Use modular ADF pipeline to execute Azure Databricks jobs
The modular pipeline is now complete and can be used for executing Azure Databricks jobs. In order to use the pipeline, use the Execute Pipeline activity in master pipelines used to control orchestration. In the settings of the activity, configure the following values:
Invoked pipeline: select “Execute Databricks Job using MI” from drop down menu
Wait on completion: checked
Parameters: set the values for the pipeline parameters:
- JobID: the ID for the Azure Databricks job found in the Azure Databricks Jobs UI main screen.
- DatabricksWorkspaceID: the ID for the workspace which can be found in the Databricks workspace URL.
- WaitSeconds: the number of seconds to wait in between each check for job status.

Figure 14 – Execute Pipeline activity in master pipeline
Adding the Managed Identity Authentication
Instructions for adding the ADF Managed Identity to the Azure Databricks workspace as a Contributor (Workspace admin) are in the following blog article.
If your organization wants to give the ADF Managed Identity limited permissions, you can also add the ADF Application ID to the Azure Databricks workspace using the Service Principal SCIM API. You can then assign permissions to the user using the permissions API. The Application ID for the ADF Managed Identity can be found in Azure Active Directory under Enterprise Applications.
Leveraging cluster reuse in Azure Databricks jobs from ADF
To optimize resource usage with jobs that orchestrate multiple tasks, you can use shared job clusters. A shared job cluster allows multiple tasks in the same job run to reuse the cluster. You can use a single job cluster to run all tasks that are part of the job, or multiple job clusters optimized for specific workloads. To learn more about cluster reuse, see this Databricks blog post.
Brought to you by Dr. Ware, Microsoft Office 365 Silver Partner, Charleston SC.

Recent Comments