This article is contributed. See the original author and article here.
Do you have data going into S3 Buckets as files that you want to ingest into Azure Sentinel?
In this blog, I will show you how to create an AWS Lambda function running PowerShell to ingest the data into Azure Sentinel.
Setup
To deploy this, you will need a machine prepared with the following:
- PowerShell Core – I recommend PowerShell 7 found here
- .Net Core 3.1 SDK found here
- AWSLambdaPSCore module – You can install this either from the PowerShell Gallery, or you can install it by using the following PowerShell Core shell command:
- Install-Module AWSLambdaPSCore -Scope CurrentUser
See the documentation here https://docs.aws.amazon.com/lambda/latest/dg/powershell-devenv.html
I recommend you review https://docs.aws.amazon.com/lambda/latest/dg/powershell-package.html to review the cmdlets that are part of AWSLambdaPSCore.
Review of the Code
Our script will be triggered when a log file is created in an S3 bucket. To create the base script, run the following PowerShell core command:
New-AWSPowerShellLambda -Template S3Event
The default template for and S3Event trigger is below:
# PowerShell script file to be executed as a AWS Lambda function.
#
# When executing in Lambda the following variables will be predefined.
# $LambdaInput - A PSObject that contains the Lambda function input data.
# $LambdaContext - An Amazon.Lambda.Core.ILambdaContext object that contains information about the currently running Lambda environment.
#
# The last item in the PowerShell pipeline will be returned as the result of the Lambda function.
#
# To include PowerShell modules with your Lambda function, like the AWS.Tools.S3 module, add a "#Requires" statement
# indicating the module and version. If using an AWS.Tools.* module the AWS.Tools.Common module is also required.
#
# The following link contains documentation describing the structure of the S3 event object.
# https://docs.aws.amazon.com/AmazonS3/latest/dev/notification-content-structure.html

#Requires -Modules @{ModuleName='AWS.Tools.Common';ModuleVersion='4.0.6.0'}
#Requires -Modules @{ModuleName='AWS.Tools.S3';ModuleVersion='4.0.6.0'}

# Uncomment to send the input event to CloudWatch Logs
# Write-Host (ConvertTo-Json -InputObject $LambdaInput -Compress -Depth 5)

foreach ($record in $LambdaInput.Records) {
  $bucket = $record.s3.bucket.name
  $key = $record.s3.object.key

  Write-Host "Processing event for: bucket = $bucket, key = $key"

  # TODO: Add logic to handle S3 event record, for example
  $obj = Get-S3Object -Bucket $bucket -Key $key
  Write-Host "Object $key is $($obj.Size) bytes"
}
As you can see for each CreateObject event from S3 the default script pulls the bucket name ($bucket = $record.s3.bucket.name) and filename ($key = $record.s3.object.key) Then Write-Host will send an output to CloudWatch logs. Lastly it gets the file size using the Get-S3object cmdlet.
I used this basic template as a starter template. First, I added a function called Write-OMSLogFile which I got from Travis Roberts on GitHub here. In short, the function takes a hash table with the log data and a few parameters and uploads it to the Log Analytics REST API. The documentation on this API is here. The function needs three parameters you will need to provide:
- Line 158 – $WorkspaceId – you will need to enter the workspace id
- Line 159 – $WorkspaceKey – you will need to enter the workspace key
- Line 160 – $CustomLogName – you will need to enter the Custom Log name you want to use for the data.
After we have those setup, the first action we need to do is download the file from S3 to tmp storage.
Write-Host "Downloading $key to /tmp/$key"
Read-S3Object -BucketName $bucket -Key $key -File "/tmp/$key"
Write-Host "Downloaded $key to /tmp/$key"
Once we have the file, we need to process the file based on file type. I have made some simple assumptions.
- If its .csv its CSV data which is easy to import to a hash table using Import-CSV.
- If its .json, its JSON data which is easy to import to hash table using Get-Content | ConvertFrom-JSON
- Lastly, if it’s a .log file the data contains CEF formatted data which takes some special processing.
- I used some REGEX and splitting to break apart the CEF Message and then build a hash table of records.
- Or its not supported in this function yet.
#Determine if CSV or JSON or whatever
$FileName = "/tmp/$key"
if ($fileName -like "*.csv") {
  Write-Host "Handling CSV File"
  $data = import-csv $filename
}
elseif ($filename -like "*.json") {
  Write-Host "Handling JSON File"
  $Data = Get-Content $filename | ConvertFrom-Json
}
elseif ($filename -like "*.log") {
  Write-Host "Handling Log File"
  #Assuming CEF formatted logs
  $cefdata = Get-Content $filename
  $data = @()
  $cefmsg = @{}
  foreach ($line in $cefdata) {
    if ($line -like "*CEF:*") {
      #Write-Host "Handling CEF Data"
      $CEFtimegenerated = ($line -split '(?<time>(?:w+ +){2,3}(?:d+:){2}d+|d{4}-d{2}-d{2}Td{2}:d{2}:d{2}.[w-:+]{3,12})')[1]
      #$CEFHost = (($line -split '(?<time>(?:w+ +){2,3}(?:d+:){2}d+|d{4}-d{2}-d{2}Td{2}:d{2}:d{2}.[w-:+]{3,12})')[2] -split "CEF:")[0]
      #$CEFVersion = $line.Split("CEF: ").Split("|")[1]
      $CEFDeviceVendor = $line.split("|")[1]
      $CEFDeviceProduct = $line.split("|")[2]
      $CEFDeviceVersion = $line.split("|")[3]
      $CEFDeviceEventClassId = $line.split("|")[4]
      $CEFName = $line.split("|")[5]
      $CEFSeverity = $line.split("|")[6]
      $CEFExtension = $line.split("|")[7] -split '([^=s]+=(?:[]=|[^=])+)(?:s|$)'
      foreach ($extenstion in $CEFExtension) {
        if ($extenstion -like "*=*") { $cefmsg += @{$extenstion.Split("=")[0] = $extenstion.Split("=")[1] } }
      }
      $CEFmsg += @{TimeGenerated = $CEFtimegenerated }
      $CEFmsg += @{DeviceVendor = $CEFDeviceVendor }
      $CEFmsg += @{DeviceProduct = $CEFDeviceProduct }
      $CEFmsg += @{DeviceVersion = $CEFDeviceVersion }
      $CEFmsg += @{DeviceEventClassID = $CEFDeviceEventClassId }
      $CEFmsg += @{Activity = $CEFName }
      $CEFmsg += @{LogSeverity = $CEFSeverity }
      $data += $CEFmsg
      $cefmsg = @{}
    }
  }
  Write-Host "Finished Handling Log file"
}
else { Write-Host "$filename is not supported yet" }
Next we can upload the data to Log Analytics. The API supports up to 30MB per upload. Since FileSize is not equal to HashTable size which is normally less than JSON actual size, we need to convert the data to JSON and measure the actual size. I created a loop to add each record to a temp object until that object is greater than 25MB then upload that chunk and start over. I used 25MB as a safety. If its less than 25MB to start with then just upload the data as is.
#Test Size; Log A limit is 30MB
$tempdata = @()
$tempDataSize = 0
Write-Host "Checking if upload is over 25MB"
if ((($Data | Convertto-json -depth 20).Length) -gt 25MB) {
  Write-Host "Upload needs to be split"
  foreach ($record in $data) {
    $tempdata += $record
    $tempDataSize += ($record | ConvertTo-Json -depth 20).Length
    if ($tempDataSize -gt 25MB) {
       Write-OMSLogfile -dateTime (Get-Date) -type $CustomLogName -logdata $tempdata -CustomerID $workspaceId -SharedKey $workspaceKey
       Write-Host "Sending data = $TempDataSize"
       $tempdata = $null
       $tempdata = @()
       $tempDataSize = 0
    }
  }
  Write-Host "Sending left over data = $Tempdatasize"
  Write-OMSLogfile -dateTime (Get-Date) -type $CustomLogName -logdata $tempdata -CustomerID $workspaceId -SharedKey $workspaceKey
}
Else {
  #Send to Log A as is
  Write-Host "Upload does not need to be split, sending to Log A"
  Write-OMSLogfile -dateTime (Get-Date) -type $CustomLogName -logdata $Data -CustomerID $workspaceId -SharedKey $workspaceKey
}
Lastly we need to clean up the file we downloaded.
Remove-Item $FileName -Force
Deploy the code
The Lambda function will need an execution role defined that grants access to the S3 bucket and CloudWatch logs. To create an execution role:
- Open the roles page in the IAM console.
- Choose Create role.
- Create a role with the following properties.
- Trusted entity – AWS Lambda.
- Permissions – AWSLambdaExecute.
- Role name – lambda-s3-role.
The AWSLambdaExecute policy has the permissions that the function needs to manage objects in Amazon S3 and write logs to CloudWatch Logs. Copy the Amazon Resource Name (ARN) of the role created as you will need it for the next step.
To deploy the PowerShell script, you can create a Package (zip file) to upload to the AWS console or you can use the Publish-AWSPowerShell cmdlet. We will use the cmdlet.
Publish-AWSPowerShellLambda -Name YourLambdaNameHere -ScriptPath <path>/S3Event.ps1 -Region <region> -IAMRoleArn <arn of role created earlier> -ProfileName <profile>
You might need –ProfileName if your configuration of .aws/credentials file doesn’t contain a default. See this document for information on setting up your AWS credentials.
Here is the sample output from my running of the cmdlet.
…....
... zipping:   adding: runtimes/win/lib/netcoreapp3.1/Modules/Microsoft.WSMan.Management/Microsoft.WSMan.Management.psd1 (deflated 42%)
... zipping:   adding: runtimes/win/lib/netcoreapp3.1/Modules/CimCmdlets/CimCmdlets.psd1 (deflated 44%)
... zipping:   adding: runtimes/win/lib/netcoreapp3.1/Modules/Microsoft.PowerShell.Diagnostics/Microsoft.PowerShell.Diagnostics.psd1 (deflated 42%)
... zipping:   adding: runtimes/win/lib/netcoreapp3.1/Modules/Microsoft.PowerShell.Diagnostics/Event.format.ps1xml (deflated 58%)
... zipping:   adding: runtimes/win/lib/netcoreapp3.1/Modules/Microsoft.PowerShell.Diagnostics/Diagnostics.format.ps1xml (deflated 54%)
... zipping:   adding: runtimes/win/lib/netcoreapp3.1/Modules/Microsoft.PowerShell.Diagnostics/GetEvent.types.ps1xml (deflated 55%)
... zipping:   adding: runtimes/win/lib/netcoreapp3.1/Modules/Microsoft.PowerShell.Security/Microsoft.PowerShell.Security.psd1 (deflated 42%)
... zipping:   adding: runtimes/win/lib/netcoreapp3.1/Modules/PSDiagnostics/PSDiagnostics.psm1 (deflated 59%)
... zipping:   adding: runtimes/win/lib/netcoreapp3.1/Modules/PSDiagnostics/PSDiagnostics.psd1 (deflated 42%)
... zipping:   adding: runtimes/unix/lib/netcoreapp3.1/Modules/Microsoft.PowerShell.Utility/Microsoft.PowerShell.Utility.psd1 (deflated 59%)
... zipping:   adding: runtimes/unix/lib/netcoreapp3.1/Modules/Microsoft.PowerShell.Management/Microsoft.PowerShell.Management.psd1 (deflated 60%)
... zipping:   adding: runtimes/unix/lib/netcoreapp3.1/Modules/Microsoft.PowerShell.Host/Microsoft.PowerShell.Host.psd1 (deflated 35%)
... zipping:   adding: runtimes/unix/lib/netcoreapp3.1/Modules/Microsoft.PowerShell.Security/Microsoft.PowerShell.Security.psd1 (deflated 39%)
Created publish archive (/private/var/folders/hv/786wbs4n13ldvz9765nx8nv40000gn/T/S3toSentinel/bin/Release/netcoreapp3.1/S3toSentinel.zip).
Creating new Lambda function S3toSentinel
New Lambda function created
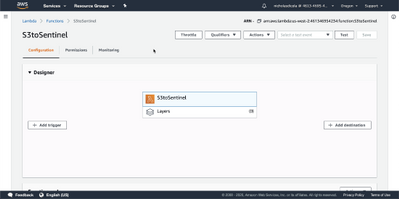
Once created, login to the AWS console. In Find services, search for Lambda. Click on Lambda.
Click on the lambda function name you used with the cmdlet. Click Add Trigger

Select S3. Select the bucket. Acknowledge the warning at the bottom. Click Add.

Your lambda function is ready to send data to Log Analytics.
Test the Code
To test your function, upload a support file to the S3 bucket defined in the trigger.

To view the results of your test, go the Lambda function. Click Monitoring tab. Click view logs in CloudWatch.

In CloudWatch, you will see each log stream from the runs. Select the latest. Here you can see anything from the script from the Write-Host cmdlet.

Go to portal.azure.com and verify your data is in the custom log. Run a query for your <CustomLogName>_CL. If this is a new custom log it may take a few minutes for results to show up. For more on queries see https://docs.microsoft.com/azure/azure-monitor/log-query/get-started-queries

NOTE: To process large files, you may need to increase the Lambda function timeout. For more information on timeouts see https://docs.aws.amazon.com/lambda/latest/dg/gettingstarted-limits.html

Next Steps:
- Create an analytic rule on your data – https://docs.microsoft.com/azure/sentinel/tutorial-detect-threats-custom
- Create a workbook on your data – https://docs.microsoft.com/en-us/azure/sentinel/tutorial-monitor-your-data
I hope this will help some folks solve a unique challenge! You can find the full code and README here.
Thanks to @Chi_Nguyen, Joel Stidley, and @sarahyo for the help on this.
Best,
Nicholas DiCola
Brought to you by Dr. Ware, Microsoft Office 365 Silver Partner, Charleston SC.

Recent Comments