This article is contributed. See the original author and article here.
Improve health, wellbeing, and productivity by tracking your home workspace CO2 levels
How to build a healthier working environment by monitoring CO2, temperature, and humidity levels with an Azure Sphere, an SDC30 sensor, and Azure IoT Central.
#JulyOT
This is part of the #JulyOT IoT Tech Community series, a collection of blog posts, hands-on-labs, and videos designed to demonstrate and teach developers how to build projects with Azure Internet of Things (IoT) services. Please also follow #JulyOT on Twitter.
Source code and learning resources
Source code: Track CO2 levels in your workspace to improve health, wellbeing, and productivity.
Learning resources: Azure Sphere Developer Learning Path.
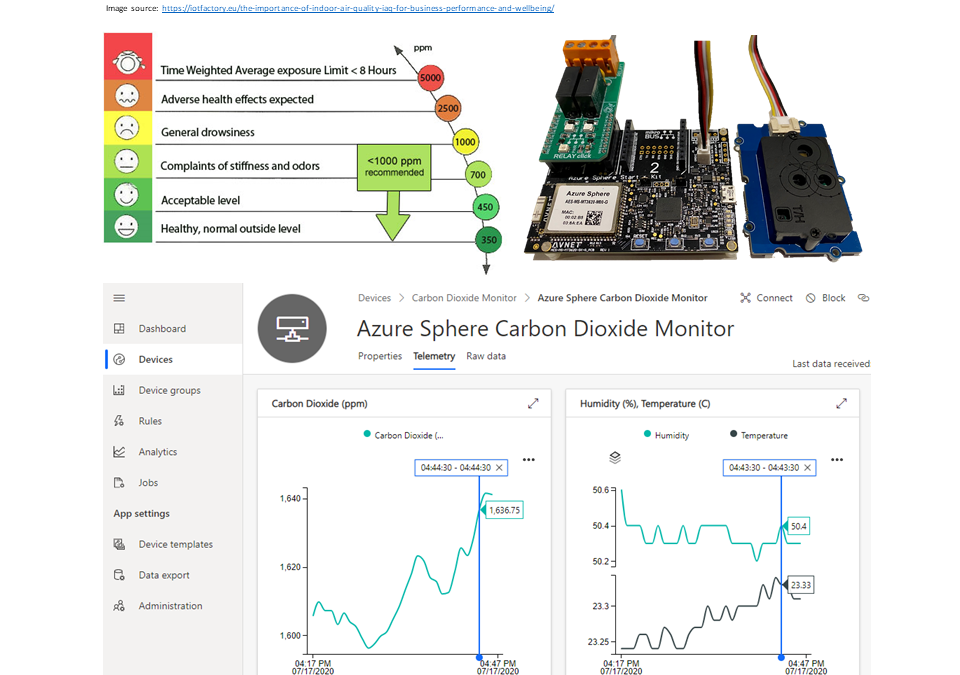
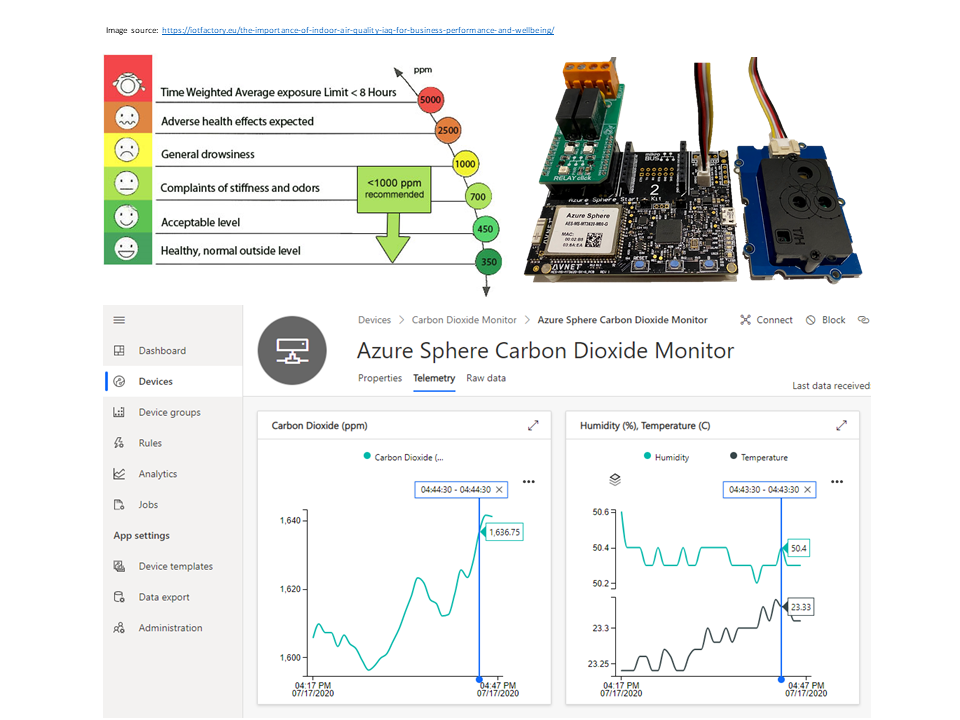
Are CO2 levels making you grumpy, sleepy, or sad
Working from home it is easy to close the door to shut out the noise of everyday life while we get on with work. Closing the door can lead to a build-up of CO2 gas, a by-product of our breathing, which can impact our wellbeing, concentration, and productivity levels.
Check out “Indoor carbon dioxide levels could be a health hazard, scientists warn“.
The problem is we cannot see or smell Carbon Dioxide, it just keeps building up, and we have no way of knowing it is happening other than getting tired or a headache. So, with that in mind, I figured it was the Internet of Things to the rescue!
The solution
I wanted to build a secure IoT device with Azure Sphere using the Seeed Studio Grove CO2 & Temperature & Humidity Sensor I had in my box of bits. The folks at Sensirion made it super easy to port their SCD30 driver to Azure Sphere. It was just a matter of implementing the I2C init/read/write functions, a microsecond sleep function, plus setting up CMake build. It all just worked. The ported driver is included in this project.
Azure IoT Central
Azure IoT Central provides an easy way to connect, monitor, and manage your Internet of Things (IoT) assets at scale.
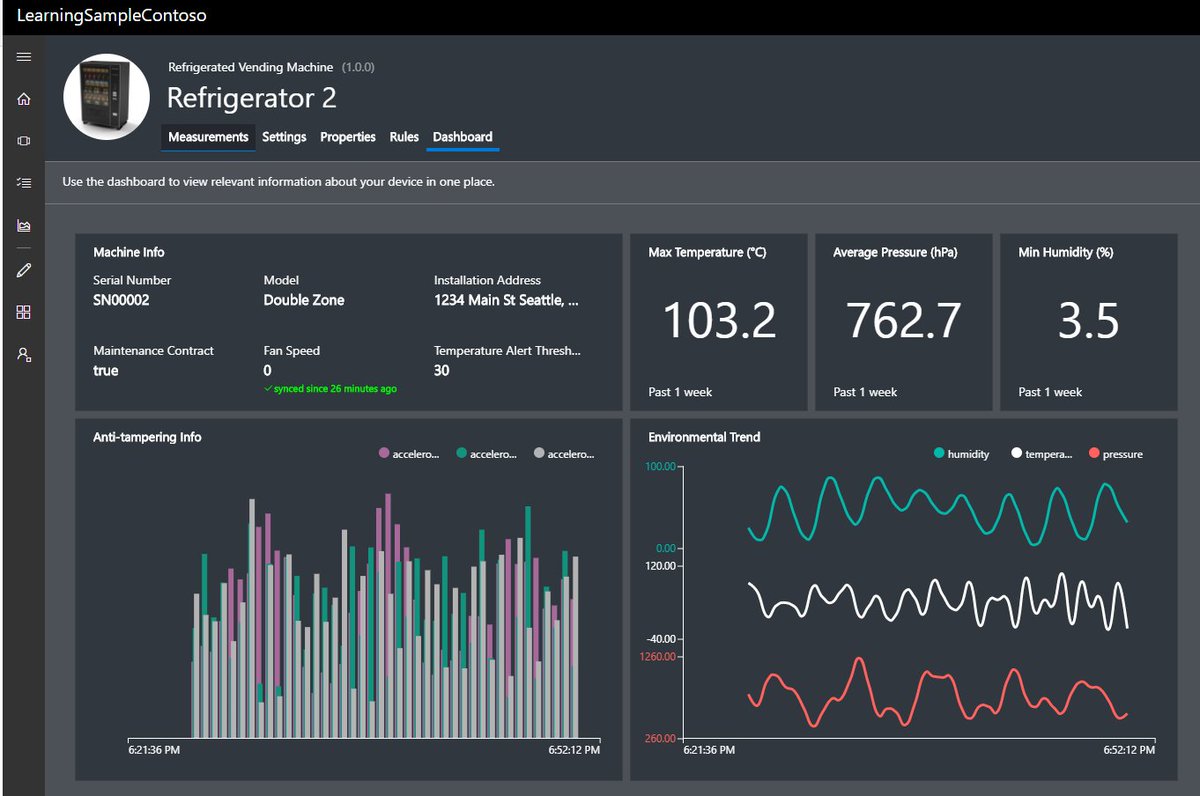
I created a free trial of Azure IoT Central and in no time I had CO2, temperature, and humidity telemetry displayed (yes, the data is real, so we have made some changes at home!). By the way, you can continue to connect two devices for free to IoT Central after the trial period expires.

Extend and integrate Azure IoT Central applications with other cloud services
Azure IoT Central is also extensible using rules and workflows. For more information, review Use workflows to integrate your Azure IoT Central application with other cloud services
Parts list
The solution supports two configurations.
Seeed Studio Azure Sphere Mini Dev Board
- Seeed Studio Seeed Studio MT3620 Mini Dev Board
- MT3620 Grove Breakout
- Seeed Studio Grove CO2 & Temperature & Humidity Sensor
- Optional, 3 x Grove LEDs, or a Grove Relay to drive a bigger warning light!
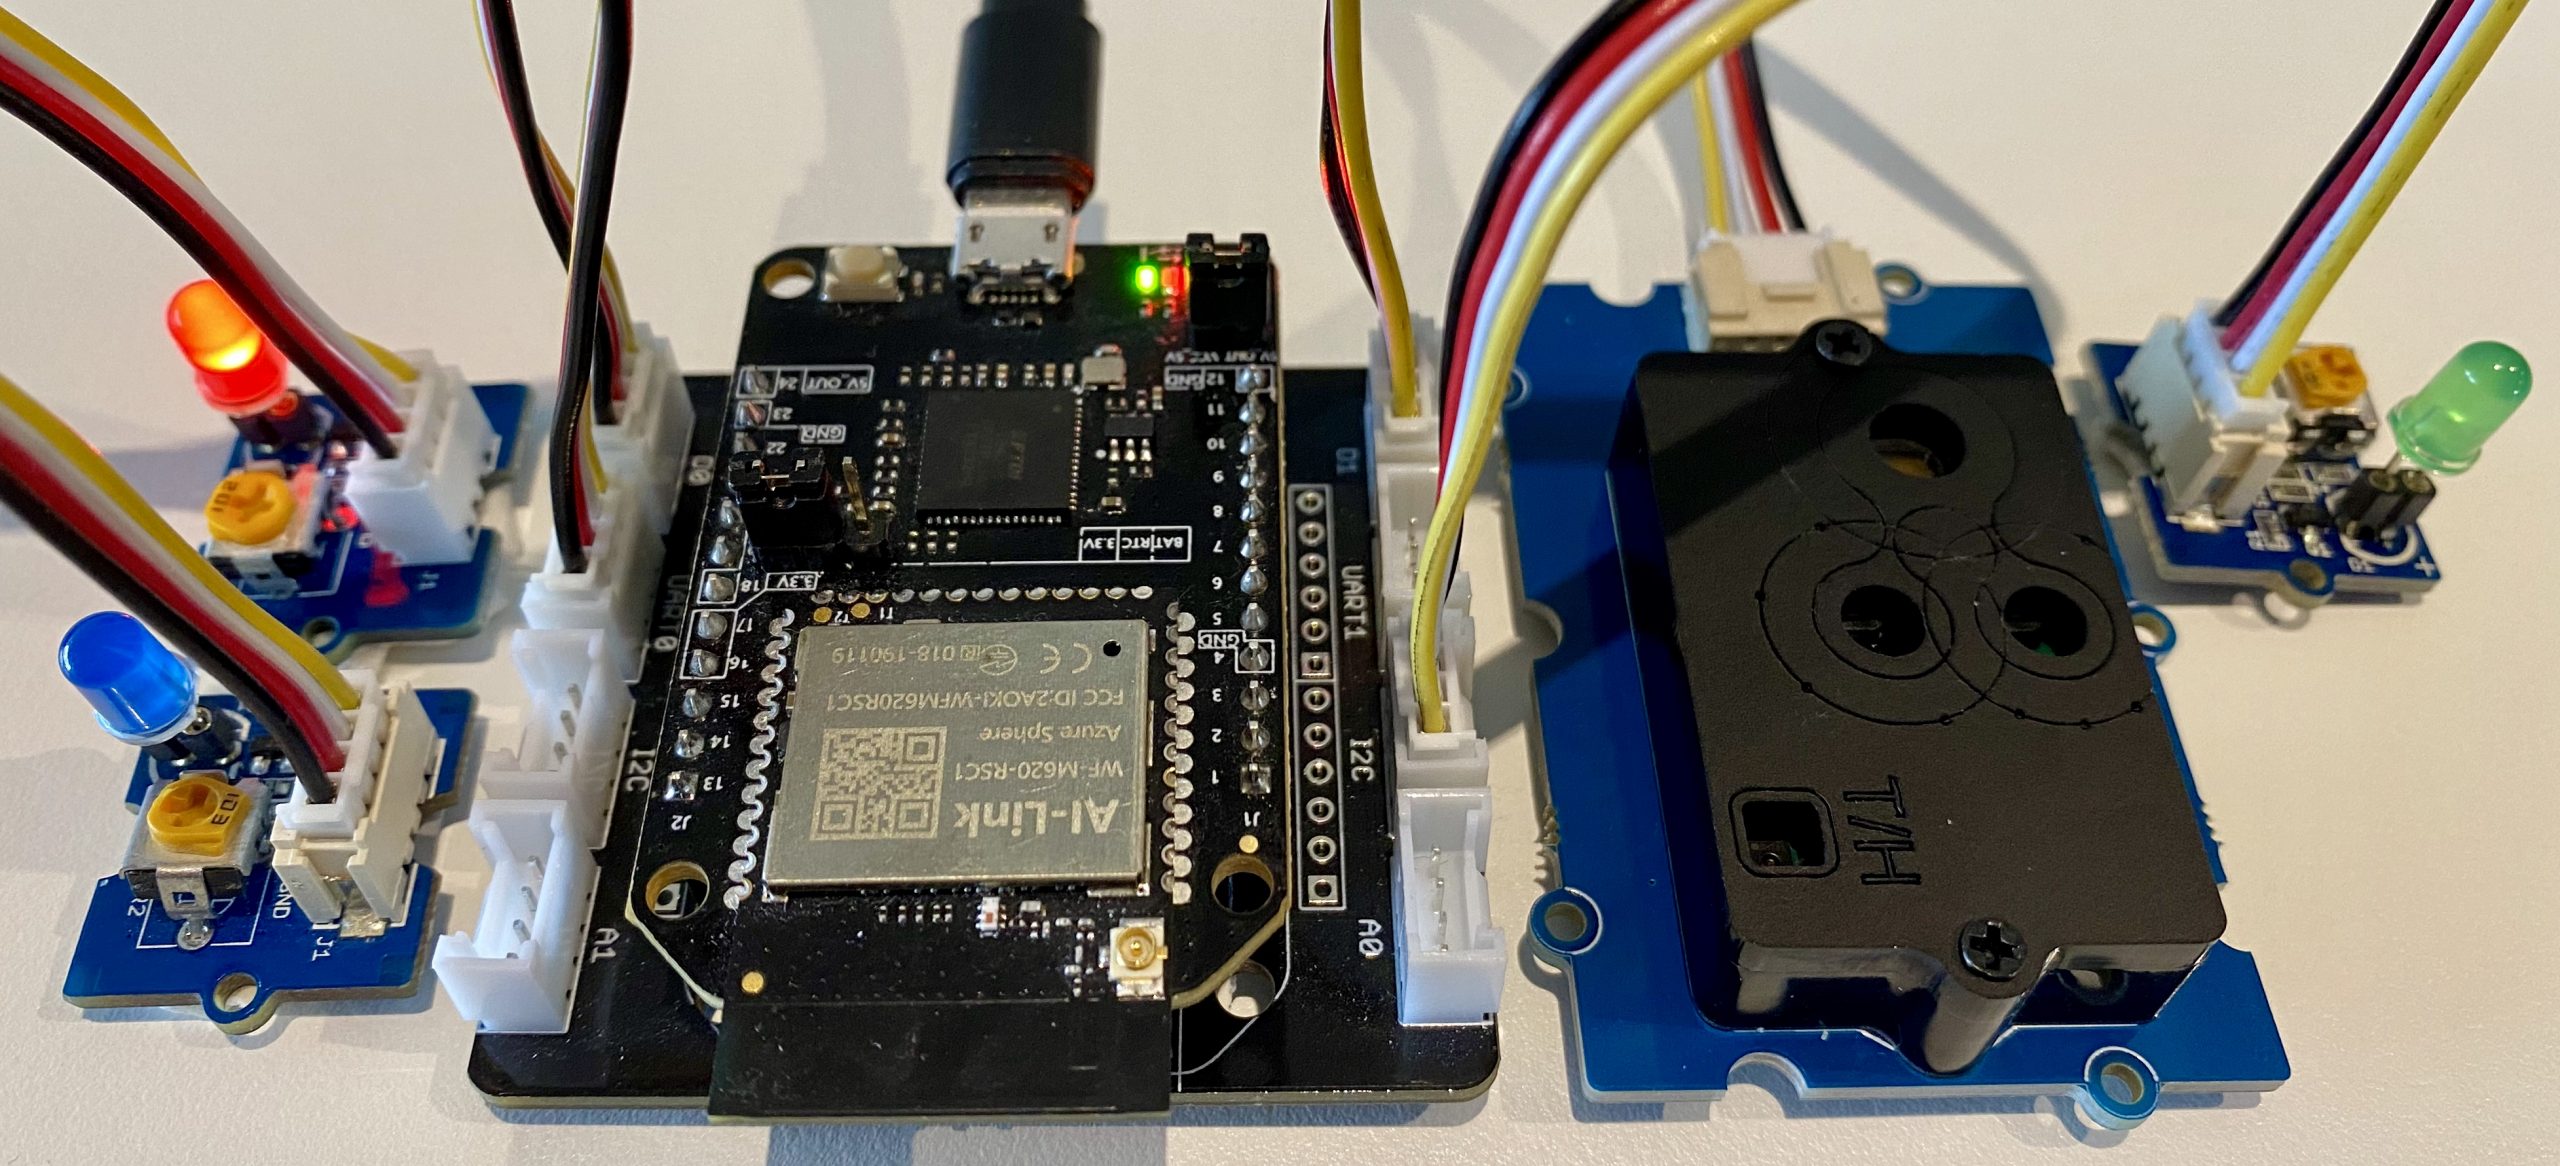
Connect Grove peripherals
Attach the Azure Sphere to the Grove Breakout board and plug in the following peripherals.
- Green LED plugged into Grove Socket D1
- Red LED plugged into Grove Socket D0
- Blue LED plugged into Grove Socket UART0
- CO2, Temperature, & Humidity sensor into Grove Socket I2C
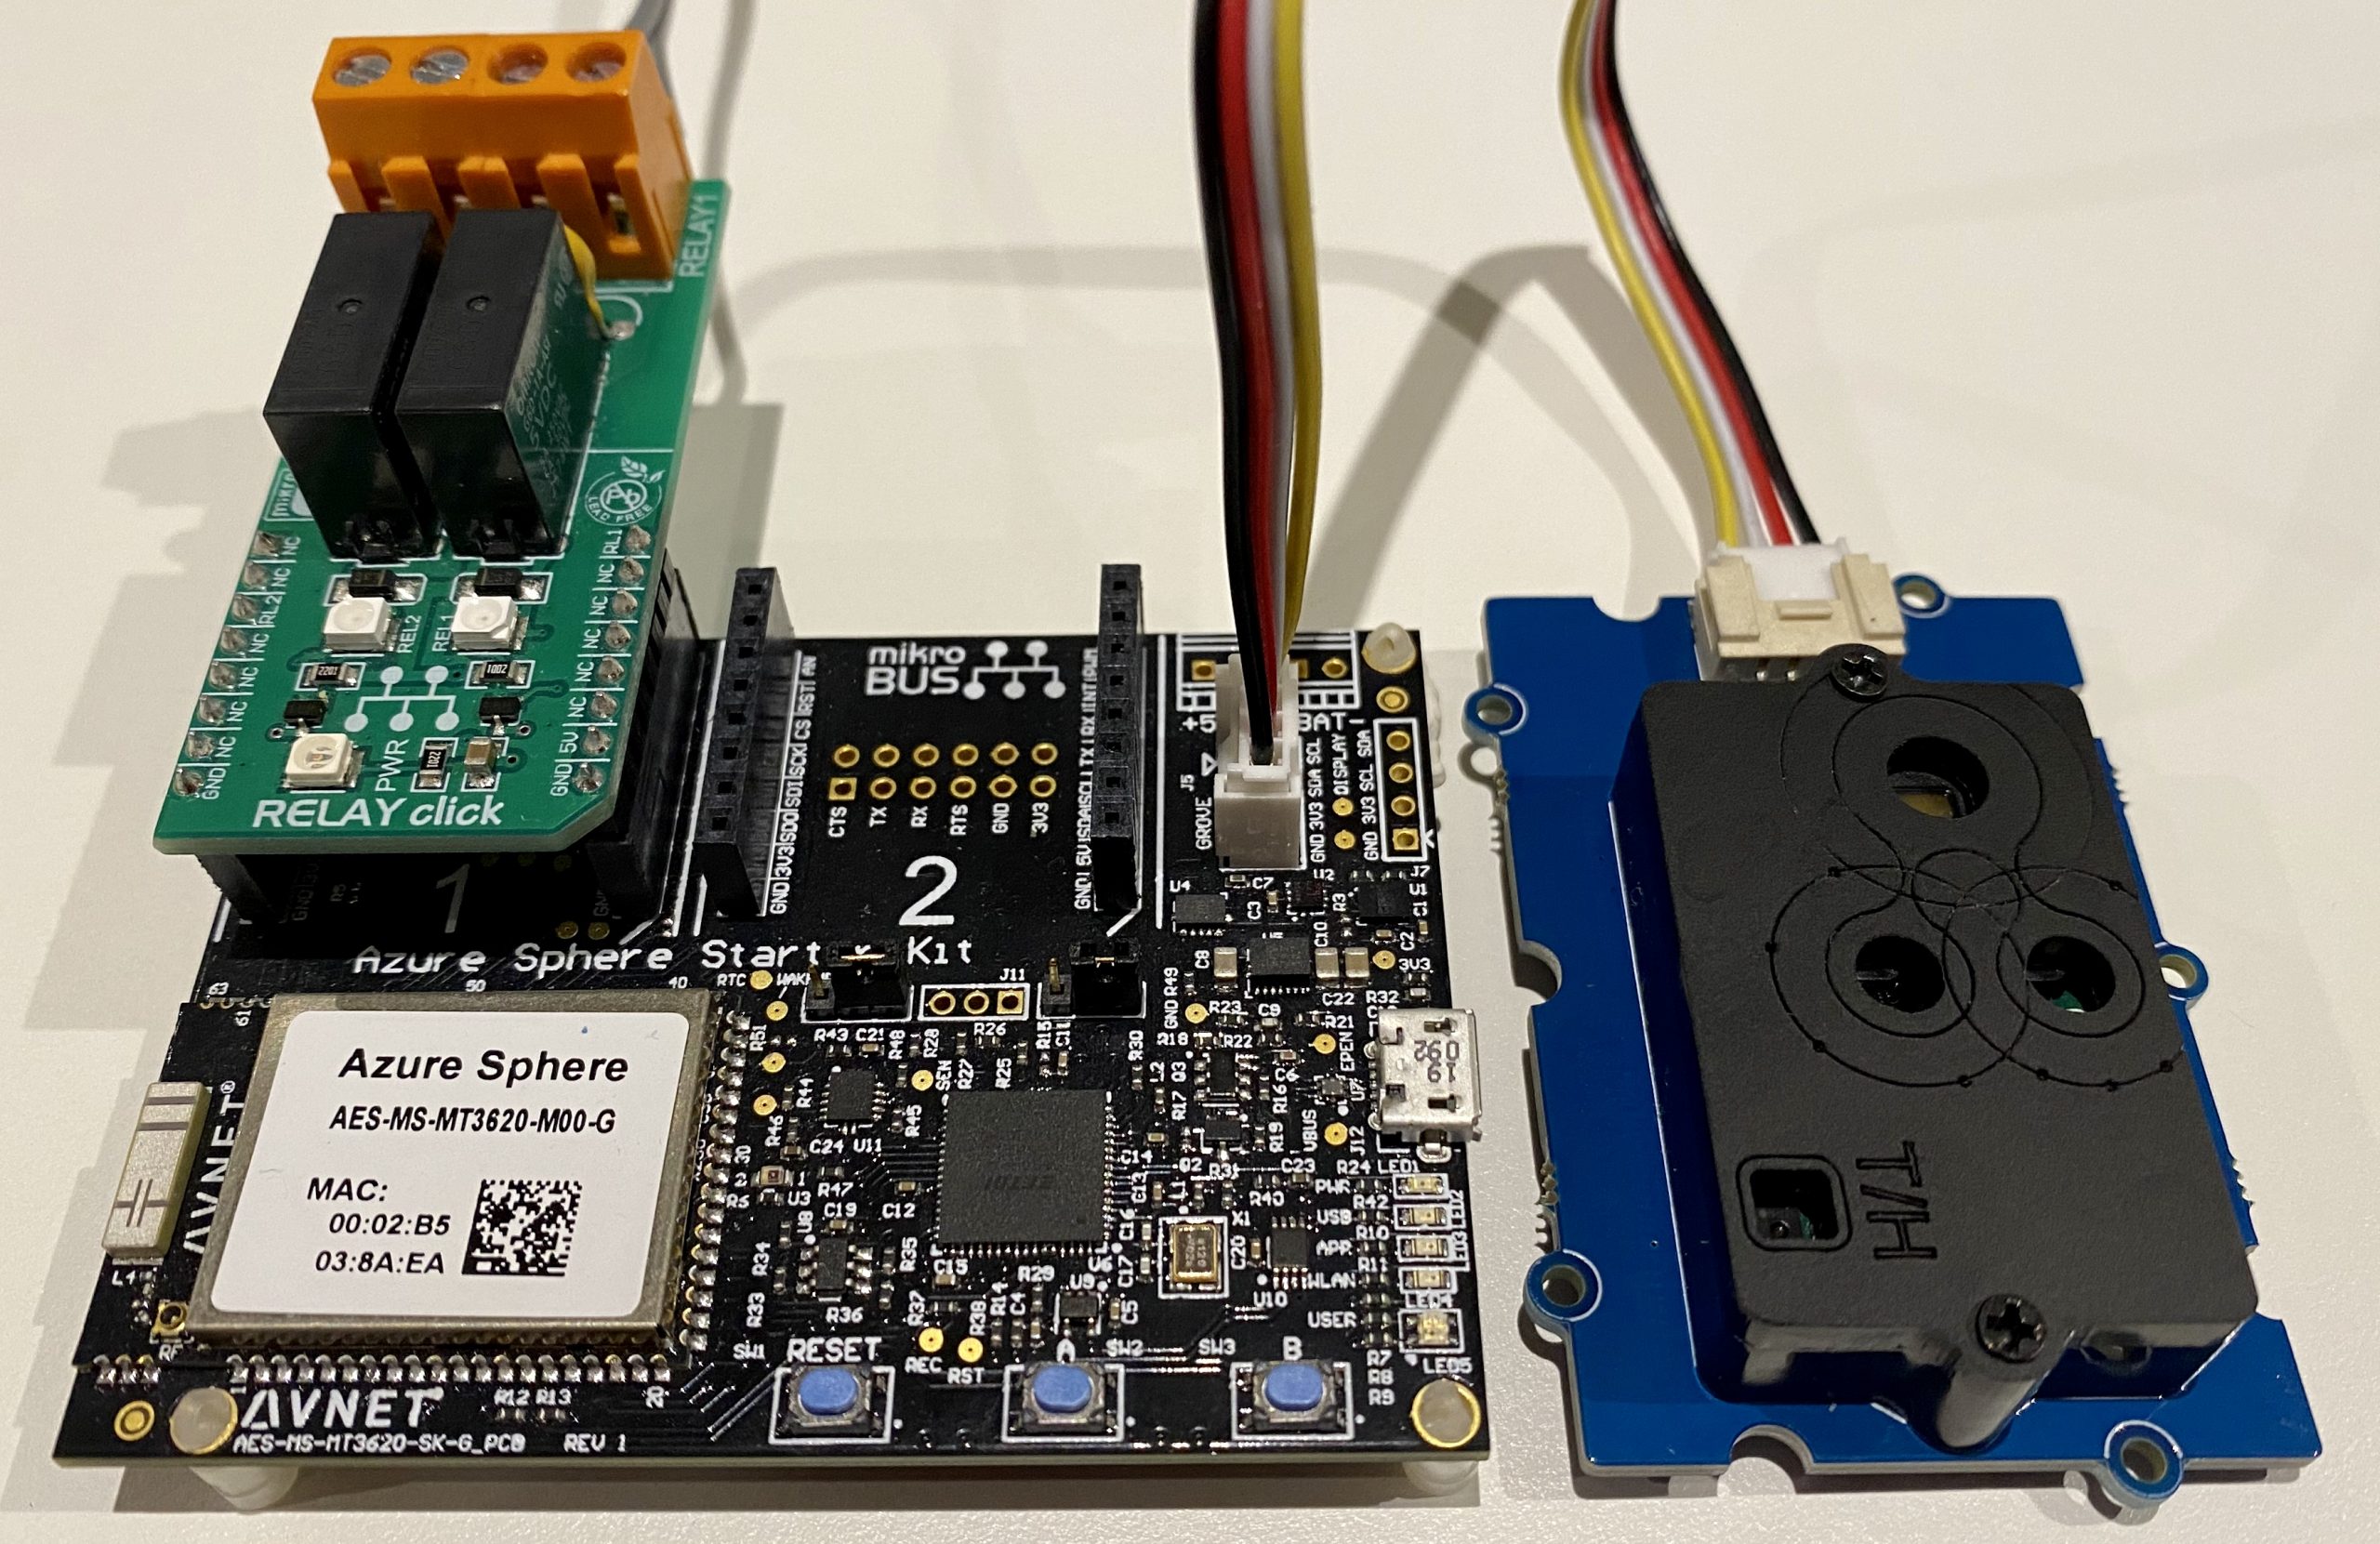
AVNET Azure Sphere Starter Kit
- AVNET Azure Sphere Starter Kit
- Seeed Studio Grove CO2 & Temperature & Humidity Sensor
- Optional, 1 x Click Relay to drive a bigger warning light.
Connect the Grove peripheral
- Plug the CO2, Temperature, & Humidity sensor into Grove Socket I2C on the AVNET Starter Kit.
Calibrating the SCD20 CO2 Sensor
IMPORTANT. Be sure to read up on calibrating the Grove – CO2 & Temperature & Humidity Sensor (SCD30) Calibration sensor. This solution will enable auto-calibration.
How to build the solution
Clone the Azure Sphere CO2 Monitor solution to your desktop.
git clone https://github.com/gloveboxes/Track-CO2-levels-in-your-workspace-to-improve-health-wellbeing-and-productivity.git azure-sphere-co2-monitor
Set up your developer tools and your Azure Sphere
Follow the Azure Sphere Developer Learning Path Lab Set Up to set up the developer tools, claim you Azure Sphere, and configure the device WiFi, and enable developer mode.
Azure IoT Central
Your Azure Sphere device can securely connect and communicate with cloud services. Azure Sphere includes built-in library support for both Azure IoT Hub and Azure IoT Central. This lab focuses on Azure IoT Central. Take a moment to read Your IoT journey: simplified and secure with Azure IoT Central and Azure Sphere.
Azure IoT Central provides an easy way to connect, monitor, and manage your Internet of Things (IoT) assets at scale.
Step 1: Create a new IoT Central Application
-
So the lab instructions are still visible, right mouse click, and open this link “Azure IoT Central” in a new window.
-
Click Build a solution.
-
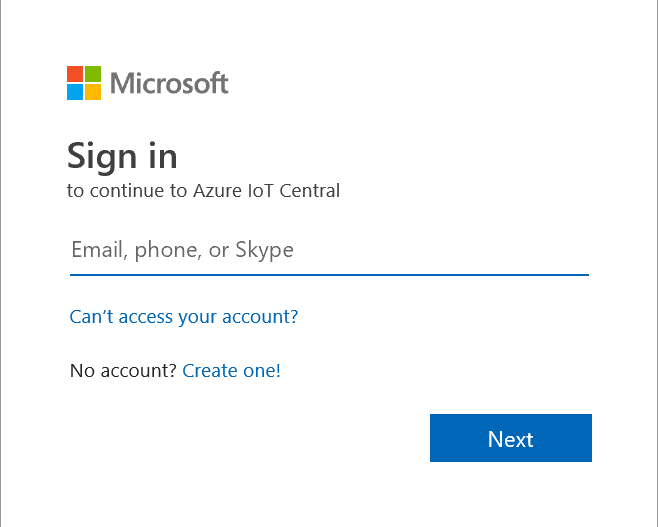
Next, you will need to sign with your Microsoft Personal, or Work, or School account. If you do not have a Microsoft account, then you can create one for free using the Create one! link.
-
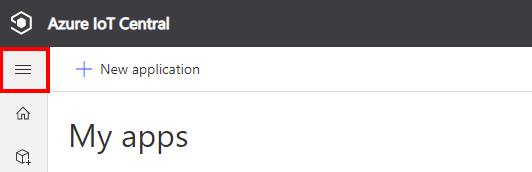
Expand the sidebar menu by clicking on the Burger menu icon.
-
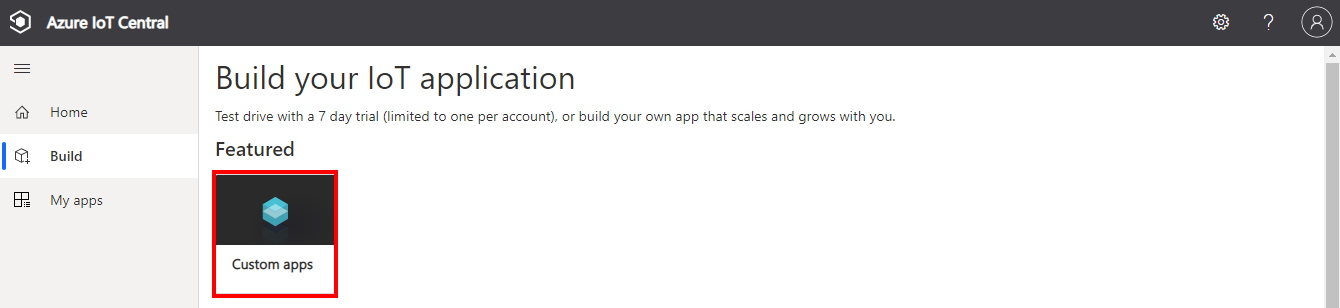
Click + New application to create a new Azure IoT Central application.
-
Select Custom app
Create a new application
-
Specify the Application name, the URL, select the Free pricing plan, and complete the registration form.
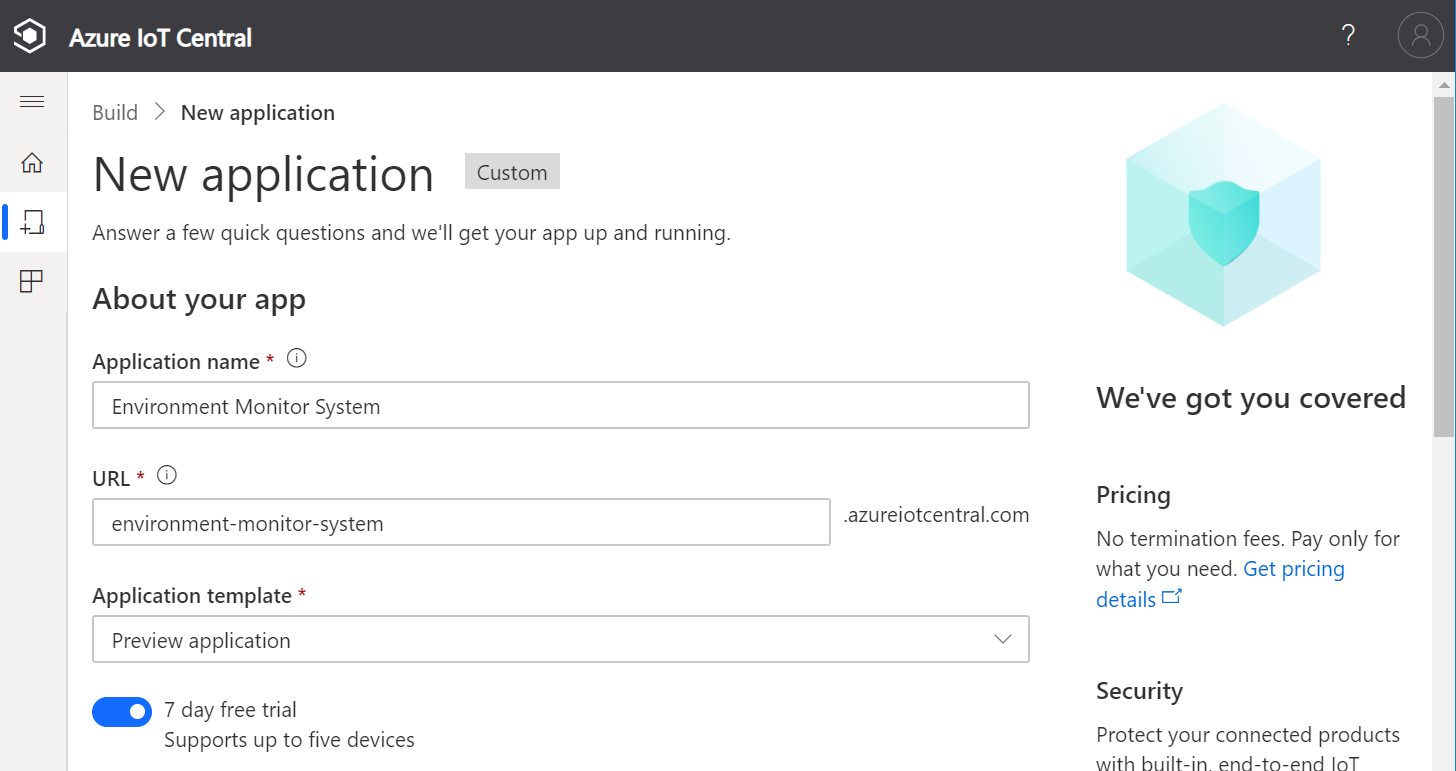
-
Then click Create.
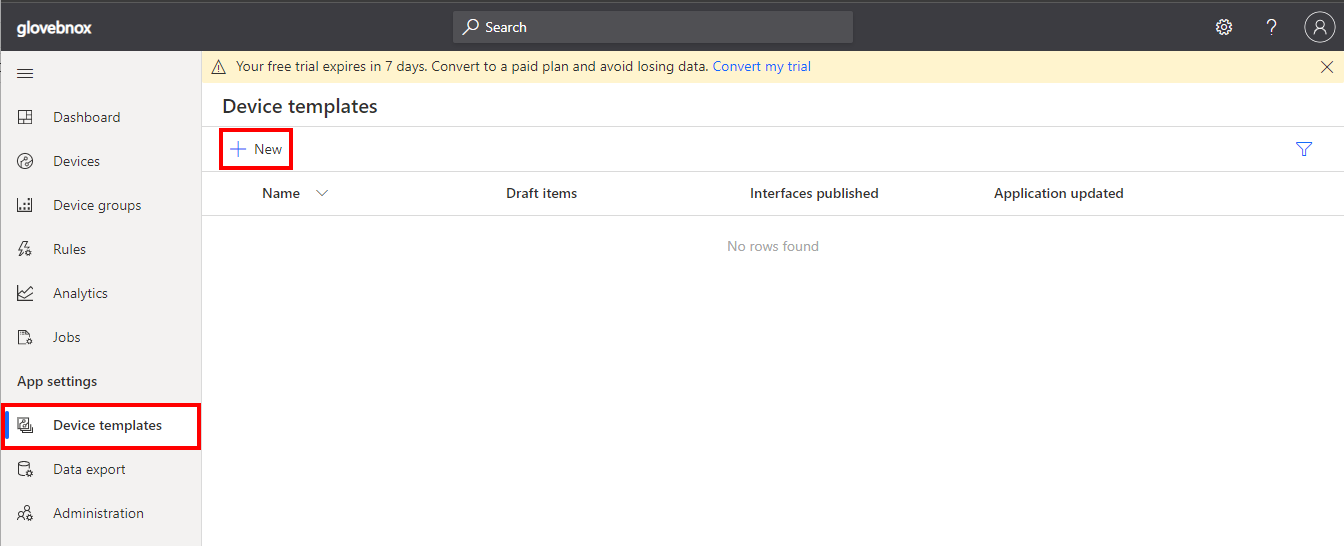
Create a new device template
A device template is a blueprint that defines the characteristics and behaviors of a type of device that connects to an Azure IoT Central application.
For more information on device templates, review the Define a new IoT device type in your Azure IoT Central application article.
-
Click Device templates, then + New.
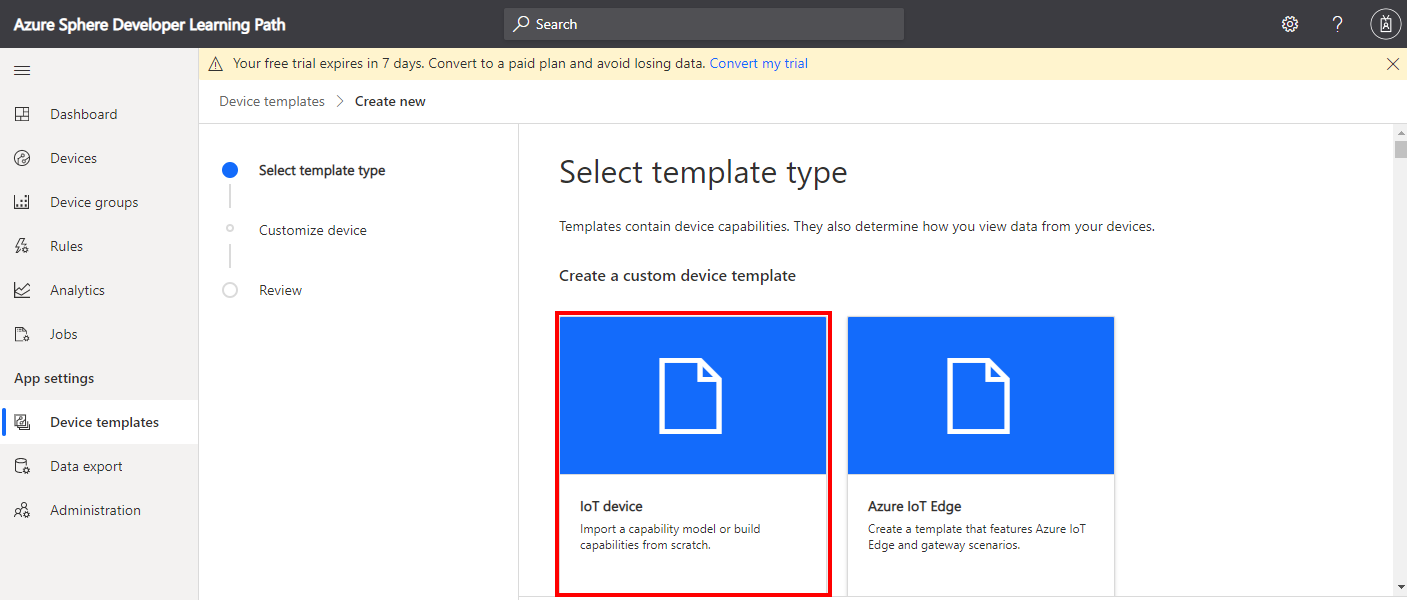
-
Click the IoT device template type.
-
Create an IoT Device Template.
- Select IoT device,
- Click Next:Customise,
- Name your template Carbon Dioxide Monitor,
- Click Next: Review,
- Click Create.
Import a Capability Model
- Click Import capability model
- Navigate to the folder you cloned the CO2 Monitor solution into.
- Navigate to the iot_central folder.
- Select CO2MonitorCapability_Model.json and open
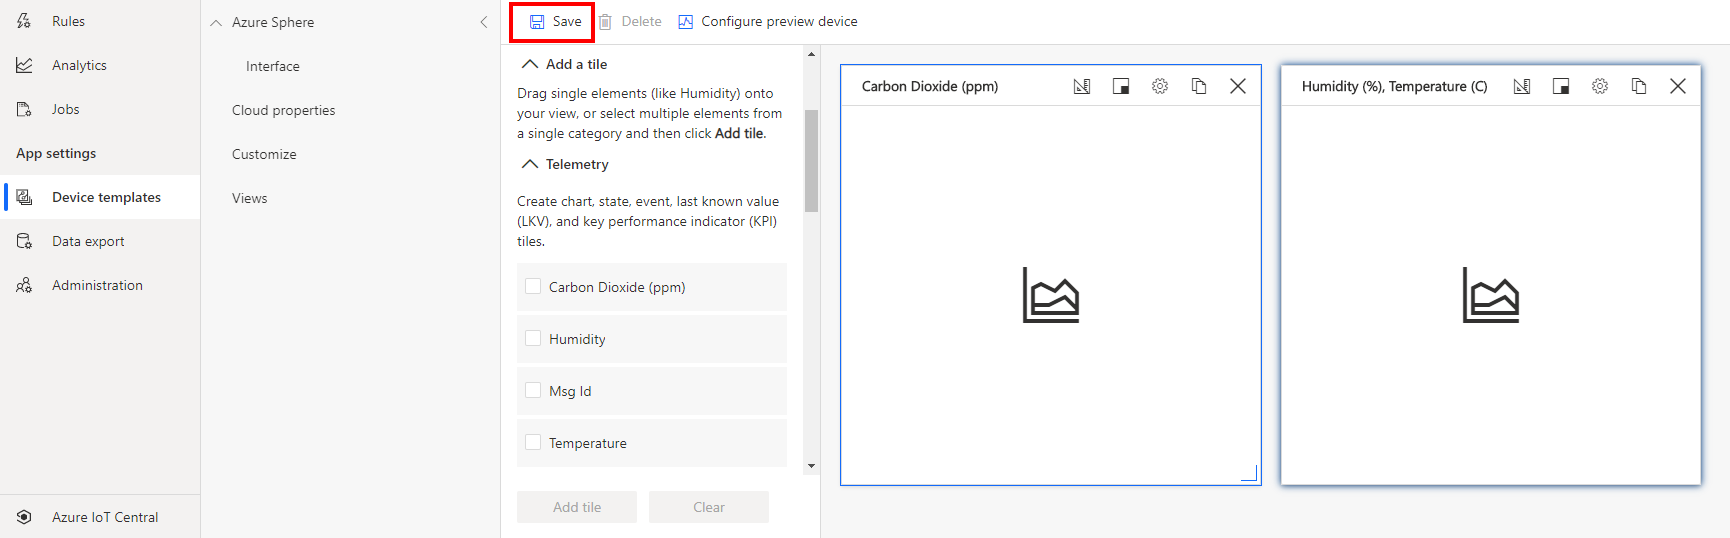
Create a device visualization view
- Click Views.

- Select Visualizing the device.
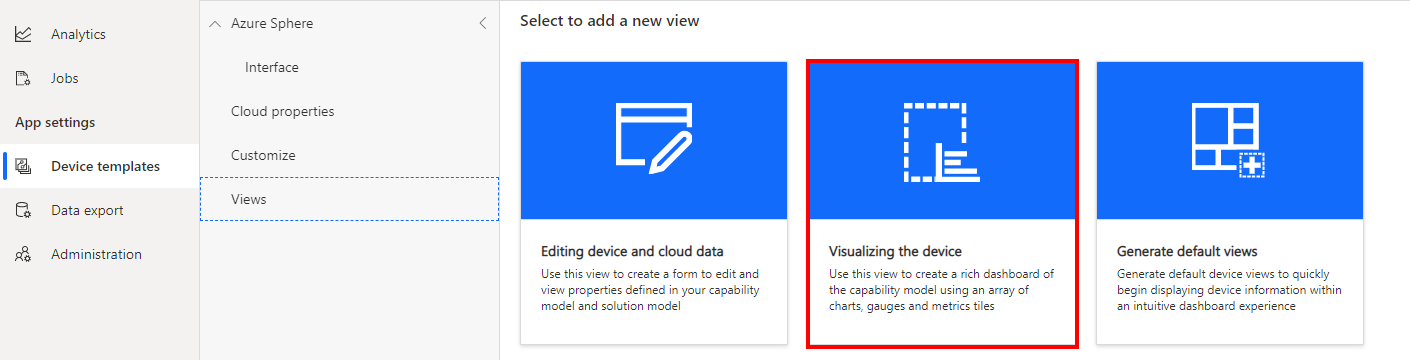
- Expand the Telemetry section
- Select Carbon Dioxide (ppm)
- Click Add Tile
- Select Humidity and Temperature telemetry items.
- Click Add Tile.
- Click Save to save the view.
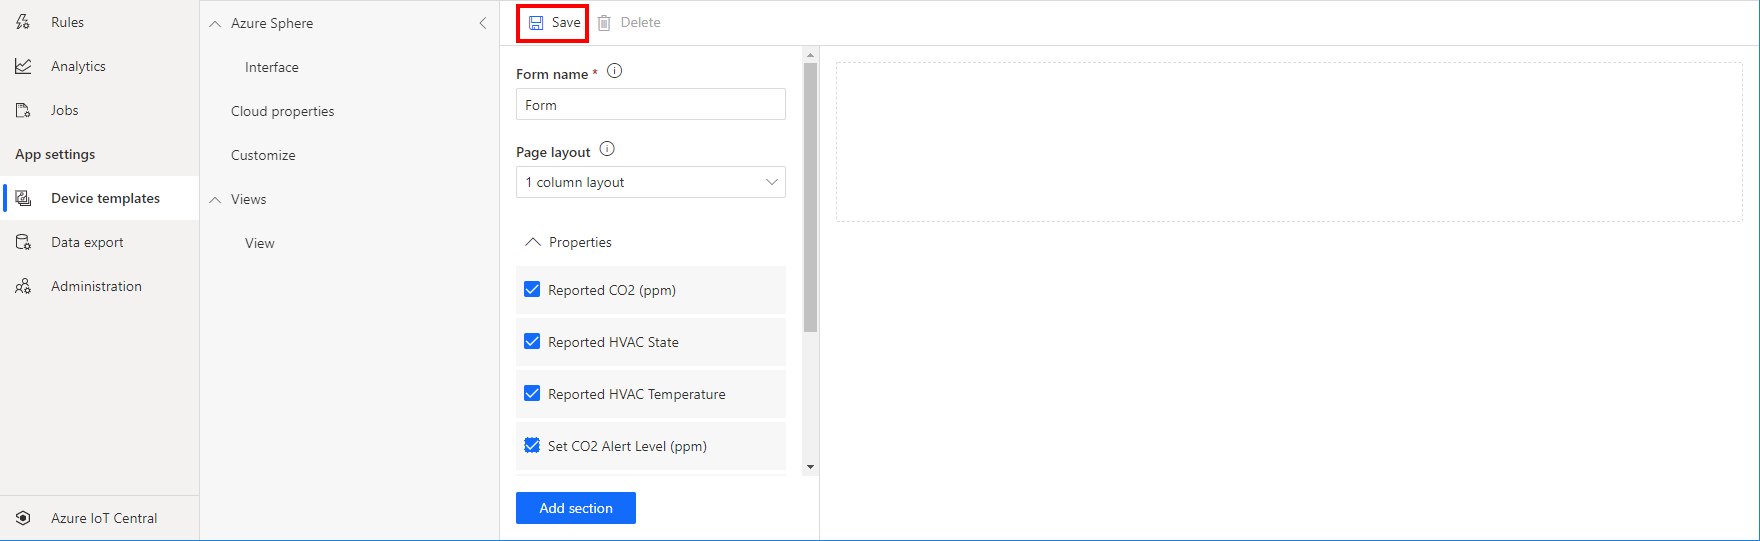
Create a properties form
- Click Views.
- Click the Editing device and cloud data option.

- Expand the Properties section.
- Select all properties.
- Click Add Section.
- Click Save to save the form.
Publish the device template
-
Click Publish to publish the template. Publishing the template makes it available for devices.

-
Next, confirm and click Publish
See Define a new IoT device type in your Azure IoT Central application for information on creating your own device templates.
Step 2: Link your Azure Sphere Tenant to IoT Central
You need to set up a trust relationship between your Azure Sphere tenant and your IoT Central application.
Devices claimed by your Azure Sphere tenant will be automatically enrolled when it first connects to your IoT Central application.
Download the tenant authentication CA certificate
- Open an Azure Sphere Developer Command Prompt
- Be sure to make a note of the current directory, or change to the CO2 Monitor directory. You will need the name of this directory in the next step.
-
Download the Certificate Authority (CA) certificate for your Azure Sphere tenant:
azsphere tenant download-CA-certificate --output CAcertificate.cerThe output file must have the .cer extension.
Upload the tenant CA certificate to Azure IoT Central and generate a verification code
-
In Azure IoT Central, go to Administration > Device Connection > Manage primary certificate.
-
Click the folder icon next to the Primary box and navigate to the directory where you downloaded the certificate. If you don’t see the .cer file in the list, make sure that the view filter is set to All files (*). Select the certificate and then click the gear icon next to the Primary box.
-
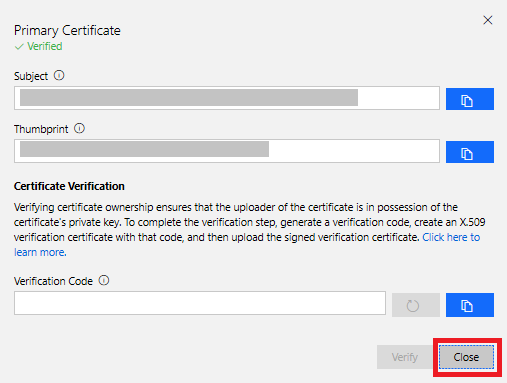
The Primary Certificate dialog box appears. The Subject and Thumbprint fields contain information about the current Azure Sphere tenant and primary root certificate.
-
Click the Refresh icon to the right of the Verification Code box to generate a verification code. Copy the verification code to the clipboard.

Verify the tenant CA certificate
-
Return to the Azure Sphere Developer Command Prompt.
-
Download a validation certificate that proves that you own the tenant CA certificate. Replace code in the command with the verification code from the previous step.
azsphere tenant download-validation-certificate --output ValidationCertification.cer --verificationcode <code> - The Azure Sphere Security Service signs the validation certificate with the verification code to prove that you own the CA.
Use the validation certificate to verify the tenant identity
- Return to Azure IoT Central and click Verify.
-
When prompted, navigate to the validation certificate that you downloaded in the previous step and select it. When the verification process is complete, the Primary Certificate dialog box displays the Verified message. Click Close to dismiss the box.
After you complete these steps, any device that is claimed into your Azure Sphere tenant will automatically be enrolled in your Azure IoT Central application when it first connects.
Step 3: Explicitly allow connections to Azure IoT Central Endpoints
Remember, applications on Azure Sphere are locked down by default, including hardware and network endpoints. You must explicitly allow connections to the network endpoints of your Azure IoT Central application otherwise your Azure Sphere application will not be able to connect.
Follow these steps:
- Open the Azure Sphere Developer Command Prompt.
-
Navigate to the Samples -> AzureIoT -> Tools directory. You cloned the Azure Sphere samples repository in the first lab.
- On Windows, navigate to the SamplesAzureIoTToolswin-x64 directory.
- On Linux, navigate to the SamplesAzureIoTToolslinux-x64 directory. On Linux, you may need to explicitly set execution permissions for the ShowIoTCentralConfig tool. From a terminal, run
chmod +x ShowIoTCentralConfigto add execution permissions for the tool.
-
When you run the ShowIoTCentralConfig tool, you will be prompted for input data. The following table outlines what information you will be prompted for and where to obtain the required data.
Input data From Are you using a legacy (2018) IoT Central application (Y/N) Respond N IoT Central App URL This can be found in your browser address bar. For Example https://myiotcentralapp.azureiotcentral.com/ API token This can be generated from your IoT Central application. In the Azure IoT Central application select Administration, select API Tokens, select Generate Token, provide a name for the token (for example, “AzureSphereSample”), select Administrator as the role, and click Generate. Copy the token to the clipboard. The token starts with SharedAccessSignature. ID Scope In the Azure IoT Central application, select Administration > Device Connection and then copy the ID Scope -
Run the ShowIoTCentralConfig tool. Now follow the prompts that the tool provides, and copy the information from the output into the app_manifest.json file in Visual Studio.
Note: Your organization might require consent for the ShowIoTCentralConfig tool to access your Azure IoT Central data in the same way that the Azure API requires such consent. In some organizations, enterprise application permissions must be granted by an IT administrator.
-
Review the output from the ShowIoTCentralConfig tool. It will look similar to the following text.
Find and modify the CmdArgs, AllowedConnections and DeviceAuthentication lines in your app_manifest.json so each includes the content from the below:
"CmdArgs": [ "0ne000BDC00" ], "Capabilities": { "AllowedConnections": [ "global.azure-devices-provisioning.net", "iotc-9999bc-3305-99ba-885e-6573fc4cf701.azure-devices.net", "iotc-789999fa-8306-4994-b70a-399c46501044.azure-devices.net", "iotc-7a099966-a8c1-4f33-b803-bf29998713787.azure-devices.net", "iotc-97299997-05ab-4988-8142-e299995acdb7.azure-devices.net", "iotc-d099995-7fec-460c-b717-e99999bf4551.azure-devices.net", "iotc-789999dd-3bf5-49d7-9e12-f6999991df8c.azure-devices.net", "iotc-29999917-7344-49e4-9344-5e0cc9999d9b.azure-devices.net", "iotc-99999e59-df2a-41d8-bacd-ebb9999143ab.azure-devices.net", "iotc-c0a9999b-d256-4aaf-aa06-e90e999902b3.azure-devices.net", "iotc-f9199991-ceb1-4f38-9f1c-13199992570e.azure-devices.net" ], "DeviceAuthentication": "--- YOUR AZURE SPHERE TENANT ID---", } -
Copy the output from the ShowIoTCentralConfig tool to Notepad as you will need this information soon.
Step 4: Get the Azure Sphere Tenant ID
We need the ID of the Azure Sphere Tenant that is now trusted by Azure IoT Central.
- From the Azure Sphere Developer Command Prompt, run
azsphere tenant show-selected.- The output of this command will look similar to the following.
text

Default Azure Sphere tenant ID is 'yourSphereTenant' (99999999-e021-43ce-9999-fa9999499994).
- The Tenant ID is the numeric value inside the parentheses.
- The output of this command will look similar to the following.
- Copy the Tenant ID to Notepad as you will need it soon.
Open the CO2 Monitor solution
Step 1: Start Visual Studio Code
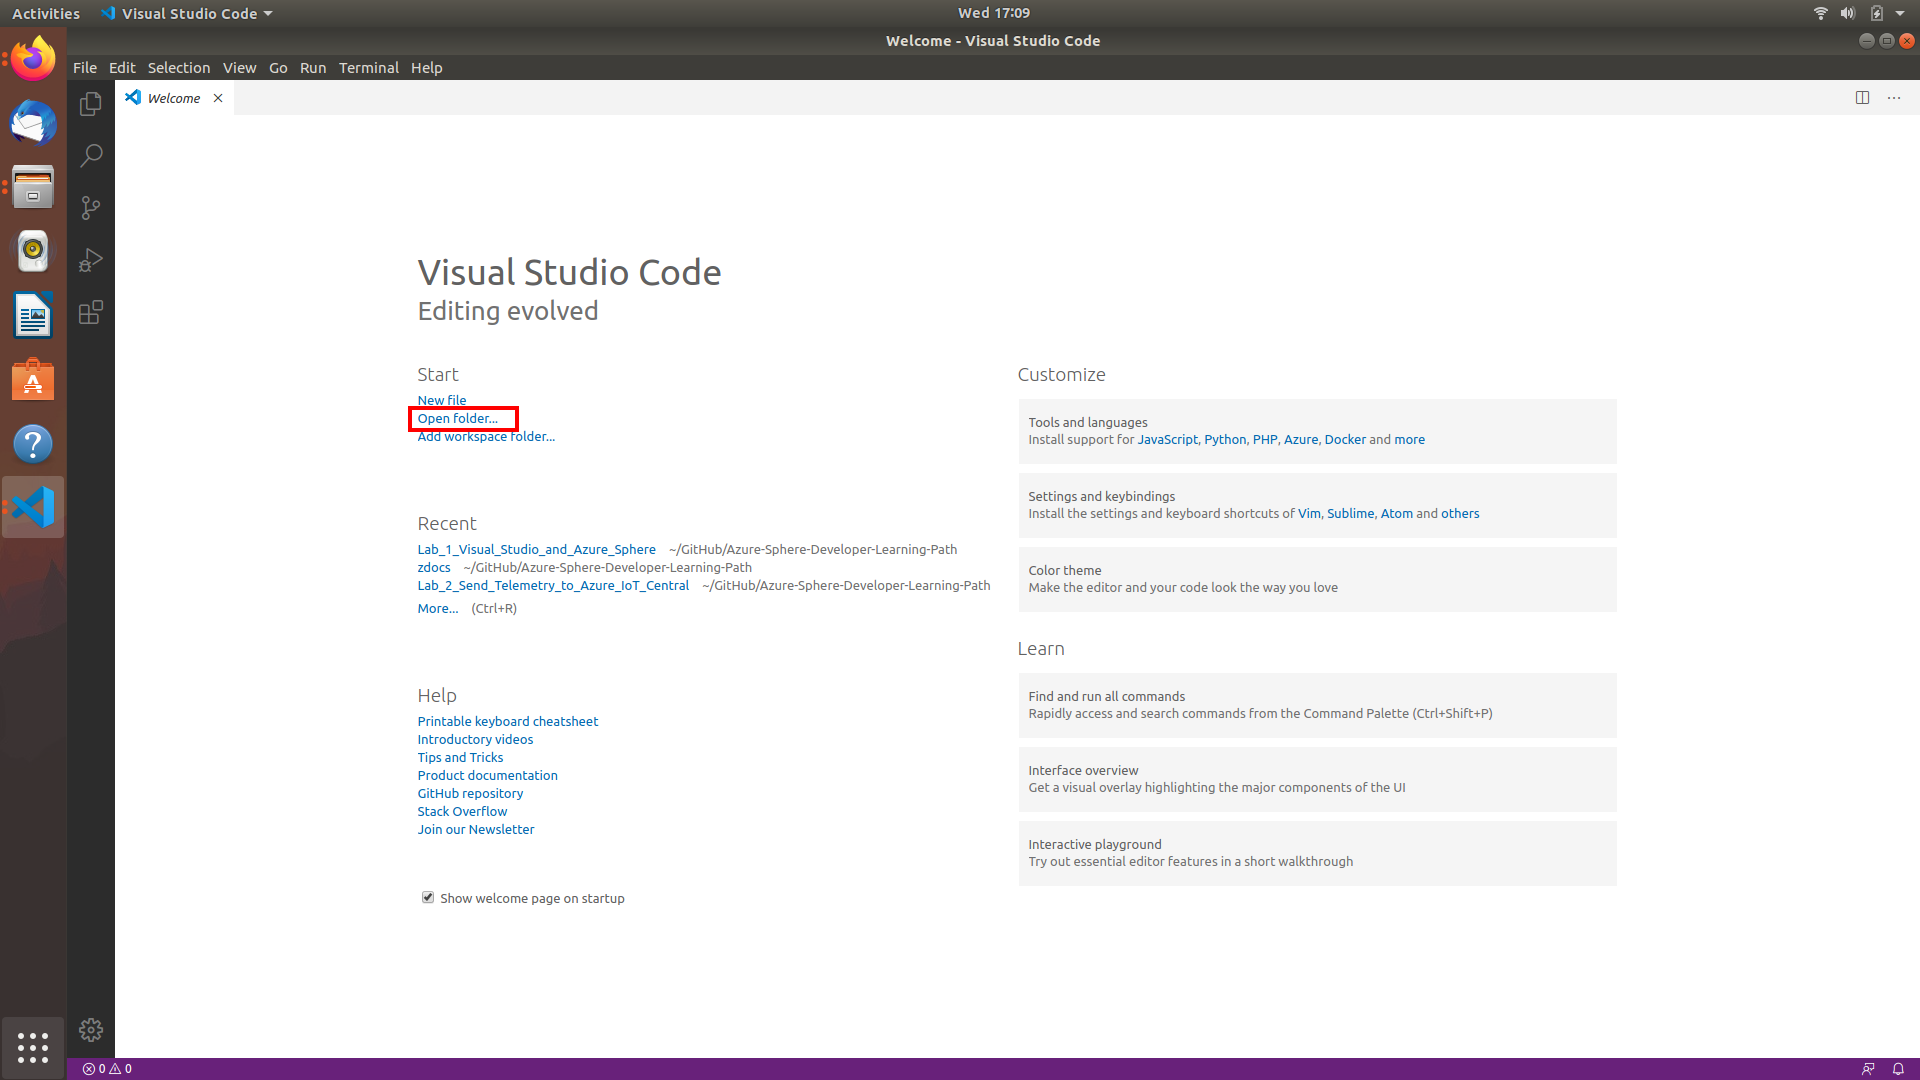
Step 2: Open the lab project
- Click Open folder.
- Open the azure-sphere-co2-monitor solution folder.
- Open the co2-monitor folder.
- Click Select Folder or the OK button to open the project.
Step 3: Set your developer board configuration
This solution supports the AVNET Starter Kit and the Seeed Studio Mini Dev Board with the Grove Breakout. You need to set the configuration that matches your developer board.
The default developer board configuration is for the AVENT Azure Sphere Starter Kit. If you have this board, there is no additional configuration required.
- Open CMakeList.txt
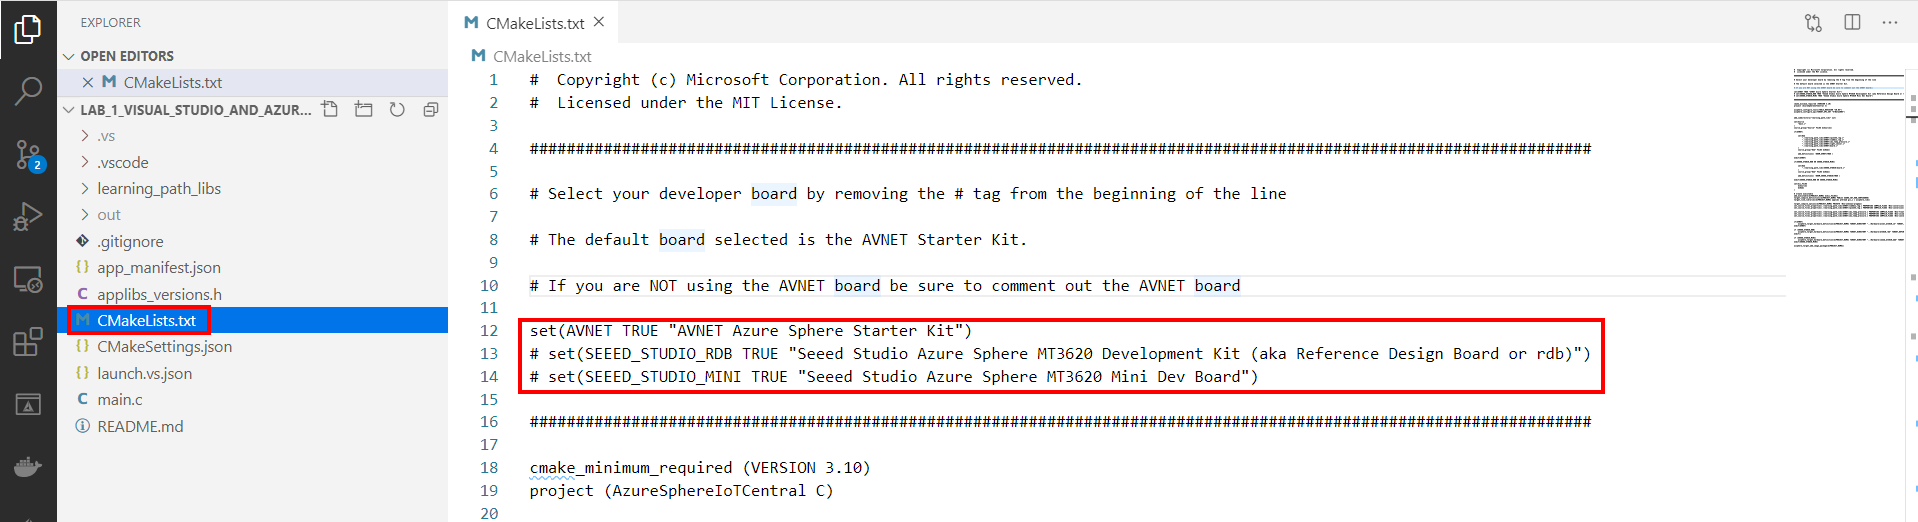
- Add a # at the beginning of the set AVNET line to disable it.
-
Uncomment the set command that corresponds to your Azure Sphere developer board.
set(AVNET TRUE "AVNET Azure Sphere Starter Kit") # set(SEEED_STUDIO_RDB TRUE "Seeed Studio Azure Sphere MT3620 Development Kit (aka Reference Design Board or rdb)") # set(SEEED_STUDIO_MINI TRUE "Seeed Studio Azure Sphere MT3620 Mini Dev Board") -
Save the file. This will auto-generate the CMake cache.
Step 4: Configure the Azure Sphere Application
-
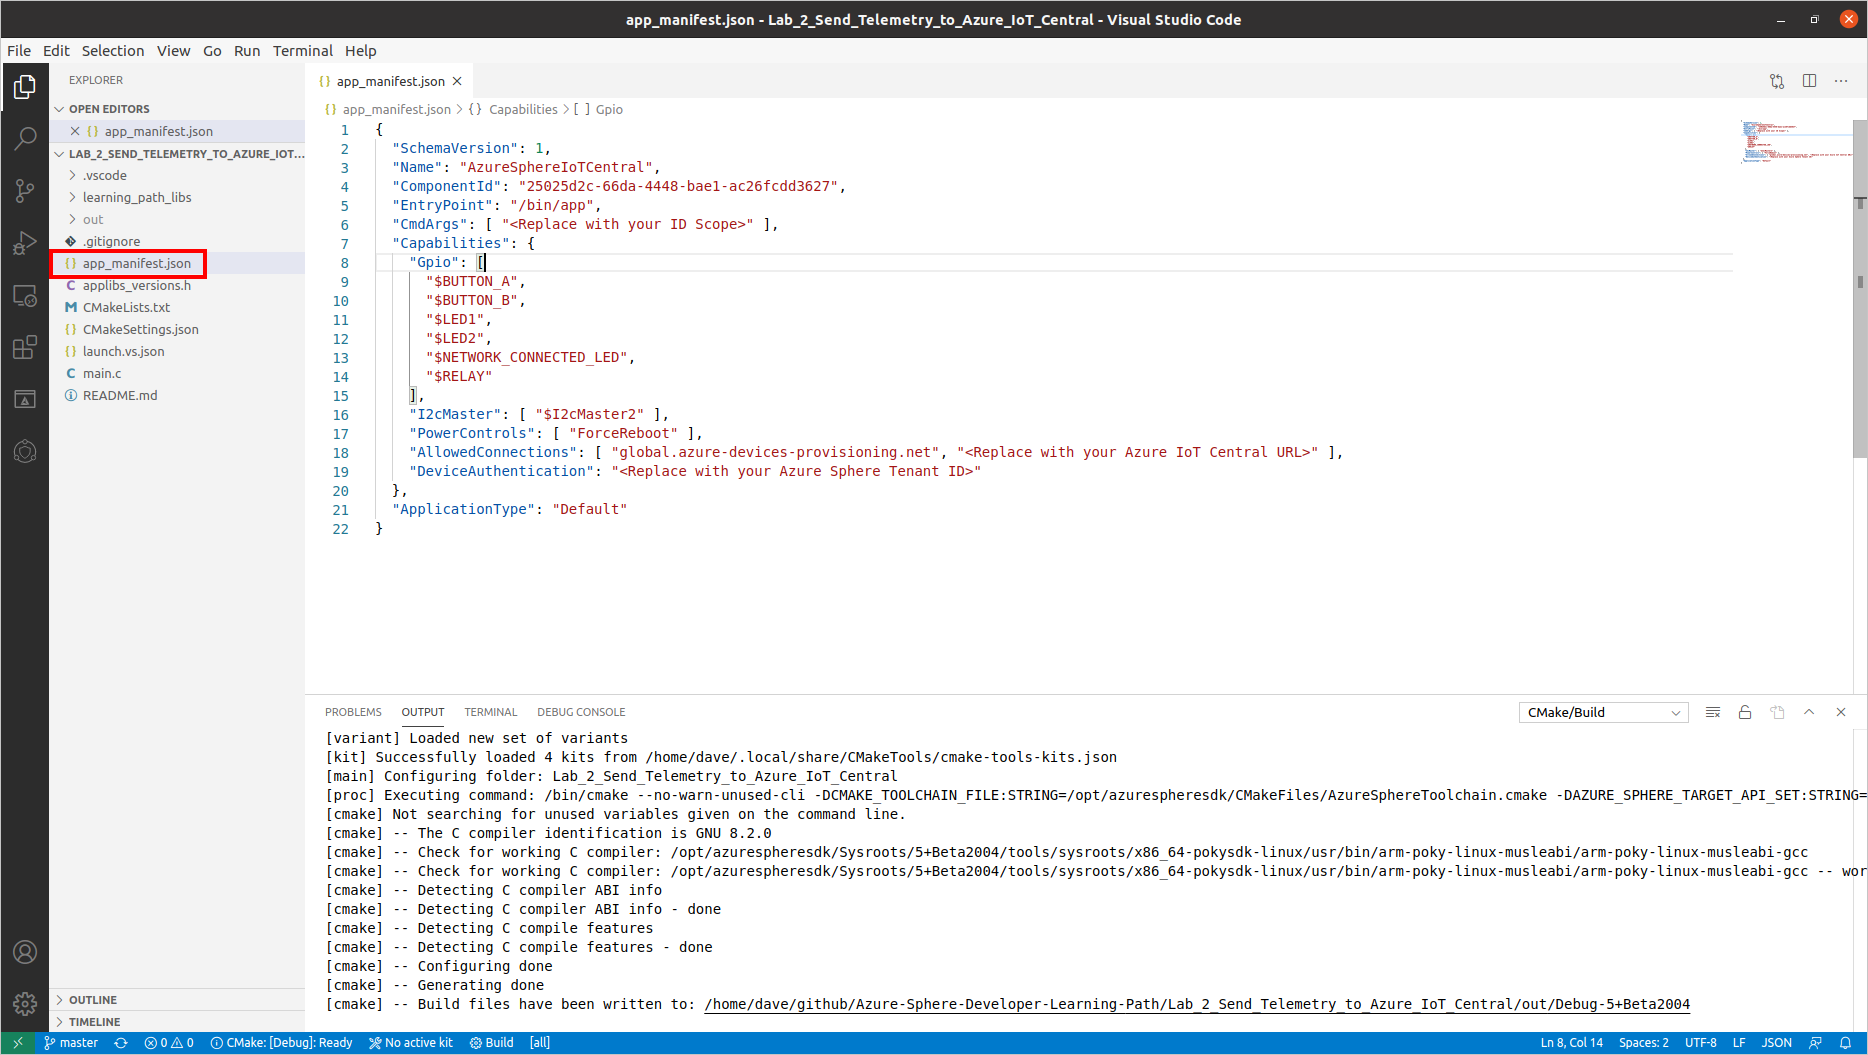
Open the app_manifest.json file
-
Update the Azure IoT Central Application connection properties.
- Update CmdArgs with your Azure IoT Central ID Scope.
- Update DeviceAuthentication with your Azure Sphere Tenant ID. Remember, this was the numeric value output from the
azsphere tenant show-selectedcommand that you copied to Notepad.
-
Update the network endpoints AllowedConnections with your Azure IoT Central Application endpoint URLs you copied to Notepad.
-
Review your updated manifest_app.json file. It should look similar to the following.
{
    "SchemaVersion": 1,
    "Name": "AzureSphereIoTCentral",
    "ComponentId": "25025d2c-66da-4448-bae1-ac26fcdd3627",
    "EntryPoint": "/bin/app",
    "CmdArgs": [ "0ne0099999D" ],
    "Capabilities": {
        "Gpio": [
            "$BUTTON_A",
            "$BUTTON_B",
            "$LED2",
            "$NETWORK_CONNECTED_LED",
            "$LED_RED",
            "$LED_GREEN",
            "$LED_BLUE"
        ],
        "I2cMaster": [ "$I2cMaster2" ],
        "PowerControls": [ "ForceReboot" ],
        "AllowedConnections": [
            "global.azure-devices-provisioning.net",
            "iotc-9999bc-3305-99ba-885e-6573fc4cf701.azure-devices.net",
            "iotc-789999fa-8306-4994-b70a-399c46501044.azure-devices.net",
            "iotc-7a099966-a8c1-4f33-b803-bf29998713787.azure-devices.net",
            "iotc-97299997-05ab-4988-8142-e299995acdb7.azure-devices.net",
            "iotc-d099995-7fec-460c-b717-e99999bf4551.azure-devices.net",
            "iotc-789999dd-3bf5-49d7-9e12-f6999991df8c.azure-devices.net",
            "iotc-29999917-7344-49e4-9344-5e0cc9999d9b.azure-devices.net",
            "iotc-99999e59-df2a-41d8-bacd-ebb9999143ab.azure-devices.net",
            "iotc-c0a9999b-d256-4aaf-aa06-e90e999902b3.azure-devices.net",
            "iotc-f9199991-ceb1-4f38-9f1c-13199992570e.azure-devices.net"
        ],
        "DeviceAuthentication": "9d7e79eb-9999-43ce-9999-fa8888888894"
    },
    "ApplicationType": "Default"
}
Deploying the Application to Azure Sphere
Step 1: Start the app build deploy process
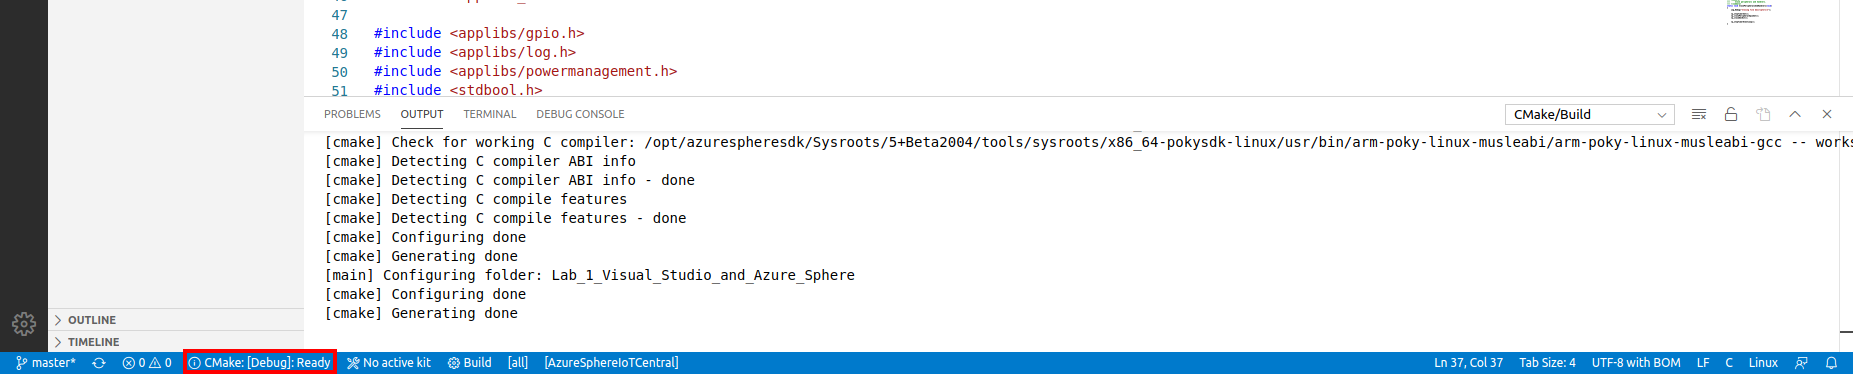
- Ensure main.c is open.
-
Select CMake: [Debug]: Ready from the Visual Studio Code Status Bar.
-
From Visual Studio Code, press F5 to build, deploy, start, and attached the remote debugger to the application now running the Azure Sphere device.
Step 2: View debugger output
-
Open the Visual Studio Code Output tab to view the output from Log_Debug statements in the code.
Pro Tip. You can open the output window by using the Visual Studio Code Ctrl+K Ctrl+H shortcut or click the Output tab.
- You will see the device negotiating security, and then it will start sending telemetry to Azure IoT Central.
You may see a couple of ERROR: failure to create IoTHub Handle messages displayed. These messages occur while the connection to IoT Central is being negotiated.
Expected Device Behaviour
Avnet Azure Sphere MT3620 Starter Kit
- The yellow WLAN LED will turn on when a connection is established with IoT Central.
- The RBG will turn red or blue depending on HVAC Temperature you set in IoT Central.
- The App Status LED will turn on if the CO2 level exceeds the CO2 alert level set in IoT Central.
Seeed Studio MT3620 Mini Dev Board
- The yellow User LED will turn on when a connection is established with IoT Central.
- The red or blue LED will turn depending on HVAC Temperature you set in IoT Central.
- The green LED will turn on if the CO2 level exceeds the CO2 alert level set in IoT Central.
Step 3: View the device telemetry on the Azure IoT Central Dashboard
- Switch back to Azure IoT Central in your web browser.
- You need to wait a minute or two before your Azure Sphere device is automatically enrolled.
- The newly enrolled device will have a numeric name that matches your Azure Sphere Device ID.
-
To display your Azure Sphere Device ID, start the Azure Sphere Developer Command Prompt and run the following command.
azsphere device show-attached
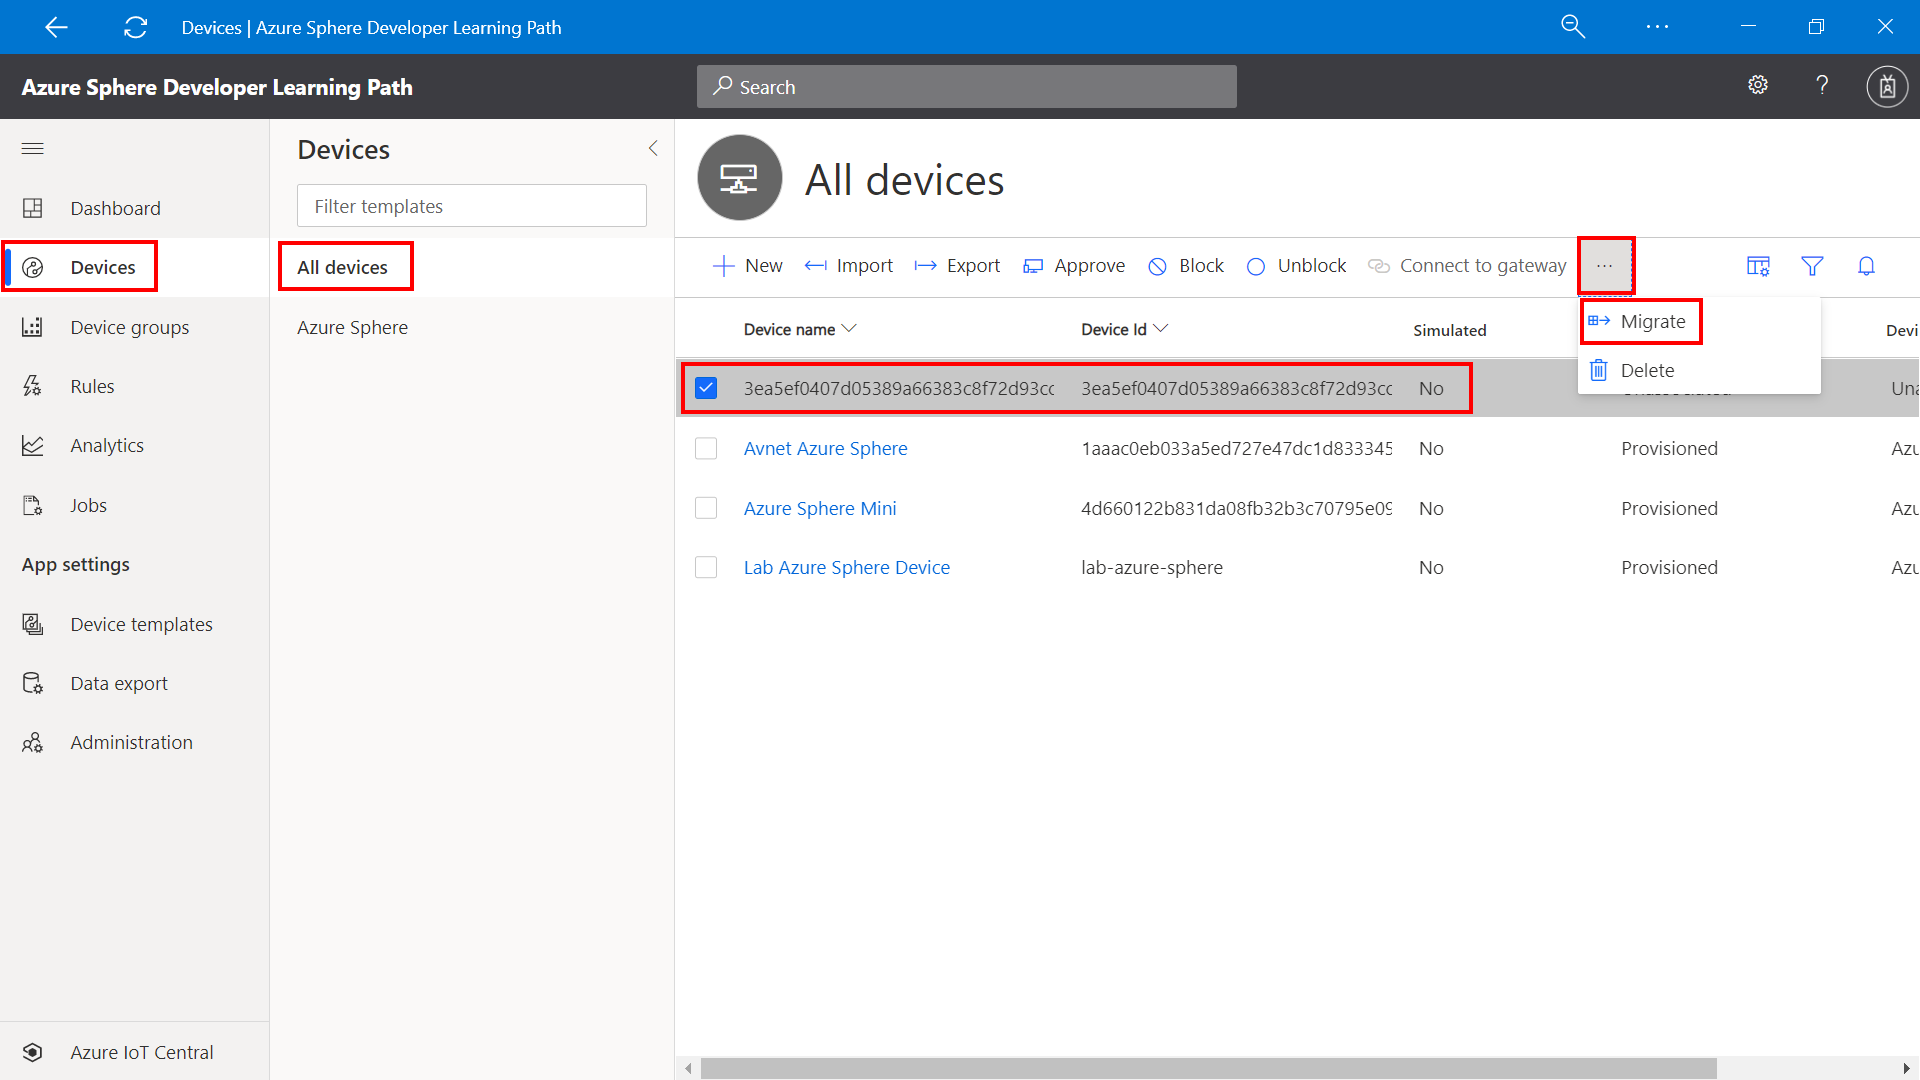
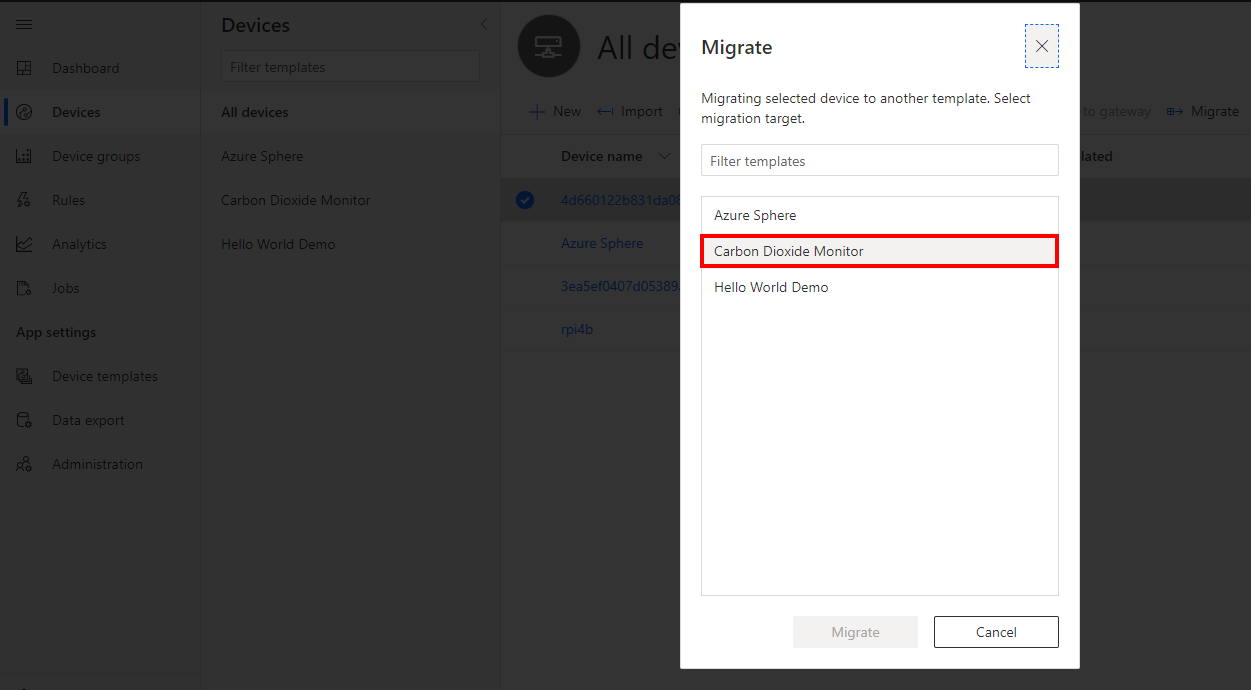
Step 4: Migrate your device to the Azure Sphere Template
You need to Migrate the newly enrolled device to the Carbon Dioxide Monitor template. The template maps the JSON formatted telemetry to the dashboard.
- Select the newly enrolled device from the All devices template.
-
Click Migrate
-
Select the Carbon Dioxide Monitor Template, and then click migrate.
Step 5: Display the Azure Sphere device telemetry
- Click Devices on the sidebar.
- Select the Carbon Dioxide template.
- Click on the migrated device.
- Select the View tab to view the device telemetry.
- Rename your device. Click the Rename button and give your device a friendly name.
Azure IoT Central does not update immediately. It may take a minute or two for the temperature, humidity, and pressure telemetry to be displayed.
Properties view
You can view and set device properties from the Form tab.
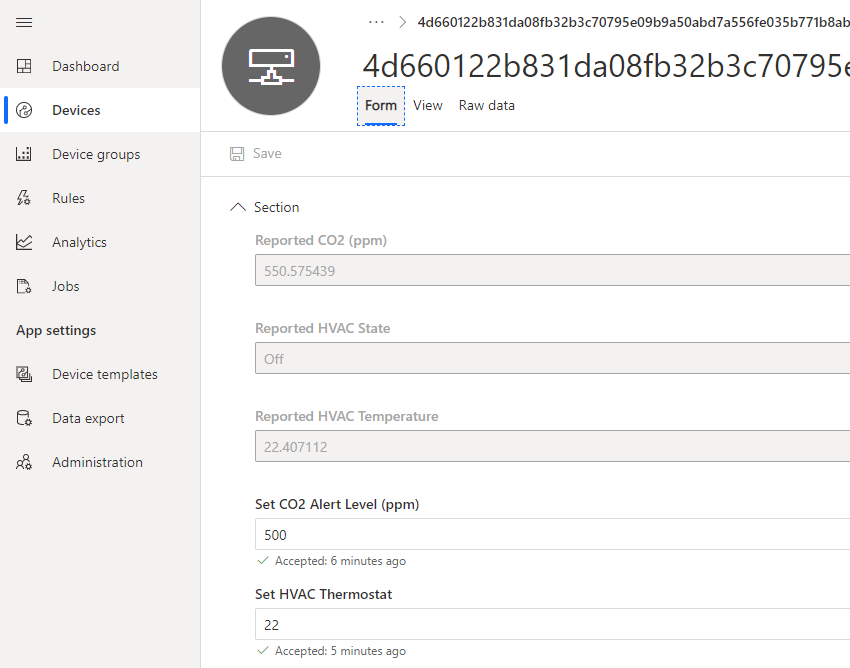
Setting the HVAC thermostat
The device simulates an HVAC. If the current temperature read by the device is greater than the thermostat setting then the blue LED will turn on to signify the room needs to be cooled. If the room temperature is less than the thermostat setting the red LED will be turned on to signify the heater needs to be turned on.
Setting the CO2 alert level from the properties view
From the properties view you can set the CO2 alert level. Azure IoT Central uses properties and ultimately Azure IoT Hub device twins to set the alert threshold on the device.
When the CO2 level reaches the alert level on the device you can set an action. The action that has been defined in code is to switch on an LED, but you can go bigger, and instead of setting an LED you could drive a relay to turn on a light, buzz an alarm, or turn on a fan.
Learn more about IoT Central properties and Azure IoT Hub device twins
Learn more about Azure IoT Central, properties, and device twins from Azure Sphere Developer Learning Path lab 3 Set the room virtual thermostat with Azure IoT Device Twins.
Extend and integrate Azure IoT Central applications with other cloud services
Azure IoT Central is also extensible using rules and workflows. For more information, review Use workflows to integrate your Azure IoT Central application with other cloud services
Have fun and stay safe and be sure to follow us on #JulyOT.
Brought to you by Dr. Ware, Microsoft Office 365 Silver Partner, Charleston SC.

Recent Comments