This article is contributed. See the original author and article here.
If you’ve ever wondered how news anchors or public speakers can stay on point and present their topics in a crisp and concise way, within a limited timeframe, chances are they are using a teleprompter.
In today’s work-from-home tip, Jeremy Chapman, from the Microsoft 365 team, will show you how you can use Microsoft Word to easily convert any document into something that works perfectly as a teleprompter. Then we’ll show you how to use Microsoft Teams as a way to project this teleprompter screen to a remote presenter or a second device like a phone screen.
Jeremy’s camera and prompter setup:
- Sony A7 II camera with F1.8 55mm lens
- Elgato Cam Link 4k USB 3.0 HDMI capture device
- Padcaster Parrot Teleprompter Kit
- Microsoft Surface Dial to scroll prompter text
- Feelworld FW568 5.5 inch 1080p HDMI Camera Field Monitor
- Shure MV7 microphone
- Blue Compass microphone boom arm
QUICK LINKS:
00:51 — Converting a Word document for teleprompter use
03:00 — Positioning the prompter screen for eye contact to the camera
03:54 — Using a Microsoft Teams meeting on a phone to send the prompter screen
04:52 — Using the Microsoft Teams web app to join a second meeting to view the prompter for in-person or remote co-presenters
05:41 — Closing remarks
Link References:
Use Microsoft Teams on the web to join a second meeting for sharing the teleprompter feed at https://teams.microsoft.com
Find more shows in our work from home series at https://aka.ms/WFHmechanics
Unfamiliar with Microsoft Mechanics?
We are Microsoft’s official video series for IT. You can watch and share valuable content and demos of current and upcoming tech from the people who build it at Microsoft.
- Subscribe to our YouTube: https://www.youtube.com/c/MicrosoftMechanicsSeries?sub_confirmation=1
- Follow us on Twitter: https://twitter.com/MSFTMechanics
- Follow us on LinkedIn: https://www.linkedin.com/company/microsoft-mechanics/
- Follow us on Facebook: https://facebook.com/microsoftmechanics/
Video Transcript:
If you’ve ever wondered how news anchors or public speakers can stay on point and present their topics in a crisp and concise way all within a limited timeframe, the chances are they’re using a teleprompter. Now, if you’re not used to using a teleprompter, with a little practice reading into your camera a teleprompter can help get your presentations or speeches to the next level.
So in today’s work from home tip, I’ll show you how you can use Microsoft Word to easily convert any document into something that works perfectly as a teleprompter and I’ll show you how you can use Microsoft Teams as a way to project this teleprompter screen to a remote presenter or a second device, like a phone screen, that can be placed directly under your camera so that your eyes stay close to the camera lens.
So in my case, I’m using Microsoft Word and what I’ll demonstrate today works more or less the same way whether you’re on a PC or Mac. Here I have a script that I’m presenting from right now and the first thing that you’ll want to do in the View tab is change the view from Print Layout to Web Layout. Now, this ensures that you can use the full width of the page and not need to scroll past page breaks, which can often appear mid-sentence.
Now, the next thing that you’ll want to do is disable the ruler at the top of the screen by unchecking this box. You can leave the page background white like mine is now, which is helpful if you’re using the screen to help with your camera’s lighting, but depending on your screen brightness or setup, the white background can also make your face too bright, or if you’re using an actual teleprompter device on your camera that works like a two-way mirror effectively, the white background sometimes can cause the image to look a little foggy or milky and to counter these effects you can easily change the background to black.
Now, to change the background color, first you’ll want to select all of your text by using Control + A. Then go to the Home tab and make sure that you font color is set to Automatic. Now, this ensures that your font color will flip to white once we change the page color to black. And to do that, just search in Word in the search box for page color, then set it to black. Now our document is looking much more like a teleprompter but the font is still pretty small and if your camera’s far away or you’re going to project this onto a small screen then you’ll want to make the font larger and you can do that easily by using the zoom control in the bottom-right corner to get a comfortable font size.
Now, the last thing, and a very key step that you’ll want to do in Word, is to switch on focus mode. Now, this will full-screen Word and make it so it looks like a teleprompter and now it’s ready to go. But let’s say we want to use this for a two-person presentation and want to get the attention of each speaker or punch up various parts of the script. Now, for that, you can use highlighting in Word to help grab attention. So, for example, if I’m presenting with Megan, I can mark her name, change the highlight, and my name, also change the highlight, and with those different colors I can grab attention of the different presenters. Or I can bold and underline the text if I really want to land a point.
Okay, so now I have my prompter complete, but another key aspect of doing this well is getting the screen with Word to be as close as possible to your camera. And if you’re just using the camera on top of your laptop or your monitor, you’ll be looking pretty far down to read your text. So in my case, I actually have a device called a Padcaster that’s attached to my Sony DSLR camera lens and under it there’s a 5 1/2-inch field monitor used as a second display over HDMI attached to my PC with the display flipped so that the text reads the correct way and the text is directly in front of the lens. So this is how you would use Word if you were in a studio environment, maybe with a second person driving the teleprompter under the display on a larger teleprompter. Now, chances are you don’t have that setup at home, but if you want something like that, I’ve put all the links in the description below to everything that I’m using to record this particular video.
Now, something that you probably do have is a mobile phone that can run Microsoft Teams or Skype and you can use screensharing to project your script inward to both your phone if you’re presenting solo as well as to a remote co-presenter using their phone or monitor to display your script in real time to them even as you scroll. Now, the phone screen has two benefits. It’s not too wide or too tall in its landscape orientation, so your eyes won’t be visibly moving too much left to right, and you can mount it either just below or behind your camera so that your eyes stay with the audience. Now, to mount your phone, the best option is really to use a mini tripod with a phone holder or you can tape it just below your camera to your monitor and that also works in a pinch.
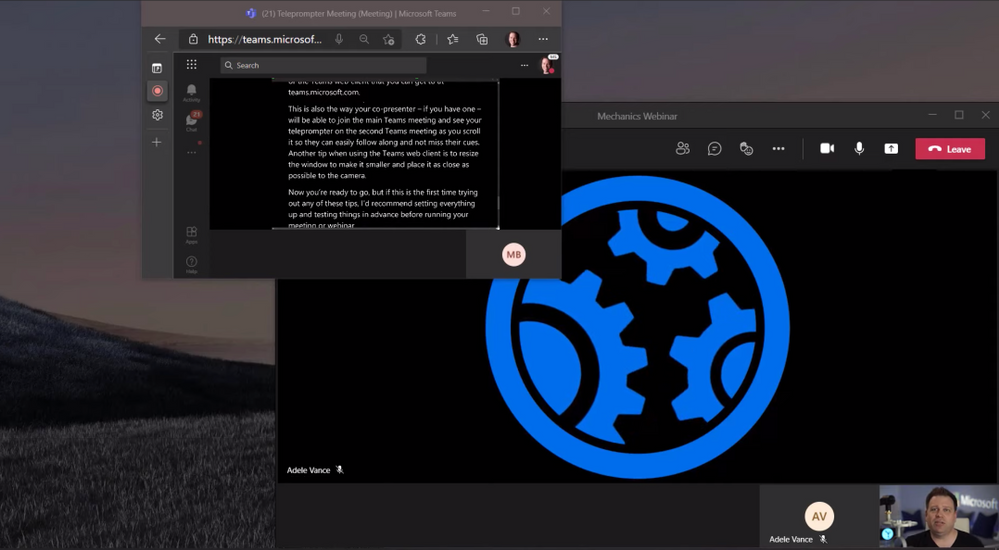
Now, let’s say this is a larger presentation, though, that’s running live and you’re presenting over Microsoft Teams and you don’t want people who are not presenting to see your teleprompter screen or to know that you’re reading from it. But a nice trick that you can use here is to join the main meeting or webinar using the Teams app that’s running on your PC or Mac and use a second meeting from the teleprompter using Teams on the mobile app on your phone or the Teams web client that you can get to at teams.microsoft.com. Now, this way, also your co-presenter if you have one will be able to join the main Teams meeting and also see your teleprompter on a second Teams meeting as you scroll so they can easily follow along and not miss their cues.
Now, another tip when using the Teams web client is to resize the window and make it smaller and place it as close as possible to the camera. So now you’re ready to go. But if this is the first time trying any of these tips out, I’d recommend setting everything up and testing things in advance before running your meeting or webinar. So those are just two tips that you can use when every word matters, whether you’re presenting on your own or to record a video like this one or on a larger Teams call or webinar.
To find more tips like this on Microsoft Mechanics, check out aka.ms/WFHMechanics. Subscribe to our channel if you haven’t already, and thanks for watching.
Brought to you by Dr. Ware, Microsoft Office 365 Silver Partner, Charleston SC.

Recent Comments